---
sidebar_label: "Example"
tags:
- name: product
label: "Implement Ticket Booking"
- server
- tutorial
products:
- product
- cart
- order
---
import { Github, PlaySolid } from "@medusajs/icons"
import { Prerequisites, WorkflowDiagram, CardList } from "docs-ui"
export const metadata = {
title: `Implement a Ticket Booking System with Medusa`,
}
# {metadata.title}
In this tutorial, you'll learn how to implement a ticket booking system using Medusa.
This tutorial is divided into two parts: this part that covers the backend and admin customizations, and a [storefront part](./storefront/page.mdx) that covers the Next.js Starter Storefront customizations.
When you install a Medusa application, you get a fully-fledged commerce platform with a Framework for customization. The Medusa application's commerce features are built around [Commerce Modules](../../../commerce-modules/page.mdx) that are available out-of-the-box.
Medusa's [Framework](!docs!/learn/fundamentals/framework) facilitates customizing Medusa's core features for your specific use case, such as ticket booking.
This tutorial provides an approach to implement a ticket booking system using Medusa. Depending on your specific requirements, you might need to adjust the implementation details or explore a different approach.
## Summary
By following this tutorial, you will learn how to:
- Install and set up Medusa with the Next.js Starter Storefront.
- Create data models for venues and tickets, and link them to Medusa's data models.
- Customize the Medusa Admin to manage venues and shows or events.
- Implement custom validation and flows for ticket booking.
- Generate QR codes for tickets and verify them at the venue.
- [Extend the Next.js Starter Storefront to allow booking tickets and choosing seats](./storefront/page.mdx): This part of the tutorial is covered separately.
---
## Step 1: Install a Medusa Application
Start by installing the Medusa application on your machine with the following command:
```bash
npx create-medusa-app@latest
```
You'll first be asked for the project's name. Then, when asked whether you want to install the [Next.js Starter Storefront](../../../nextjs-starter/page.mdx), choose Yes.
Afterward, the installation process will start, which will install the Medusa application in a directory with your project's name, and the Next.js Starter Storefront in a separate directory with the `{project-name}-storefront` name.
The Medusa application is composed of a headless Node.js server and an admin dashboard. The storefront is installed or custom-built separately and connects to the Medusa application through its REST endpoints, called [API routes](!docs!/learn/fundamentals/api-routes). Learn more in [Medusa's Architecture documentation](!docs!/learn/introduction/architecture).
Once the installation finishes successfully, the Medusa Admin dashboard will open with a form to create a new user. Enter the user's credentials and submit the form. Afterward, you can log in with the new user and explore the dashboard.
Check out the [troubleshooting guides](../../../troubleshooting/create-medusa-app-errors/page.mdx) for help.
---
## Step 2: Create Ticket Booking Module
In Medusa, you can build custom features in a [module](!docs!/learn/fundamentals/modules). A module is a reusable package with the data models and functionality related to a single feature or domain. Medusa integrates the module into your application without implications or side effects on your setup.
In this step, you'll build a Ticket Booking Module that defines the data models and logic to manage venues and tickets. Later, you'll build commerce flows related to ticket booking around the module.
Refer to the [Modules documentation](!docs!/learn/fundamentals/modules) to learn more.
### a. Create Module Directory
Create the directory `src/modules/ticket-booking` that will hold the Ticket Booking Module's code.
### b. Define Data Models
A data model represents a table in the database. You create data models using Medusa's Data Model Language (DML). It simplifies defining a table's columns, relations, and indexes with straightforward methods and configurations.
Refer to the [Data Models documentation](!docs!/learn/fundamentals/modules#1-create-data-model) to learn more.
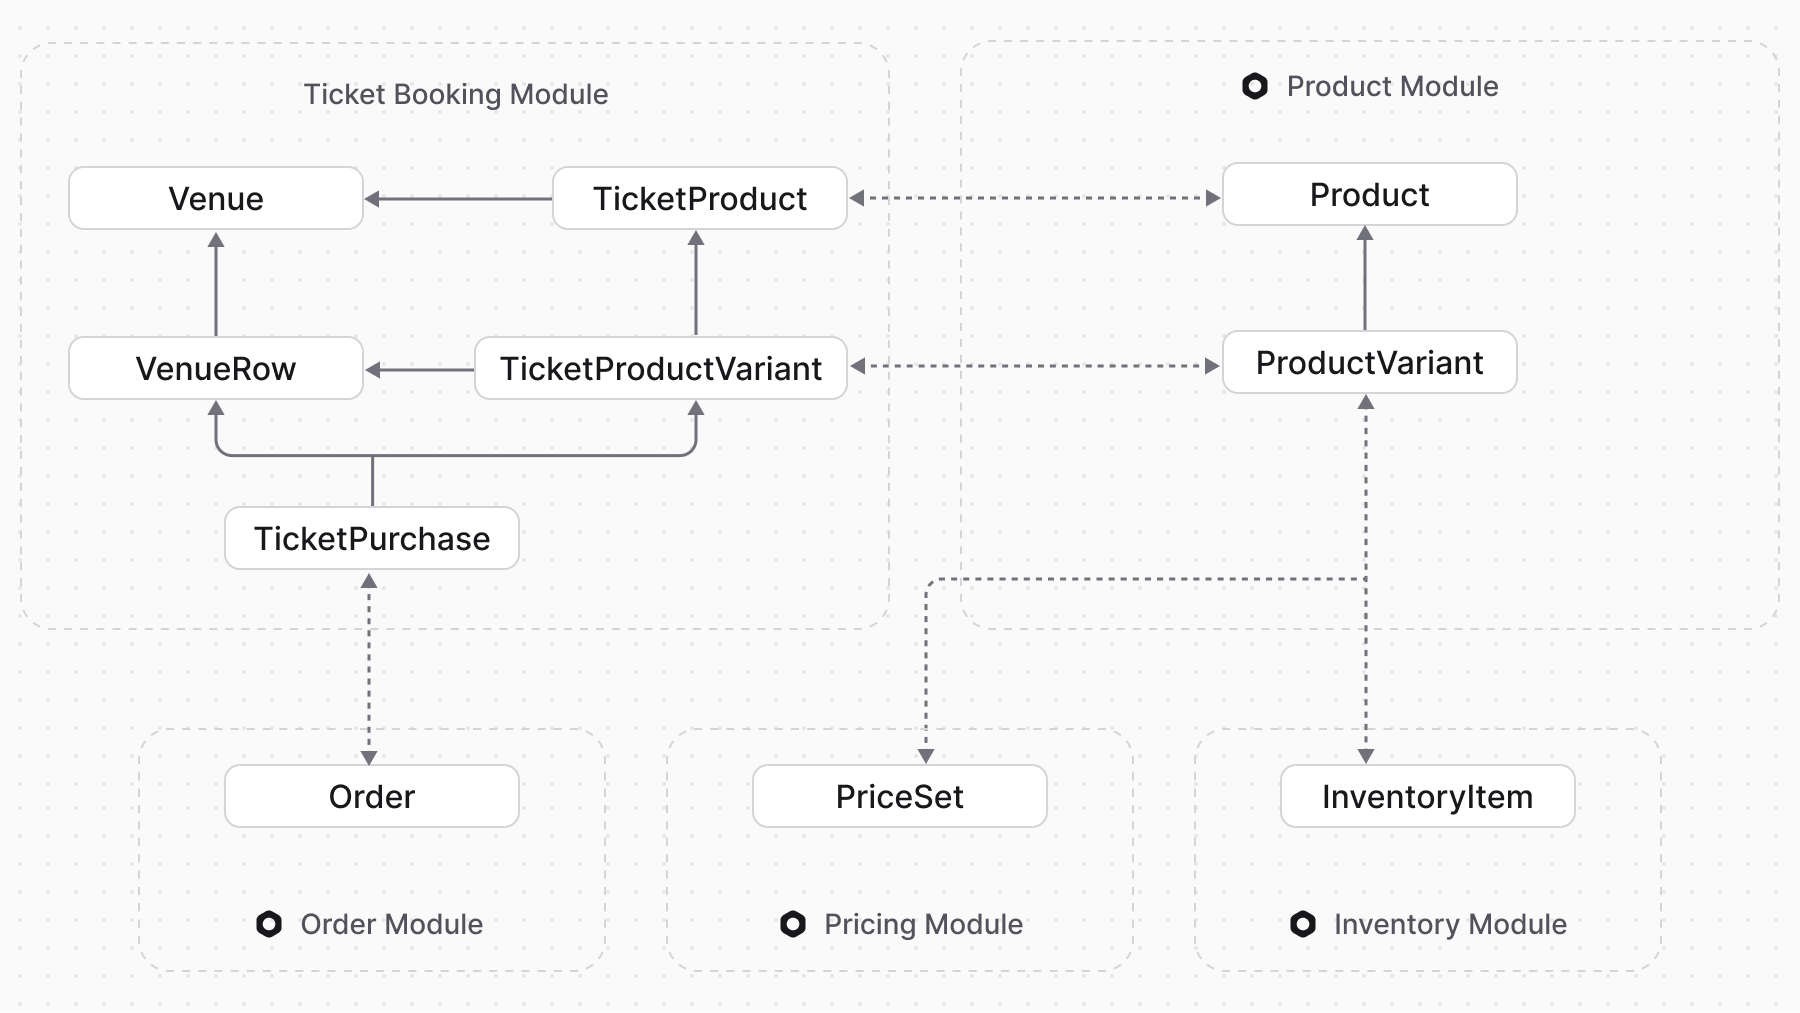
You'll define data models to represent venues, tickets, and purchases. Later, you'll link these data models to Medusa's data models, such as products and orders.
#### Venue Model
The `Venue` data model represents a venue where shows or events take place.
To create the `Venue` data model, create the file `src/modules/ticket-booking/models/venue.ts` with the following content:
```ts title="src/modules/ticket-booking/models/venue.ts"
import { model } from "@medusajs/framework/utils"
import { VenueRow } from "./venue-row"
export const Venue = model.define("venue", {
id: model.id().primaryKey(),
name: model.text(),
address: model.text().nullable(),
rows: model.hasMany(() => VenueRow, {
mappedBy: "venue",
}),
})
.cascades({
delete: ["rows"],
})
export default Venue
```
The `Venue` data model has the following properties:
- `id`: The primary key of the table.
- `name`: The name of the venue.
- `address`: The address of the venue.
- `rows`: A one-to-many relation with the `VenueRow` data model, which you'll create next.
Learn more about defining data model properties in the [Property Types documentation](!docs!/learn/fundamentals/data-models/properties).
#### VenueRow Model
The `VenueRow` data model represents a row in a venue, each with a specific type and number of seats.
To create the `VenueRow` data model, create the file `src/modules/ticket-booking/models/venue-row.ts` with the following content:
```ts title="src/modules/ticket-booking/models/venue-row.ts"
import { model } from "@medusajs/framework/utils"
import { Venue } from "./venue"
export enum RowType {
PREMIUM = "premium",
BALCONY = "balcony",
STANDARD = "standard",
VIP = "vip"
}
export const VenueRow = model.define("venue_row", {
id: model.id().primaryKey(),
row_number: model.text(),
row_type: model.enum(RowType),
seat_count: model.number(),
venue: model.belongsTo(() => Venue, {
mappedBy: "rows",
}),
})
.indexes([
{
on: ["venue_id", "row_number"],
unique: true,
},
])
export default VenueRow
```
The `VenueRow` data model has the following properties:
- `id`: The primary key of the table.
- `row_number`: The identifier of the row, such as "A" and "B", or "1" and "2".
- `row_type`: The type of the row, which can be "premium", "balcony", "standard", or "vip".
- `seat_count`: The number of seats in the row.
- `venue`: A many-to-one relation with the `Venue` data model, which represents the venue that the row belongs to.
You also add a unique index on the combination of `venue_id` and `row_number` to ensure that each row number is unique within a venue.
#### TicketProduct Model
The `TicketProduct` data model represents a product purchased as a ticket, such as a show or event. It will be linked to Medusa's `Product` data model.
To create the `TicketProduct` data model, create the file `src/modules/ticket-booking/models/ticket-product.ts` with the following content:
```ts title="src/modules/ticket-booking/models/ticket-product.ts"
import { model } from "@medusajs/framework/utils"
import { Venue } from "./venue"
import { TicketProductVariant } from "./ticket-product-variant"
import { TicketPurchase } from "./ticket-purchase"
export const TicketProduct = model.define("ticket_product", {
id: model.id().primaryKey(),
product_id: model.text().unique(),
venue: model.belongsTo(() => Venue),
dates: model.array(),
variants: model.hasMany(() => TicketProductVariant, {
mappedBy: "ticket_product",
}),
purchases: model.hasMany(() => TicketPurchase, {
mappedBy: "ticket_product",
}),
})
.indexes([
{
on: ["venue_id", "dates"],
},
])
export default TicketProduct
```
The `TicketProduct` data model has the following properties:
- `id`: The primary key of the table.
- `product_id`: The ID of the linked product in Medusa's `Product` data model.
- `venue`: A many-to-one relation with the `Venue` data model, which represents the venue where the show takes place.
- `dates`: An array of dates when the show takes place.
- `variants`: A one-to-many relation with the `TicketProductVariant` data model, which you'll create next.
- `purchases`: A one-to-many relation with the `TicketPurchase` data model, which you'll create next.
You also add an index on the combination of `venue_id` and `dates` to optimize queries that filter by these fields.
Data relevant for ticket sales like price, inventory, etc., are all either included in the `Product` and `ProductVariant` data models or their linked records. So, you don't need to duplicate this information in the `TicketProduct` data model.
#### TicketProductVariant Model
The `TicketProductVariant` data model represents a variant of a ticket product, such as a specific row type. It will be linked to Medusa's `ProductVariant` data model.
To create the `TicketProductVariant` data model, create the file `src/modules/ticket-booking/models/ticket-product-variant.ts` with the following content:
```ts title="src/modules/ticket-booking/models/ticket-product-variant.ts"
import { model } from "@medusajs/framework/utils"
import { TicketProduct } from "./ticket-product"
import { RowType } from "./venue-row"
import { TicketPurchase } from "./ticket-purchase"
export const TicketProductVariant = model.define("ticket_product_variant", {
id: model.id().primaryKey(),
product_variant_id: model.text().unique(),
ticket_product: model.belongsTo(() => TicketProduct, {
mappedBy: "variants",
}),
row_type: model.enum(RowType),
purchases: model.hasMany(() => TicketPurchase, {
mappedBy: "ticket_variant",
}),
})
.indexes([
{
on: ["ticket_product_id", "row_type"],
},
])
export default TicketProductVariant
```
The `TicketProductVariant` data model has the following properties:
- `id`: The primary key of the table.
- `product_variant_id`: The ID of the linked product variant in Medusa's `ProductVariant` data model.
- `ticket_product`: A many-to-one relation with the `TicketProduct` data model, which represents the ticket product the variant belongs to.
- `row_type`: The type of the row associated with the variant, which can be "premium", "balcony", "standard", or "vip".
- `purchases`: A one-to-many relation with the `TicketPurchase` data model, which you'll create next.
#### TicketPurchase Model
The `TicketPurchase` data model represents the purchase of a seat for a specific `TicketProduct`. It will be linked to Medusa's `Order` data model.
To create the `TicketPurchase` data model, create the file `src/modules/ticket-booking/models/ticket-purchase.ts` with the following content:
```ts title="src/modules/ticket-booking/models/ticket-purchase.ts"
import { model } from "@medusajs/framework/utils"
import { TicketProduct } from "./ticket-product"
import { TicketProductVariant } from "./ticket-product-variant"
import { VenueRow } from "./venue-row"
export const TicketPurchase = model.define("ticket_purchase", {
id: model.id().primaryKey(),
order_id: model.text(),
ticket_product: model.belongsTo(() => TicketProduct),
ticket_variant: model.belongsTo(() => TicketProductVariant),
venue_row: model.belongsTo(() => VenueRow),
seat_number: model.text(),
show_date: model.dateTime(),
status: model.enum(["pending", "scanned"]).default("pending"),
})
.indexes([
{
on: ["order_id"],
},
{
on: ["ticket_product_id", "venue_row_id", "seat_number", "show_date"],
unique: true,
},
])
export default TicketPurchase
```
The `TicketPurchase` data model has the following properties:
- `id`: The primary key of the table.
- `order_id`: The ID of the linked order in Medusa's `Order` data model.
- `ticket_product`: A many-to-one relation with the `TicketProduct` data model, which represents the ticket product purchased.
- `ticket_variant`: A many-to-one relation with the `TicketProductVariant` data model, which represents the variant (row type) of the ticket product purchased.
- `venue_row`: A many-to-one relation with the `VenueRow` data model, which represents the row of the seat purchased.
- `seat_number`: The number of the seat purchased.
- `show_date`: The date of the show for which the ticket was purchased.
- `status`: The status of the ticket purchase, which can be "pending" or "scanned". This is useful later when you add QR scanning functionality.
You also add two indexes:
- An index on the `order_id` field to optimize queries that filter by this field.
- A unique index on the combination of `ticket_product_id`, `venue_row_id`, `seat_number`, and `show_date` to ensure that a specific seat for a specific show date can only be purchased once.
### c. Create Module's Service
You can manage your module's data models in a service.
A service is a TypeScript class that the module exports. In the service's methods, you can connect to the database, allowing you to manage your data models, or connect to third-party services, which is useful if you're integrating with external services.
Refer to the [Module Service documentation](!docs!/learn/fundamentals/modules#2-create-service) to learn more.
To create the Ticket Booking Module's service, create the file `src/modules/ticket-booking/service.ts` with the following content:
```ts title="src/modules/ticket-booking/service.ts"
import { MedusaService } from "@medusajs/framework/utils"
import Venue from "./models/venue"
import VenueRow from "./models/venue-row"
import TicketProduct from "./models/ticket-product"
import TicketProductVariant from "./models/ticket-product-variant"
import TicketPurchase from "./models/ticket-purchase"
export class TicketBookingModuleService extends MedusaService({
Venue,
VenueRow,
TicketProduct,
TicketProductVariant,
TicketPurchase,
}) { }
export default TicketBookingModuleService
```
The `TicketBookingModuleService` extends `MedusaService`, which generates a class with data-management methods for your module's data models. This saves you time on implementing Create, Read, Update, and Delete (CRUD) methods.
The `TicketBookingModuleService` class now has methods like `createTicketProducts` and `retrieveVenue`.
Find all methods generated by the `MedusaService` in [the Service Factory reference](../../../service-factory-reference/page.mdx).
### d. Export Module Definition
The final piece of a module is its definition, which you export in an `index.ts` file at its root directory. This definition tells Medusa the name of the module and its service.
So, create the file `src/modules/ticket-booking/index.ts` with the following content:
```ts title="src/modules/ticket-booking/index.ts"
import TicketBookingModuleService from "./service"
import { Module } from "@medusajs/framework/utils"
export const TICKET_BOOKING_MODULE = "ticketBooking"
export default Module(TICKET_BOOKING_MODULE, {
service: TicketBookingModuleService,
})
```
You use the `Module` function to create the module's definition. It accepts two parameters:
1. The module's name, which is `ticketBooking`.
2. An object with a required property `service` indicating the module's service.
You also export the module's name as `TICKET_BOOKING_MODULE` so you can reference it later.
### e. Add Module to Medusa's Configurations
Once you finish building the module, add it to Medusa's configurations to start using it.
In `medusa-config.ts`, add a `modules` property and pass an array with your custom module:
```ts title="medusa-config.ts"
module.exports = defineConfig({
// ...
modules: [
{
resolve: "./src/modules/ticket-booking",
},
],
})
```
Each object in the `modules` array has a `resolve` property, whose value is either a path to the module's directory, or an `npm` package’s name.
### f. Generate Migrations
Since data models represent tables in the database, you define how they're created in the database with migrations. A migration is a TypeScript class that defines database changes made by a module.
Refer to the [Migrations documentation](!docs!/learn/fundamentals/modules#5-generate-migrations) to learn more.
Medusa's CLI tool can generate the migrations for you. To generate a migration for the Ticket Booking Module, run the following command in your Medusa application's directory:
```bash
npx medusa db:generate ticketBooking
```
The `db:generate` command of the Medusa CLI accepts the name of the module to generate the migration for. You'll now have a `migrations` directory under `src/modules/ticket-booking` that holds the generated migration.
Then, to reflect these migrations on the database, run the following command:
```bash
npx medusa db:migrate
```
The tables for the Ticket Booking Module's data models are now created in the database.
---
## Step 3: Link Ticket Booking to Medusa Data Models
Since Medusa isolates modules to integrate them into your application without side effects, you can't directly create relationships between data models of different modules.
Instead, Medusa provides a mechanism to define links between data models and retrieve and manage linked records while maintaining module isolation.
Refer to the [Module Isolation documentation](!docs!/learn/fundamentals/modules/isolation) to learn more.
In this step, you'll define a link between the data models in the Ticket Booking Module and Medusa's Commerce Modules.
### a. TicketProduct \<\> Product Link
To define a link between the `TicketProduct` data model and Medusa's `Product` data model, create the file `src/links/ticket-product.ts` with the following content:
```ts title="src/links/ticket-product.ts"
import TicketingModule from "../modules/ticket-booking"
import ProductModule from "@medusajs/medusa/product"
import { defineLink } from "@medusajs/framework/utils"
export default defineLink(
{
linkable: TicketingModule.linkable.ticketProduct,
deleteCascade: true,
},
ProductModule.linkable.product
)
```
You define a link using the `defineLink` function. It accepts two parameters:
1. An object indicating the first data model part of the link. A module has a special `linkable` property that contains link configurations for its data models. You pass the linkable configurations of the Ticket Booking Module's `TicketProduct` data model. You also set the `deleteCascade` property to `true`, indicating that a ticket product should be deleted if its linked product is deleted.
2. An object indicating the second data model part of the link. You pass the linkable configurations of the Product Module's `Product` data model.
In later steps, you'll learn how this link allows you to retrieve and manage ticket products and their related Medusa products.
Refer to the [Module Links](!docs!/learn/fundamentals/module-links) documentation to learn more about defining links.
### b. TicketProductVariant \<\> ProductVariant Link
To define a link between the `TicketProductVariant` data model and Medusa's `ProductVariant` data model, create the file `src/links/ticket-product-variant.ts` with the following content:
```ts title="src/links/ticket-product-variant.ts"
import TicketingModule from "../modules/ticket-booking"
import ProductModule from "@medusajs/medusa/product"
import { defineLink } from "@medusajs/framework/utils"
export default defineLink(
{
linkable: TicketingModule.linkable.ticketProductVariant,
deleteCascade: true,
},
ProductModule.linkable.productVariant
)
```
You define a link in a similar way as the previous link, but this time between the `TicketProductVariant` and `ProductVariant` data models.
### c. TicketPurchase \<\> Order Link
Finally, to define a link between the `TicketPurchase` data model and Medusa's `Order` data model, create the file `src/links/ticket-purchase-order.ts` with the following content:
```ts title="src/links/ticket-purchase-order.ts"
import TicketingModule from "../modules/ticket-booking"
import OrderModule from "@medusajs/medusa/order"
import { defineLink } from "@medusajs/framework/utils"
export default defineLink(
{
linkable: TicketingModule.linkable.ticketPurchase,
deleteCascade: true,
isList: true,
},
OrderModule.linkable.order
)
```
You define a link in a similar way as the previous links, but this time between the `TicketPurchase` and `Order` data models. You also set the `isList` property to `true` for the `TicketPurchase` data model, indicating that an order can have multiple ticket purchases.
### d. Sync Links to Database
After defining links, you need to sync them to the database. This creates the necessary tables to manage the links.
To sync the links to the database, run the migrations command again in the Medusa application's directory:
```bash
npx medusa db:migrate
```
This command will create the necessary tables to manage the links between the Ticket Booking Module's data models and Medusa's data models.
---
## Step 4: Create Venue
In this step, you'll implement the logic to create a venue.
When you build commerce features in Medusa that can be consumed by client applications, such as the Medusa Admin dashboard or storefront, you need to implement:
1. A [workflow](!docs!/learn/fundamentals/workflows) with steps that define the business logic of the feature.
2. An [API route](!docs!/learn/fundamentals/api-routes) that exposes the workflow's functionality to client applications.
In this step, you'll implement the workflow and API route for creating a venue.
### a. Create Venue Workflow
A workflow is a series of queries and actions, called steps, that complete a task. A workflow is similar to a function, but it allows you to track its executions' progress, define roll-back logic, and configure other advanced features.
Refer to the [Workflows documentation](!docs!/learn/fundamentals/workflows) to learn more.
The workflow to create a venue will have the following steps:
The `useQueryGraphStep` is available through Medusa's `@medusajs/medusa/core-flows` package. You'll implement other steps in the workflow.
#### createVenueStep
The `createVenueStep` creates a venue.
To create the step, create the file `src/workflows/steps/create-venue.ts` with the following content:
```ts title="src/workflows/steps/create-venue.ts"
import { createStep, StepResponse } from "@medusajs/framework/workflows-sdk"
import { TICKET_BOOKING_MODULE } from "../../modules/ticket-booking"
export type CreateVenueStepInput = {
name: string
address?: string
}
export const createVenueStep = createStep(
"create-venue",
async (input: CreateVenueStepInput, { container }) => {
const ticketBookingModuleService = container.resolve(TICKET_BOOKING_MODULE)
const venue = await ticketBookingModuleService.createVenues(input)
return new StepResponse(venue, venue)
},
async (venue, { container }) => {
if (!venue) {return}
const ticketBookingModuleService = container.resolve(TICKET_BOOKING_MODULE)
await ticketBookingModuleService.deleteVenues(venue.id)
}
)
```
You create a step with the `createStep` function. It accepts three parameters:
1. The step's unique name.
2. An async function that receives two parameters:
- The step's input, which is an object with the `name` and `address` properties of the venue to create.
- An object that has properties including the [Medusa container](!docs!/learn/fundamentals/medusa-container), which is a registry of Framework and commerce tools that you can access in the step.
3. An async compensation function that undoes the actions performed by the step function. This function is only executed if an error occurs during the workflow's execution.
In the step function, you resolve the Ticket Booking Module's service from the Medusa container using its `resolve` method, passing it the module's name as a parameter.
Then, you use the generated `createVenues` method of the Ticket Booking Module's service to create a venue with the provided input.
Finally, a step function must return a `StepResponse` instance. The `StepResponse` constructor accepts two parameters:
1. The step's output, which is the venue created.
2. Data to pass to the step's compensation function.
In the compensation function, you undo creating the venue by deleting it using the generated `deleteVenues` method of the Ticket Booking Module's service.
#### createVenueRowsStep
The `createVenueRowsStep` creates rows in a venue.
To create the step, create the file `src/workflows/steps/create-venue-rows.ts` with the following content:
```ts title="src/workflows/steps/create-venue-rows.ts"
import { createStep, StepResponse } from "@medusajs/framework/workflows-sdk"
import { TICKET_BOOKING_MODULE } from "../../modules/ticket-booking"
import { RowType } from "../../modules/ticket-booking/models/venue-row"
export type CreateVenueRowsStepInput = {
rows: {
venue_id: string
row_number: string
row_type: RowType
seat_count: number
}[]
}
export const createVenueRowsStep = createStep(
"create-venue-rows",
async (input: CreateVenueRowsStepInput, { container }) => {
const ticketBookingModuleService = container.resolve(TICKET_BOOKING_MODULE)
const venueRows = await ticketBookingModuleService.createVenueRows(
input.rows
)
return new StepResponse(venueRows, venueRows)
},
async (venueRows, { container }) => {
if (!venueRows) {return}
const ticketBookingModuleService = container.resolve(TICKET_BOOKING_MODULE)
await ticketBookingModuleService.deleteVenueRows(
venueRows.map((row) => row.id)
)
}
)
```
This step receives the rows to create as an input.
In the step function, you create the rows and return them.
In the compensation function, you undo creating the rows by deleting them.
#### Create Venue Workflow
You can now create the workflow that uses the steps you implemented.
To create the workflow, create the file `src/workflows/create-venue.ts` with the following content:
```ts title="src/workflows/create-venue.ts"
import { createWorkflow, transform, WorkflowResponse } from "@medusajs/framework/workflows-sdk"
import { createVenueStep } from "./steps/create-venue"
import { createVenueRowsStep } from "./steps/create-venue-rows"
import { RowType } from "../modules/ticket-booking/models/venue-row"
import { useQueryGraphStep } from "@medusajs/core-flows"
export type CreateVenueWorkflowInput = {
name: string
address?: string
rows: Array<{
row_number: string
row_type: RowType
seat_count: number
}>
}
export const createVenueWorkflow = createWorkflow(
"create-venue",
(input: CreateVenueWorkflowInput) => {
const venue = createVenueStep({
name: input.name,
address: input.address,
})
const venueRowsData = transform({
venue,
input,
}, (data) => {
return data.input.rows.map((row) => ({
venue_id: data.venue.id,
row_number: row.row_number,
row_type: row.row_type,
seat_count: row.seat_count,
}))
})
createVenueRowsStep({
rows: venueRowsData,
})
const { data: venues } = useQueryGraphStep({
entity: "venue",
fields: ["id", "name", "address", "rows.*"],
filters: {
id: venue.id,
},
})
return new WorkflowResponse({
venue: venues[0],
})
}
)
```
You create a workflow using the `createWorkflow` function. It accepts the workflow's unique name as a first parameter.
It accepts as a second parameter a constructor function that holds the workflow's implementation. The function accepts an input object containing the details of the venue and its rows.
In the workflow, you:
1. Create a venue using the `createVenueStep`.
2. Prepare the data to create the venue's rows.
3. Create the venue's rows using the `createVenueRowsStep`.
4. Retrieve the created venue with its rows using the `useQueryGraphStep`.
- This step uses [Query](!docs!/learn/fundamentals/module-links/query) under the hood. It allows you to retrieve data across modules.
A workflow must return an instance of `WorkflowResponse` that accepts the data to return to the workflow's executor. You return the created venue with its rows.
`transform` allows you to access the values of data during execution. Learn more in the [Data Manipulation](!docs!/learn/fundamentals/workflows/variable-manipulation) documentation.
### b. Create Venue API Route
Next, you'll create an API route that exposes the functionality of the `createVenueWorkflow` to client applications.
An API route is created in a `route.ts` file under a sub-directory of the `src/api` directory. The path of the API route is the file's path relative to `src/api`.
Refer to the [API routes](!docs!/learn/fundamentals/api-routes) documentation to learn more about them.
Create the file `src/api/admin/venues/route.ts` with the following content:
```ts title="src/api/admin/venues/route.ts"
import { MedusaRequest, MedusaResponse } from "@medusajs/framework/http"
import { createVenueWorkflow } from "../../../workflows/create-venue"
import { RowType } from "../../../modules/ticket-booking/models/venue-row"
import { z } from "zod"
export const CreateVenueSchema = z.object({
name: z.string(),
address: z.string().optional(),
rows: z.array(z.object({
row_number: z.string(),
row_type: z.nativeEnum(RowType),
seat_count: z.number(),
})),
})
type CreateVenueSchema = z.infer
export async function POST(
req: MedusaRequest,
res: MedusaResponse
) {
const { result } = await createVenueWorkflow(req.scope).run({
input: req.validatedBody,
})
res.json(result)
}
```
You use [Zod](https://zod.dev/) to create the `CreateVenueSchema` that is used to validate request bodies sent to this API route.
Then, you export a `POST` route handler function, which will expose a `POST` API route at `/admin/venues`.
In the route handler, you execute the `createVenueWorkflow`, passing it the request body as an input.
Finally, you return the created venue with its rows in the response.
You'll test this API route later when you customize the Medusa Admin.
#### Add Validation Middleware for Create Venue API Route
To validate the body parameters of requests sent to the API route, you need to apply a [middleware](!docs!/learn/fundamentals/api-routes/middlewares).
To apply a middleware to a route, create the file `src/api/middlewares.ts` with the following content:
```ts title="src/api/middlewares.ts"
import {
defineMiddlewares,
validateAndTransformBody,
} from "@medusajs/framework/http"
import { CreateTicketProductSchema } from "./admin/ticket-products/route"
export default defineMiddlewares({
routes: [
{
matcher: "/admin/venues",
methods: ["POST"],
middlewares: [
validateAndTransformBody(CreateVenueSchema),
],
},
],
})
```
You apply Medusa's `validateAndTransformBody` middleware to `POST` requests sent to the `/admin/venues` route.
The middleware function accepts a Zod schema, which you created in the API route's file.
Refer to the [Middlewares](!docs!/learn/fundamentals/api-routes/middlewares) documentation to learn more.
---
## Step 5: List Venues API Route
In this step, you'll add an API route to retrieve a list of venues. You'll use this API route later to display a list of venues in the Medusa Admin.
To create the API route, add the following to the `src/api/admin/venues/route.ts` file:
```ts title="src/api/admin/venues/route.ts"
export async function GET(
req: MedusaRequest,
res: MedusaResponse
) {
const query = req.scope.resolve("query")
const {
data: venues,
metadata,
} = await query.graph({
entity: "venue",
...req.queryConfig,
})
res.json({
venues,
count: metadata?.count,
limit: metadata?.take,
offset: metadata?.skip,
})
}
```
You export a `GET` route handler function, which will expose a `GET` API route at `/admin/venues`.
In the route handler, you resolve Query from the Medusa container and use it to retrieve a list of venues.
Notice that you spread the `req.queryConfig` object into the `query.graph` method. This allows clients to pass query parameters for pagination and configure returned fields. You'll learn how to set these configurations in a bit.
Finally, you return the list of venues and pagination details in the response.
You'll test out this API route later when you customize the Medusa Admin.
### Add Validation Middleware for List Venues API Route
To validate the query parameters of requests sent to the API route, and to allow clients to configure pagination and returned fields, you need to apply a middleware.
To apply a middleware to the route, add the following imports at the top of the `src/api/middlewares.ts` file:
```ts title="src/api/middlewares.ts"
import { validateAndTransformQuery } from "@medusajs/framework/http"
import { createFindParams } from "@medusajs/medusa/api/utils/validators"
```
Then, add the following object to the `routes` array passed to `defineMiddlewares`:
```ts title="src/api/middlewares.ts"
export default defineMiddlewares({
routes: [
// ...
{
matcher: "/admin/venues",
methods: ["GET"],
middlewares: [
validateAndTransformQuery(createFindParams(), {
isList: true,
defaults: ["id", "name", "address", "rows.*"],
}),
],
},
],
})
```
You apply the `validateAndTransformQuery` middleware to `GET` requests sent to the `/admin/venues` route. This allows you to validate query parameters and set configurations for pagination and returned fields.
The middleware function accepts two parameters:
1. A Zod schema to validate the query parameters. You use Medusa's `createFindParams` utility function to create a schema that validates common query parameters like `limit`, `offset`, `fields`, and `order`.
2. Query configurations that you use in the API route using the `req.queryConfig` object. You set the following configurations:
- `isList`: Set to `true` to indicate that the API route returns a list of records.
- `defaults`: An array of fields to return by default if the client doesn't specify any fields in the request.
Refer to the [Query](!docs!/learn/fundamentals/module-links/query#request-query-configurations) documentation to learn more about query request configurations.
---
## Step 6: Manage Venues in Medusa Admin
In this step, you'll customize the Medusa Admin to allow admin users to manage venues.
The Medusa Admin dashboard is customizable, allowing you to insert widgets into existing pages, or create new pages.
Refer to the [Admin Development](!docs!/learn/fundamentals/admin) documentation to learn more.
In this step, you'll create a new page or UI route in the Medusa Admin to view a list of venues and create new venues.
### a. Initialize JS SDK
To send requests to the Medusa server, you'll use the [JS SDK](../../../js-sdk/page.mdx). It's already installed in your Medusa project, but you need to initialize it before using it in your customizations.
Create the file `src/admin/lib/sdk.ts` with the following content:
```ts title="src/admin/lib/sdk.ts"
import Medusa from "@medusajs/js-sdk"
export const sdk = new Medusa({
baseUrl: import.meta.env.VITE_BACKEND_URL || "/",
debug: import.meta.env.DEV,
auth: {
type: "session",
},
})
```
Learn more about the initialization options in the [JS SDK](../../../js-sdk/page.mdx) reference.
### b. Define Types
Next, you'll define types that you'll use in your admin customizations.
Create the file `src/admin/types.ts` with the following content:
```ts title="src/admin/types.ts"
export enum RowType {
PREMIUM = "premium",
BALCONY = "balcony",
STANDARD = "standard",
VIP = "vip"
}
export interface VenueRow {
id: string
row_number: string
row_type: RowType
seat_count: number
venue_id: string
created_at: string
updated_at: string
}
export interface Venue {
id: string
name: string
address?: string
rows: VenueRow[]
created_at: string
updated_at: string
}
export interface CreateVenueRequest {
name: string
address?: string
rows: {
row_number: string
row_type: RowType
seat_count: number
}[]
}
export interface VenuesResponse {
venues: Venue[]
count: number
limit: number
offset: number
}
```
You define types for the `RowType` enum, `VenueRow` and `Venue` data models, as well as types for API request and response bodies.
### c. Create Venues Page
You can now create a page that shows a list of venues in a table.
You create a page by creating a UI route. A UI route is a React component defined under the `src/admin/routes` directory in a `page.tsx` file. The path of the UI route is the file's path relative to `src/admin/routes`.
To create the venues page, create the file `src/admin/routes/venues/page.tsx` with the following content:
```tsx title="src/admin/routes/venues/page.tsx" collapsibleLines="1-15" expandButtonLabel="Show Imports"
import { defineRouteConfig } from "@medusajs/admin-sdk"
import { Buildings } from "@medusajs/icons"
import {
createDataTableColumnHelper,
Container,
DataTable,
useDataTable,
Heading,
DataTablePaginationState,
} from "@medusajs/ui"
import { useQuery, useQueryClient } from "@tanstack/react-query"
import { useState, useMemo } from "react"
import { sdk } from "../../lib/sdk"
import { Venue, CreateVenueRequest } from "../../types"
const VenuesPage = () => {
// TODO implement component
}
export const config = defineRouteConfig({
label: "Venues",
icon: Buildings,
})
export default VenuesPage
```
A UI route file must export:
- A React component as the default export. This component is rendered when the user navigates to the UI route.
- A route configuration object defined using the `defineRouteConfig` function. This object configures the UI route's label and icon in the sidebar.
In the `VenuesPage` component, you'll display the list of venues in a [Data Table](!ui!/components/data-table) component.
To define the columns of the data table, add the following before the `VenuesPage` component:
```tsx title="src/admin/routes/venues/page.tsx"
const columnHelper = createDataTableColumnHelper()
const columns = [
columnHelper.accessor("name", {
header: "Name",
cell: ({ row }) => (
{row.original.name}
{row.original.address && (
{row.original.address}
)}
),
}),
columnHelper.accessor("rows", {
header: "Total Capacity",
cell: ({ row }) => {
const totalCapacity = row.original.rows.reduce(
(sum, rowItem) => sum + rowItem.seat_count,
0
)
return {totalCapacity} seats
},
}),
columnHelper.accessor("address", {
header: "Address",
cell: ({ row }) => (
{row.original.address || "-"}
),
}),
]
```
You define three columns: `Name`, `Total Capacity`, and `Address`.
Next, to show the data table, replace the `VenuesPage` component with the following:
```tsx title="src/admin/routes/venues/page.tsx"
const VenuesPage = () => {
const limit = 15
const [pagination, setPagination] = useState({
pageSize: limit,
pageIndex: 0,
})
const queryClient = useQueryClient()
const offset = useMemo(() => {
return pagination.pageIndex * limit
}, [pagination])
const { data, isLoading } = useQuery<{
venues: Venue[]
count: number
limit: number
offset: number
}>({
queryKey: ["venues", offset, limit],
queryFn: () => sdk.client.fetch("/admin/venues", {
query: {
offset: pagination.pageIndex * pagination.pageSize,
limit: pagination.pageSize,
order: "-created_at",
},
}),
})
const table = useDataTable({
columns,
data: data?.venues || [],
rowCount: data?.count || 0,
isLoading,
pagination: {
state: pagination,
onPaginationChange: setPagination,
},
getRowId: (row) => row.id,
})
return (
Venues
)
}
```
In the component, you use React Query's `useQuery` hook to fetch the list of venues from the `GET /admin/venues` API route you created earlier. You pass the `offset` and `limit` query parameters to paginate the results.
Then, you use the `useDataTable` hook from Medusa UI to create a data table instance with the fetched venues and the columns you defined earlier.
Finally, you render the data table.
### d. Create Venue Modal
Next, you'll add a component that shows a form in a modal to create a new venue. You'll open this modal when the user clicks a button on the venues page.
Before adding the modal, you'll add a component that visualizes the venue rows in a seat chart. You'll use this component in the modal to help admin users visualize the rows they're adding to the venue.
To create the seat chart component, create the file `src/admin/components/seat-chart.tsx` with the following content:
```tsx title="src/admin/components/seat-chart.tsx"
import React from "react"
import { Heading } from "@medusajs/ui"
import { RowType, VenueRow } from "../types"
interface ChartVenueRow extends Pick {}
interface SeatChartProps {
rows: ChartVenueRow[]
className?: string
}
const getRowTypeColor = (rowType: RowType): string => {
switch (rowType) {
case RowType.VIP:
return "bg-purple-500"
case RowType.PREMIUM:
return "bg-orange-500"
case RowType.BALCONY:
return "bg-blue-500"
case RowType.STANDARD:
return "bg-gray-500"
default:
return "bg-gray-300"
}
}
const getRowTypeLabel = (rowType: RowType): string => {
switch (rowType) {
case RowType.VIP:
return "VIP"
case RowType.PREMIUM:
return "Premium"
case RowType.BALCONY:
return "Balcony"
case RowType.STANDARD:
return "Standard"
default:
return "Unknown"
}
}
export const SeatChart = ({ rows, className = "" }: SeatChartProps) => {
if (rows.length === 0) {
return (
No rows added yet. Add rows to see the seat chart.
)
}
// Sort rows by row_number for consistent display
const sortedRows = [...rows].sort((a, b) => a.row_number.localeCompare(b.row_number))
return (
Total capacity: {rows.reduce((sum, row) => sum + row.seat_count, 0)} seats
)
}
```
This component accepts a list of venue rows and visualizes them in a seat chart.
Then, to create the component for the modal, create the file `src/admin/components/create-venue-modal.tsx` with the following content:
```tsx title="src/admin/components/create-venue-modal.tsx" collapsibleLines="1-14" expandButtonLabel="Show Imports"
import { useState } from "react"
import {
FocusModal,
Heading,
Input,
Select,
Textarea,
Label,
Button,
toast,
} from "@medusajs/ui"
import { CreateVenueRequest, RowType, VenueRow } from "../types"
import { SeatChart } from "./seat-chart"
interface NewVenueRow extends Pick {}
interface CreateVenueModalProps {
open: boolean
onOpenChange: (open: boolean) => void
onSubmit: (data: CreateVenueRequest) => Promise
}
export const CreateVenueModal = ({
open,
onOpenChange,
onSubmit,
}: CreateVenueModalProps) => {
const [name, setName] = useState("")
const [address, setAddress] = useState("")
const [rows, setRows] = useState([])
const [newRow, setNewRow] = useState({
row_number: "",
row_type: RowType.VIP,
seat_count: 10,
})
const [isLoading, setIsLoading] = useState(false)
// TODO add functions to manage venue rows
}
```
You create a `CreateVenueModal` component that accepts three props:
- `open`: A boolean indicating whether the modal is open or closed.
- `onOpenChange`: A function called when the modal's open state changes.
- `onSubmit`: A function called when the user submits the form to create a venue.
In the component, you define state variables to hold the venue's name, address, rows, a new row being added, and a loading state.
In the form, admin users should be able to add multiple rows to the venue. So, you'll add methods to manage rows, such as adding and removing rows.
Replace the `TODO` in the `CreateVenueModal` component with the following:
```tsx title="src/admin/components/create-venue-modal.tsx"
const addRow = () => {
if (!newRow.row_number.trim()) {
toast.error("Row number is required")
return
}
if (rows.some((row) => row.row_number === newRow.row_number)) {
toast.error("Row number already exists")
return
}
if (newRow.seat_count <= 0) {
toast.error("Seat count must be greater than 0")
return
}
setRows([...rows, {
row_number: newRow.row_number,
row_type: newRow.row_type,
seat_count: newRow.seat_count,
}])
setNewRow({
row_number: "",
row_type: RowType.VIP,
seat_count: 10,
})
}
const removeRow = (rowNumber: string) => {
setRows(rows.filter((row) => row.row_number !== rowNumber))
}
const formatRowType = (rowType: RowType) => {
switch (rowType) {
case RowType.VIP:
return "VIP"
default:
return rowType.charAt(0).toUpperCase() + rowType.slice(1).toLowerCase()
}
}
// TODO handle form submission and modal close
```
You add the `addRow` function to add a new row to the venue, and the `removeRow` function to remove a row by its row number. You also add the `formatRowType` function to format the row type for display.
Next, you'll implement the logic to submit the form to create a venue and to close the modal and reset the form when the user closes it.
Replace the `TODO` in the `CreateVenueModal` component with the following:
```tsx title="src/admin/components/create-venue-modal.tsx"
const handleClose = () => {
setName("")
setAddress("")
setRows([])
setNewRow({
row_number: "",
row_type: RowType.VIP,
seat_count: 10,
})
onOpenChange(false)
}
const handleSubmit = async (e: React.FormEvent) => {
e.preventDefault()
if (!name.trim()) {
toast.error("Venue name is required")
return
}
if (rows.length === 0) {
toast.error("At least one row is required")
return
}
setIsLoading(true)
try {
await onSubmit({
name: name.trim(),
address: address.trim() || undefined,
rows: rows.map((row) => ({
row_number: row.row_number,
row_type: row.row_type,
seat_count: row.seat_count,
})),
})
handleClose()
} catch (error: any) {
toast.error(error.message)
} finally {
setIsLoading(false)
}
}
// TODO render modal
```
You add the `handleClose` function to reset the form and call the `onOpenChange` prop to close the modal. You'll trigger this function when users close the modal or after successfully creating a venue.
You also add the `handleSubmit` function to validate the form data, call the `onSubmit` prop with the venue data, and handle loading and error states.
Finally, you'll render the modal with the form. Replace the `TODO` in the `CreateVenueModal` component with the following:
```tsx title="src/admin/components/create-venue-modal.tsx"
return (