* initial

* initial

* update tests

* remove unused import

* allow passing with no tests

* vale fixes
201 lines
8.1 KiB
Plaintext
201 lines
8.1 KiB
Plaintext
export const metadata = {
|
|
title: `Prerequisites for New Projects`,
|
|
}
|
|
|
|
# {metadata.title}
|
|
|
|
In this guide, learn about the prerequisites for your Medusa application and storefront before deploying it to Cloud in a new project.
|
|
|
|
Alternatively, you can create a project from a starter, as explained in the [Create Projects](../page.mdx) guide.
|
|
|
|
## Who is this guide for?
|
|
|
|
This guide is intended for developers and teams deploying their local Medusa applications to Cloud.
|
|
|
|
You'll learn what setup steps are necessary for:
|
|
|
|
1. Deploying a Medusa application (server and admin dashboard) only;
|
|
2. Or deploying a Medusa application along with a storefront.
|
|
|
|
---
|
|
|
|
## Prerequisites for Medusa Application Only
|
|
|
|
This section covers the prerequisites for deploying your Medusa application (server and admin dashboard) to Cloud.
|
|
|
|
If you're also deploying a storefront with your backend, check the [next section](#prerequisites-for-medusa-application-with-storefront) for additional prerequisites.
|
|
|
|
### Configurations Managed in Cloud
|
|
|
|
Your existing Medusa application (server and admin dashboard) doesn't need specific configurations to be deployed to Cloud. Medusa automatically:
|
|
|
|
- Creates the necessary [server and worker instances](!docs!/learn/production/worker-mode).
|
|
- Scales your Medusa application's resources based on the traffic it receives.
|
|
- Sets up and configures production resources and modules for your Medusa application:
|
|
- [Redis Caching Module Provider](!resources!/infrastructure-modules/caching/providers/redis)
|
|
- [Redis Event Module](!resources!/infrastructure-modules/event/redis)
|
|
- [Redis Locking Module Provider](!resources!/infrastructure-modules/locking/redis)
|
|
- [Redis Workflow Engine Module](!resources!/infrastructure-modules/workflow-engine/redis)
|
|
- [S3 File Provider Module](!resources!/infrastructure-modules/file/s3)
|
|
|
|
Make sure to remove any of these modules from your `medusa-config.ts` file unless you want to use custom options for them. In that case, you must manually set up and manage those resources externally and configure them in your Medusa application.
|
|
|
|
<Note>
|
|
|
|
The Caching Module was introduced in [Medusa v2.11.0](https://github.com/medusajs/medusa/releases/tag/v2.11.0) to replace the deprecated Cache Module. If you're still using the Cache Module, make sure to remove it from your `medusa-config.ts` file as well.
|
|
|
|
</Note>
|
|
|
|
---
|
|
|
|
## Prerequisites for Medusa Application with Storefront
|
|
|
|
This section covers the prerequisites for deploying your Medusa application (server and admin dashboard) along with a storefront to Cloud.
|
|
|
|
Make sure to follow these steps in addition to the ones mentioned in the [previous section](#prerequisites-for-medusa-application-only).
|
|
|
|
<Note type="soon">
|
|
|
|
Storefront deployment is an experimental feature, and our team is actively working on enhancing it. If you run into any issues, contact support for assistance.
|
|
|
|
</Note>
|
|
|
|
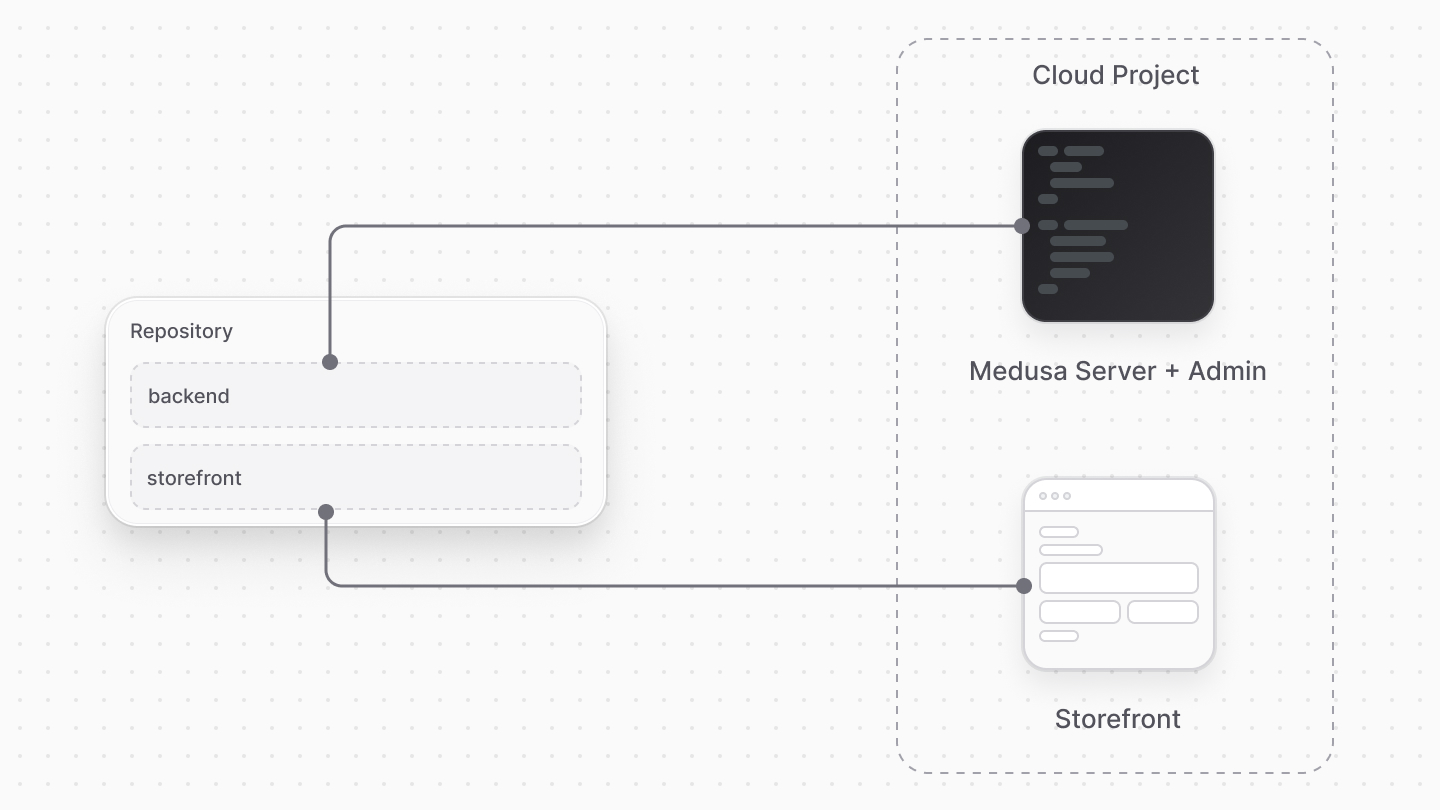
### Monorepo Setup
|
|
|
|
To deploy your Medusa application along with a storefront, both projects must be set up in a monorepo structure.
|
|
|
|
To create a monorepo, you need:
|
|
|
|
1. Package manager: Cloud supports `npm`, `yarn` (v1, v3, and v4), and `pnpm` as package managers.
|
|
2. Monorepo tool: You can use [turbo](https://turborepo.com/) or [nx](https://nx.dev/) to manage your monorepo.
|
|
|
|
You can structure your monorepo as you see fit. You'll be required to specify the paths to your Medusa application and storefront during the project creation process on Cloud.
|
|
|
|
|
|
|
|
### Root Build Script
|
|
|
|
Your monorepo must have a `build` script that builds both the Medusa application and the storefront. Medusa executes this script during the deployment process.
|
|
|
|
For example, if you're using `turbo`, you should have the following script in your root `package.json` file:
|
|
|
|
```json title="package.json"
|
|
{
|
|
"scripts": {
|
|
"build": "turbo run build"
|
|
// other scripts...
|
|
}
|
|
}
|
|
```
|
|
|
|
### Prerequisites for Yarn Workspaces
|
|
|
|
If you're using `yarn` as your package manager, create the `.yarnrc.yml` file in the root of your monorepo with the following content:
|
|
|
|
```yaml title=".yarnrc.yml"
|
|
nodeLinker: node-modules
|
|
|
|
nmHoistingLimits: workspaces
|
|
```
|
|
|
|
You set the following configurations:
|
|
|
|
1. `nodeLinker: node-modules`: Configures Yarn to install dependencies using the traditional `node_modules` structure, which is required for Medusa applications.
|
|
2. `nmHoistingLimits: workspaces`: Ensures that dependencies are hoisted only to the workspace level, preventing potential conflicts between packages in the monorepo.
|
|
|
|
{/* ### Prerequisites for PNPM Workspaces
|
|
|
|
If you're using `pnpm` as your package manager, set up the following configurations in your monorepo.
|
|
|
|
First, create the `.npmrc` file in the root of your monorepo with the following content:
|
|
|
|
```text title=".npmrc"
|
|
auto-install-peers=true
|
|
strict-peer-dependencies=false
|
|
shared-workspace-lockfile=false
|
|
```
|
|
|
|
You set the following configurations:
|
|
|
|
1. `auto-install-peers=true`: Ensures that peer dependencies are automatically installed when you install packages, preventing potential issues with missing peer dependencies.
|
|
2. `strict-peer-dependencies=false`: Allows more flexibility when resolving peer dependencies, which can be helpful in a monorepo setup.
|
|
3. `shared-workspace-lockfile=false`: Ensures that each package in the monorepo can have its own lockfile, which is necessary for Medusa to resolve dependencies correctly.
|
|
|
|
Next, create the `pnpm-workspace.yaml` file in the root of your monorepo with the following content:
|
|
|
|
```yaml title="pnpm-workspace.yaml"
|
|
packages:
|
|
- "apps/**"
|
|
- "!apps/backend/.medusa/**"
|
|
```
|
|
|
|
This configuration specifies the packages that are part of your pnpm workspace. The example above includes all packages under the `apps` directory, except for the `.medusa` directory within the `backend` package.
|
|
|
|
Finally, add the `.npmrc` file to your Medusa application's root directory if it doesn't already exist, with the following content:
|
|
|
|
```text title="apps/backend/.npmrc"
|
|
public-hoist-pattern[]=*@medusajs/*
|
|
public-hoist-pattern[]=@tanstack/react-query
|
|
public-hoist-pattern[]=react-i18next
|
|
public-hoist-pattern[]=react-router-dom
|
|
```
|
|
|
|
This configuration ensures that specific dependencies are hoisted to the root `node_modules` directory, which is necessary for Medusa to function correctly. */}
|
|
|
|
### Prerequisites for NPM Workspaces
|
|
|
|
If you're using `npm` as your package manager, and you're using the [Next.js Starter Storefront](!resources!/nextjs-starter) as your storefront, add the following override in the storefront's `package.json`:
|
|
|
|
```json title="apps/storefront/package.json"
|
|
{
|
|
"overrides": {
|
|
// other overrides...
|
|
"@medusajs/icons": {
|
|
"react": "19.0.3",
|
|
"react-dom": "19.0.3"
|
|
}
|
|
}
|
|
}
|
|
```
|
|
|
|
This ensures the `@medusajs/icons` package uses compatible versions of `react` and `react-dom` with the Next.js Starter Storefront.
|
|
|
|
Also, add the following override in your monorepo's root `package.json`:
|
|
|
|
```json title="package.json"
|
|
{
|
|
"overrides": {
|
|
// other overrides...
|
|
"react": "19.0.3",
|
|
"react-dom": "19.0.3"
|
|
}
|
|
}
|
|
```
|
|
|
|
This ensures that all packages in your monorepo use compatible versions of `react` and `react-dom`.
|
|
|
|
### Supported Storefront Frameworks
|
|
|
|
Cloud currently supports deploying storefronts built with the following frameworks:
|
|
|
|
1. [Next.js](https://nextjs.org/) v15+
|
|
2. [SvelteKit](https://kit.svelte.dev/) v2.40.0+
|
|
3. [Tanstack Start](https://tanstack.com/start) v1.132.0+
|
|
|
|
If you're using a different framework for your storefront, contact support to request it.
|
|
|
|
---
|
|
|
|
## Additional Storefront Considerations
|
|
|
|
When deploying your storefront to Cloud, there are additional considerations to keep in mind related to the build process, environment variables, and custom domains.
|
|
|
|
Refer to the [Storefront](../../storefront/page.mdx) guide for more details on these considerations.
|
|
|
|
---
|
|
|
|
## Next Steps
|
|
|
|
Now that you know the prerequisites for deploying your Medusa application and storefront to Cloud, you can create your project.
|
|
|
|
Refer to the [Project](../page.mdx) guide to learn how to create a new project on Cloud. |