* docs: updates for storefront in cloud

* comment-out pnpm

* fix broken link

* npm prerequisites

* Update www/apps/cloud/app/storefront/page.mdx

Co-authored-by: Stevche Radevski <sradevski@live.com>

* remove global cdn

---------

Co-authored-by: Stevche Radevski <sradevski@live.com>
143 lines
7.5 KiB
Plaintext
143 lines
7.5 KiB
Plaintext
import { CodeTab, CodeTabs } from "docs-ui"
|
|
|
|
export const metadata = {
|
|
title: `Storefront Deployment on Cloud`,
|
|
}
|
|
|
|
# {metadata.title}
|
|
|
|
In this guide, learn how to deploy your storefront with your Medusa application on Cloud.
|
|
|
|
## Storefront Deployment Overview
|
|
|
|
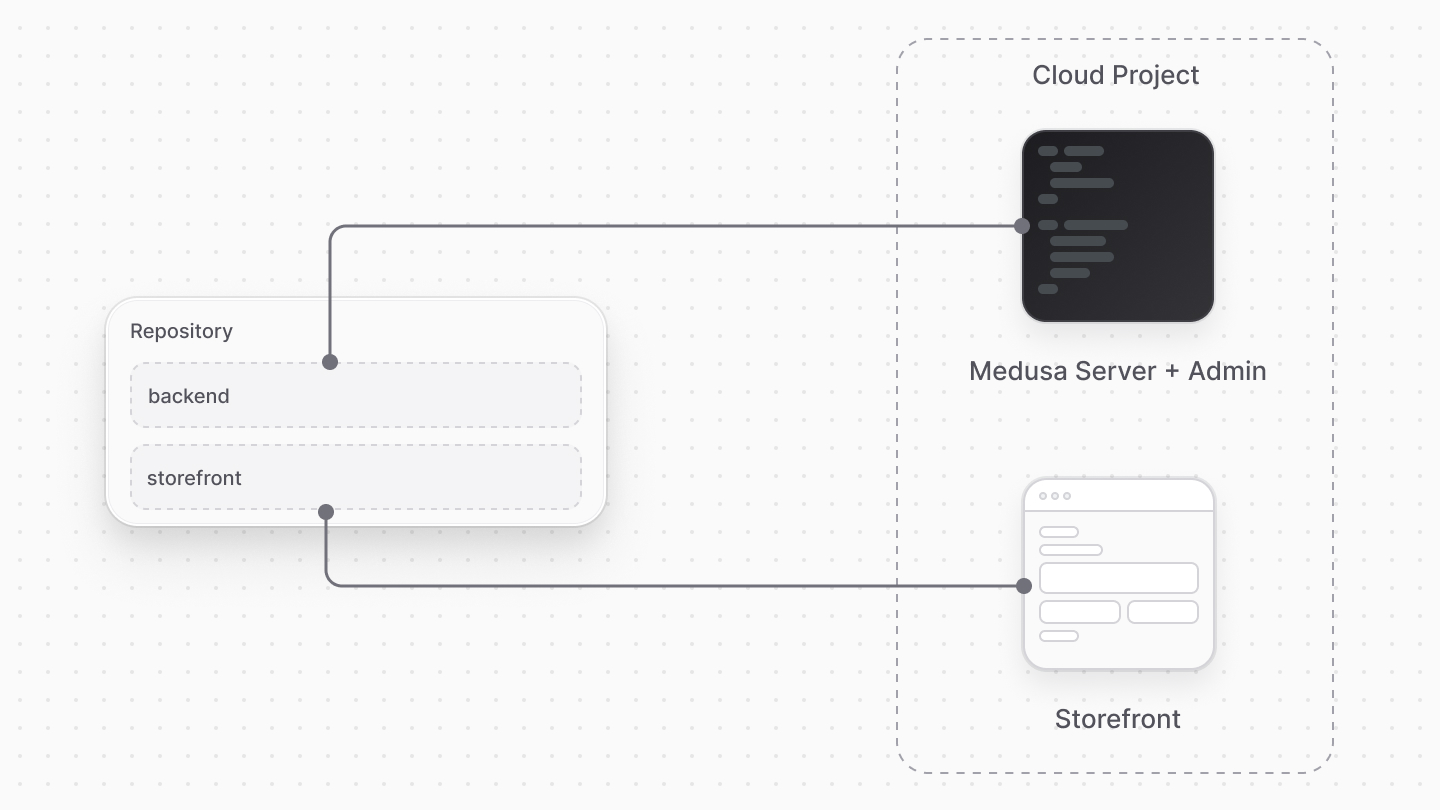
Medusa allows you to deploy your storefront alongside your Medusa application on Cloud, enabling you to host and manage both backend and frontend in a single platform.
|
|
|
|
To deploy a storefront with your Medusa application on Cloud, you need a monorepo structure where both the Medusa application and storefront code are in the same repository. Medusa then builds and deploys both the backend and frontend.
|
|
|
|
|
|
|
|
### Storefront Deployment Per Environment
|
|
|
|
Similar to the Medusa backend, Medusa deploys a storefront for every long-lived and preview environment, based on your plan's limits. This allows you to test and preview changes in isolation.
|
|
|
|
Medusa also automatically configures the necessary settings for each environment, such as URLs, API keys, and Cross-Origin Resource Sharing (CORS) settings, to ensure seamless connectivity between the storefront and Medusa application.
|
|
|
|
### Deploy Storefront with Medusa Application
|
|
|
|
To deploy a storefront with your Medusa application on Cloud, you can either:
|
|
|
|
1. [Create a new project](../projects/page.mdx#create-a-project) with a monorepo structure that includes both the Medusa application and storefront code.
|
|
2. [Add a storefront to an existing project](../projects/page.mdx#add-storefront) that already has a Medusa application deployed on Cloud.
|
|
|
|
Unless you create a new project from a starter, you'll need to set up the monorepo structure. Learn how to create the monorepo in the [Prerequisites](../projects/prerequisites/page.mdx#prerequisites-for-medusa-application-with-storefront) guide.
|
|
|
|
---
|
|
|
|
## Storefront Hosting Features
|
|
|
|
Cloud's storefront hosting includes the following features:
|
|
|
|
1. **End-to-end deployment of your commerce application**: Host and manage all components of your commerce application, including server, admin, and storefront, in a single platform.
|
|
2. **Zero-configuration deployment**: Medusa automatically configures your server and storefront settings, including URLs and CORS, to ensure seamless connectivity between the two.
|
|
3. **Storefront previews**: Medusa creates both backend and storefront previews for GitHub pull requests, automatically configuring preview URLs and settings to connect to the corresponding Medusa preview. This allows you to preview storefront and backend changes together.
|
|
4. **Framework agnostic**: Deploy storefronts built with popular frameworks like Next.js and Tanstack Start. Refer to the [Supported Storefront Frameworks](#supported-storefront-frameworks) section for the full list of supported frameworks.
|
|
5. **Custom domains**: Set up custom domains for your storefronts to use branded URLs for your customers.
|
|
6. **SSL Certificates**: Cloud automatically provisions and renews SSL certificates for your custom domains, ensuring secure connections for your customers.
|
|
8. **Environment-specific configurations**: Each environment (production, staging, previews) has its own configuration, allowing you to test changes without affecting the live storefront.
|
|
|
|
---
|
|
|
|
## Storefront Hosting Pricing
|
|
|
|
Storefront deployment is included in your organization's [plan](../pricing/page.mdx) at no additional cost, subject to usage limits.
|
|
|
|
Exceeding these limits may incur [Flex Usage](../usage/page.mdx#what-is-flex-usage) charges.
|
|
|
|
---
|
|
|
|
## Supported Storefront Frameworks
|
|
|
|
Cloud currently supports deploying storefronts built with the following frameworks:
|
|
|
|
1. [Next.js](https://nextjs.org/) v15+
|
|
2. [SvelteKit](https://kit.svelte.dev/) v2.40.0+
|
|
3. [Tanstack Start](https://tanstack.com/start) v1.132.0+
|
|
|
|
If you're using a different framework for your storefront, contact support to request it.
|
|
|
|
---
|
|
|
|
## Storefront Custom Domain
|
|
|
|
By default, storefronts are deployed at the `medusajs.site` subdomain. The domain prefix is the same as the Medusa application's subdomain. For example, if your Medusa application is at `my-store.medusajs.app`, your storefront will be at `my-store.medusajs.site`.
|
|
|
|
You can also set up a custom domain for your storefront to use a branded URL.
|
|
|
|
### Prerequisites
|
|
|
|
To set up a custom domain for your storefront, you need a domain registered with a domain provider that supports either ALIAS records or top-level CNAME records.
|
|
|
|
### Set Up Storefront Custom Domain
|
|
|
|
You can set up storefront custom domains per environment. For example, you can set up a custom domain for the Production environment while keeping the default domain for the Staging and preview environments.
|
|
|
|
To set up a storefront custom domain for an environment:
|
|
|
|
1. Go to a [project's dashboard](../projects/page.mdx#open-project-dashboard) in Cloud.
|
|
2. Click on the environment's card where you want to set up the custom domain. For example, the Production environment.
|
|
3. In the environment's dashboard, click on the "Settings" tab.
|
|
4. Choose the "Storefront Domains" tab from the sidebar.
|
|
5. Click on the "Add domain" button.
|
|
6. A form with two steps will open:
|
|
- **Domain Step**: Enter your custom domain name. For example, `acme.com`.
|
|
- **DNS Step**: Follow the instructions to add the necessary DNS records with your domain provider.
|
|
7. Once you're done, click the "Done" button.
|
|
|
|
Your custom domain will be active once the DNS changes propagate, which may take up to 48 hours.
|
|
|
|
---
|
|
|
|
## Storefront Considerations
|
|
|
|
The following section covers considerations to keep in mind when deploying your storefront to Cloud.
|
|
|
|
### Framework-Specific Build Command
|
|
|
|
When building your storefront before deployment on Cloud, Medusa runs the `build` command specific to your storefront framework. For example, if you're using Next.js, Medusa runs `next build` to build your storefront.
|
|
|
|
So, if you perform any custom commands or manipulation during the build process, Medusa will not run them.
|
|
|
|
### Pre-Configured Deployment Settings
|
|
|
|
When deploying your storefront to Cloud, you don't need to add any specific configurations for deployment. For example, you don't need to specify the hosting provider with a Vite plugin in Tanstack Start.
|
|
|
|
Medusa automatically injects the necessary configurations during the deployment process to ensure your storefront is correctly set up on Cloud.
|
|
|
|
### Injected Environment Variables
|
|
|
|
When deploying your storefront to Cloud, Medusa automatically injects the following environment variables into your storefront's build process:
|
|
|
|
<CodeTabs group="storefront-framework">
|
|
<CodeTab label="Next.js" value="nextjs">
|
|
|
|
```shell
|
|
NEXT_PUBLIC_MEDUSA_PUBLISHABLE_KEY # Your Medusa application's publishable key
|
|
NEXT_PUBLIC_MEDUSA_BACKEND_URL # Your Medusa backend's URL
|
|
MEDUSA_BACKEND_URL # Your Medusa backend's URL, compatible with Next.js Starter Storefront
|
|
```
|
|
|
|
</CodeTab>
|
|
<CodeTab label="SvelteKit / Tanstack Start" value="sveltekit-tanstack">
|
|
|
|
```shell
|
|
VITE_MEDUSA_PUBLISHABLE_KEY # Your Medusa application's publishable key
|
|
VITE_MEDUSA_BACKEND_URL # Your Medusa backend's URL
|
|
```
|
|
|
|
</CodeTab>
|
|
</CodeTabs>
|
|
|
|
So, make sure to use these environment variables in your storefront to connect it to your Medusa backend.
|
|
|
|
You can also add custom environment variables to your storefront either during the project creation process on Cloud or [later via the project settings](../environments/environment-variables/page.mdx).
|