* standard docs for caching module + deprecated cache module

* added guides for creating + using, and overall changes from cache to caching

* fix details related to redis provider

* fix build errors

* fix build error

* fixes

* add guides to sidebar

* add sidebar util

* document query + index

* moved cache tag conventions

* fix build errors

* added migration guide

* added memcached guide

* fixes

* general fixes and updates

* updated reference

* document medusa cache

* small fix

* fixes

* remove cloud cache

* revert edit dates changes

* revert edit dates

* small update
124 lines
5.0 KiB
Plaintext
124 lines
5.0 KiB
Plaintext
import { Prerequisites } from "docs-ui"
|
|
|
|
export const metadata = {
|
|
title: `Migrate from Cache Module to Caching Module`,
|
|
}
|
|
|
|
# {metadata.title}
|
|
|
|
In this guide, you'll learn how to migrate from the deprecated [Cache Module](../../cache/page.mdx) to the new [Caching Module](../page.mdx).
|
|
|
|
<Note>
|
|
|
|
The Caching Module is available starting [Medusa v2.11.0](https://github.com/medusajs/medusa/releases/tag/v2.11.0).
|
|
|
|
</Note>
|
|
|
|
<Note title="This guide is for developers who have">
|
|
|
|
1. Set up a Cache Module in `medusa-config.ts`.
|
|
2. Used the Cache Module's service in their code.
|
|
|
|
If you haven't done either of these, you don't need to migrate to the Caching Module. You can refer to the [Caching Module guide](../page.mdx#install-the-caching-module) to learn how to set it up.
|
|
|
|
</Note>
|
|
|
|
## Why Migrate to the Caching Module?
|
|
|
|
The Caching Module provides improved performance, flexibility, and scalability compared to the deprecated Cache Module.
|
|
|
|
It also offers a better developer experience, making it easier to cache Query results and other data.
|
|
|
|
Additionally, the Caching Module supports registering multiple caching providers, such as Redis and Memcached, allowing you to use different caching backends in your application.
|
|
|
|
---
|
|
|
|
## Architectural Module Changes
|
|
|
|
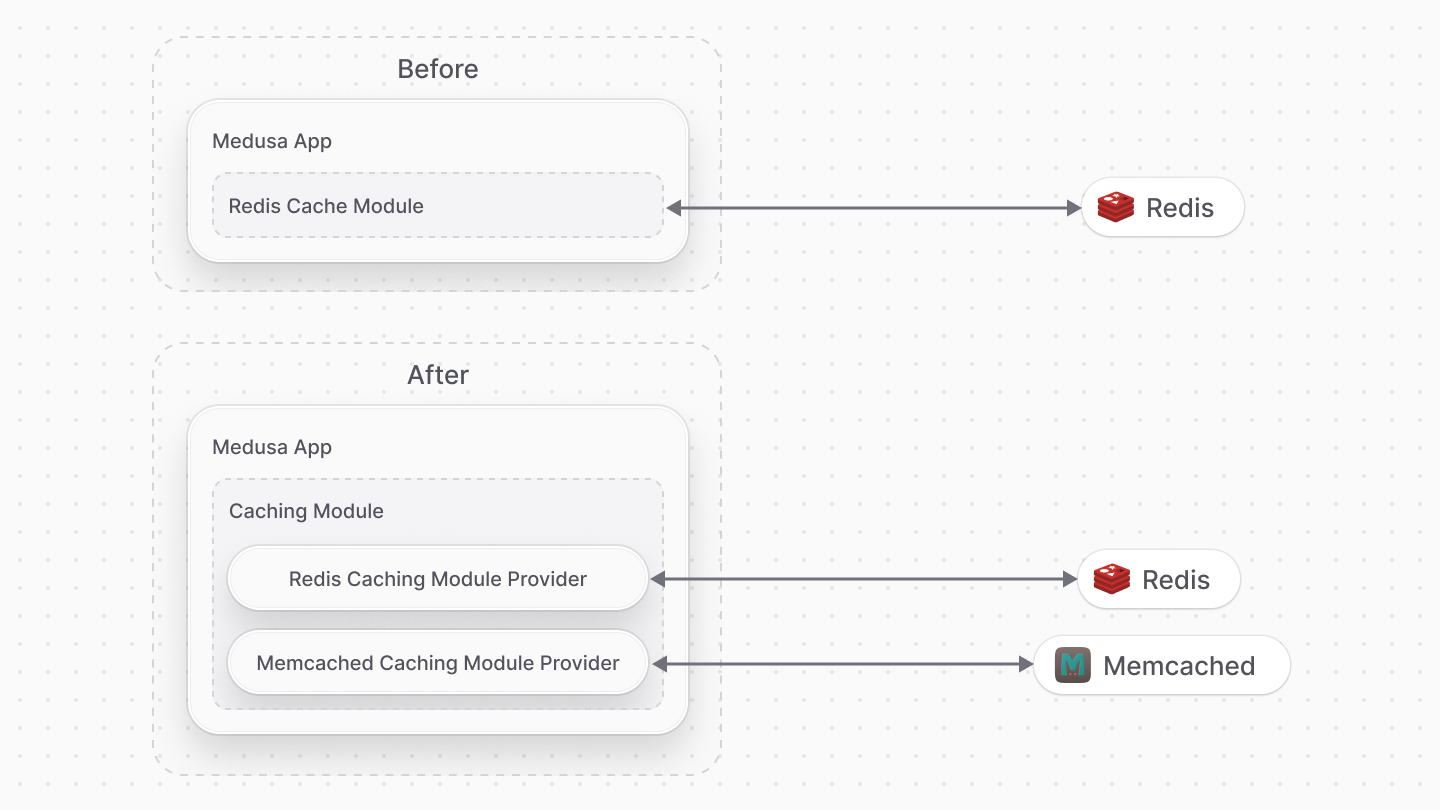
The Cache Module implements caching logic, including integration with third-party caching services like Redis. For example, the Redis Cache Module handled connecting to the Redis server and performing caching operations.
|
|
|
|
The Caching Module, on the other hand, follows a provider-based architecture. The Caching Module provides the interface you use to manage cached data, while Caching Module Providers implement the actual caching logic. You can choose which provider to use, such as the Redis Caching Module Provider or a custom provider you create.
|
|
|
|
This separation of concerns allows for greater flexibility and extensibility. You can easily switch between different caching providers or create your own custom provider without modifying the core Caching Module.
|
|
|
|
|
|
|
|
---
|
|
|
|
## How to Migrate to the Caching Module
|
|
|
|
<Prerequisites
|
|
items={[
|
|
{
|
|
text: "Updated your Medusa application to v2.11.0 or later",
|
|
link: "https://github.com/medusajs/medusa/releases/tag/v2.11.0"
|
|
}
|
|
]}
|
|
/>
|
|
|
|
### 1. Remove the Cache Module
|
|
|
|
The first step is to remove the Cache Module from your `medusa-config.ts` file.
|
|
|
|
For example, if you set up the Redis Cache Module, remove the following code from `medusa-config.ts`:
|
|
|
|
```ts title="medusa-config.ts" highlights={[["5"], ["6"], ["7"], ["8"], ["9"], ["10"]]}
|
|
module.exports = defineConfig({
|
|
// ...
|
|
modules: [
|
|
// REMOVE THE FOLLOWING LINES
|
|
{
|
|
resolve: "@medusajs/medusa/cache-redis",
|
|
options: {
|
|
redisUrl: process.env.CACHE_REDIS_URL,
|
|
},
|
|
},
|
|
],
|
|
})
|
|
```
|
|
|
|
### 2. Install and Register the Caching Module
|
|
|
|
The Caching Module is installed by default in your application. To use it, enable the caching feature flag and register the module in your `medusa-config.ts` file.
|
|
|
|
Refer to the [Caching Module guide](../page.mdx#install-the-caching-module) for setup instructions.
|
|
|
|
### 3. (Optional) Update Your Code to Use the Caching Module's Service
|
|
|
|
If you're using the Cache Module's service in your code, update it to use the Caching Module's service instead.
|
|
|
|
#### Container Key Change
|
|
|
|
Previously, you resolved the Cache Module's service using the `Modules.CACHE` or `cache` key.
|
|
|
|
Now, use the `Modules.CACHING` or `caching` key to resolve the Caching Module's service. For example:
|
|
|
|
```ts
|
|
const cachingModuleService = container.resolve(Modules.CACHING)
|
|
// or
|
|
const cachingModuleService = container.resolve("caching")
|
|
```
|
|
|
|
#### Method Changes
|
|
|
|
The Caching Module's service has similar methods to the Cache Module's service:
|
|
|
|
1. `get` -> Use the Caching Module's [get method](/references/caching-service#get).
|
|
2. `set` -> Use the Caching Module's [set method](/references/caching-service#set).
|
|
3. `invalidate` -> Use the Caching Module's [clear method](/references/caching-service#clear).
|
|
|
|
### 4. (Optional) Create Custom Caching Module Provider
|
|
|
|
If you have a custom Cache Module, recreate it as a custom Caching Module Provider. For example, recreate a custom Memcached Cache Module as a Caching Module Provider.
|
|
|
|
The Caching Module Provider's service has similar methods to the Cache Module's service. Refer to the [Create Caching Module Provider guide](/references/caching-module-provider) for instructions on creating a custom Caching Module Provider.
|
|
|
|
---
|
|
|
|
## Understand Caching Changes
|
|
|
|
With the Cache Module, you handled caching and invalidation manually.
|
|
|
|
The Caching Module can now handle caching and invalidation automatically for certain operations, such as caching Query results. You can still use the Caching Module's service to cache custom data.
|
|
|
|
Learn more about the Caching Module in the [Caching Module guide](../page.mdx). |