* docs improvements and changes

* updated module definition

* modules + dml changes

* fix build

* fix vale error

* fix lint errors

* fixes to stripe docs

* fix condition

* fix condition

* fix module defintion

* fix checkout

* disable UI action

* change oas preview action

* flatten provider module options

* fix lint errors

* add module link docs

* pr comments fixes

* fix vale error

* change node engine version

* links -> linkable

* add note about database name

* small fixes

* link fixes

* fix response code in api reference

* added migrations step
367 lines
13 KiB
Plaintext
367 lines
13 KiB
Plaintext
import { AcademicCapSolid } from "@medusajs/icons"
|
||
import { LearningPath } from "docs-ui"
|
||
|
||
export const metadata = {
|
||
title: `Integrate Ecommerce Stack Recipe`,
|
||
}
|
||
|
||
# {metadata.title}
|
||
|
||
This recipe provides the general steps to integrate your ecommerce stack with Medusa.
|
||
|
||
## Overview
|
||
|
||
Integrating third-party systems, such as ERP or a CMS, into your ecommerce stack requires:
|
||
|
||
- Establishing connections with the different systems based on each of their APIs.
|
||
- Building flows that span across multiple systems.
|
||
- Maintaining data consistency and syncing between your systems.
|
||
|
||
Medusa’s architecture and functionalities allow you to integrate third-party systems and build flows around them. It also provides error-handling mechanisms and webhook capabilities that prevent data inconsistency between your systems.
|
||
|
||
---
|
||
|
||
## Integrate External System with a Module
|
||
|
||
To integrate an external system, such as an ERP, into your Medusa application, create a module whose service has methods to connect to the external system.
|
||
|
||
Then, resolve the module's main service in other resources, such as API routes or workflows, to perform actions in the external system.
|
||
|
||
<Card
|
||
href="!docs!/basics/modules-and-services"
|
||
title="Create a Module"
|
||
text="Learn how to create a module in Medusa."
|
||
startIcon={<AcademicCapSolid />}
|
||
showLinkIcon={false}
|
||
/>
|
||
|
||
<Details summaryContent="Example: Create a module integrating an ERP system">
|
||
|
||
This example showcases how to create a module that integrates to a dummy ERP system.
|
||
|
||
Start by creating the directory `src/modules/erp` for your module.
|
||
|
||
Then, create the file `src/modules/erp/service.ts` with the following content:
|
||
|
||
export const serviceHighlights = [
|
||
["4", "ErpModuleOptions", "The module's expected options."],
|
||
["9", "client_", "The client to connect to the external system."],
|
||
["12", "create", "Create the client using Axios. Can instead use an SDK if the external system has one."],
|
||
["20", "getProductData", "This method retrieves the product's data from the ERP system."],
|
||
["26", "createProduct", "This method creates a product in the ERP system."],
|
||
["32", "deleteProduct", "This method deletes the product in the ERP system."]
|
||
]
|
||
|
||
```ts title="src/modules/erp/service.ts" highlights={serviceHighlights}
|
||
import axios, { AxiosInstance } from "axios"
|
||
import { ProductDTO } from "@medusajs/types"
|
||
|
||
type ErpModuleOptions = {
|
||
apiKey: string
|
||
}
|
||
|
||
class ErpModuleService {
|
||
private client_: AxiosInstance
|
||
|
||
constructor({}, { apiKey }: ErpModuleOptions) {
|
||
this.client_ = axios.create({
|
||
baseURL: `https://api.erp-example.com`,
|
||
headers: {
|
||
Authorization: `Bearer ${apiKey}`,
|
||
},
|
||
})
|
||
}
|
||
|
||
async getProductData(id: string) {
|
||
const { data: erpProduct } = await this.client_.get(`/product/${id}`)
|
||
|
||
return erpProduct
|
||
}
|
||
|
||
async createProduct(data: ProductDTO) {
|
||
const { data: erpProduct } = await this.client_.post(`/product`, data)
|
||
|
||
return erpProduct
|
||
}
|
||
|
||
async deleteProduct(id: string) {
|
||
await this.client_.delete(`/product/${id}`)
|
||
}
|
||
}
|
||
|
||
export default ErpModuleService
|
||
```
|
||
|
||
This creates the module's main service. Few things to note:
|
||
|
||
- The module accepts an `apiKey` option, used to authenticate to the dummy ERP system. The module's main service accesses this option in the second parameter of the constructor.
|
||
- The module uses axios to create a client in the constructor. The client is used in the service's methods when connecting to the ERP system. If the system you're integrating has an SDK, you can initialize it in the constructor, instead.
|
||
- The `getProductData` method retrieves a product's details from the ERP system by sending a `GET` request using the client.
|
||
- The `createProduct` method creates a product in the ERP system by sending a `POST` request using the client.
|
||
- The `deleteProduct` method deletes a product in the ERP system by sending a `DELETE` request using the client.
|
||
|
||
<Note title="Tip">
|
||
|
||
You can store the product's ID in the external system using the `metadata` property of the `Product` data model in the Product Module. Alternatively, you can create a [data model](!docs!/basics/data-models) in your module to store data related to the external system.
|
||
|
||
</Note>
|
||
|
||
Then, create the module's definition file at `src/modules/erp/index.ts` with the following content:
|
||
|
||
```ts title="src/modules/erp/index.ts"
|
||
import ErpModuleService from "./service"
|
||
import { Module } from "@medusajs/utils"
|
||
|
||
export default Module("erp", {
|
||
service: ErpModuleService,
|
||
})
|
||
```
|
||
|
||
Finally, add the module to the `modules` object in `medusa-config.js`:
|
||
|
||
```js title="medusa-config.js" highlights={[["7", "ERP_API_KEY", "The environment variable holding the API key of the ERP system."]]}
|
||
module.exports = defineConfig({
|
||
// ...
|
||
modules: {
|
||
erpModuleService: {
|
||
resolve: "./modules/erp",
|
||
options: {
|
||
apiKey: process.env.ERP_API_KEY,
|
||
},
|
||
},
|
||
},
|
||
})
|
||
```
|
||
|
||
</Details>
|
||
|
||
|
||
---
|
||
|
||
## Build Flows Across Systems
|
||
|
||
With Medusa’s workflows, build flows with steps that perform actions across systems.
|
||
|
||
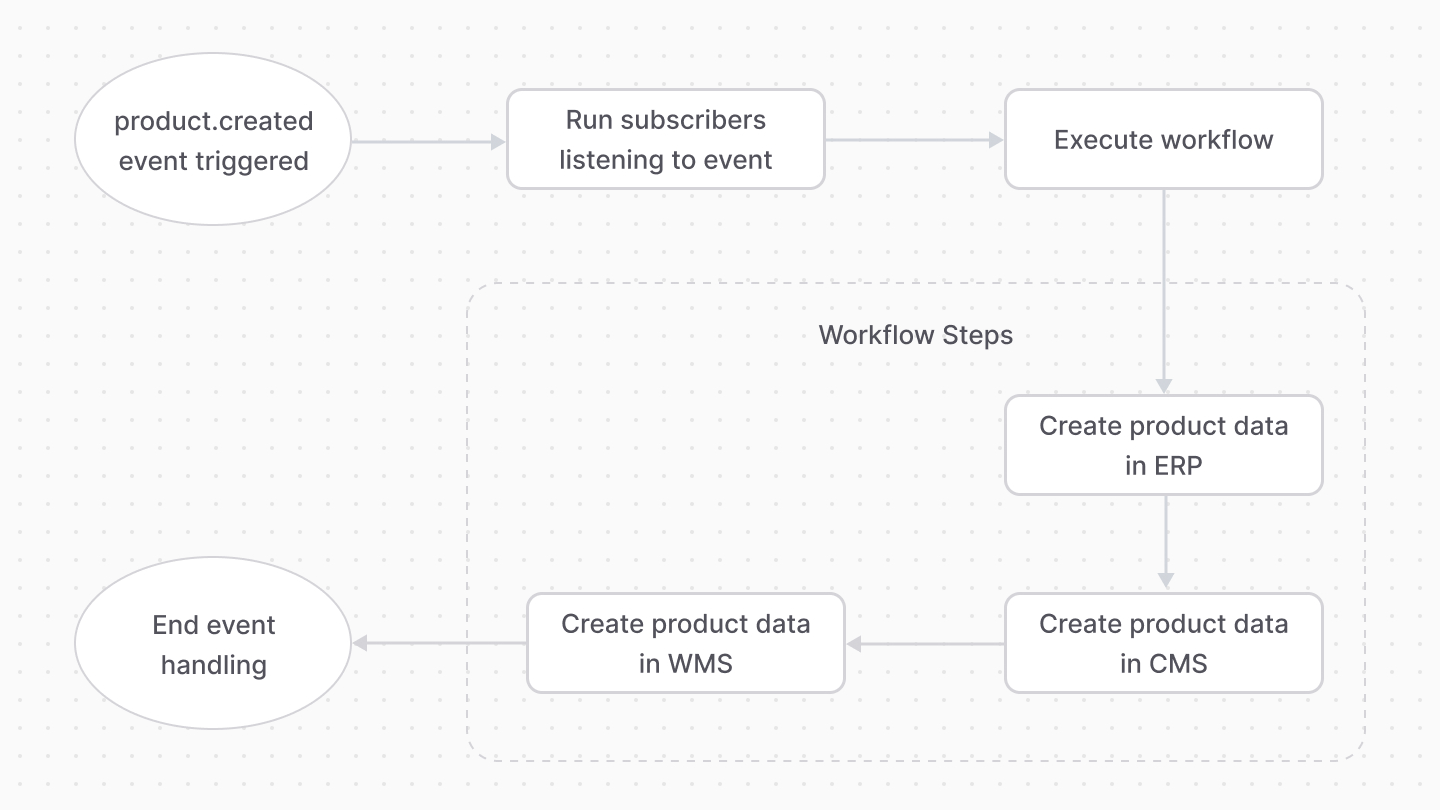
For example, you can create a workflow that creates a product in integrated systems like ERPs, WMSs, and CMSs.
|
||
|
||
Workflows can be executed from anywhere. So, taking the workflow described above, you can listen to the `product.created` event using a subscriber and execute the workflow whenever the event is triggered.
|
||
|
||
|
||
|
||
Workflows guarantee data consistency through their compensation feature. You can provide a compensation function to steps that roll back the actions of that step. Then, if an error occurs in any step, the actions of previous steps are rolled back using their compensation function.
|
||
|
||
<Card
|
||
href="!docs!/basics/workflows"
|
||
title="Workflows"
|
||
text="Learn more about Workflows and how to create them."
|
||
startIcon={<AcademicCapSolid />}
|
||
showLinkIcon={false}
|
||
/>
|
||
|
||
<Details summaryContent="Example: Create products across systems with workflows">
|
||
|
||
For example, create the following workflow in `src/workflows/create-product.ts`:
|
||
|
||
export const workflowHighlights = [
|
||
["18", "createInErpStep", "A step that creates a product in the ERP system."],
|
||
["21", "erpModuleService", "Resolve the ERP Module's main service."],
|
||
["24", "productModuleService", "Resolve the Product Module's main service."],
|
||
["28", "retrieve", "Retrieve the created product's data."],
|
||
["30", "createProduct", "Create the product in the ERP system."],
|
||
["34", "update", "Update the product in Medusa with the ID of the ERP product."],
|
||
["43", "erpId", "Pass the ERP product's ID to the compensation function."],
|
||
["44", "productId", "Pass the product's ID to the compensation function."],
|
||
["46", "", "Define a compensation function that rolls back changes when an error occurs."],
|
||
["53", "deleteProduct", "Undo creating the product in the ERP system by deleting it."],
|
||
["54", "update", "Update the product in Medusa to remove the ERP product's ID."]
|
||
]
|
||
|
||
```ts title="src/workflows/create-product.ts" highlights={workflowHighlights} collapsibleLines="1-9" expandButtonLabel="Show Imports"
|
||
import {
|
||
createStep,
|
||
StepResponse,
|
||
createWorkflow
|
||
} from "@medusajs/workflows-sdk"
|
||
import { IProductModuleService } from "@medusajs/types"
|
||
import { ModuleRegistrationName } from "@medusajs/utils"
|
||
import ErpModuleService from "../modules/erp/service"
|
||
|
||
type WorkflowInput = {
|
||
productId: string
|
||
}
|
||
|
||
type WorkflowOutput = {
|
||
erpProduct: any
|
||
}
|
||
|
||
const createInErpStep = createStep(
|
||
"create-in-erp",
|
||
async ({ productId }: WorkflowInput, { container }) => {
|
||
const erpModuleService: ErpModuleService = container.resolve(
|
||
"erpModuleService"
|
||
)
|
||
const productModuleService: IProductModuleService = container
|
||
.resolve(ModuleRegistrationName.PRODUCT)
|
||
|
||
const createdProductData = await productModuleService
|
||
.retrieveProduct(productId)
|
||
|
||
const erpProduct = await erpModuleService.createProduct(
|
||
createdProductData
|
||
)
|
||
|
||
await productModuleService.updateProducts(productId, {
|
||
metadata: {
|
||
erp_id: erpProduct.id
|
||
}
|
||
})
|
||
|
||
return new StepResponse({
|
||
erpProduct
|
||
}, {
|
||
erpId: erpProduct.id,
|
||
productId
|
||
})
|
||
}, async ({ erpId, productId }, { container}) => {
|
||
const erpModuleService: ErpModuleService = container.resolve(
|
||
"erpModuleService"
|
||
)
|
||
const productModuleService: IProductModuleService = container
|
||
.resolve(ModuleRegistrationName.PRODUCT)
|
||
|
||
await erpModuleService.deleteProduct(erpId)
|
||
await productModuleService.updateProducts(productId, {
|
||
metadata: {}
|
||
})
|
||
})
|
||
|
||
const createProductWorkflow = createWorkflow<
|
||
WorkflowInput, WorkflowOutput
|
||
>("create-product-in-systems", function (input) {
|
||
const erpData = createInErpStep(input)
|
||
|
||
return erpData
|
||
})
|
||
|
||
export default createProductWorkflow
|
||
```
|
||
|
||
This workflow has one step that:
|
||
|
||
- Retrieves the product's data using the Product Module's main service.
|
||
- Create the product in the ERP system using the ERP Module's main service.
|
||
- Updates the product in Medusa by setting the ID of the ERP product in the product's `metadata` property.
|
||
|
||
The step also has a compensation function that rolls back changes when an error occurs. It deletes the product in the ERP system and removes the ID of the ERP product in the Medusa product.
|
||
|
||
Then, create the subscriber at `src/subscribers/create-product.ts`:
|
||
|
||
```ts title="src/subscribers/create-product.ts"
|
||
import type {
|
||
SubscriberConfig,
|
||
SubscriberArgs,
|
||
} from "@medusajs/medusa"
|
||
import createProductWorkflow from "../workflows/create-product"
|
||
|
||
export default async function handleProductUpdate({
|
||
data, container
|
||
}: SubscriberArgs<{id: string}>) {
|
||
createProductWorkflow(container)
|
||
.run({
|
||
input: {
|
||
productId: "data" in data ? data.data.id : data.id
|
||
}
|
||
})
|
||
.then(() => {
|
||
console.log("Created product across systems.")
|
||
})
|
||
}
|
||
|
||
export const config: SubscriberConfig = {
|
||
event: "product.created",
|
||
}
|
||
```
|
||
|
||
The subscriber executes the workflow whenever the `product.created` event is triggered, passing it the ID of the created product.
|
||
|
||
</Details>
|
||
|
||
---
|
||
|
||
## Create Webhook Listeners
|
||
|
||
You can provide webhook listeners that your external systems call when their data is updated. This lets you synchronize data between your systems. To create webhook listeners, create an API route.
|
||
|
||
For example, suppose an administrator changes the product data in the ERP system. The system then sends a request to the webhook you define in your Medusa application, which updates the product data in the application.
|
||
|
||
<Card
|
||
href="!docs!/basics/api-routes"
|
||
title="Create an API Route"
|
||
text="Learn how to create an API Route in Medusa."
|
||
startIcon={<AcademicCapSolid />}
|
||
showLinkIcon={false}
|
||
/>
|
||
|
||
<Details summaryContent="Example: Create a webhook listener for ERP changes">
|
||
|
||
For example, create the file `src/api/webhooks/erp/update/route.ts` with the following content:
|
||
|
||
```ts title="src/api/webhooks/erp/update/route.ts" collapsibleLines="1-12" expandButtonLabel="Show Imports"
|
||
import {
|
||
MedusaRequest,
|
||
MedusaResponse,
|
||
} from "@medusajs/medusa"
|
||
import {
|
||
IProductModuleService,
|
||
UpdateProductDTO
|
||
} from "@medusajs/types"
|
||
import {
|
||
ModuleRegistrationName
|
||
} from "@medusajs/modules-sdk"
|
||
|
||
type WebhookReq = {
|
||
id: string
|
||
updatedData: UpdateProductDTO
|
||
}
|
||
|
||
export async function POST(
|
||
req: MedusaRequest<WebhookReq>,
|
||
res: MedusaResponse
|
||
) {
|
||
const { id, updatedData} = req.body
|
||
|
||
const productService: IProductModuleService = req.scope
|
||
.resolve(
|
||
ModuleRegistrationName.PRODUCT
|
||
)
|
||
|
||
await productService.updateProducts(id, updatedData)
|
||
|
||
res.status(200)
|
||
}
|
||
```
|
||
|
||
This creates a webhook listener for an ERP system. It receives the ID of a product and its updated data, assuming that’s how your ERP system sends the data.
|
||
|
||
Then, create the file `src/api/middlewares.ts` with the following content:
|
||
|
||
```ts title="src/api/middlewares.ts"
|
||
import { MiddlewaresConfig } from "@medusajs/medusa"
|
||
import { raw } from "body-parser"
|
||
|
||
export const config: MiddlewaresConfig = {
|
||
routes: [
|
||
{
|
||
method: ["POST", "PUT"],
|
||
matcher: "/webhooks/*",
|
||
bodyParser: false,
|
||
middlewares: [raw({ type: "application/json" })],
|
||
},
|
||
],
|
||
}
|
||
```
|
||
|
||
This replaces the default JSON middleware with the raw middleware, which is useful for webhook routes.
|
||
|
||
</Details>
|