172 lines
4.2 KiB
Plaintext
172 lines
4.2 KiB
Plaintext
export const metadata = {
|
||
title: `Accept Payment Flow`,
|
||
}
|
||
|
||
# {metadata.title}
|
||
|
||
In this document, you’ll learn how to implement an accept-payment flow using the Payment Module's main service.
|
||
|
||
<Note title="Tip">
|
||
|
||
For a guide on how to implement this flow in the storefront, check out [this guide](../../../storefront-development/checkout/payment/page.mdx).
|
||
|
||
</Note>
|
||
|
||
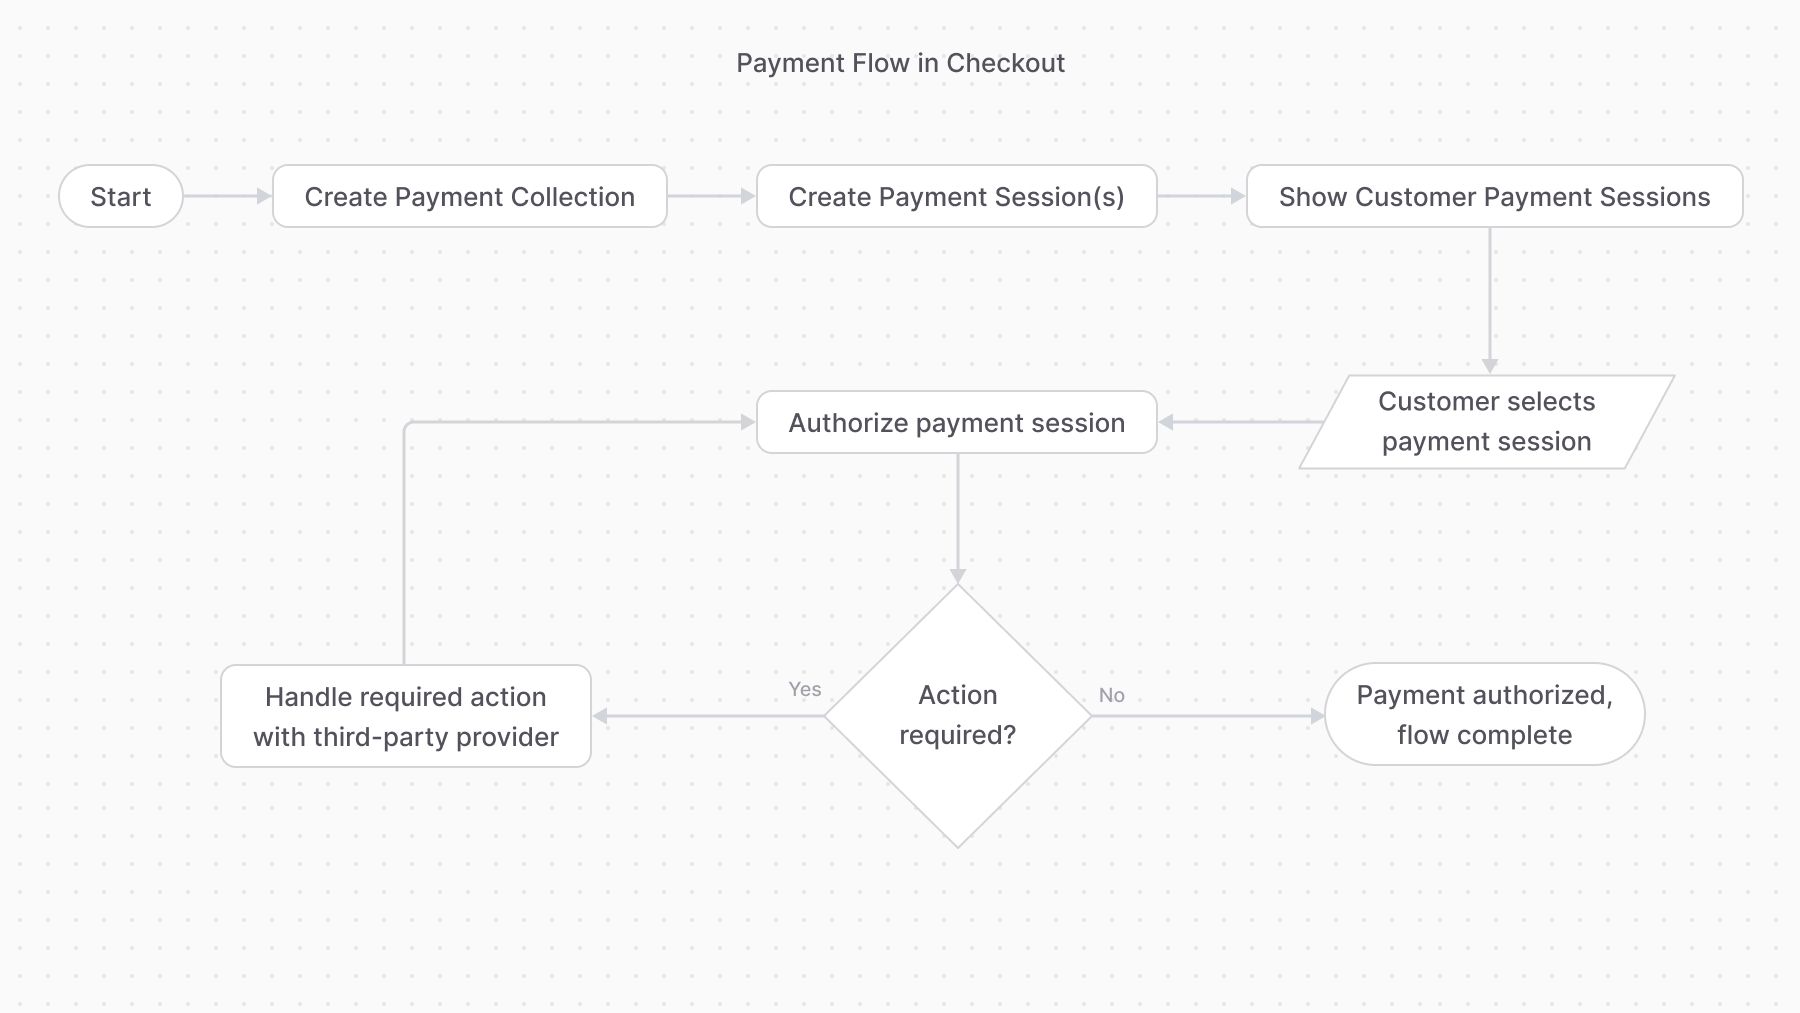
## Flow Overview
|
||
|
||
|
||
|
||
---
|
||
|
||
## 1. Create a Payment Collection
|
||
|
||
A payment collection holds all details related to a resource’s payment operations. So, you start off by creating a payment collection.
|
||
|
||
For example:
|
||
|
||
```ts
|
||
const paymentCollection =
|
||
await paymentModuleService.createPaymentCollections({
|
||
region_id: "reg_123",
|
||
currency_code: "usd",
|
||
amount: 5000,
|
||
})
|
||
```
|
||
|
||
<Note title="Tip">
|
||
|
||
Learn more about the `createPaymentCollections` method in [this reference](/references/payment/createPaymentCollections).
|
||
|
||
</Note>
|
||
|
||
Then, create a link between the payment collection and the resource it's storing payment details for, such as a cart in the Cart Module:
|
||
|
||
```ts
|
||
import {
|
||
ContainerRegistrationKeys,
|
||
Modules
|
||
} from "@medusajs/framework/utils"
|
||
|
||
// ...
|
||
|
||
// resolve the remote link
|
||
const remoteLink = container.resolve(
|
||
ContainerRegistrationKeys
|
||
)
|
||
|
||
remoteLink.create({
|
||
[Modules.CART]: {
|
||
cart_id: "cart_123"
|
||
},
|
||
[Modules.PAYMENT]: {
|
||
payment_collection_id: paymentCollection.id
|
||
}
|
||
})
|
||
```
|
||
|
||
<Note title="Tip">
|
||
|
||
Learn more about the remote link in [this documentation](!docs!/advanced-development/module-links/remote-link).
|
||
|
||
</Note>
|
||
|
||
---
|
||
|
||
## 2. Create Payment Sessions
|
||
|
||
The payment collection has one or more payment sessions, each being a payment amount to be authorized by a payment provider.
|
||
|
||
So, after creating the payment collection, create at least one payment session for a provider.
|
||
|
||
For example:
|
||
|
||
```ts
|
||
const paymentSession =
|
||
await paymentModuleService.createPaymentSession(
|
||
paymentCollection.id,
|
||
{
|
||
provider_id: "stripe",
|
||
currency_code: "usd",
|
||
amount: 5000,
|
||
data: {
|
||
// any necessary data for the
|
||
// payment provider
|
||
},
|
||
}
|
||
)
|
||
```
|
||
|
||
<Note>
|
||
|
||
Learn more about the `createPaymentSession` method in [this reference](/references/payment/createPaymentSession).
|
||
|
||
</Note>
|
||
|
||
---
|
||
|
||
## 3. Authorize Payment Session
|
||
|
||
Once the customer chooses a payment session, start the authorization process. This may involve some action performed by the third-party payment provider, such as entering a 3DS code.
|
||
|
||
For example:
|
||
|
||
```ts
|
||
const payment =
|
||
await paymentModuleService.authorizePaymentSession(
|
||
paymentSession.id,
|
||
{}
|
||
)
|
||
```
|
||
|
||
When the payment authorization is successful, a payment is created and returned.
|
||
|
||
<Note>
|
||
|
||
Learn more about the `authorizePaymentSession` method in [this reference](/references/payment/authorizePaymentSession).
|
||
|
||
</Note>
|
||
|
||
### Handling Additional Action
|
||
|
||
If the payment authorization isn’t successful, whether because it requires additional action or for another reason, the method updates the payment session with the new status and throws an error.
|
||
|
||
In that case, you can catch that error and, if the session's `status` property is `requires_more`, handle the additional action, then retry the authorization.
|
||
|
||
For example:
|
||
|
||
```ts
|
||
try {
|
||
const payment =
|
||
await paymentModuleService.authorizePaymentSession(
|
||
paymentSession.id,
|
||
{}
|
||
)
|
||
} catch (e) {
|
||
// retrieve the payment session again
|
||
const updatedPaymentSession = (
|
||
await paymentModuleService.listPaymentSessions({
|
||
id: [paymentSession.id],
|
||
})
|
||
)[0]
|
||
|
||
if (updatedPaymentSession.status === "requires_more") {
|
||
// TODO perform required action
|
||
// TODO authorize payment again.
|
||
}
|
||
}
|
||
```
|
||
|
||
---
|
||
|
||
## 4. Payment Flow Complete
|
||
|
||
The payment flow is complete once the payment session is authorized and the payment is created.
|
||
|
||
You can then use the payment to capture the amount using the [capturePayment method](/references/payment/capturePayment). You can also refund captured amounts using the [refundPayment method](/references/payment/refundPayment).
|
||
|
||
<Note>
|
||
|
||
Some payment providers allow capturing the payment automatically once it’s authorized. In that case, you don’t need to do it manually.
|
||
|
||
</Note>
|