* initial

* initial

* update tests

* remove unused import

* allow passing with no tests

* vale fixes
162 lines
6.2 KiB
Plaintext
162 lines
6.2 KiB
Plaintext
export const metadata = {
|
|
title: `${pageNumber} Build Medusa Application`,
|
|
}
|
|
|
|
# {metadata.title}
|
|
|
|
In this chapter, you'll learn how to create a production build of your Medusa application for deployment to a hosting provider.
|
|
|
|
The next chapter explains how to deploy your Medusa application.
|
|
|
|
<Note title="Deploy with Cloud" type="success">
|
|
|
|
The below instructions are useful for self-hosting your Medusa application. You can also use [Cloud](!cloud!) to deploy and manage your Medusa application without worrying about infrastructure. Medusa will handle the configurations, deployment, and scaling for you.
|
|
|
|
</Note>
|
|
|
|
## build Command
|
|
|
|
The Medusa CLI tool provides a [build](!resources!/medusa-cli/commands/build) command that creates a standalone build of the Medusa application that:
|
|
|
|
- Doesn't rely on the source TypeScript files.
|
|
- Can be copied to a production server reliably.
|
|
|
|
So, to create the production build, run the following command in the root of your Medusa application:
|
|
|
|
```bash
|
|
npx medusa build
|
|
```
|
|
|
|
The command will create a `.medusa/server` directory in the root of your project that contains your build assets. The next sections explain how to use the build output.
|
|
|
|
---
|
|
|
|
## Start Built Medusa Application
|
|
|
|
To start the Medusa application after running the `build` command:
|
|
|
|
<Note>
|
|
|
|
You need to run these steps every time you run the `build` command, since the `.medusa/server` directory is recreated each time.
|
|
|
|
</Note>
|
|
|
|
1. Change to the `.medusa/server` directory and install the dependencies:
|
|
|
|
```bash npm2yarn
|
|
cd .medusa/server && npm install
|
|
```
|
|
|
|
2. When running the application locally, make sure to copy the `.env` file from the root project's directory. In production, use system environment variables instead.
|
|
|
|
```bash title=".medusa/server"
|
|
cp ../../.env .env.production
|
|
```
|
|
|
|
<Note>
|
|
|
|
When `NODE_ENV=production`, the Medusa application loads the environment variables from `.env.production`. Learn more in the [environment variables guide](../fundamentals/environment-variables/page.mdx).
|
|
|
|
</Note>
|
|
|
|
3. Set `NODE_ENV` to `production` in the system environment variable:
|
|
|
|
```bash title=".medusa/server"
|
|
export NODE_ENV=production
|
|
```
|
|
|
|
4. Start the Medusa application from `.medusa/server`:
|
|
|
|
```bash npm2yarn title=".medusa/server"
|
|
npm run start
|
|
```
|
|
|
|
### Authentication Locally in Production Build
|
|
|
|
When the Medusa application is started in production (`NODE_ENV=production`) or staging mode, cookie settings are stricter. Cookie authentication only works if the client application is served from the same domain as the Medusa server, and the domain is not `localhost` or part of the [public suffix list](https://publicsuffix.org/).
|
|
|
|
So if you try to access the Medusa Admin locally in production mode, you won't be able to log in.
|
|
|
|
To access the Medusa Admin locally in production mode, set the `projectConfig.cookieOptions` in your `medusa-config.ts` file to be less strict. For example:
|
|
|
|
```ts title="medusa-config.ts"
|
|
module.exports = defineConfig({
|
|
projectConfig: {
|
|
// ...
|
|
cookieOptions: {
|
|
sameSite: "lax",
|
|
secure: false,
|
|
},
|
|
},
|
|
})
|
|
```
|
|
|
|
In this example, you set `sameSite` to `lax` and `secure` to `false`, which allows cookies to be sent over non-secure connections and from different domains.
|
|
|
|
Then rebuild the Medusa application and start it again as described in the [steps above](#start-built-medusa-application). You can now access the Medusa Admin locally in production mode.
|
|
|
|
<Note type="warning">
|
|
|
|
Make sure to remove the `projectConfig.cookieOptions` configuration once you're done testing locally, as it's not secure for production environments.
|
|
|
|
</Note>
|
|
|
|
---
|
|
|
|
## Build Output
|
|
|
|
The `build` command creates a `.medusa/server` directory in the root of your project that contains your build assets. Do not commit this directory to your repository. This directory should be generated as part of your deployment process.
|
|
|
|
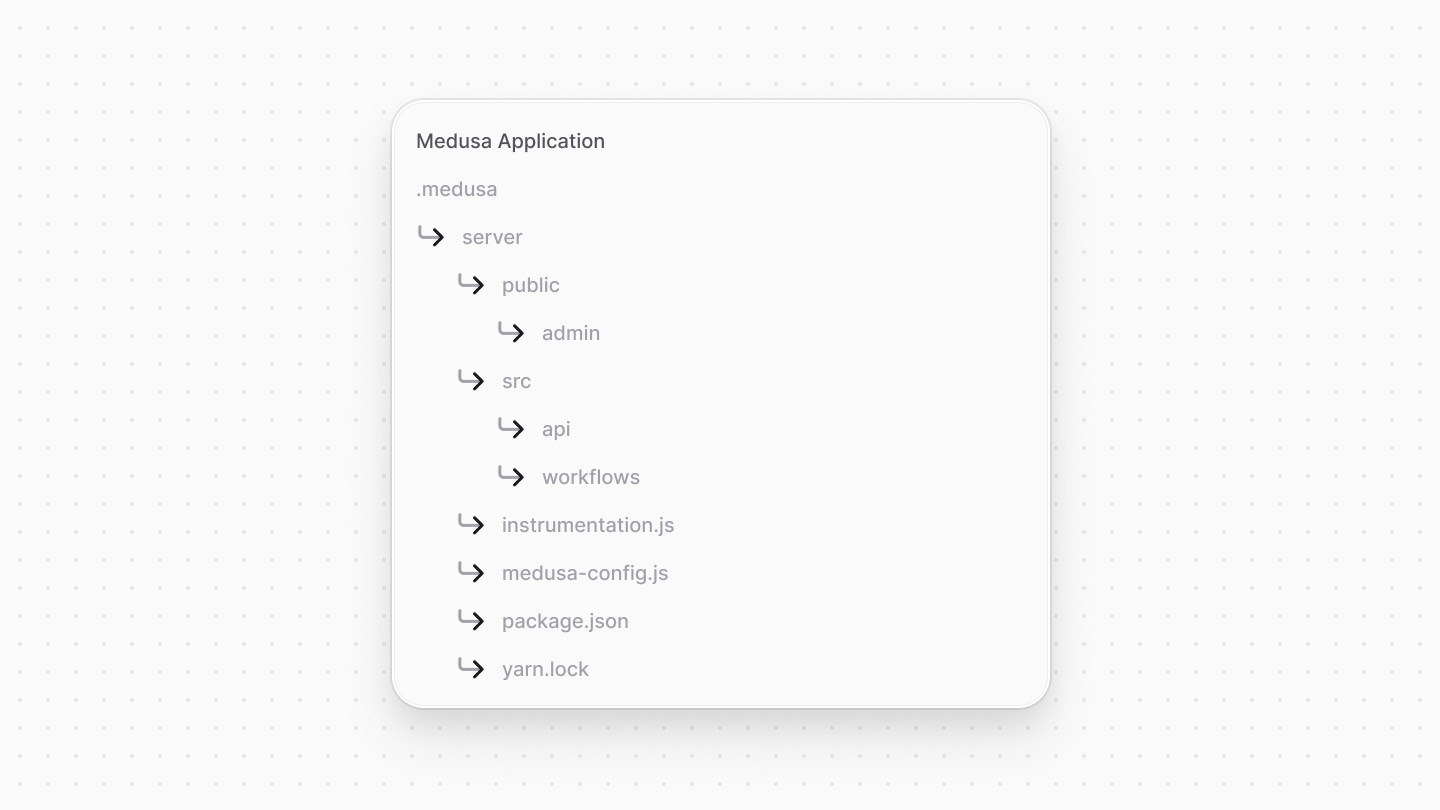
The `.medusa/server` directory contains the following:
|
|
|
|
|
|
|
|
- `public/admin`: Contains the production build of the admin dashboard. The `public` directory is publicly accessible.
|
|
- `src`: Contains the compiled JavaScript files of your `src` directory.
|
|
- `instrumentation.js`: The compiled [instrumentation configuration file](../debugging-and-testing/instrumentation/page.mdx), if you have one.
|
|
- `medusa-config.js`: The compiled Medusa configuration file.
|
|
- `package.json` and a lock file: The dependencies required to run the Medusa application in production.
|
|
|
|
### Built Assets
|
|
|
|
The `build` command compiles and copies `.{ts,js,tsx,jsx}` files in your project, such as those in the root directory and in the `src` directory.
|
|
|
|
If you have other assets, such as JSON files or fonts, that you need in your Medusa backend at runtime, you need to copy them to the `.medusa/server` directory as part of your build process.
|
|
|
|
For example, consider you have a `src/data` directory that contains JSON files needed at runtime. You can add a `postbuild` script to your `package.json` file to copy this directory after the build process:
|
|
|
|
```json title="package.json"
|
|
{
|
|
"scripts": {
|
|
"postbuild": "cp -r src/data .medusa/server/src/data",
|
|
"build": "medusa build && npm run postbuild"
|
|
}
|
|
}
|
|
```
|
|
|
|
This script copies the `src/data` directory to the `.medusa/server` directory after the build process.
|
|
|
|
<Note type="warning">
|
|
|
|
Do not expose sensitive files in your deployments, especially in the `.medusa/server/public` directory, as they will be publicly accessible. Sensitive files include those containing API keys, database credentials, or any other confidential information.
|
|
|
|
</Note>
|
|
|
|
### Customize Admin Build
|
|
|
|
The admin dashboard is built with [Vite](!https://vitejs.dev/). If you need to customize the build process to include additional static assets, you can modify the Vite configuration with the [admin.vite](../configurations/medusa-config/page.mdx) option in your `medusa-config.ts` file.
|
|
|
|
### Separate Admin Build
|
|
|
|
The `build` command accepts a `--admin-only` option that outputs the admin to the `.medusa/admin` directory. This is useful when deploying the admin dashboard separately, such as on Vercel:
|
|
|
|
```bash
|
|
npx medusa build --admin-only
|
|
```
|
|
|
|
---
|
|
|
|
## Deploying Production Build
|
|
|
|
The next chapter covers how to deploy the production build.
|