* docs: added guide on sending invite user emails + updates to reset password guide

* fix vale error
453 lines
15 KiB
Plaintext
453 lines
15 KiB
Plaintext
---
|
|
sidebar_label: "Invite User Email"
|
|
tags:
|
|
- server
|
|
- how to
|
|
- notification
|
|
---
|
|
|
|
export const metadata = {
|
|
title: `Send Invite User Email Notification`,
|
|
}
|
|
|
|
# {metadata.title}
|
|
|
|
In this guide, you'll learn how to handle the `invite.created` and `invite.resent` events to send an invite email (or other notification type) to the user.
|
|
|
|
<Note title="Looking for no-code docs?">
|
|
|
|
Refer to the [Manage Invites](!user-guide!/settings/users/invites) user guide to learn how to manage invites using the Medusa Admin.
|
|
|
|
</Note>
|
|
|
|
## User Invite Flow Overview
|
|
|
|
|
|
|
|
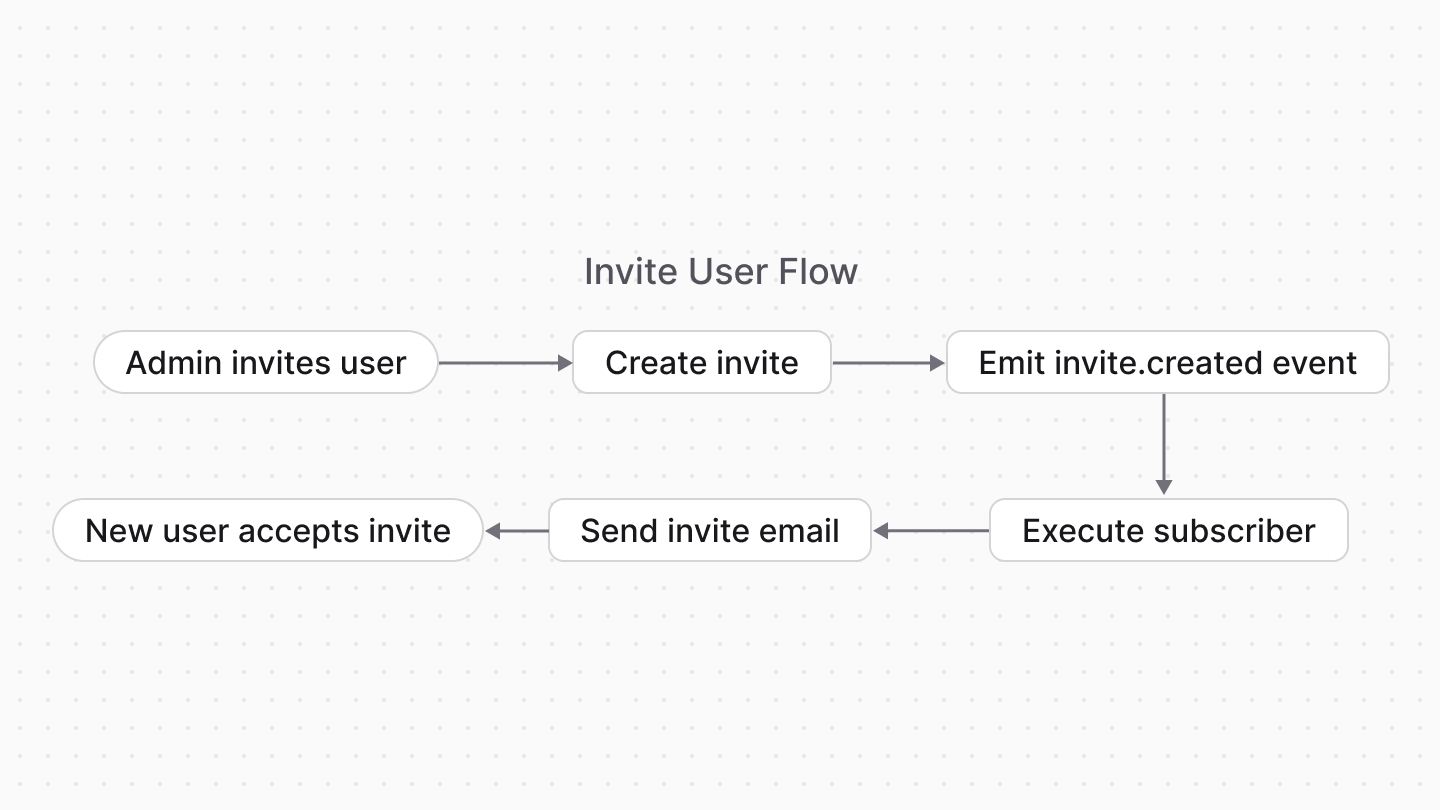
Admin users can add new users to their store by sending them an invite. The flow for inviting users is as follows:
|
|
|
|
1. An admin user invites a user either through the [Medusa Admin](!user-guide!/settings/users/invites) or using the [Create Invite API route](!api!/admin#invites_postinvites).
|
|
2. The invite is created and the `invite.created` event is emitted.
|
|
- At this point, you can handle the event to send an email or notification to the user.
|
|
3. The invited user receives the invite and can accept it, which creates a new user.
|
|
- The invited user can accept the invite either through the Medusa Admin or using the [Accept Invite API route](!api!/admin#invites_postinvitesaccept).
|
|
|
|
The admin user can also resend the invite if the invited user doesn't receive the invite or doesn't accept it before expiry, which emits the `invite.resent` event.
|
|
|
|
In this guide, you'll implement a subscriber that handles the `invite.created` and `invite.resent` events to send an email to the user.
|
|
|
|
After adding the subscriber, you will have a complete user invite flow that you can utilize either through the Medusa Admin or using the Admin APIs.
|
|
|
|
---
|
|
|
|
## Prerequisites: Notification Module Provider
|
|
|
|
To send an email or notification to the user, you must have a Notification Module Provider set up.
|
|
|
|
Medusa provides providers like [SendGrid](../../../infrastructure-modules/notification/sendgrid/page.mdx) and [Resend](../../../integrations/guides/resend/page.mdx), and you can also [create your own custom provider](/references/notification-provider-module).
|
|
|
|
Refer to the [Notification Module](../../../infrastructure-modules/notification/page.mdx#what-is-a-notification-module-provider) documentation for a list of available providers and how to set them up.
|
|
|
|
### Testing with the Local Notification Module Provider
|
|
|
|
For testing purposes, you can use the [Local Notification Module Provider](../../../infrastructure-modules/notification/local/page.mdx) by adding this to your `medusa-config.ts`:
|
|
|
|
```ts title="medusa-config.ts"
|
|
module.exports = defineConfig({
|
|
// ...
|
|
modules: [
|
|
{
|
|
resolve: "@medusajs/medusa/notification",
|
|
options: {
|
|
providers: [
|
|
// ...
|
|
{
|
|
resolve: "@medusajs/medusa/notification-local",
|
|
id: "local",
|
|
options: {
|
|
channels: ["email"],
|
|
},
|
|
},
|
|
],
|
|
},
|
|
},
|
|
],
|
|
})
|
|
```
|
|
|
|
The Local provider logs email details to your terminal instead of sending actual emails, which is useful for development and testing.
|
|
|
|
---
|
|
|
|
## Create the Invite User Subscriber
|
|
|
|
To create a [subscriber](!docs!/learn/fundamentals/events-and-subscribers) that handles the `invite.created` and `invite.resent` events, create the file `src/subscribers/user-invited.ts` with the following content:
|
|
|
|
export const highlights = [
|
|
["15", "invite", "Retrieve the invite's details."],
|
|
["26", "backend_url", "Construct the backend URL."],
|
|
["28", "adminPath", "Get the admin path from the config."],
|
|
["30", "createNotifications", "Send the notification to the user."],
|
|
["34", "channel", "Use the Notification Module Provider configured for the email channel."],
|
|
["35", "data", "Pass the invite URL to the notification template."],
|
|
["42", "event", "Subscribe to the invite events."]
|
|
]
|
|
|
|
```ts title="src/subscribers/user-invited.ts" highlights={highlights}
|
|
import { SubscriberArgs, type SubscriberConfig } from "@medusajs/framework"
|
|
|
|
export default async function inviteCreatedHandler({
|
|
event: { data },
|
|
container,
|
|
}: SubscriberArgs<{
|
|
id: string
|
|
}>) {
|
|
const query = container.resolve("query")
|
|
const notificationModuleService = container.resolve(
|
|
"notification"
|
|
)
|
|
const config = container.resolve("configModule")
|
|
|
|
const { data: [invite] } = await query.graph({
|
|
entity: "invite",
|
|
fields: [
|
|
"email",
|
|
"token",
|
|
],
|
|
filters: {
|
|
id: data.id,
|
|
},
|
|
})
|
|
|
|
const backend_url = config.admin.backendUrl !== "/" ? config.admin.backendUrl :
|
|
"http://localhost:9000"
|
|
const adminPath = config.admin.path
|
|
|
|
await notificationModuleService.createNotifications({
|
|
to: invite.email,
|
|
// TODO replace with template ID in notification provider
|
|
template: "user-invited",
|
|
channel: "email",
|
|
data: {
|
|
invite_url: `${backend_url}${adminPath}/invite?token=${invite.token}`,
|
|
},
|
|
})
|
|
}
|
|
|
|
export const config: SubscriberConfig = {
|
|
event: [
|
|
"invite.created",
|
|
"invite.resent",
|
|
],
|
|
}
|
|
```
|
|
|
|
The subscriber receives the ID of the invite in the event payload. You resolve [Query](!docs!/learn/fundamentals/module-links/query) to fetch the invite details, including the email and token.
|
|
|
|
### Invite URL
|
|
|
|
You then use the Notification Module's service to send an email to the user with the invite link. The invite link is constructed using:
|
|
|
|
1. The backend URL of the Medusa application, since the Medusa Admin is hosted on the same URL.
|
|
2. The admin path, which is the path to the Medusa Admin (for example, `/app`).
|
|
|
|
Note that the Medusa Admin has an invite form at `/invite?token=`, which accepts the invite token as a query parameter.
|
|
|
|
### Notification Configurations
|
|
|
|
For the notification, you can configure the following fields:
|
|
|
|
- `template`: The template ID of the email to send. This ID depends on the Notification Module provider you use. For example, if you use SendGrid, this would be the ID of the SendGrid template.
|
|
- Refer to the [Example Notification Templates](#example-notification-templates) section below for examples of notification templates to use.
|
|
- `channel`: The channel to send the notification through. In this case, it's set to `email`.
|
|
- `data`: The data to pass to the notification template. You can add additional fields as needed, such as the invited user's email.
|
|
|
|
### Test It Out
|
|
|
|
After you set up the Notification Module Provider, create a template in the provider, and create the subscriber, you can test the full invite flow.
|
|
|
|
Start the Medusa application with the following command:
|
|
|
|
```bash npm2yarn
|
|
npm run dev
|
|
```
|
|
|
|
Then, open the Medusa Admin (locally at `http://localhost:9000/app`) and go to Settings → Users. Create an invite as explained in the [Manage Invites](!user-guide!/settings/users/invites) user guide.
|
|
|
|
Once you create the invite, you should see that the `invite.created` event is emitted in the server's logs:
|
|
|
|
```bash
|
|
info: Processing invite.created which has 1 subscribers
|
|
```
|
|
|
|
If you're using an email Notification Module Provider, check the recipient's email inbox for the invite email with the link to accept the invite.
|
|
|
|
If you're using the Local provider, check your terminal for the logged email details.
|
|
|
|
---
|
|
|
|
## Example Notification Templates
|
|
|
|
The following section provides example notification templates for some Notification Module Providers.
|
|
|
|
### SendGrid
|
|
|
|
<Note>
|
|
|
|
Refer to the [SendGrid Notification Module Provider](../../../infrastructure-modules/notification/sendgrid/page.mdx) documentation for more details on how to set up SendGrid.
|
|
|
|
</Note>
|
|
|
|
The following HTML template can be used with SendGrid to send an invite email:
|
|
|
|
```html
|
|
<!DOCTYPE html>
|
|
<html>
|
|
<head>
|
|
<meta charset="utf-8">
|
|
<meta name="viewport" content="width=device-width, initial-scale=1.0">
|
|
<title>You're Invited!</title>
|
|
<style>
|
|
body {
|
|
font-family: -apple-system, BlinkMacSystemFont, 'Segoe UI', 'Roboto', 'Oxygen', 'Ubuntu', 'Cantarell', 'Fira Sans', 'Droid Sans', 'Helvetica Neue', sans-serif;
|
|
background-color: #ffffff;
|
|
margin: 0;
|
|
padding: 20px;
|
|
}
|
|
.container {
|
|
max-width: 465px;
|
|
margin: 40px auto;
|
|
border: 1px solid #eaeaea;
|
|
border-radius: 5px;
|
|
padding: 20px;
|
|
}
|
|
.header {
|
|
text-align: center;
|
|
margin: 30px 0;
|
|
}
|
|
.title {
|
|
color: #000000;
|
|
font-size: 24px;
|
|
font-weight: normal;
|
|
margin: 0;
|
|
}
|
|
.content {
|
|
margin: 32px 0;
|
|
}
|
|
.text {
|
|
color: #000000;
|
|
font-size: 14px;
|
|
line-height: 24px;
|
|
margin: 0 0 16px 0;
|
|
}
|
|
.button-container {
|
|
text-align: center;
|
|
margin: 32px 0;
|
|
}
|
|
.invite-button {
|
|
background-color: #000000;
|
|
border-radius: 3px;
|
|
color: #ffffff;
|
|
font-size: 12px;
|
|
font-weight: 600;
|
|
text-decoration: none;
|
|
text-align: center;
|
|
padding: 12px 20px;
|
|
display: inline-block;
|
|
}
|
|
.invite-button:hover {
|
|
background-color: #333333;
|
|
}
|
|
.url-section {
|
|
margin: 32px 0;
|
|
}
|
|
.url-link {
|
|
color: #2563eb;
|
|
text-decoration: none;
|
|
font-size: 14px;
|
|
line-height: 24px;
|
|
word-break: break-all;
|
|
}
|
|
.footer {
|
|
margin-top: 32px;
|
|
}
|
|
.footer-text {
|
|
color: #666666;
|
|
font-size: 12px;
|
|
line-height: 24px;
|
|
margin: 0;
|
|
}
|
|
</style>
|
|
</head>
|
|
<body>
|
|
<div class="container">
|
|
<div class="header">
|
|
<h1 class="title">You're Invited!</h1>
|
|
</div>
|
|
|
|
<div class="content">
|
|
<p class="text">
|
|
Hello{{#if email}} {{email}}{{/if}},
|
|
</p>
|
|
<p class="text">
|
|
You've been invited to join our platform. Click the button below to accept your invitation and set up your account.
|
|
</p>
|
|
</div>
|
|
|
|
<div class="button-container">
|
|
<a href="{{invite_url}}" class="invite-button">
|
|
Accept Invitation
|
|
</a>
|
|
</div>
|
|
|
|
<div class="url-section">
|
|
<p class="text">
|
|
Or copy and paste this URL into your browser:
|
|
</p>
|
|
<a href="{{invite_url}}" class="url-link">
|
|
{{invite_url}}
|
|
</a>
|
|
</div>
|
|
|
|
<div class="footer">
|
|
<p class="footer-text">
|
|
If you weren't expecting this invitation, you can ignore this email.
|
|
</p>
|
|
</div>
|
|
</div>
|
|
</body>
|
|
</html>
|
|
```
|
|
|
|
Make sure to pass the `invite_url` variable to the template, which contains the URL to accept the invite.
|
|
|
|
You can also customize the template further to show other information, such as the user's email.
|
|
|
|
### Resend
|
|
|
|
If you've integrated Resend as explained in the [Resend Integration Guide](../../../integrations/guides/resend/page.mdx), you can add a new template for user invites at `src/modules/resend/emails/user-invited.tsx`:
|
|
|
|
```tsx title="src/modules/resend/emails/user-invited.tsx"
|
|
import {
|
|
Text,
|
|
Container,
|
|
Heading,
|
|
Html,
|
|
Section,
|
|
Tailwind,
|
|
Head,
|
|
Preview,
|
|
Body,
|
|
Link,
|
|
Button,
|
|
} from "@react-email/components"
|
|
|
|
type UserInvitedEmailProps = {
|
|
invite_url: string
|
|
email?: string
|
|
}
|
|
|
|
function UserInvitedEmailComponent({ invite_url, email }: UserInvitedEmailProps) {
|
|
return (
|
|
<Html>
|
|
<Head />
|
|
<Preview>You've been invited to join our platform</Preview>
|
|
<Tailwind>
|
|
<Body className="bg-white my-auto mx-auto font-sans px-2">
|
|
<Container className="border border-solid border-[#eaeaea] rounded my-[40px] mx-auto p-[20px] max-w-[465px]">
|
|
<Section className="mt-[32px]">
|
|
<Heading className="text-black text-[24px] font-normal text-center p-0 my-[30px] mx-0">
|
|
You're Invited!
|
|
</Heading>
|
|
</Section>
|
|
|
|
<Section className="my-[32px]">
|
|
<Text className="text-black text-[14px] leading-[24px]">
|
|
Hello{email ? ` ${email}` : ""},
|
|
</Text>
|
|
<Text className="text-black text-[14px] leading-[24px]">
|
|
You've been invited to join our platform. Click the button below to accept your invitation and set up your account.
|
|
</Text>
|
|
</Section>
|
|
|
|
<Section className="text-center mt-[32px] mb-[32px]">
|
|
<Button
|
|
className="bg-[#000000] rounded text-white text-[12px] font-semibold no-underline text-center px-5 py-3"
|
|
href={invite_url}
|
|
>
|
|
Accept Invitation
|
|
</Button>
|
|
</Section>
|
|
|
|
<Section className="my-[32px]">
|
|
<Text className="text-black text-[14px] leading-[24px]">
|
|
Or copy and paste this URL into your browser:
|
|
</Text>
|
|
<Link
|
|
href={invite_url}
|
|
className="text-blue-600 no-underline text-[14px] leading-[24px] break-all"
|
|
>
|
|
{invite_url}
|
|
</Link>
|
|
</Section>
|
|
|
|
<Section className="mt-[32px]">
|
|
<Text className="text-[#666666] text-[12px] leading-[24px]">
|
|
If you weren't expecting this invitation, you can ignore this email.
|
|
</Text>
|
|
</Section>
|
|
</Container>
|
|
</Body>
|
|
</Tailwind>
|
|
</Html>
|
|
)
|
|
}
|
|
|
|
export const userInvitedEmail = (props: UserInvitedEmailProps) => (
|
|
<UserInvitedEmailComponent {...props} />
|
|
)
|
|
|
|
// Mock data for preview/development
|
|
const mockInvite: UserInvitedEmailProps = {
|
|
invite_url: "https://your-app.com/app/invite/sample-token-123",
|
|
email: "user@example.com",
|
|
}
|
|
|
|
export default () => <UserInvitedEmailComponent {...mockInvite} />
|
|
```
|
|
|
|
Feel free to customize the email template further to match your branding and style, or to add additional information such as the user's email.
|
|
|
|
Then, in the Resend Module's service at `src/modules/resend/service.ts`, add the new template to the `templates` object and `Templates` type:
|
|
|
|
```ts title="src/modules/resend/service.ts"
|
|
// other imports...
|
|
import { userInvitedEmail } from "./emails/user-invited"
|
|
|
|
enum Templates {
|
|
// ...
|
|
USER_INVITED = "user-invited",
|
|
}
|
|
|
|
const templates: {[key in Templates]?: (props: unknown) => React.ReactNode} = {
|
|
// ...
|
|
[Templates.USER_INVITED]: userInvitedEmail,
|
|
}
|
|
```
|
|
|
|
Finally, find the `getTemplateSubject` function in the `ResendNotificationProviderService` and add a case for the `USER_INVITED` template:
|
|
|
|
```ts title="src/modules/resend/service.ts"
|
|
class ResendNotificationProviderService extends AbstractNotificationProviderService {
|
|
// ...
|
|
|
|
private getTemplateSubject(template: Templates) {
|
|
// ...
|
|
switch (template) {
|
|
// ...
|
|
case Templates.USER_INVITED:
|
|
return "You've been invited to join our platform"
|
|
}
|
|
}
|
|
}
|
|
``` |