735 lines
30 KiB
Plaintext
735 lines
30 KiB
Plaintext
---
|
|
sidebar_label: "Integrate Slack"
|
|
tags:
|
|
- server
|
|
- tutorial
|
|
- notification
|
|
products:
|
|
- order
|
|
---
|
|
|
|
import { Card, Prerequisites, Details, WorkflowDiagram } from "docs-ui"
|
|
import { Github, PlaySolid } from "@medusajs/icons"
|
|
|
|
export const metadata = {
|
|
title: `Integrate Slack (Notification) with Medusa`,
|
|
}
|
|
|
|
# {metadata.title}
|
|
|
|
In this tutorial, you'll learn how to integrate Slack with Medusa to receive notifications about created orders.
|
|
|
|
When you install a Medusa application, you get a fully-fledged commerce platform with a Framework for customization. Medusa's architecture facilitates integrating third-party services to customize Medusa's infrastructure for your business needs.
|
|
|
|
Medusa's [Notification Module](../../../infrastructure-modules/notification/page.mdx) allows you to customize Medusa's infrastructure to send notifications using the third-party provider that fits your business needs, such as [Slack](https://slack.com/).
|
|
|
|
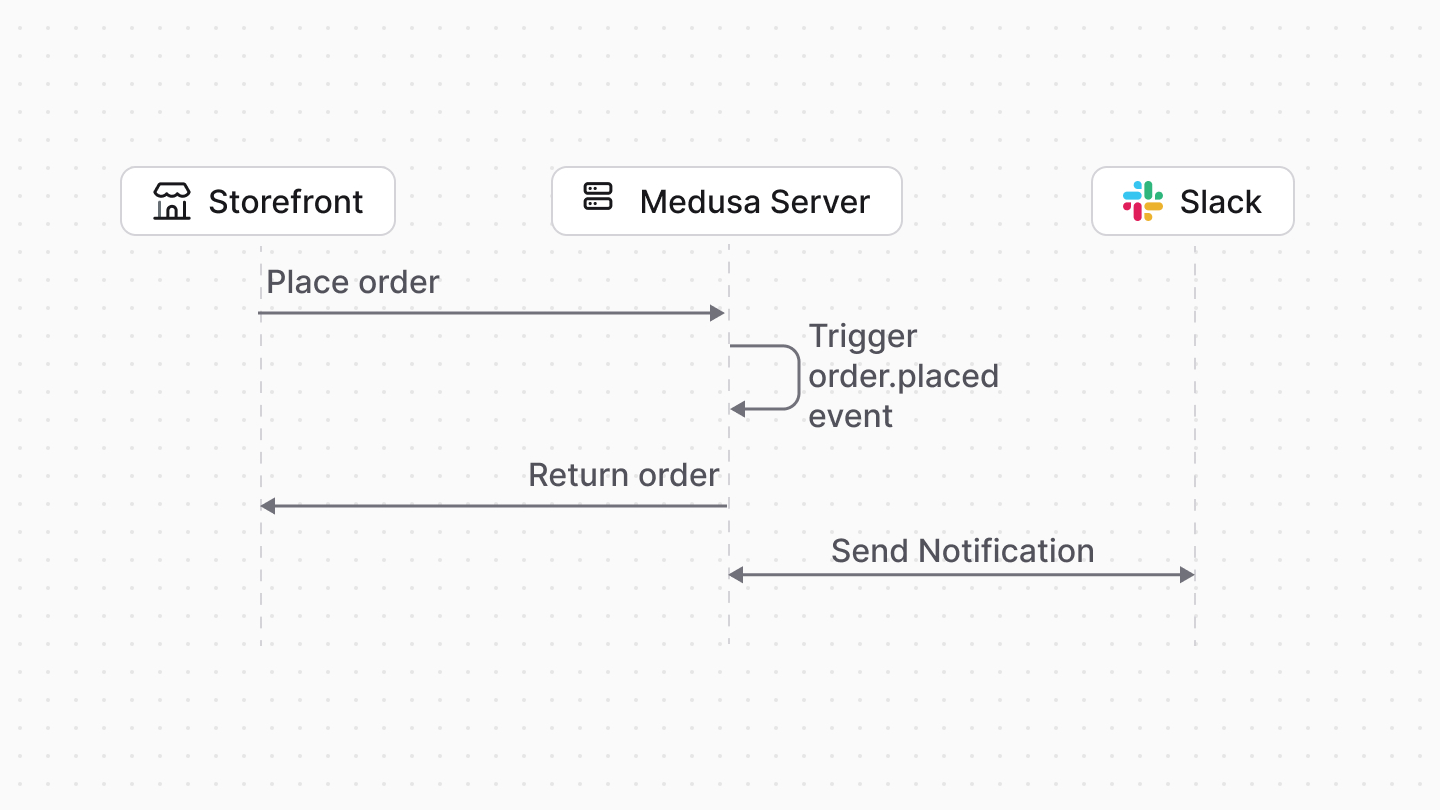
In this tutorial, you'll integrate Slack with Medusa to receive notifications about created orders.
|
|
|
|
## Summary
|
|
|
|
By following this tutorial, you'll learn how to:
|
|
|
|
- Install and set up Medusa.
|
|
- Integrate Slack with Medusa.
|
|
- Handle Medusa's `order.placed` event to send notifications to Slack.
|
|
|
|
You can follow this tutorial whether you're new to Medusa or an advanced Medusa developer.
|
|
|
|
|
|
|
|
<Card
|
|
title="Example Repository"
|
|
text="Find the full code of the guide in this repository."
|
|
href="https://github.com/medusajs/examples/tree/main/slack-integration"
|
|
icon={Github}
|
|
/>
|
|
|
|
---
|
|
|
|
## Step 1: Install a Medusa Application
|
|
|
|
<Prerequisites items={[
|
|
{
|
|
text: "Node.js v20+",
|
|
link: "https://nodejs.org/en/download"
|
|
},
|
|
{
|
|
text: "Git CLI tool",
|
|
link: "https://git-scm.com/downloads"
|
|
},
|
|
{
|
|
text: "PostgreSQL",
|
|
link: "https://www.postgresql.org/download/"
|
|
}
|
|
]} />
|
|
|
|
Start by installing the Medusa application on your machine with the following command:
|
|
|
|
```bash
|
|
npx create-medusa-app@latest
|
|
```
|
|
|
|
First, you'll be asked for the project's name. Then, when prompted about installing the [Next.js Starter Storefront](../../../nextjs-starter/page.mdx), choose "Yes."
|
|
|
|
Afterwards, the installation process will start, which will install the Medusa application in a directory with your project's name and the Next.js Starter Storefront in a separate directory named `{project-name}-storefront`.
|
|
|
|
<Note title="Why is the storefront installed separately?">
|
|
|
|
The Medusa application is composed of a headless Node.js server and an admin dashboard. The storefront is installed or custom-built separately and connects to the Medusa application through its REST endpoints, called [API routes](!docs!/learn/fundamentals/api-routes). Learn more in [Medusa's Architecture documentation](!docs!/learn/introduction/architecture).
|
|
|
|
</Note>
|
|
|
|
Once the installation finishes successfully, the Medusa Admin dashboard will open with a form to create a new user. Enter the user's credentials and submit the form. Afterwards, you can log in with the new user and explore the dashboard.
|
|
|
|
<Note title="Ran into Errors?">
|
|
|
|
Check out the [troubleshooting guides](../../../troubleshooting/create-medusa-app-errors/page.mdx) for help.
|
|
|
|
</Note>
|
|
|
|
---
|
|
|
|
## Step 2: Create Slack Module Provider
|
|
|
|
To integrate third-party services into Medusa, you create a custom [module](!docs!/learn/fundamentals/modules). A module is a reusable package with functionalities related to a single feature or domain.
|
|
|
|
Medusa's [Notification Module](../../../infrastructure-modules/notification/page.mdx) provides an interface to send notifications in your Medusa application. It delegates the actual sending of notifications to the underlying provider, such as Slack.
|
|
|
|
In this step, you'll integrate Slack as a Notification Module Provider. Later, you'll use it to send a notification when an order is created.
|
|
|
|
<Note>
|
|
|
|
Refer to the [Modules](!docs!/learn/fundamentals/modules) documentation to learn more about modules in Medusa.
|
|
|
|
</Note>
|
|
|
|
### a. Install Axios
|
|
|
|
To send requests to Slack, you'll use the [Axios](https://axios-http.com/) library. So, run the following command to install it in your Medusa application:
|
|
|
|
```bash npm2yarn
|
|
npm install axios
|
|
```
|
|
|
|
You'll use Axios in the module's service.
|
|
|
|
### b. Create Module Directory
|
|
|
|
A module is created under the `src/modules` directory of your Medusa application. So, create the directory `src/modules/slack`.
|
|
|
|
### c. Create Slack Module's Service
|
|
|
|
A module has a service that contains its logic. For Notification Module Providers, the service implements the logic to send notifications with a third-party service.
|
|
|
|
To create the service of the Slack Notification Module Provider, create the file `src/modules/slack/service.ts` with the following content:
|
|
|
|
export const serviceHighlights = [
|
|
["6", "webhook_url", "The Slack webhook URL to send notifications to."],
|
|
["7", "admin_url", "The URL of the Medusa Admin dashboard, used to add links in the notifications."],
|
|
["13", "identifier", "The unique identifier for the module provider."],
|
|
]
|
|
|
|
```ts title="src/modules/slack/service.ts" highlights={serviceHighlights}
|
|
import {
|
|
AbstractNotificationProviderService,
|
|
} from "@medusajs/framework/utils"
|
|
|
|
type Options = {
|
|
webhook_url: string
|
|
admin_url: string
|
|
}
|
|
|
|
type InjectedDependencies = {}
|
|
|
|
class SlackNotificationProviderService extends AbstractNotificationProviderService {
|
|
static identifier = "slack"
|
|
protected options: Options
|
|
|
|
constructor(container: InjectedDependencies, options: Options) {
|
|
super()
|
|
this.options = options
|
|
}
|
|
}
|
|
```
|
|
|
|
A Notification Module Provider's service must extend the `AbstractNotificationProviderService` class. You'll implement its methods in a bit.
|
|
|
|
The service must also have an `identifier` static property, which is a unique identifier for the module. This identifier is used when registering the module in the [Medusa container](!docs!/learn/fundamentals/medusa-container).
|
|
|
|
The service's constructor receives two parameters:
|
|
|
|
- `container`: The [module's container](!docs!/learn/fundamentals/modules/container) that contains Framework resources available to the module. You don't need to access any resources for this provider.
|
|
- `options`: Options that are passed to the module provider when it's registered in Medusa's configurations. You define the following options:
|
|
- `webhook_url`: The Slack webhook URL to send notifications to.
|
|
- `admin_url`: The URL of the Medusa Admin dashboard, which you'll use to add links in the notifications.
|
|
|
|
<Note>
|
|
|
|
You'll learn how to set these options when you [add the module provider to Medusa's configurations](#g-add-module-provider-to-medusas-configurations).
|
|
|
|
</Note>
|
|
|
|
In the constructor, you set the `options` property to the passed options.
|
|
|
|
In the next sections, you'll implement the methods of the `AbstractNotificationProviderService` class.
|
|
|
|
<Note>
|
|
|
|
Refer to the [Create Notification Module Provider](/references/notification-provider-module) guide for detailed information about the methods.
|
|
|
|
</Note>
|
|
|
|
### d. Implement validateOptions Method
|
|
|
|
The `validateOptions` method is used to validate the options passed to the module provider. If the method throws an error, the Medusa application won't start.
|
|
|
|
So, add the `validateOptions` method to the `SlackNotificationProviderService` class:
|
|
|
|
```ts title="src/modules/slack/service.ts"
|
|
// other imports...
|
|
import {
|
|
MedusaError,
|
|
} from "@medusajs/framework/utils"
|
|
|
|
class SlackNotificationProviderService extends AbstractNotificationProviderService {
|
|
// ...
|
|
static validateOptions(options: Record<any, any>): void | never {
|
|
if (!options.webhook_url) {
|
|
throw new MedusaError(
|
|
MedusaError.Types.INVALID_ARGUMENT,
|
|
"Webhook URL is required"
|
|
)
|
|
}
|
|
if (!options.admin_url) {
|
|
throw new MedusaError(
|
|
MedusaError.Types.INVALID_ARGUMENT,
|
|
"Admin URL is required"
|
|
)
|
|
}
|
|
}
|
|
}
|
|
```
|
|
|
|
The `validateOptions` method receives the options passed to the module provider as a parameter.
|
|
|
|
In the method, you throw an error if any of the options are not set.
|
|
|
|
### e. Implement send Method
|
|
|
|
When the Medusa application needs to send a notification through a channel (such as Slack), it calls the `send` method of the channel's module provider.
|
|
|
|
You'll first add helper methods that you'll use in the `send` method. Then, you'll implement the `send` method itself.
|
|
|
|
#### getDisplayAmount Method
|
|
|
|
The first method you'll add is a method to format amounts for displaying them in notifications. So, add the `getDisplayAmount` method to the `SlackNotificationProviderService` class:
|
|
|
|
```ts title="src/modules/slack/service.ts"
|
|
class SlackNotificationProviderService extends AbstractNotificationProviderService {
|
|
// ...
|
|
private async getDisplayAmount(amount: number, currencyCode: string) {
|
|
return Intl.NumberFormat("en-US", {
|
|
style: "currency",
|
|
currency: currencyCode,
|
|
}).format(amount)
|
|
}
|
|
}
|
|
```
|
|
|
|
The `getDisplayAmount` method receives an amount and a currency code and returns the formatted amount as a string.
|
|
|
|
#### sendOrderNotification Method
|
|
|
|
Next, you'll add a method to format a Slack message for created orders. So, add the `sendOrderNotification` method to the `SlackNotificationProviderService` class:
|
|
|
|
export const sendOrderNotificationHighlights = [
|
|
["12", "order", "The order to send a notification for."],
|
|
["20", "blocks", "Format the slack message as blocks."],
|
|
["96", "axios", "Send the formatted message to Slack using Axios."],
|
|
]
|
|
|
|
```ts title="src/modules/slack/service.ts" highlights={sendOrderNotificationHighlights}
|
|
// other imports...
|
|
import {
|
|
OrderDTO,
|
|
ProviderSendNotificationDTO,
|
|
ProviderSendNotificationResultsDTO,
|
|
} from "@medusajs/framework/types"
|
|
import axios from "axios"
|
|
|
|
class SlackNotificationProviderService extends AbstractNotificationProviderService {
|
|
// ...
|
|
async sendOrderNotification(notification: ProviderSendNotificationDTO) {
|
|
const order = notification.data?.order as OrderDTO
|
|
if (!order) {
|
|
throw new MedusaError(
|
|
MedusaError.Types.NOT_FOUND,
|
|
"Order not found"
|
|
)
|
|
}
|
|
const shippingAddress = order.shipping_address
|
|
const blocks: Record<string, unknown>[] = [
|
|
{
|
|
type: "section",
|
|
text: {
|
|
type: "mrkdwn",
|
|
text: `Order *<${this.options.admin_url}/orders/${order.id}|#${order.display_id}>* has been created.`,
|
|
},
|
|
},
|
|
]
|
|
|
|
if (shippingAddress) {
|
|
blocks.push({
|
|
type: "section",
|
|
text: {
|
|
type: "mrkdwn",
|
|
text: `*Customer*\n${shippingAddress.first_name} ${
|
|
shippingAddress.last_name
|
|
}\n${order.email}\n*Destination*\n${
|
|
shippingAddress.address_1
|
|
}\n${
|
|
shippingAddress.city
|
|
}, ${(shippingAddress.country_code as string).toUpperCase()}`,
|
|
},
|
|
})
|
|
}
|
|
|
|
blocks.push(
|
|
{
|
|
type: "section",
|
|
text: {
|
|
type: "mrkdwn",
|
|
text: `*Subtotal*\t${await this.getDisplayAmount(order.subtotal as number, order.currency_code)}\n*Shipping*\t${
|
|
await this.getDisplayAmount(order.shipping_total as number, order.currency_code)
|
|
}\n*Discount Total*\t${await this.getDisplayAmount(
|
|
order.discount_total as number,
|
|
order.currency_code
|
|
)}\n*Tax*\t${await this.getDisplayAmount(order.tax_total as number, order.currency_code)}\n*Total*\t${
|
|
await this.getDisplayAmount(order.total as number, order.currency_code)
|
|
}`,
|
|
},
|
|
},
|
|
{
|
|
type: "divider",
|
|
}
|
|
)
|
|
|
|
await Promise.all(
|
|
order.items?.map(async (item) => {
|
|
const line: Record<string, unknown> = {
|
|
type: "section",
|
|
text: {
|
|
type: "mrkdwn",
|
|
text: `*${item.title}*\n${item.quantity} x ${await this.getDisplayAmount(
|
|
item.unit_price as number,
|
|
order.currency_code
|
|
)}`,
|
|
},
|
|
}
|
|
|
|
if (item.thumbnail) {
|
|
const url = item.thumbnail
|
|
|
|
line.accessory = {
|
|
type: "image",
|
|
alt_text: "Item",
|
|
image_url: url,
|
|
}
|
|
}
|
|
|
|
blocks.push(line)
|
|
blocks.push({
|
|
type: "divider",
|
|
})
|
|
}) || []
|
|
)
|
|
|
|
await axios.post(this.options.webhook_url, {
|
|
text: `Order ${order.display_id} was created`,
|
|
blocks,
|
|
})
|
|
|
|
return {
|
|
id: order.id,
|
|
}
|
|
}
|
|
}
|
|
```
|
|
|
|
The `sendOrderNotification` method receives a `ProviderSendNotificationDTO` object, which is the object passed to the `send` method that you'll implement next. The object has a `data` property that contains the order data.
|
|
|
|
In the method, you format the Slack message to show the order's ID, customer information, shipping address, order items, and total amounts. You also add a link to the order's details page in the Medusa Admin dashboard.
|
|
|
|
Finally, you send the formatted message to Slack using the `axios.post` method with the configured webhook URL.
|
|
|
|
#### send Method
|
|
|
|
You can now implement the `send` method, which is the method that Medusa calls to send notifications using the provider. Add the `send` method to the `SlackNotificationProviderService` class:
|
|
|
|
```ts title="src/modules/slack/service.ts"
|
|
class SlackNotificationProviderService extends AbstractNotificationProviderService {
|
|
// ...
|
|
async send(
|
|
notification: ProviderSendNotificationDTO
|
|
): Promise<ProviderSendNotificationResultsDTO> {
|
|
const { template } = notification
|
|
|
|
switch (template) {
|
|
case "order-created":
|
|
return this.sendOrderNotification(notification)
|
|
default:
|
|
throw new MedusaError(
|
|
MedusaError.Types.NOT_FOUND,
|
|
`Template ${template} not supported`
|
|
)
|
|
}
|
|
}
|
|
}
|
|
```
|
|
|
|
The `send` method receives a `ProviderSendNotificationDTO` object, which contains the notification data and the template to use for sending the notification.
|
|
|
|
<Note>
|
|
|
|
The method receives other parameters, which you can find in the [Create Notification Module Provider](/references/notification-provider-module#send) guide.
|
|
|
|
</Note>
|
|
|
|
In the method, you check the `template` property of the notification object. If it's `order-created`, you call the `sendOrderNotification` method to send the notification. Otherwise, you throw an error indicating that the template is not supported.
|
|
|
|
### f. Export Module Definition
|
|
|
|
You've now finished implementing the necessary methods for the Slack Notification Module Provider.
|
|
|
|
The final piece to a module is its definition, which you export in an `index.ts` file at the module's root directory. This definition tells Medusa the module's details, including its service.
|
|
|
|
To create the module's definition, create the file `src/modules/slack/index.ts` with the following content:
|
|
|
|
```ts title="src/modules/slack/index.ts"
|
|
import SlackNotificationProvider from "./service"
|
|
import {
|
|
ModuleProvider,
|
|
Modules,
|
|
} from "@medusajs/framework/utils"
|
|
|
|
export default ModuleProvider(Modules.NOTIFICATION, {
|
|
services: [SlackNotificationProvider],
|
|
})
|
|
```
|
|
|
|
You use `ModuleProvider` from the Modules SDK to create the module provider's definition. It accepts two parameters:
|
|
|
|
1. The name of the module that this provider belongs to, which is `Modules.NOTIFICATION` in this case.
|
|
2. An object with a required property `services` indicating the Module Provider's services.
|
|
|
|
### g. Add Module Provider to Medusa's Configurations
|
|
|
|
Once you finish building the module, add it to Medusa's configurations to start using it.
|
|
|
|
In `medusa-config.ts`, add a `modules` property:
|
|
|
|
export const configHighlights = [
|
|
["10", "id", "The ID of the module provider, used to register it."],
|
|
["12", "channels", "The channels that this provider is used to send notifications."],
|
|
["13", "webhook_url", "The Slack webhook URL to send notifications to."],
|
|
["14", "admin_url", "The URL of the Medusa Admin dashboard, used to add links in the notifications."]
|
|
]
|
|
|
|
```ts title="medusa-config.ts" highlights={configHighlights}
|
|
module.exports = defineConfig({
|
|
// ...
|
|
modules: [
|
|
{
|
|
resolve: "@medusajs/medusa/notification",
|
|
options: {
|
|
providers: [
|
|
{
|
|
resolve: "./src/modules/slack",
|
|
id: "slack",
|
|
options: {
|
|
channels: ["slack"],
|
|
webhook_url: process.env.SLACK_WEBHOOK_URL,
|
|
admin_url: process.env.SLACK_ADMIN_URL,
|
|
},
|
|
},
|
|
],
|
|
},
|
|
},
|
|
],
|
|
})
|
|
```
|
|
|
|
To pass a Notification Module Provider to the Notification Module, you add the `modules` property to the Medusa configuration and pass the Notification Module in its value.
|
|
|
|
The Notification Module accepts a `providers` option, which is an array of Notification Module Providers to register.
|
|
|
|
To register the Slack Notification Module Provider, you add an object to the `providers` array with the following properties:
|
|
|
|
- `resolve`: The NPM package or path to the module provider. In this case, it's the path to the `src/modules/slack` directory.
|
|
- `id`: The ID of the module provider. The Notification Module Provider is then registered with the ID `np_{identifier}_{id}`, where:
|
|
- `{identifier}`: The identifier static property defined in the Module Provider's service, which is `slack` in this case.
|
|
- `{id}`: The ID set in this configuration, which is also `slack` in this case.
|
|
- `options`: The options to pass to the module provider. These are the options you defined in the `Options` interface of the module provider's service.
|
|
- You must also set a `channel` option that indicates the channel this provider is used to send notifications.
|
|
|
|
### h. Set Options as Environment Variables
|
|
|
|
Next, you'll set the options you passed to the Slack Notification Module Provider as environment variables.
|
|
|
|
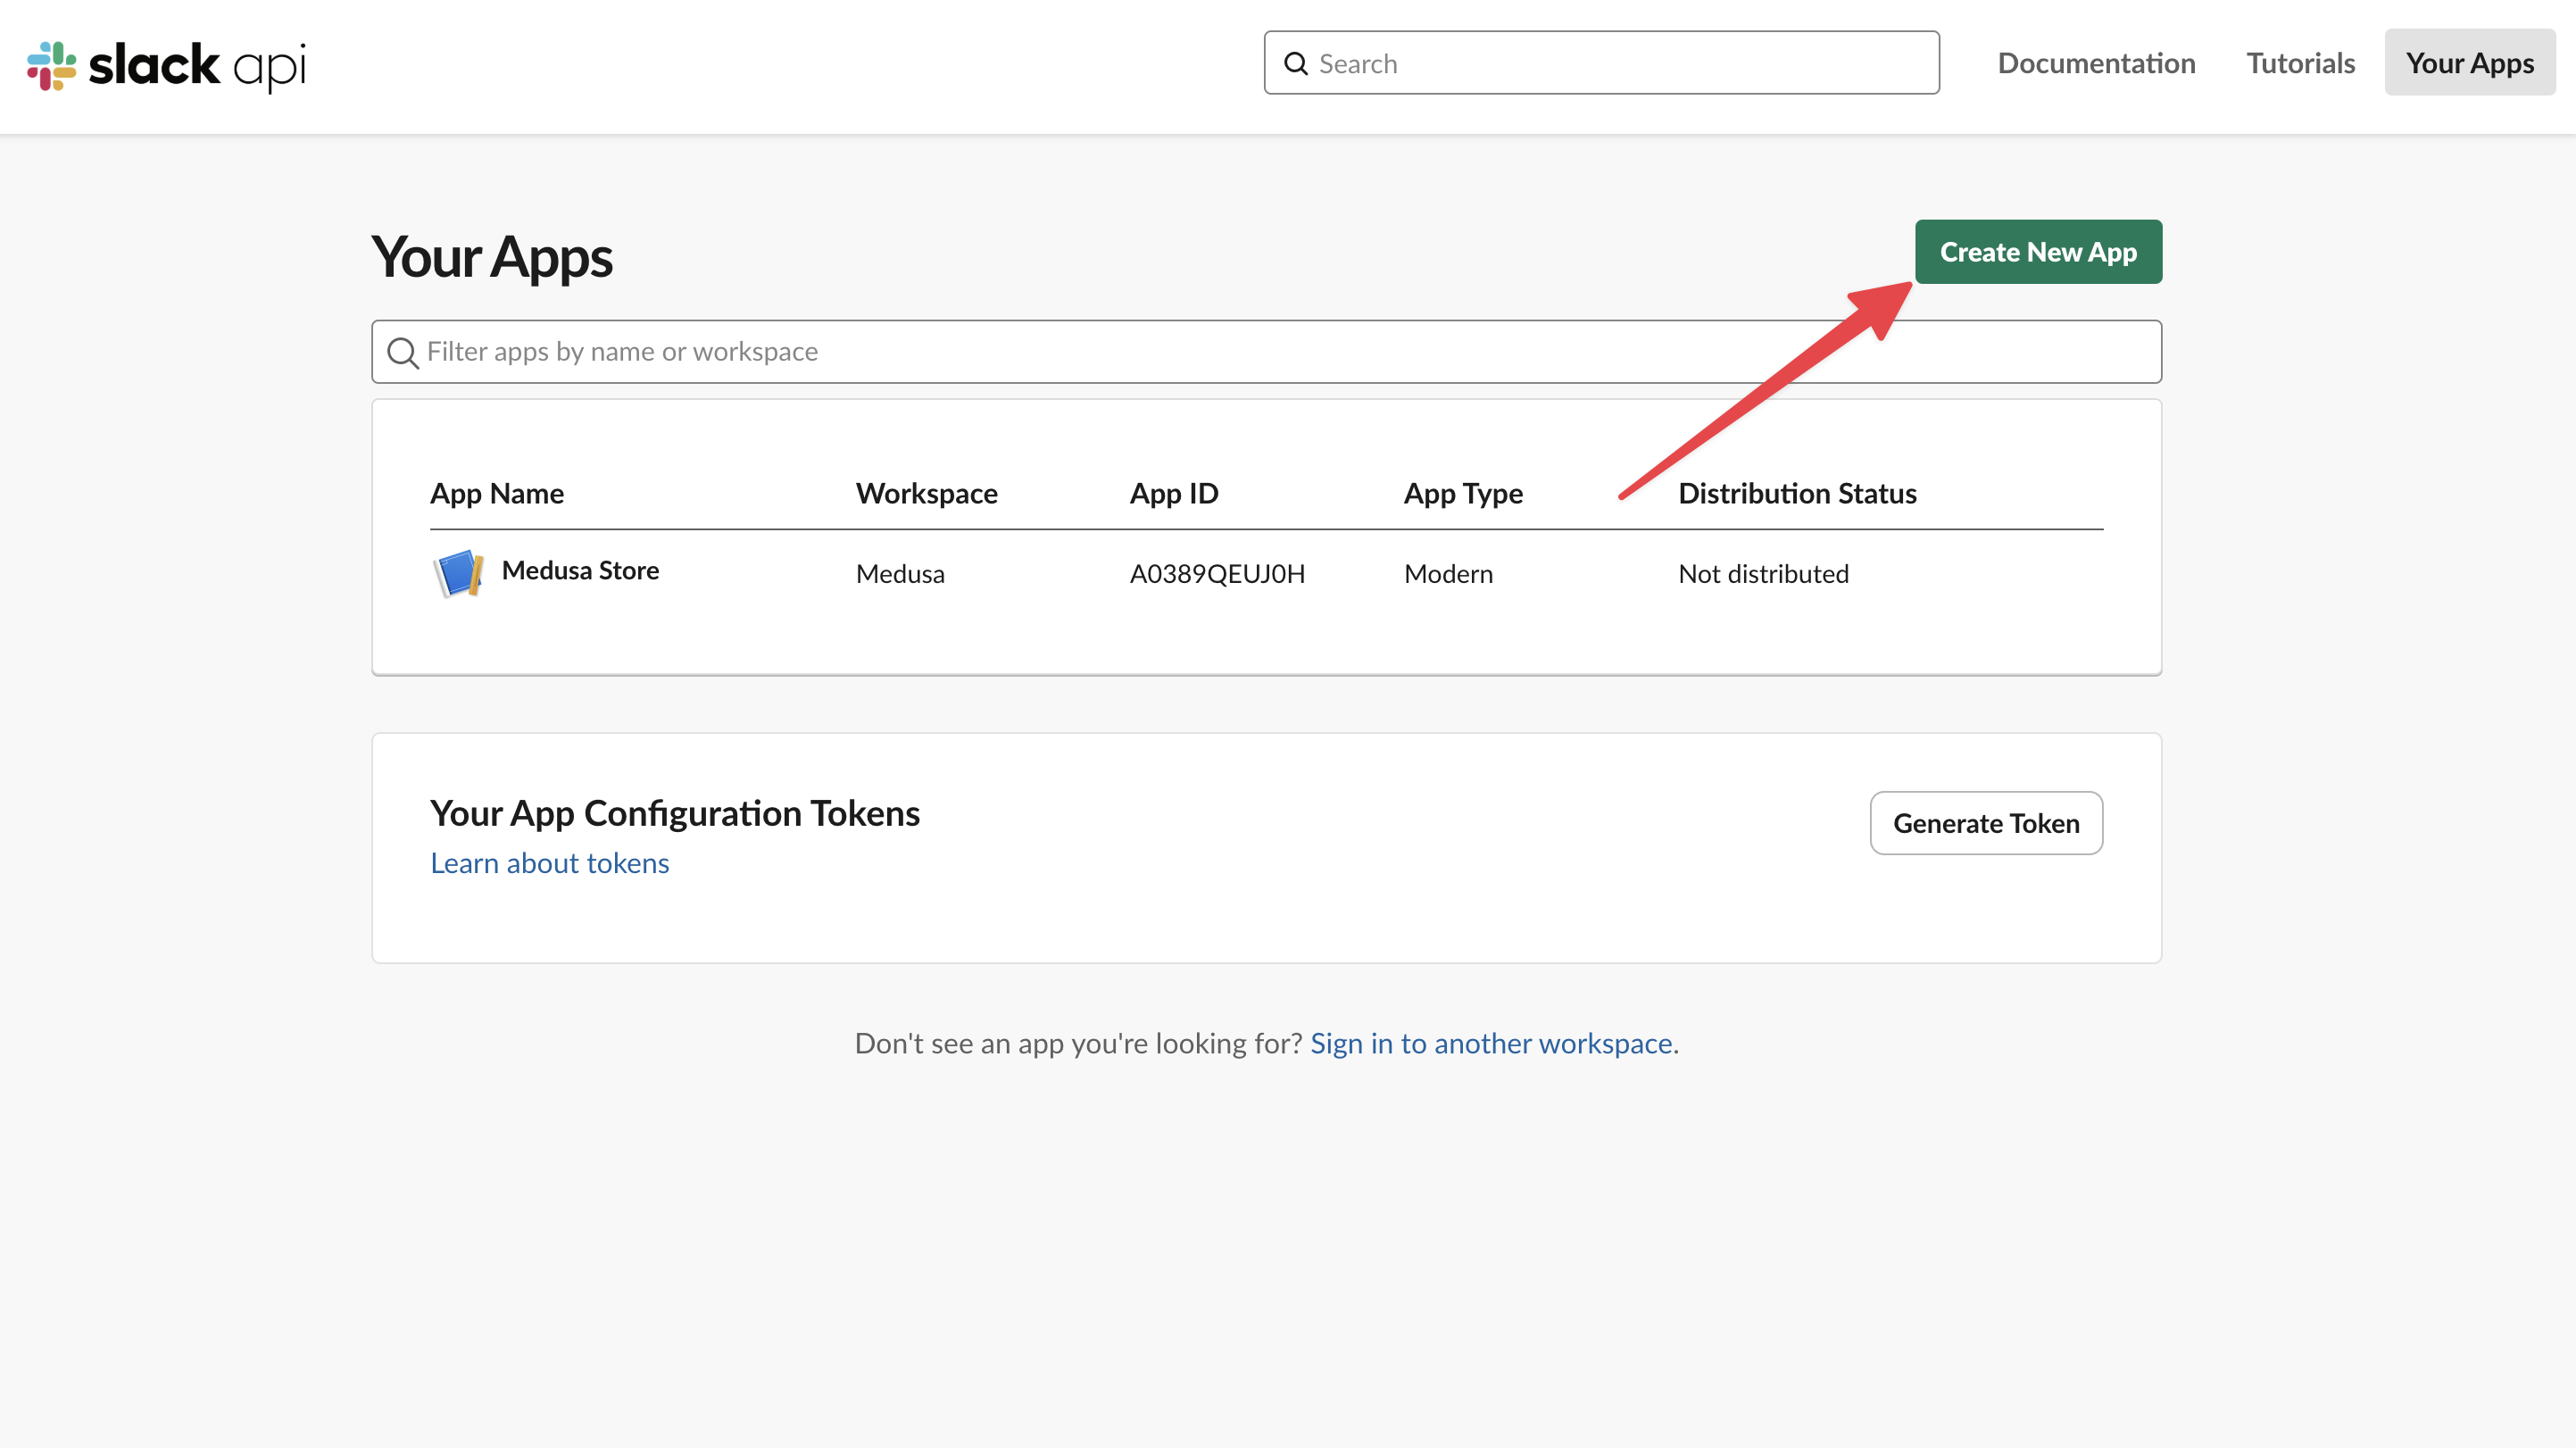
To set the webhook URL, you need to create a Slack application and configure a webhook URL. To do that:
|
|
|
|
1. Go to your [Slack Apps](https://api.slack.com/apps) page.
|
|
2. Click the "Create New App" button.
|
|
|
|
|
|
|
|
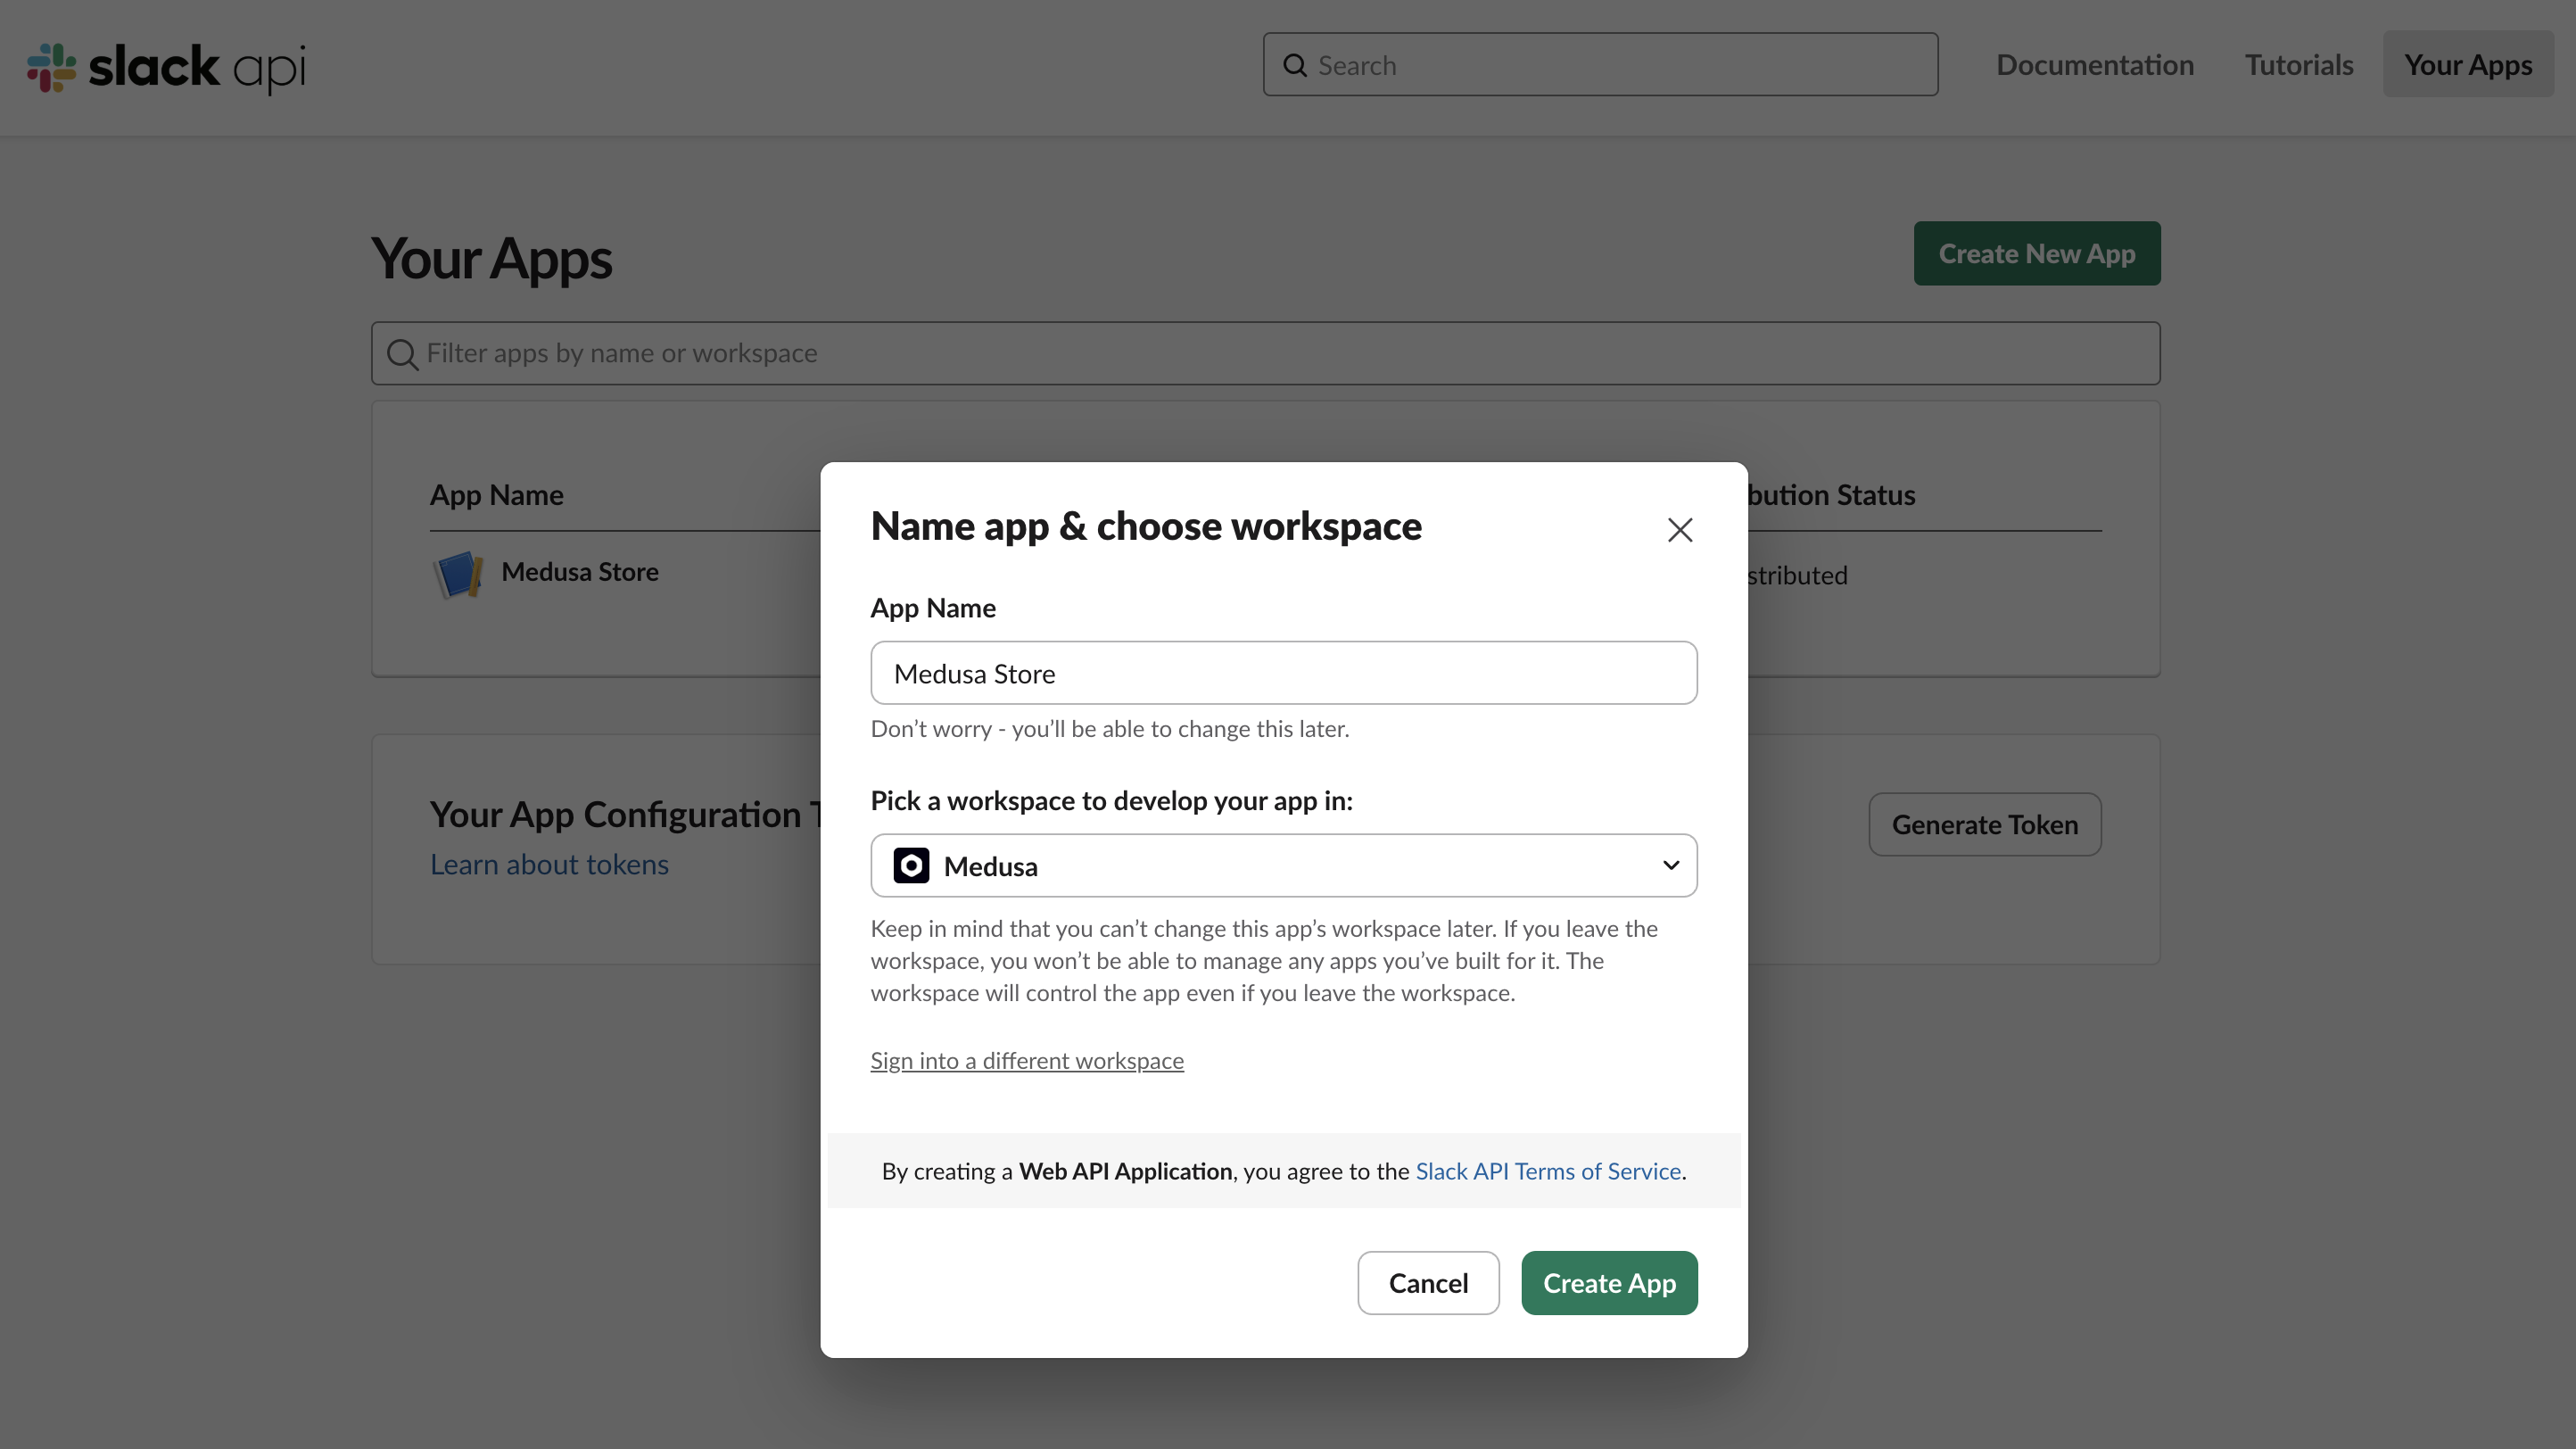
3. In the pop-up, choose "From scratch".
|
|
4. Enter the app's name and select the workspace to install it in.
|
|
5. Once you're done, click the "Create App" button.
|
|
|
|
|
|
|
|
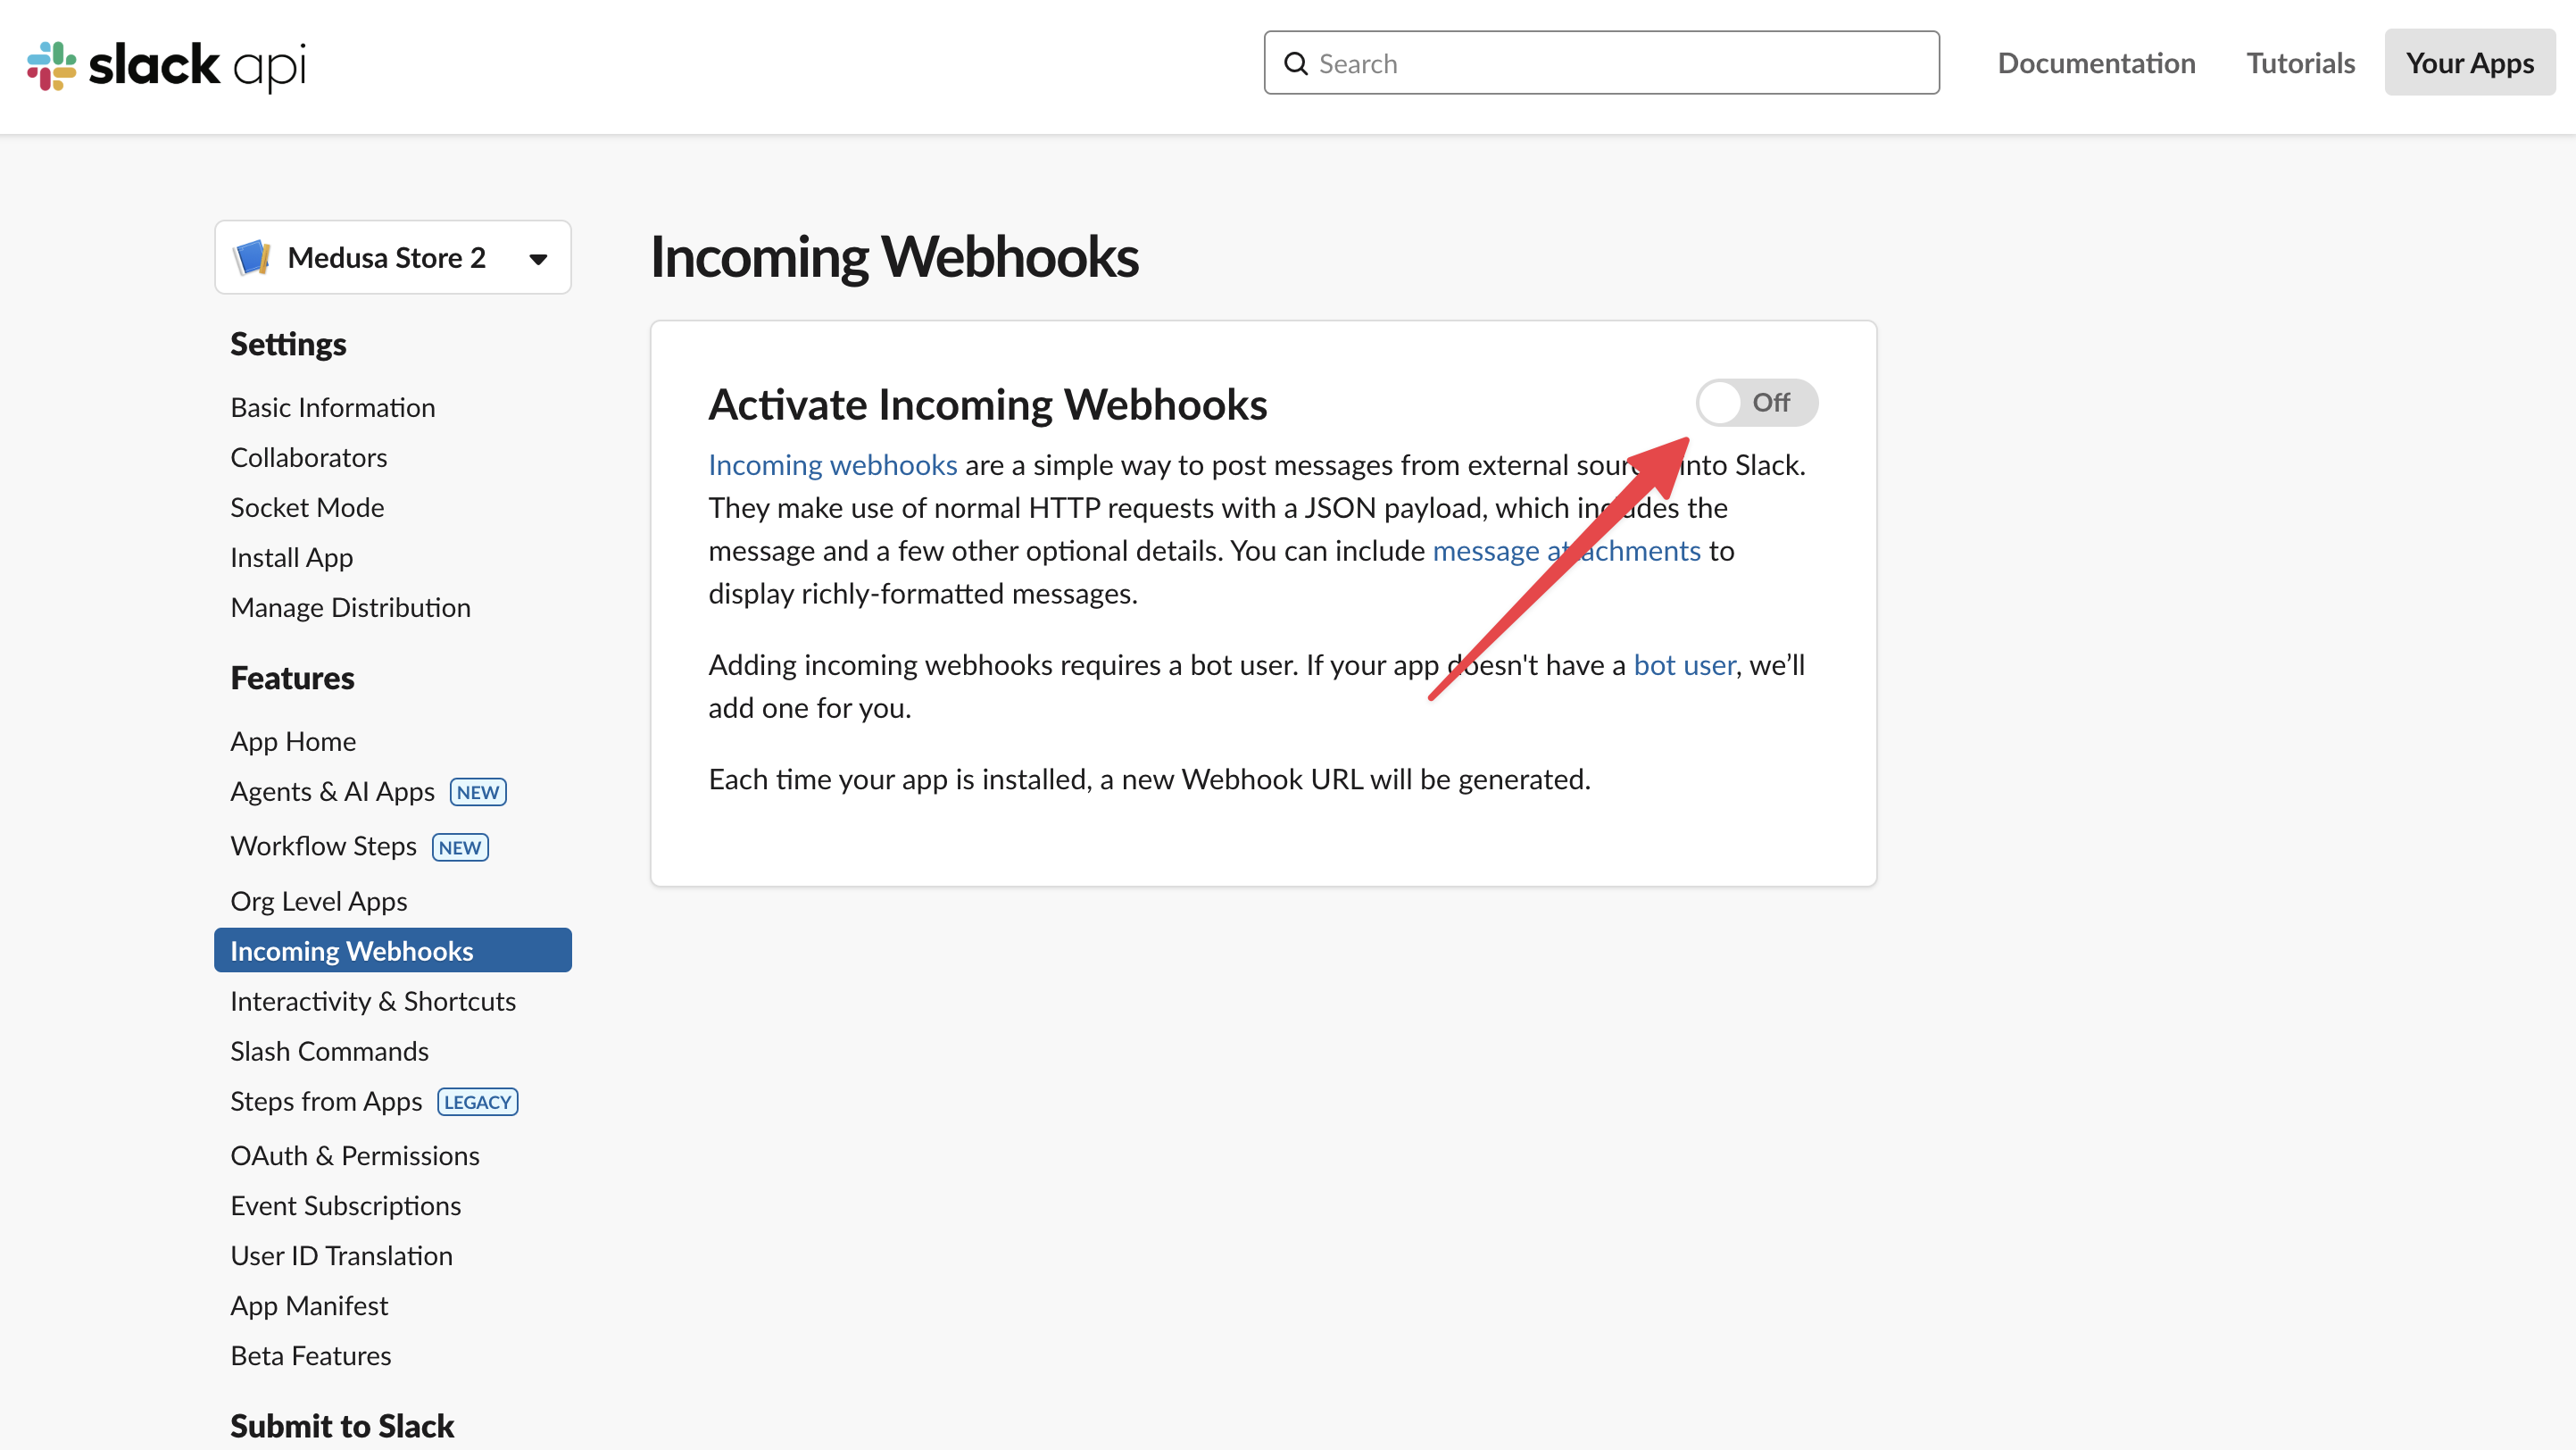
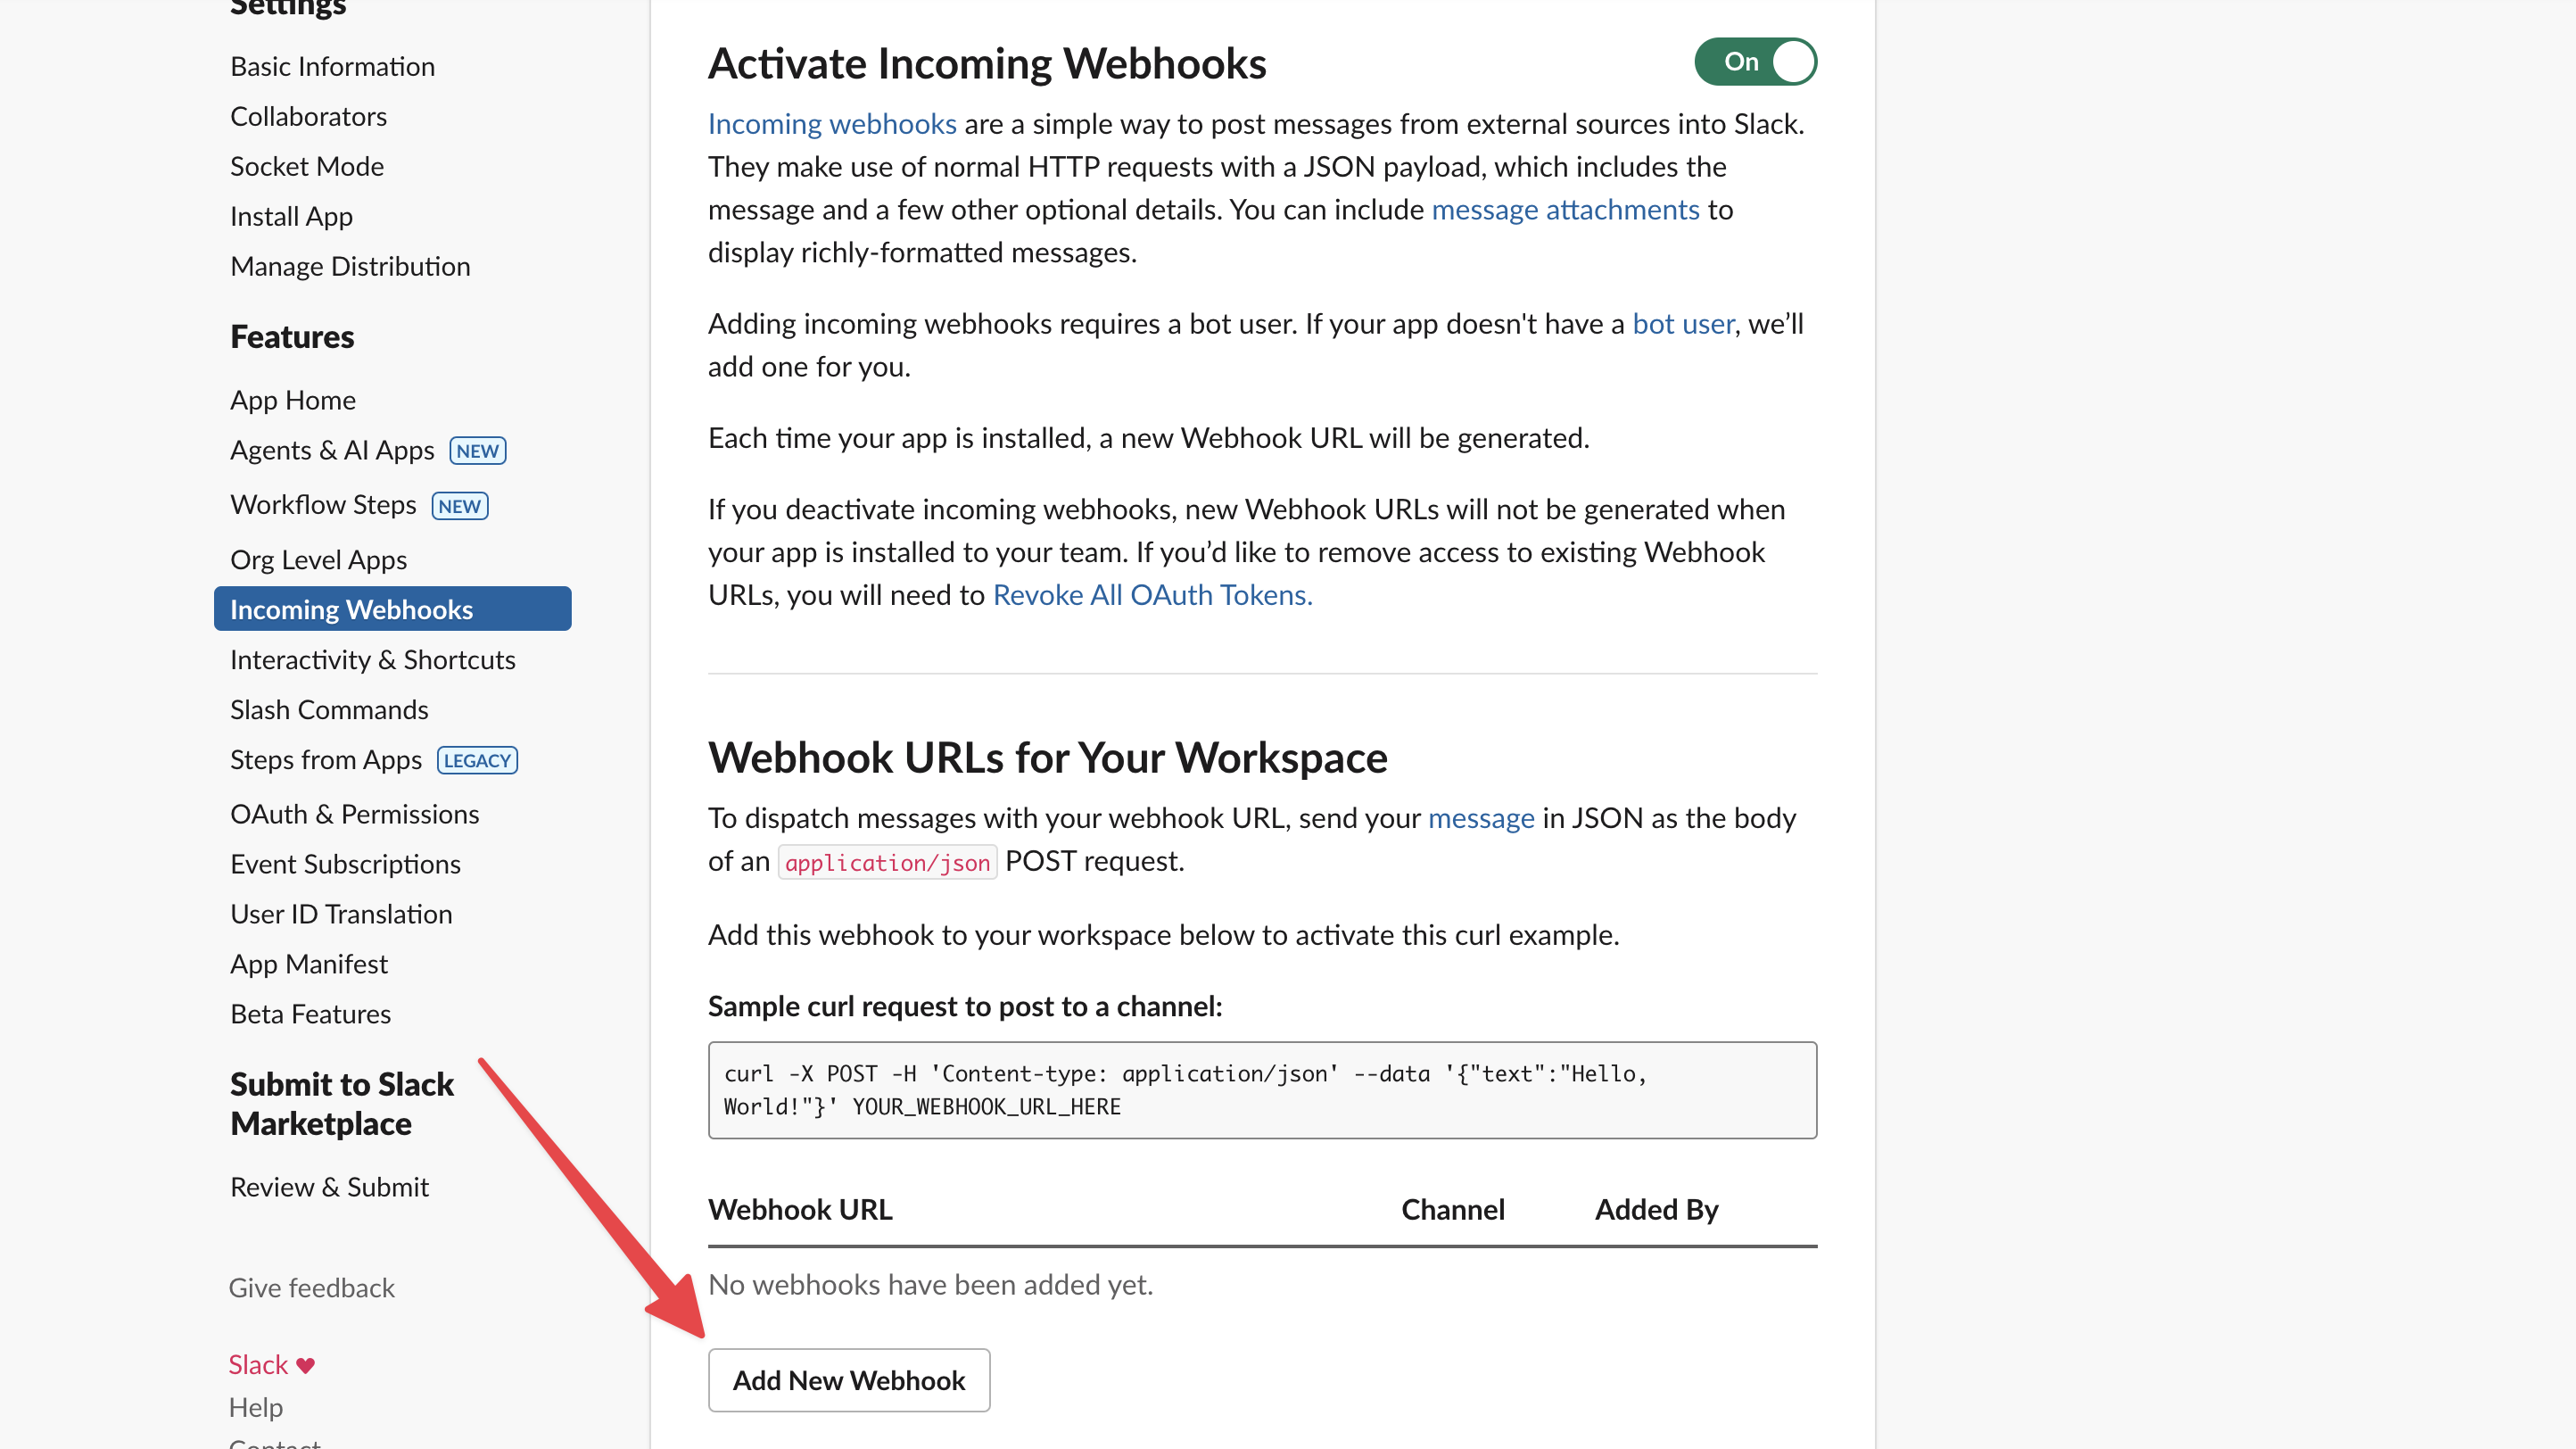
6. In the app's settings, go to the "Incoming Webhooks" section.
|
|
7. Enable the "Activate Incoming Webhooks" toggle.
|
|
|
|
|
|
|
|
8. In the "Webhook URLs for Your Workspace" section, click the "Add New Webhook" button.
|
|
|
|
|
|
|
|
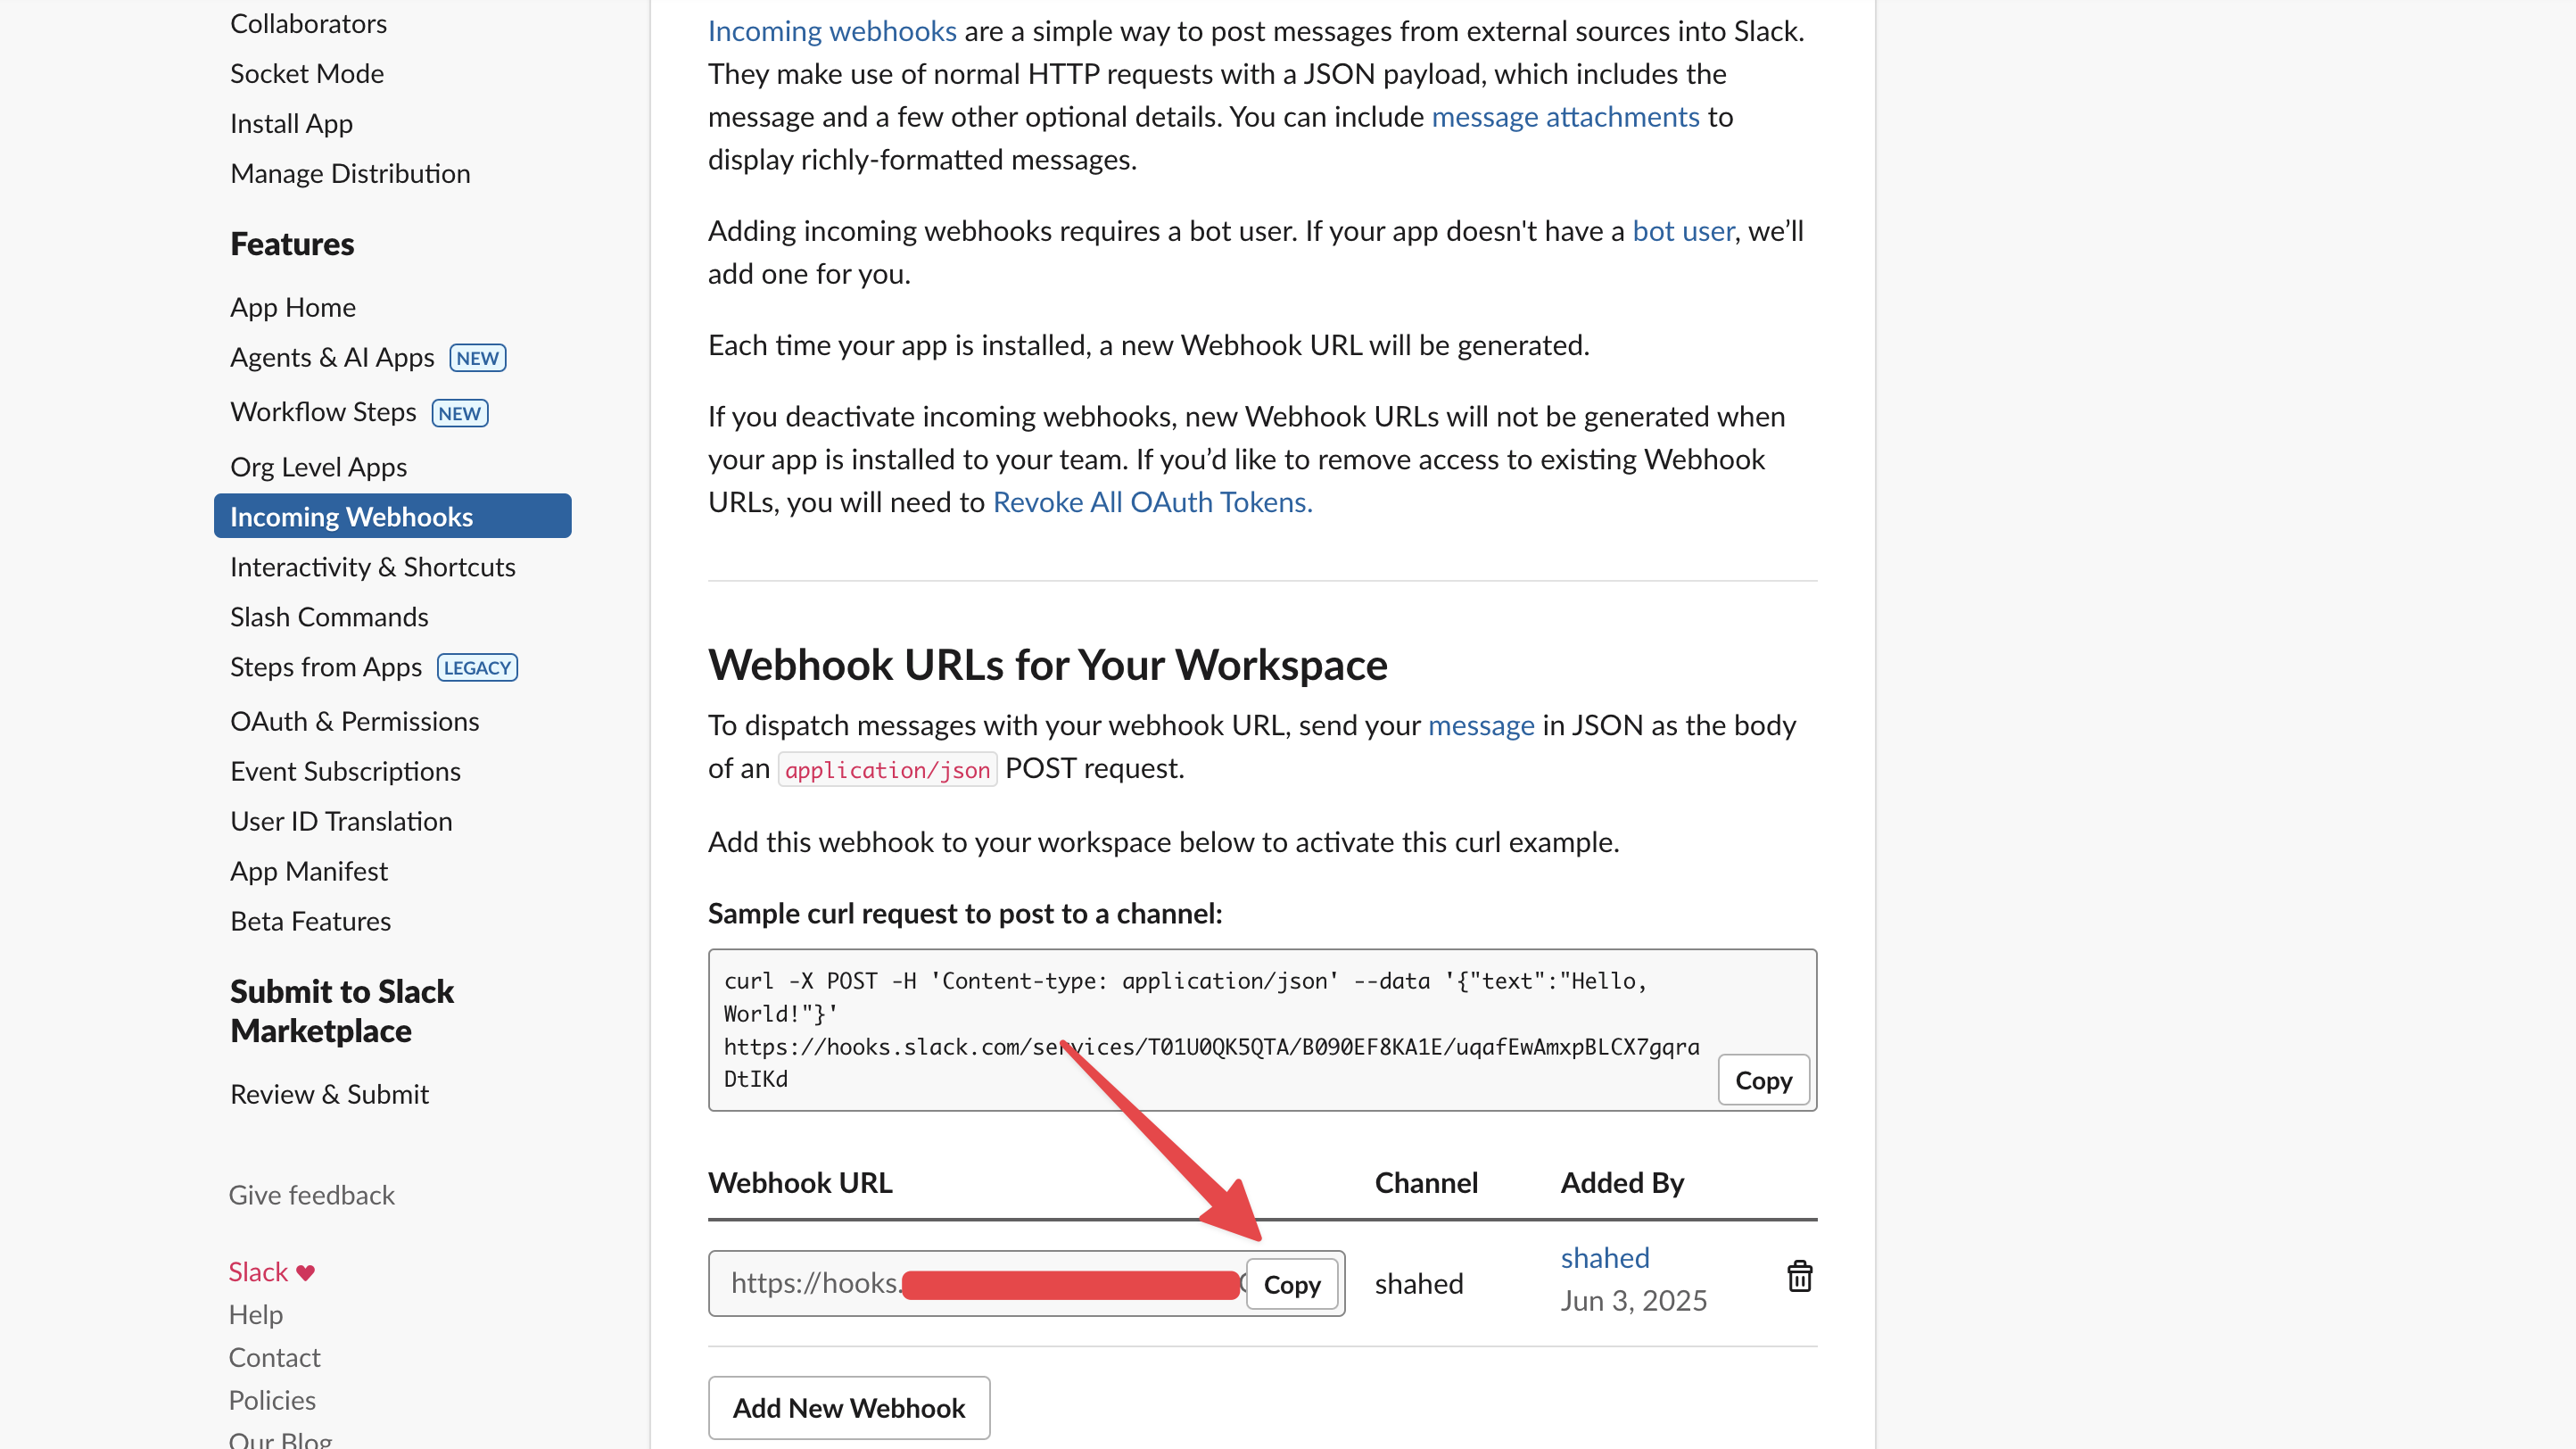
9. Select the channel or conversation to send notifications to and click the "Allow" button.
|
|
10. Copy the generated webhook URL.
|
|
|
|
|
|
|
|
Then, in the `.env` file of your Medusa application, set the `SLACK_WEBHOOK_URL` and `SLACK_ADMIN_URL` environment variables:
|
|
|
|
```shell title=".env"
|
|
SLACK_WEBHOOK_URL=https://hooks.slack.com/...
|
|
SLACK_ADMIN_URL=http://localhost:9000/app
|
|
```
|
|
|
|
In development, the Medusa Admin dashboard is running on `http://localhost:9000/app`, so you can use that URL for the `SLACK_ADMIN_URL` environment variable.
|
|
|
|
You'll test out the integration when you handle the `order.placed` event in the next step.
|
|
|
|
---
|
|
|
|
## Step 3: Handle the `order.placed` Event
|
|
|
|
Now that you've integrated Slack with Medusa, you can send notifications to Slack at any point, including when an order is created.
|
|
|
|
To send a notification to Slack when an order is created, you will:
|
|
|
|
- Implement the order details retrieval and notification sending with Slack in a [workflow](!docs!/learn/fundamentals/workflows). A workflow is a series of actions, called steps, that complete a task with rollback and retry mechanisms.
|
|
- Listen to the `order.placed` event in a [subscriber](!docs!/learn/fundamentals/events-and-subscribers). A subscriber is an asynchronous function that listens to events to perform actions, such as execute a workflow, when the event is emitted.
|
|
|
|
### a. Create the Workflow
|
|
|
|
The workflow to send notifications to Slack will have the following steps:
|
|
|
|
<WorkflowDiagram
|
|
workflow={{
|
|
name: "orderPlacedNotificationWorkflow",
|
|
steps: [
|
|
{
|
|
type: "step",
|
|
name: "useQueryGraphStep",
|
|
description: "Retrieve the order details.",
|
|
link: "/references/helper-steps/useQueryGraphStep",
|
|
depth: 1
|
|
},
|
|
{
|
|
type: "step",
|
|
name: "sendNotificationsStep",
|
|
description: "Send a notification with a configured provider.",
|
|
link: "/references/medusa-workflows/steps/sendNotificationsStep",
|
|
depth: 1
|
|
}
|
|
]
|
|
}}
|
|
hideLegend
|
|
/>
|
|
|
|
Medusa provides both steps in its `@medusajs/medusa/core-flows` package.
|
|
|
|
So, to create the workflow, create the file `src/workflows/order-placed-notification.ts` with the following content:
|
|
|
|
export const orderPlacedNotificationWorkflowHighlights = [
|
|
["13", "useQueryGraphStep", "Retrieve the order details using the Query Graph."],
|
|
["34", "sendNotificationsStep", "Send a notification to Slack with the order details."]
|
|
]
|
|
|
|
```ts title="src/workflows/order-placed-notification.ts" highlights={orderPlacedNotificationWorkflowHighlights}
|
|
import {
|
|
createWorkflow,
|
|
} from "@medusajs/framework/workflows-sdk"
|
|
import { sendNotificationsStep, useQueryGraphStep } from "@medusajs/medusa/core-flows"
|
|
|
|
type WorkflowInput = {
|
|
id: string
|
|
}
|
|
|
|
export const orderPlacedNotificationWorkflow = createWorkflow(
|
|
"order-placed-notification",
|
|
({ id }: WorkflowInput) => {
|
|
const { data: orders } = useQueryGraphStep({
|
|
entity: "order",
|
|
fields: [
|
|
"id",
|
|
"display_id",
|
|
"email",
|
|
"shipping_address.*",
|
|
"subtotal",
|
|
"shipping_total",
|
|
"currency_code",
|
|
"discount_total",
|
|
"tax_total",
|
|
"total",
|
|
"items.*",
|
|
"original_total",
|
|
],
|
|
filters: {
|
|
id,
|
|
},
|
|
})
|
|
|
|
sendNotificationsStep([{
|
|
to: "slack-channel", // This will be configured in the Slack app
|
|
channel: "slack",
|
|
template: "order-created",
|
|
data: {
|
|
order: orders[0],
|
|
},
|
|
}])
|
|
}
|
|
)
|
|
```
|
|
|
|
You create a workflow using `createWorkflow` from the Workflows SDK. It accepts the workflow's unique name as a first parameter.
|
|
|
|
It accepts as a second parameter a constructor function, which is the workflow's implementation. The function can accept input, which in this case is an object holding the ID of the order placed.
|
|
|
|
In the workflow's constructor function, you:
|
|
|
|
- Retrieve the order's details using the `useQueryGraphStep`. This step uses Medusa's [Query](!docs!/learn/fundamentals/module-links/query) tool to retrieve data across modules. You pass it the order ID to retrieve.
|
|
- Send a notification using the `sendNotificationsStep`. You pass the step an array of notifications to send, and each notification is an object with the following properties:
|
|
- `to`: The channel to send the notification to. Since you configure this in the Slack app, you just set it to `slack-channel`.
|
|
- `channel`: The channel to use for sending the notification. By setting it to `slack`, the Notification Module will use the Slack Notification Module Provider to send the notification.
|
|
- `template`: The template to use for sending the notification, which is `order-created` in this case.
|
|
- `data`: The data payload to pass with the notification, which contains the order details.
|
|
|
|
You now have a workflow that retrieves the order details and sends a notification to Slack when an order is placed.
|
|
|
|
<Note>
|
|
|
|
Refer to the [Workflows](!docs!/learn/fundamentals/workflows) documentation to learn more about workflows and steps.
|
|
|
|
</Note>
|
|
|
|
### b. Create the Subscriber
|
|
|
|
To execute the workflow when an order is placed, you need to create a subscriber that listens to the `order.placed` event and executes the workflow.
|
|
|
|
To create the subscriber, create the file `src/subscribers/order-placed.ts` with the following content:
|
|
|
|
```ts title="src/subscribers/order-placed.ts"
|
|
import { SubscriberArgs, SubscriberConfig } from "@medusajs/framework"
|
|
import {
|
|
orderPlacedNotificationWorkflow,
|
|
} from "../workflows/order-placed-notification"
|
|
|
|
export default async function orderPlacedHandler({
|
|
event: { data },
|
|
container,
|
|
}: SubscriberArgs<{ id: string }>) {
|
|
await orderPlacedNotificationWorkflow(container)
|
|
.run({
|
|
input: data,
|
|
})
|
|
}
|
|
|
|
export const config: SubscriberConfig = {
|
|
event: "order.placed",
|
|
}
|
|
```
|
|
|
|
A subscriber file must export:
|
|
|
|
1. An asynchronous function, which is the subscriber that is executed when the event is emitted.
|
|
2. A configuration object that holds the name of the event that the subscriber listens to, which is `order.placed` in this case.
|
|
|
|
The subscriber function receives an object as a parameter that has the following properties:
|
|
|
|
- `event`: An object that holds the event's data payload. The payload of the `order.placed` event is the ID of the order placed.
|
|
- `container`: The [Medusa container](!docs!/learn/fundamentals/medusa-container) to access the Framework and commerce tools.
|
|
|
|
In the subscriber function, you execute the `orderPlacedNotificationWorkflow` by invoking it, passing the Medusa container as a parameter. Then, you chain a `run` method, passing it the order ID from the event's data payload as input.
|
|
|
|
<Note>
|
|
|
|
Refer to the [Events and Subscribers](!docs!/learn/fundamentals/events-and-subscribers) documentation to learn more about creating subscribers.
|
|
|
|
</Note>
|
|
|
|
### Test it Out
|
|
|
|
You'll now test out the integration by placing an order using the [Next.js Starter Storefront](../../../nextjs-starter/page.mdx).
|
|
|
|
<Note title="Reminder" forceMultiline>
|
|
|
|
The Next.js Starter Storefront was installed in a separate directory from Medusa. The directory's name is `{your-project}-storefront`.
|
|
|
|
So, if your Medusa application's directory is `medusa-slack`, you can find the storefront by going back to the parent directory and changing to the `medusa-slack-storefront` directory:
|
|
|
|
```bash
|
|
cd ../medusa-slack-storefront # change based on your project name
|
|
```
|
|
|
|
</Note>
|
|
|
|
First, start the Medusa application by running the following command in the Medusa application's directory:
|
|
|
|
```bash npm2yarn badgeLabel="Medusa Application" badgeColor="green"
|
|
npm run dev
|
|
```
|
|
|
|
Then, start the Next.js Starter Storefront by running the following command in the storefront's directory:
|
|
|
|
```bash npm2yarn badgeLabel="Next.js Starter Storefront" badgeColor="blue"
|
|
npm run dev
|
|
```
|
|
|
|
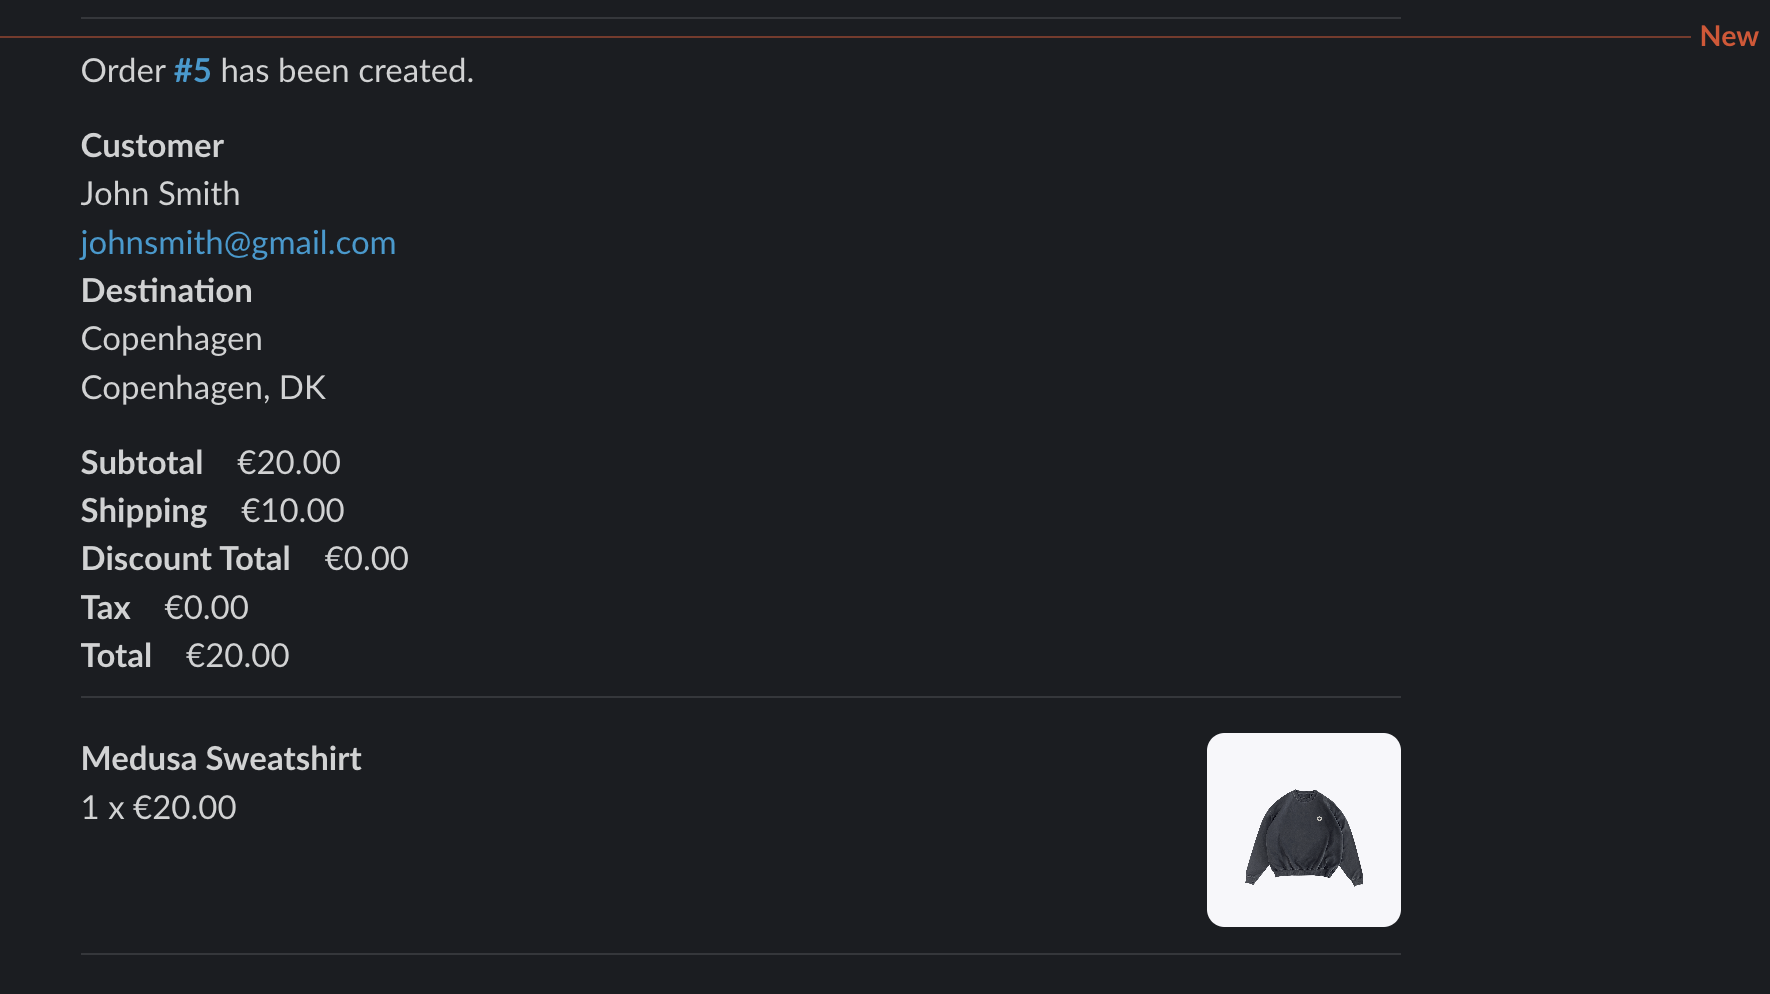
Next, open the Next.js Starter Storefront in your browser at `http://localhost:8000`. Add a product to the cart, proceed to checkout, and place an order.
|
|
|
|
Afterwards, you'll receive a notification in the Slack channel you configured in the Slack app. The notification will contain the order details.
|
|
|
|
You can also click on the order's ID in the notification to open the order's details page in the Medusa Admin dashboard.
|
|
|
|
|
|
|
|
---
|
|
|
|
## Next Steps
|
|
|
|
You've now integrated Slack with Medusa to receive notifications about created orders. You can expand on this integration to send other types of notifications, such as order updates. Refer to the [Events Reference](/references/events) for a list of events you can listen to in your subscribers.
|
|
|
|
You can also customize the notifications to include more information or change the format of the messages. Refer to [Slack's documentation](https://api.slack.com/reference/surfaces/formatting) for more information on how to format messages in Slack.
|
|
|
|
If you're new to Medusa, check out the [main documentation](!docs!/learn), where you'll get a more in-depth understanding of all the concepts you've used in this guide and more.
|
|
|
|
To learn more about the commerce features that Medusa provides, check out Medusa's [Commerce Modules](../../../commerce-modules/page.mdx).
|
|
|
|
### Troubleshooting
|
|
|
|
If you encounter issues during your development, check out the [troubleshooting guides](../../../troubleshooting/page.mdx).
|
|
|
|
### Getting Help
|
|
|
|
If you encounter issues not covered in the troubleshooting guides:
|
|
|
|
1. Visit the [Medusa GitHub repository](https://github.com/medusajs/medusa) to report issues or ask questions.
|
|
2. Join the [Medusa Discord community](https://discord.gg/medusajs) for real-time support from community members.
|
|
3. Contact the [sales team](https://medusajs.com/contact/) to get help from the Medusa team.
|