* added draft order plugin docs

* fix vale error

* added note about draft order being optional

* add new shipping option - shipping method link

* update user guides

* generate

* fix github icon

* changes to shipping option type

* document logger

* reorder list

* fixes

* fixes
163 lines
6.3 KiB
Plaintext
163 lines
6.3 KiB
Plaintext
---
|
||
sidebar_position: 2
|
||
sidebar_label: "Manage Order Payments"
|
||
tags:
|
||
- user guide
|
||
- order
|
||
- payment
|
||
products:
|
||
- order
|
||
- payment
|
||
---
|
||
|
||
import {
|
||
EllipsisHorizontal,
|
||
} from "@medusajs/icons"
|
||
import { Table } from "docs-ui"
|
||
|
||
export const metadata = {
|
||
title: `Manage Order Payments in Medusa Admin`,
|
||
}
|
||
|
||
# {metadata.title}
|
||
|
||
In this guide, you’ll learn how to manage an order’s payment, including capturing and refunding the payment.
|
||
|
||
## Overview
|
||
|
||
When a customer places an order, their payment is authorized by the payment provider they've chosen. You can manage an order's payment by capturing it, refunding it, or handling outstanding amounts.
|
||
|
||
### Order Payment Statuses
|
||
|
||
At the top of the order details page, you can see the payment status of the order. The payment status can be one of the following:
|
||
|
||
<Table>
|
||
<Table.Header>
|
||
<Table.Row>
|
||
<Table.HeaderCell>Status</Table.HeaderCell>
|
||
<Table.HeaderCell>Description</Table.HeaderCell>
|
||
</Table.Row>
|
||
</Table.Header>
|
||
<Table.Body>
|
||
<Table.Row>
|
||
<Table.Cell>Authorized</Table.Cell>
|
||
<Table.Cell>The default status when an order is placed, unless the payment provider is configured to automatically capture the payment.</Table.Cell>
|
||
</Table.Row>
|
||
<Table.Row>
|
||
<Table.Cell>Partially Authorized</Table.Cell>
|
||
<Table.Cell>Part of the payment is authorized, which happens if an order has changed. For example, if an order was edited and new payment is required.</Table.Cell>
|
||
</Table.Row>
|
||
<Table.Row>
|
||
<Table.Cell>Captured</Table.Cell>
|
||
<Table.Cell>The payment has been captured and processed with the payment provider.</Table.Cell>
|
||
</Table.Row>
|
||
<Table.Row>
|
||
<Table.Cell>Partially Captured</Table.Cell>
|
||
<Table.Cell>A part of the payment has been captured. This happens when an order's payment was previously captured, but a change to the status, such as an exchange, requires additional payment.</Table.Cell>
|
||
</Table.Row>
|
||
<Table.Row>
|
||
<Table.Cell>Refunded</Table.Cell>
|
||
<Table.Cell>The payment has been refunded to the customer.</Table.Cell>
|
||
</Table.Row>
|
||
<Table.Row>
|
||
<Table.Cell>Partially Refunded</Table.Cell>
|
||
<Table.Cell>A part of the payment has been refunded.</Table.Cell>
|
||
</Table.Row>
|
||
</Table.Body>
|
||
</Table>
|
||
|
||
---
|
||
|
||
## Capture Payment
|
||
|
||
Unless the payment provider that the customer chose is configured to automatically capture an order's payment, you need to manually capture the payment.
|
||
|
||
Capturing an order's payment triggers its processing with the chosen payment provider, such as Stripe.
|
||
|
||
<Note>
|
||
|
||
If you're unsure whether your payment provider is configured to automatically capture payments, please contact your technical team to debug the [integrated payment service](!resources!/commerce-modules/payment/payment-provider).
|
||
|
||
</Note>
|
||
|
||
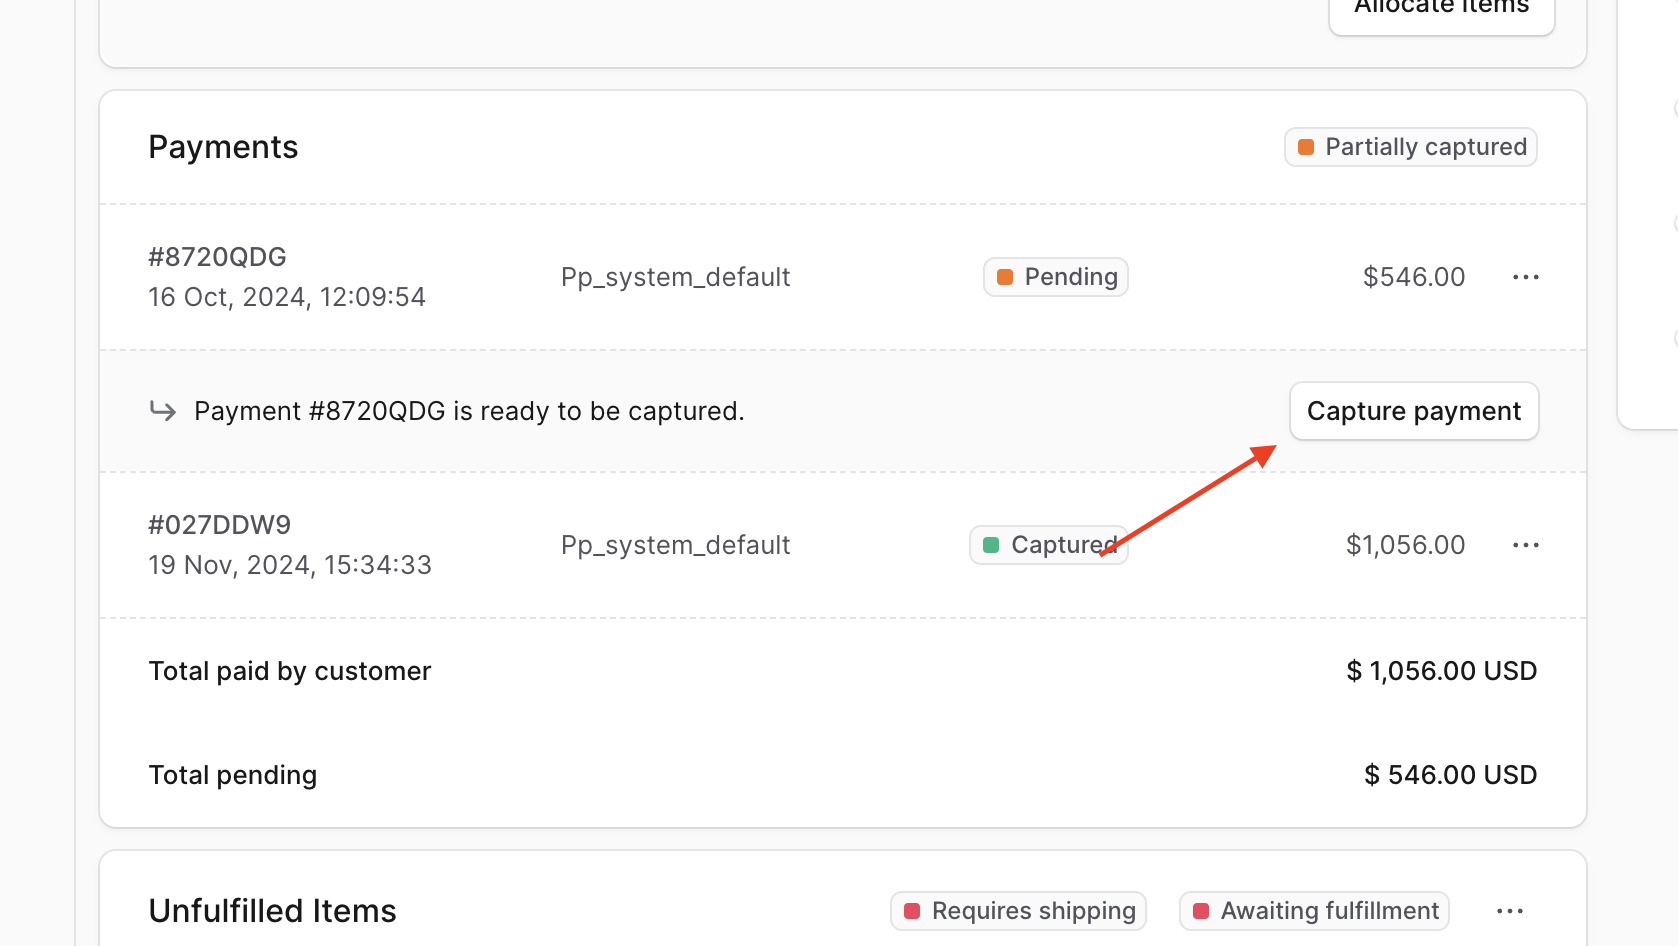
To capture an order’s payment:
|
||
|
||
1. Open the order's details page.
|
||
2. Scroll to the Payments section.
|
||
3. Click on the Capture Payment button.
|
||
4. Confirm capturing the payment by clicking the "Confirm" button in the pop-up.
|
||
|
||
|
||
|
||
---
|
||
|
||
## Refund Payment
|
||
|
||
If you've made changes to an order, such as return or exchange items, that resulted in a negative outstanding amount, you can refund a previously-captured payment.
|
||
|
||
Refunding the payment triggers its processing with the chosen payment provider, such as Stripe.
|
||
|
||
<Note type="warning">
|
||
|
||
Refunding payments is irreversible.
|
||
|
||
</Note>
|
||
|
||
To refund an order’s negative outstanding amount:
|
||
|
||
1. Open the order's details page.
|
||
2. Scroll to the Payment section.
|
||
3. Click on the <InlineIcon Icon={EllipsisHorizontal} alt="three-dots" /> icon at the right of the payment to refund.
|
||
4. Choose "Refund" from the dropdown.
|
||
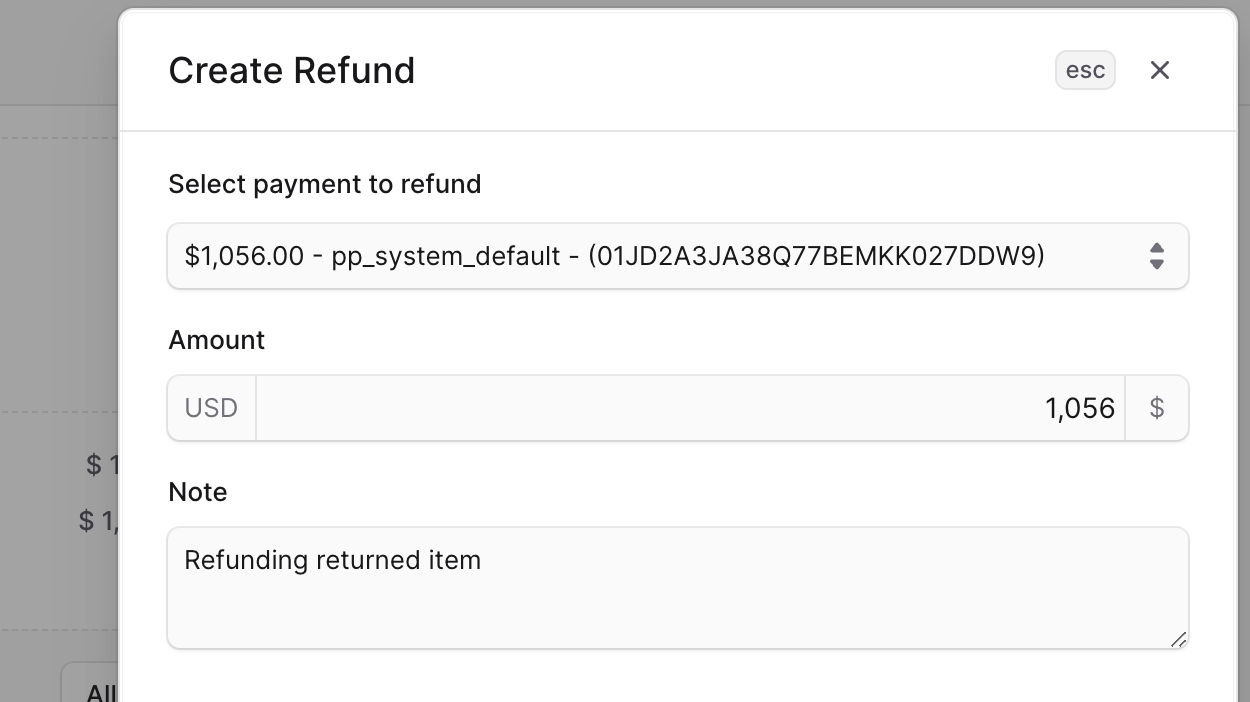
5. In the side window that opens, fill out the following fields:
|
||
- **Select payment to refund**: Choose the payment to refund an amount from.
|
||
- **Amount**: Enter the amount to refund.
|
||
- **Note**: A note that the customer can see in the notification they receive.
|
||
6. Once you’re done, click on the Save button.
|
||
|
||
Once the payment is refunded, the customer will receive a notification about the refund and you can view the refund as part of the order's activity.
|
||
|
||
|
||
|
||
---
|
||
|
||
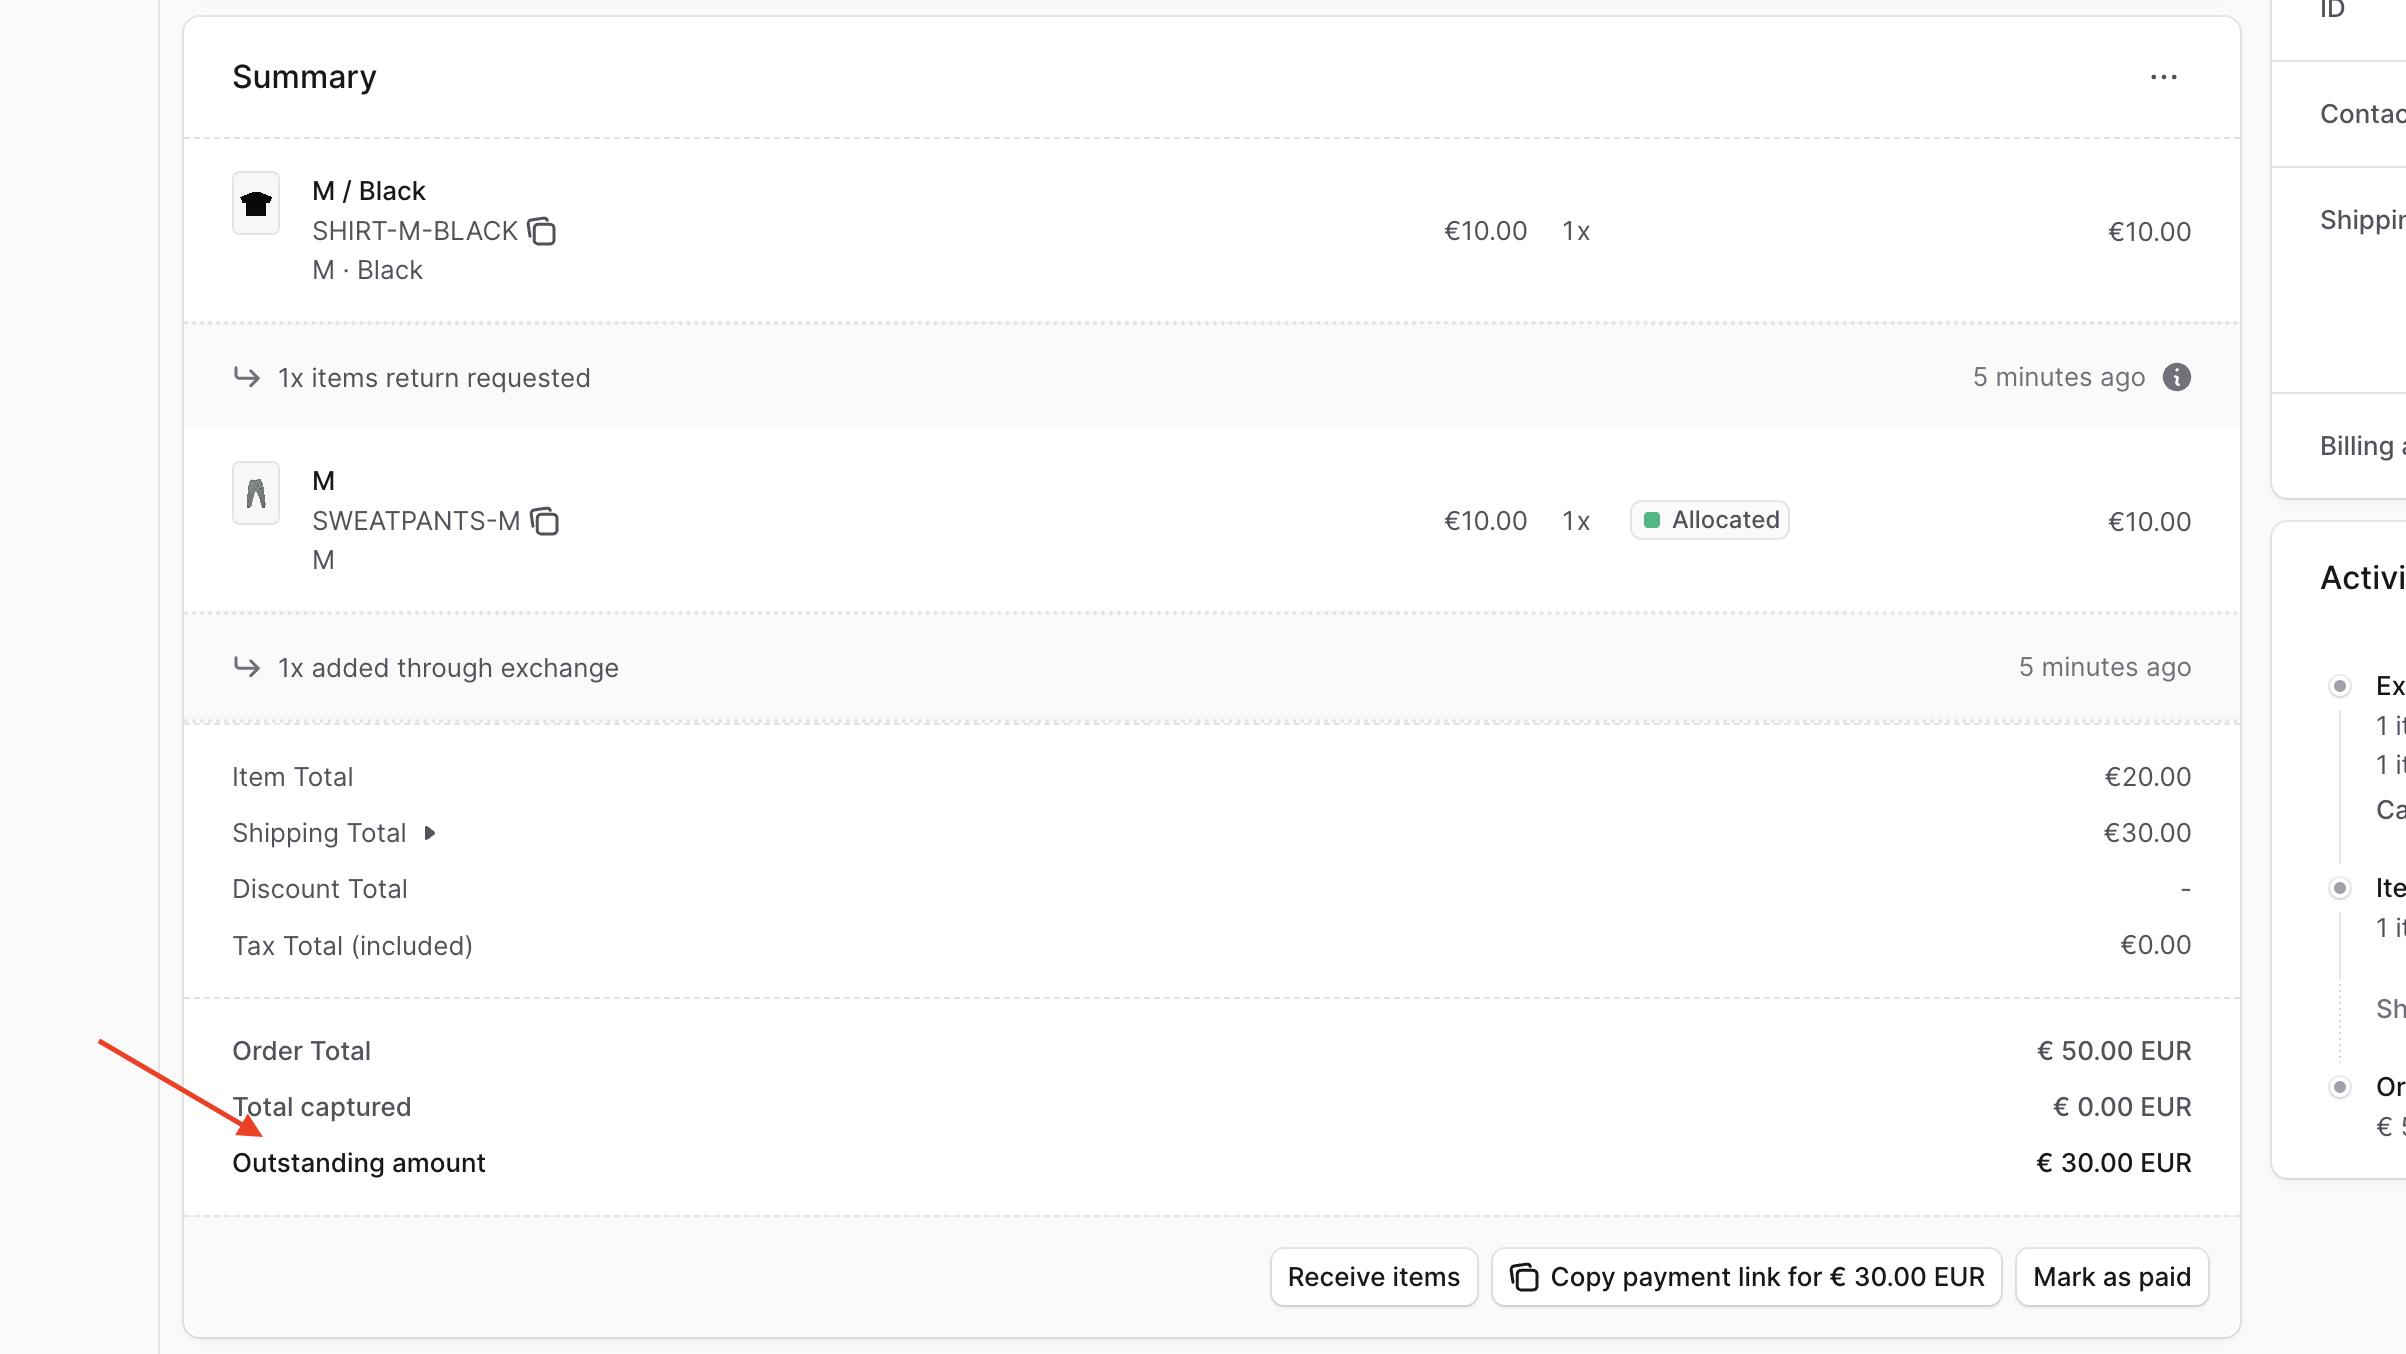
## Handling Positive Outstanding Amounts
|
||
|
||
An order may have a positive outstanding amount either after making changes to it, or if it was created as a [draft order](../draft-orders/page.mdx).
|
||
|
||
A positive outstanding amount indicates that the customer needs to pay an additional amount to complete the order.
|
||
|
||
|
||
|
||
You can handle it by either:
|
||
|
||
1. [Marking the order as paid manually](#mark-outstanding-amount-as-paid);
|
||
2. Or [copying a payment link](#copy-payment-link-for-additional-payment).
|
||
|
||
### Mark Outstanding Amount as Paid
|
||
|
||
By marking a positive outstanding amount as paid, you're capturing the payment without processing it through the associated payment provider. Instead, you handle capturing the payment outside of Medusa.
|
||
|
||
To mark a positive outstanding amount as paid:
|
||
|
||
1. Open the order's details page.
|
||
2. In the Summary section, click on the "Mark as paid" button.
|
||
3. Confirm marking the payment as paid by clicking the "Confirm" button in the pop-up.
|
||
|
||
### Copy Payment Link for Additional Payment
|
||
|
||
Another way you can handle a positive outstanding amount is by sharing a payment link with the customer to authorize the payment. The payment link is a link in the storefront that the customer can use to pay for the additional amount.
|
||
|
||
To copy a payment link for the additional payment:
|
||
|
||
1. Open the order's details page.
|
||
2. In the Summary section, click on the "Copy payment link" button.
|
||
|
||
The link is then copied and you can share it with the customer to authorize the payment. Once authorized, you can then [capture the payment](../payments/page.mdx#capture-payment).
|
||
|
||
<Note title="Tip">
|
||
|
||
If the payment link doesn't start with a domain or has a domain that doesn't match your storefront, refer your technical team to [this guide](!docs!/learn/configurations/medusa-config#storefronturl) to set up the storefront domain.
|
||
|
||
</Note>
|