* docs: auth in cloud + restructure deployment guides

* added details about enabling cloud auth

* fix vale errors
240 lines
12 KiB
Plaintext
240 lines
12 KiB
Plaintext
import { InlineIcon } from "docs-ui"
|
|
import { EllipsisHorizontal, ChevronUpDown } from "@medusajs/icons"
|
|
|
|
export const metadata = {
|
|
title: `Long-Lived Environments`,
|
|
}
|
|
|
|
# {metadata.title}
|
|
|
|
In this guide, you'll learn about long-lived environments in Cloud and how to manage them.
|
|
|
|
Long-lived environments are stable environments that you create for specific branches in your GitHub repository, such as Production or Staging. They allow you to test changes in a production-like environment before deploying them to the live application.
|
|
|
|
<Note>
|
|
|
|
Learn more about what environments are and their types in the [Environments](../page.mdx) guide.
|
|
|
|
</Note>
|
|
|
|
## Long-Lived Environments Infrastructure
|
|
|
|
Production and long-lived environments are stable and scalable, making them ideal for hosting your Medusa applications. Medusa ensures that they're:
|
|
|
|
- **Always available with zero-downtime deployments**: Your application will always be available for users, even during deployments. Medusa automatically handles rolling updates without interrupting your users.
|
|
- **Automatically scaled to meet peak traffic**: Medusa automatically scales your servers to handle traffic spikes, such as during flash sales or marketing campaigns. Your application can handle sudden increases in traffic without manual intervention.
|
|
- **Equipped with server and worker instances**: Your application runs on multiple server instances that handle incoming HTTP requests, while worker instances handle background tasks like scheduled jobs and subscribers. This separation allows your application to handle both web traffic and background processing efficiently.
|
|
|
|
---
|
|
|
|
## Create a Long-Lived Environment on Cloud
|
|
|
|
It's recommended to create long-lived environments for different stages of your project's development.
|
|
|
|
For example, you can create a Staging environment to test new features and updates before deploying them to Production. That way, you can test changes in a production-like environment without affecting the live application.
|
|
|
|
This section explains how to create a long-lived environment in Cloud.
|
|
|
|
### Prerequisites: Create Environment Branch
|
|
|
|
A long-lived environment is associated with a specific branch in your GitHub repository. So, before creating an environment, make sure you have the necessary branch for it in your repository.
|
|
|
|
For example, if you're creating a Staging environment, create and push a `staging` branch in your repository:
|
|
|
|
```bash
|
|
git checkout -b staging # create branch
|
|
git push origin staging # push branch to remote
|
|
```
|
|
|
|
### Steps to Create a Long-Lived Environment
|
|
|
|
To create a long-lived environment:
|
|
|
|
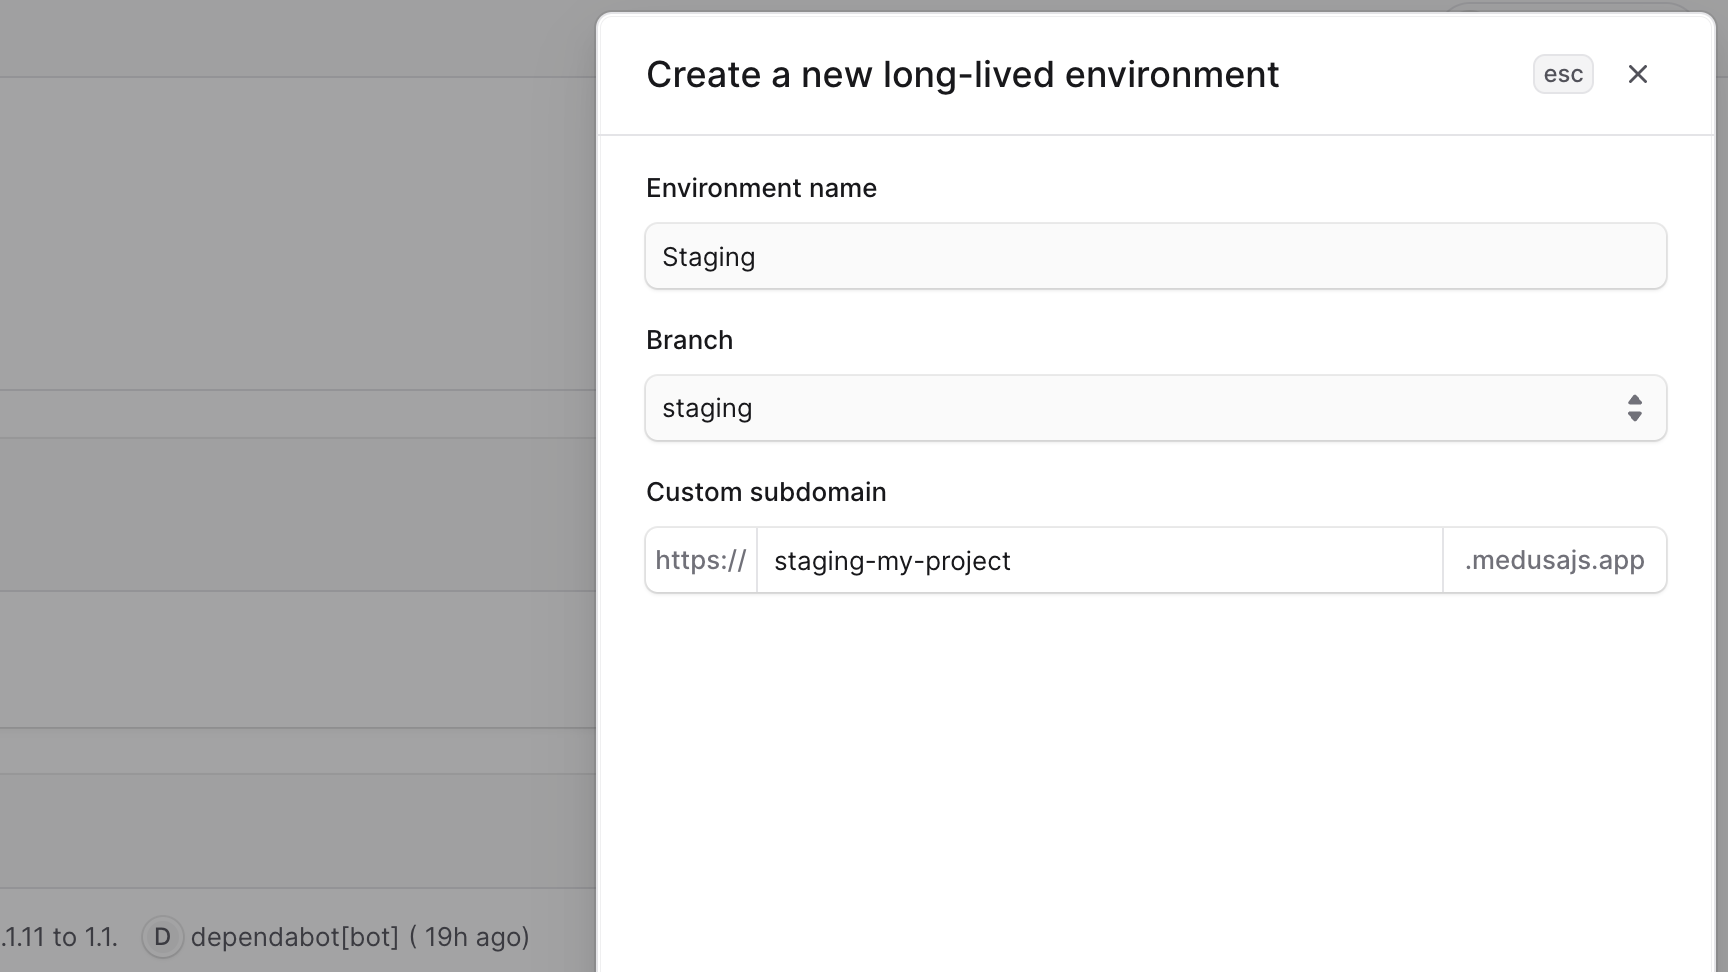
1. In the [project's dashboard](../../projects/page.mdx#open-project-dashboard), click on the "Add environment" button at the top right.
|
|
2. In the side window that opens:
|
|
- Enter the name of the environment. For example, `Staging`.
|
|
- Select the branch you want to associate with this environment. For example, `staging`.
|
|
- If you don't see the branch you want to use, refresh the page to load the latest branches from your repository.
|
|
- Set the custom subdomain for the environment. All environments are subdomains of `medusajs.app`. So, if you set the subdomain to `staging-my-project`, the environment's URL will be `staging-my-project.medusajs.app`.
|
|
- Refer to the [Subdomain Restrictions](../../projects/page.mdx#subdomain-restrictions) guide for reserved subdomains and restrictions.
|
|
3. Once you're done, click the "Create" button.
|
|
|
|
|
|
|
|
The created environment will appear in the [project's dashboard](../../projects/page.mdx) as a card.
|
|
|
|
### Trigger Environment Deployment
|
|
|
|
After creating the environment, Medusa will automatically trigger a deployment for the environment using the associated branch (for example, `staging`). This includes:
|
|
|
|
- Deploying the environment from the associated branch.
|
|
- Setting up the database and resources for the environment. These are different from the resources of other environments.
|
|
|
|
After that, Medusa will automatically deploy the environment whenever you push a new commit to the associated branch.
|
|
|
|
### Create Medusa Admin User in Environment
|
|
|
|
After the environment is deployed, you can log in either with:
|
|
|
|
1. Your Cloud account by clicking the "Log in with Medusa Cloud" button. A user will be created in the Medusa application with the same email as your Cloud account.
|
|
2. The email and password you set using environment variables.
|
|
|
|
<Note title="Can't find the Log in With Medusa Cloud Button?">
|
|
|
|
Refer to the [Access Deployment](../../deployments/access/page.mdx#cant-find-the-log-in-with-medusa-cloud-button) guide for troubleshooting steps.
|
|
|
|
</Note>
|
|
|
|
You can set the initial admin user's email and password only once if they aren't already set in the environment. Updating these environment variables later won't change the existing admin user's credentials.
|
|
|
|
To set the initial admin user's email and password:
|
|
|
|
1. In the [project's dashboard](../../projects/page.mdx#open-project-dashboard), click on the environment you just created.
|
|
2. In the environment's dashboard, click on the "Settings" tab.
|
|
3. In the "Add new environment variables" section, add the following environment variables:
|
|
|
|
```shell
|
|
USER_INITIAL_EMAIL=admin@test.com
|
|
USER_INITIAL_PASSWORD=secret
|
|
```
|
|
|
|
<Note title="Tip">
|
|
|
|
You can paste the above variables directly in the Key field and both environment variables will be filled.
|
|
|
|
</Note>
|
|
|
|
Make sure to replace the values with your desired email and password.
|
|
|
|
4. Click the "Save" button to save the environment variables.
|
|
|
|
#### Redeploy Environment
|
|
|
|
If you added the initial admin user's email and password environment variables, you need to redeploy the environment for the changes to take effect:
|
|
|
|
1. Go back to the environment's dashboard by clicking the "Overview" tab.
|
|
2. Click on the "Redeploy" button to redeploy the environment with the new environment variables.
|
|
|
|
This will redeploy the environment's live deployment with the new admin user credentials.
|
|
|
|

|
|
|
|
Then, wait for the deployment to finish. You can check its status in the "Deployments" section. Once it's deployed, you can [access the environment](#access-deployed-environment) using its URL.
|
|
|
|
---
|
|
|
|
## Access Deployed Environment
|
|
|
|
Once an environment is deployed, you can access it through its URL.
|
|
|
|
Learn more about how to access an environment's deployment in the [Access Deployment](../../deployments/access/page.mdx) guide.
|
|
|
|
---
|
|
|
|
## Open Environment Dashboard
|
|
|
|
On the environment's dashboard, you can view its details, logs, and settings. You can also manage the environment's variables, deployment rules, and database dump.
|
|
|
|
To open an environment's dashboard:
|
|
|
|
1. Make sure you're viewing the [correct organization's dashboard in Cloud](../../organizations/page.mdx#switch-organization).
|
|
2. Click on the project that contains the environment you want to view.
|
|
3. In the project's dashboard, click on the environment you want to view.
|
|
|
|
This will open the environment's dashboard. You can see the environment's name at the top of the Cloud dashboard.
|
|
|
|
|
|
|
|
### Find Environment Details
|
|
|
|
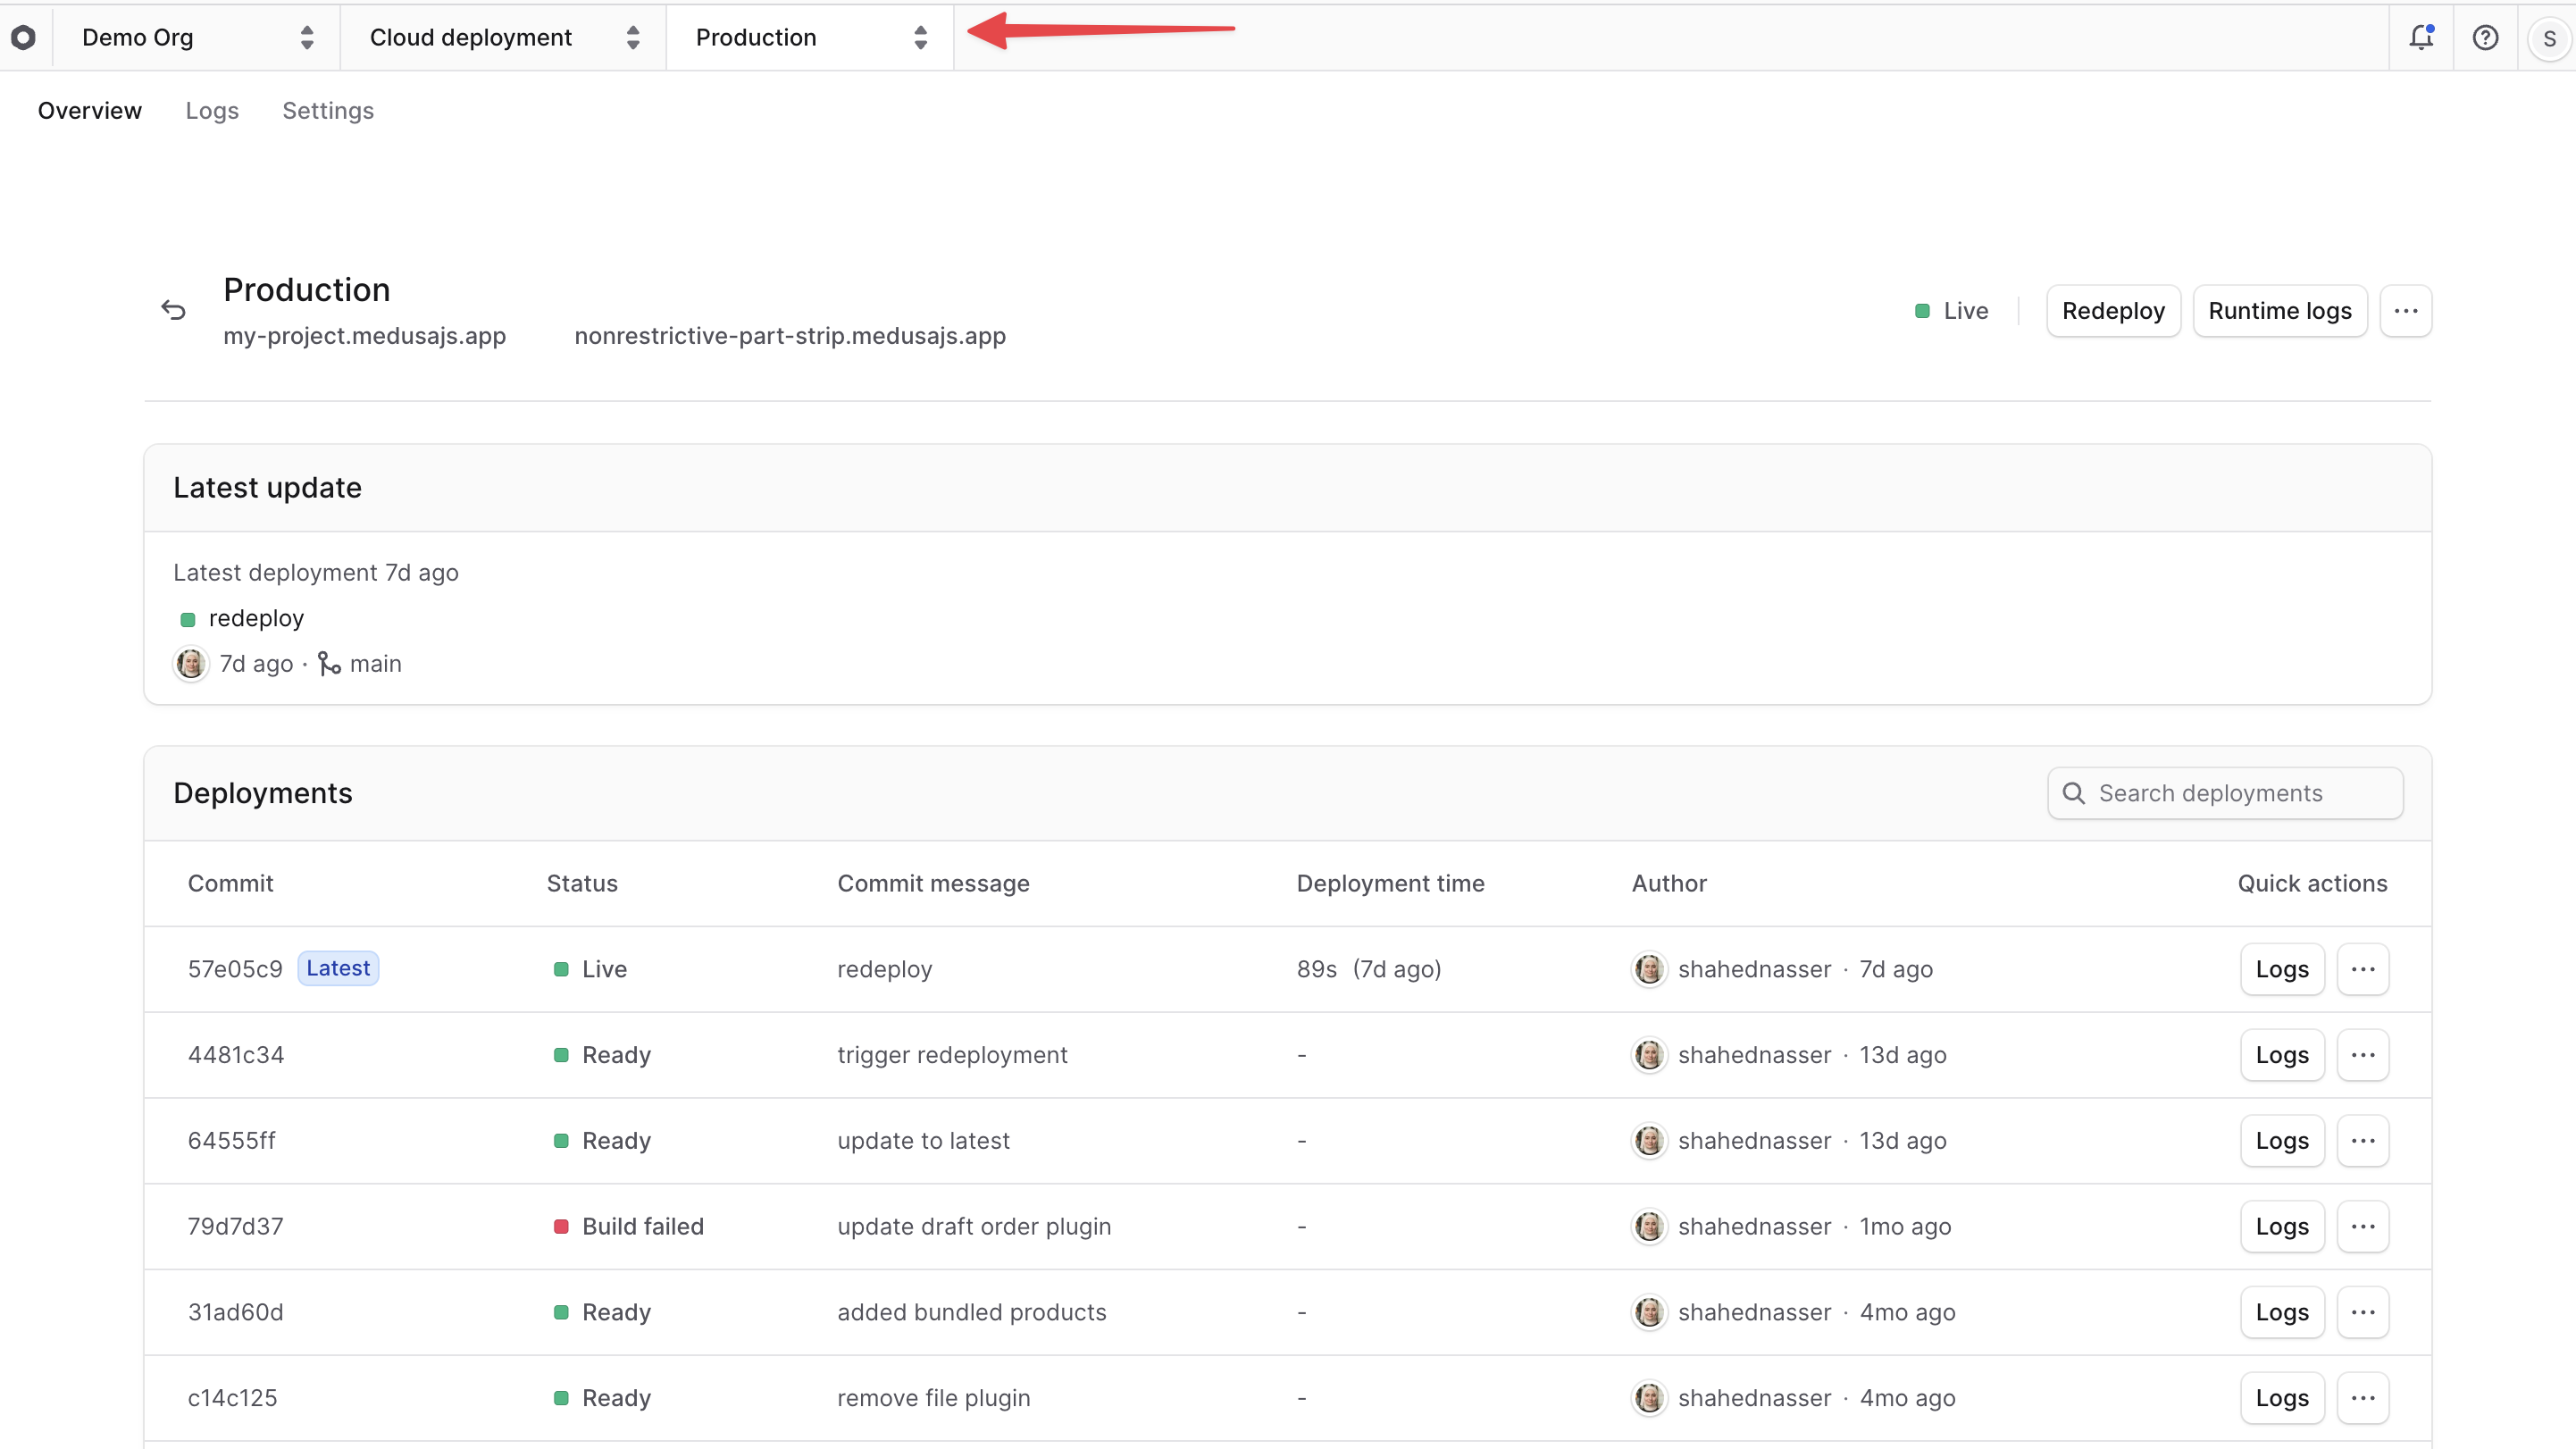
On the environment's dashboard, you can find the following details:
|
|
|
|

|
|
|
|
1. **Environment URL**: The URL to access the environment. You can find it below the environment's name.
|
|
2. **Environment Status**: The current status of the environment, such as "Live" or "Deploying". You can find it at the top right of the environment's dashboard.
|
|
3. **Environment Deployments**: The list of deployments for the environment, including the latest deployment. You can find it in the "Deployments" section of the environment's dashboard.
|
|
|
|
### Switch Environments
|
|
|
|
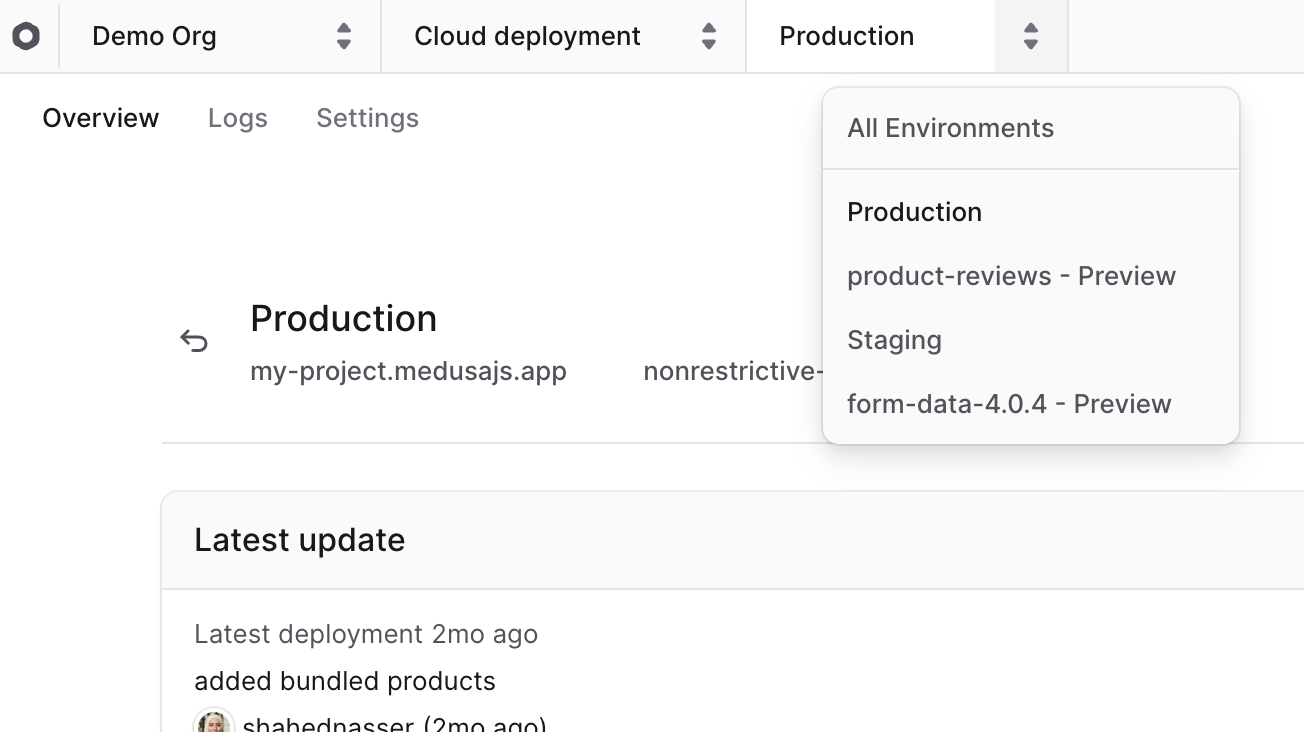
The environment's name at the top of the dashboard is also an environment switcher.
|
|
|
|
To switch to a different environment:
|
|
|
|
1. Click on the <InlineIcon Icon={ChevronUpDown} alt="switch environment" /> icon next to the environment's name at the top of the Cloud dashboard.
|
|
2. Choose the environment you want to switch to from the dropdown.
|
|
|
|
|
|
|
|
This will change the view to the selected environment, and you'll see its details, logs, and settings.
|
|
|
|
---
|
|
|
|
## View Environment Logs
|
|
|
|
You can view build and runtime logs for an environment in the "Logs" section of the environment's dashboard. These logs help you debug issues in your application.
|
|
|
|
Learn more in the [Logs guide](../../logs/page.mdx).
|
|
|
|
---
|
|
|
|
## Manage Environment Variables
|
|
|
|
In the environment's "Settings" tab, you can manage the environment variables for the environment. Environment variables are key-value pairs that store sensitive information, such as API keys, or configurations that your application needs to run.
|
|
|
|
Learn how to manage environment variables in the [Environment Variables](../environment-variables/page.mdx) guide.
|
|
|
|
---
|
|
|
|
## Change Environment's Branch
|
|
|
|
<Note>
|
|
|
|
You can't change the branch of preview environments. This section only applies to long-lived environments, such as Production or Staging.
|
|
|
|
</Note>
|
|
|
|
In an environment's "Settings" tab, you can manage the deployment rules for the environment. Deployment rules allow you to control how and when deployments are triggered for the environment.
|
|
|
|
To change the branch associated with an environment using deployment rules:
|
|
|
|
1. In the [environment's dashboard](#open-environment-dashboard), click on the "Settings" tab.
|
|
2. Choose the "Deployment rules" tab from the sidebar.
|
|
3. Click the <InlineIcon Icon={EllipsisHorizontal} alt="three-dots" /> icon at the right side of the `branch` rule.
|
|
4. Choose "Edit" from the dropdown menu.
|
|
5. In the side window that opens, you can change the branch associated with the environment.
|
|
6. Once you're done, click the "Save" button.
|
|
|
|
Changes will take effect the next time you push a commit to the new branch. The environment will be redeployed with the latest changes from the new branch.
|
|
|
|

|
|
|
|
---
|
|
|
|
## Import and Export Environment's Database Dump
|
|
|
|
In the environment's "Settings" tab, you can export a database dump of the environment. This is useful for backing up the environment's data, debugging issues, or migrating the data to another environment.
|
|
|
|
You can also import a database dump to use existing data that you have, or to restore the environment to a previous state.
|
|
|
|
Learn more in the [Database](../../database/page.mdx) guide.
|
|
|
|
---
|
|
|
|
## Delete an Environment
|
|
|
|
<Note title="Danger" type="warning">
|
|
|
|
Deleting an environment will delete all its resources and settings, including its database and environment variables. This action is irreversible. You won't be able to recover any data after deletion.
|
|
|
|
</Note>
|
|
|
|
You can delete any environment in your project, except for the Production environment.
|
|
|
|
To delete an environment:
|
|
|
|
1. In the environment's dashboard, click on the "Settings" tab.
|
|
2. Click the "Delete Environment" button.
|
|
|
|

|