330 lines
9.9 KiB
Plaintext
330 lines
9.9 KiB
Plaintext
import { Prerequisites, CodeTabs, CodeTab } from "docs-ui"
|
|
|
|
export const metadata = {
|
|
title: `Translate Custom Data Models`,
|
|
}
|
|
|
|
# {metadata.title}
|
|
|
|
In this chapter, you'll learn how to support translations for your custom data models using the Translation Module.
|
|
|
|
<Prerequisites
|
|
items={[
|
|
{
|
|
text: "Medusa v2.12.4 or later",
|
|
link: "https://github.com/medusajs/medusa/releases/tag/v2.12.4"
|
|
},
|
|
{
|
|
text: "Translation Module Configured",
|
|
link: "/commerce-modules/translation#configure-translation-module",
|
|
},
|
|
]}
|
|
/>
|
|
|
|
## Summary
|
|
|
|
The Translation Module allows you to extend translation capabilities to custom data models in your Medusa application. Then, you can [manage translations from the Medusa Admin](!user-guide!/settings/translations), and serve translated resources in your configured locales.
|
|
|
|
By following this guide, you'll learn how to:
|
|
|
|
- Configure the Translation Module to support translations for your custom data models.
|
|
- Manage translations for your custom data models from the Medusa Admin.
|
|
- Serve translated resources in your configured locales.
|
|
|
|
---
|
|
|
|
## Prerequisites: Custom Data Model
|
|
|
|
This guide assumes you already have a custom [module](!docs!/learn/fundamentals/modules) with a data model. The guide will use a Blog Module with the following `Post` data model as an example:
|
|
|
|
```ts title="src/modules/blog/models/post.ts"
|
|
import { model } from "@medusajs/framework/utils"
|
|
|
|
const Post = model.define("post", {
|
|
id: model.id().primaryKey(),
|
|
title: model.text(),
|
|
})
|
|
|
|
export default Post
|
|
```
|
|
|
|
The module must also be registered in `medusa-config.ts`. For example:
|
|
|
|
```ts title="medusa-config.ts"
|
|
module.exports = defineConfig({
|
|
// ...
|
|
modules: [
|
|
// other modules...
|
|
{
|
|
resolve: "./src/modules/blog",
|
|
},
|
|
],
|
|
})
|
|
```
|
|
|
|
---
|
|
|
|
## Step 1: Configure Translatable Entities
|
|
|
|
The first step is to configure the Translation Module with the custom entities you want to support translations for.
|
|
|
|
Before proceeding, run the `build` command to ensure the generated types are up-to-date:
|
|
|
|
```bash npm2yarn
|
|
npm run build
|
|
```
|
|
|
|
This will allow you to benefit from auto-completion when configuring the Translation Module.
|
|
|
|
Next, in `medusa-config.ts`, add the `options.entities` property to the Translation Module configuration:
|
|
|
|
export const configHighlights = [
|
|
["8", "entities", "The custom entities to support translations for."],
|
|
["10", "type", "The name of the table for the custom data model."],
|
|
["11", "fields", "The fields of the custom data model to support translations for."]
|
|
]
|
|
|
|
```ts title="medusa-config.ts" highlights={configHighlights}
|
|
module.exports = defineConfig({
|
|
// ...
|
|
modules: [
|
|
// other modules...
|
|
{
|
|
resolve: "@medusajs/medusa/translation",
|
|
options: {
|
|
entities: [
|
|
{
|
|
type: "post",
|
|
fields: ["title"],
|
|
},
|
|
],
|
|
},
|
|
},
|
|
],
|
|
})
|
|
```
|
|
|
|
The `options.entities` option is an array of objects indicating the custom data models to support translations for. Each object has the following properties:
|
|
|
|
1. `type`: The name of the table where the custom data model is stored. This is the same value passed as the first parameter to `model.define`.
|
|
2. `fields`: An array of fields in the custom data model to support translations for.
|
|
|
|
---
|
|
|
|
## Step 2: Manage Translations from Medusa Admin
|
|
|
|
After configuring the Translation Module, you can manage translations for your custom data models from the Medusa Admin.
|
|
|
|
Run the following command to start the Medusa application:
|
|
|
|
```bash npm2yarn
|
|
npm run dev
|
|
```
|
|
|
|
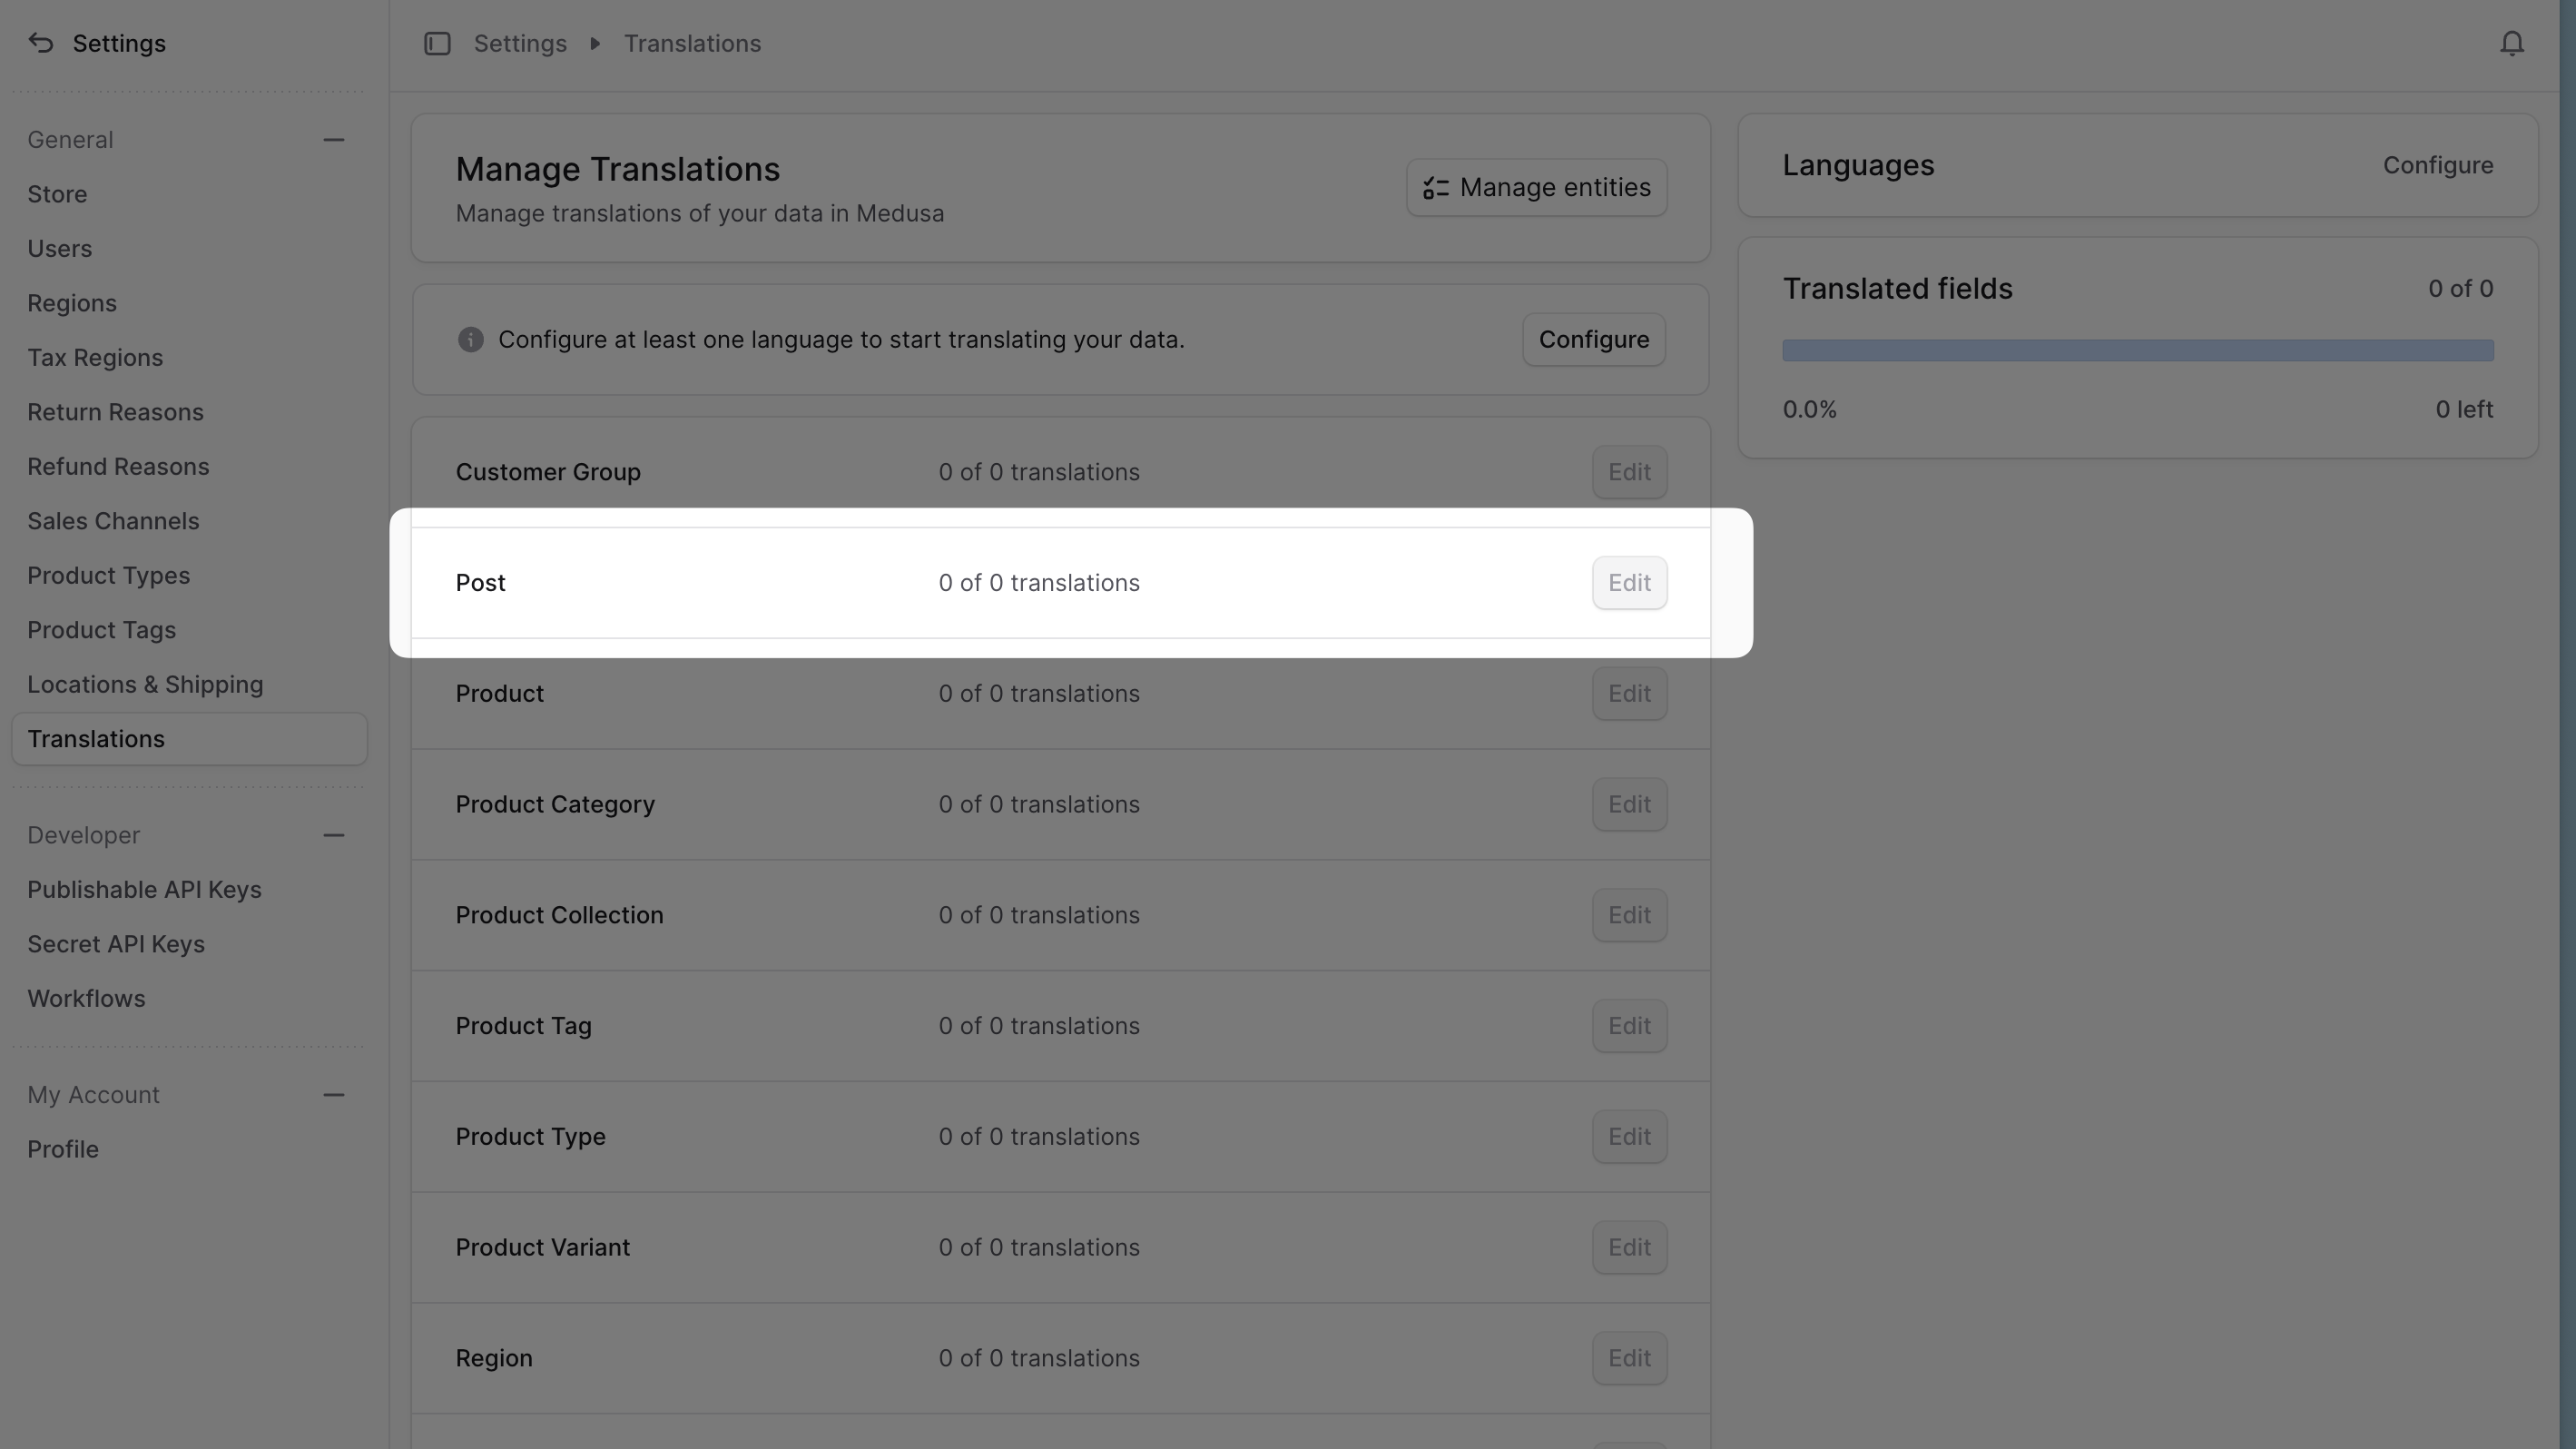
Then, open the Medusa Admin and go to Settings -> Translations. You should see your custom data model in the list of translatable resources.
|
|
|
|
|
|
|
|
Click the Edit button for your custom data model to manage translations for its resources. You can manage translations for the configured locales and fields.
|
|
|
|
Learn more in the [Translations User Guide](!user-guide!/settings/translations).
|
|
|
|
---
|
|
|
|
## Step 3: Serve Translated Resources
|
|
|
|
Finally, you can serve translated resources for your custom data models in your configured locales. This section focuses on returning records with translated fields from API routes.
|
|
|
|
### Pass Locale in API Requests
|
|
|
|
Medusa supports passing the desired locale in API requests to `/store` routes using either:
|
|
|
|
1. The `locale` query parameter.
|
|
2. The `x-medusa-locale` header.
|
|
|
|
For example, assuming you have a `/store/posts` API route, you can pass the locale in the request as follows:
|
|
|
|
<CodeTabs group="localization">
|
|
<CodeTab label="Query Parameter" value="query-parameter">
|
|
```bash
|
|
curl "http://localhost:9000/store/posts?locale=fr-FR" \
|
|
-H 'x-publishable-api-key: {your_publishable_api_key}'
|
|
```
|
|
</CodeTab>
|
|
<CodeTab label="Request Header" value="request-header">
|
|
```bash
|
|
curl "http://localhost:9000/store/posts" \
|
|
-H 'x-publishable-api-key: {your_publishable_api_key}' \
|
|
-H 'x-medusa-locale: fr-FR'
|
|
```
|
|
</CodeTab>
|
|
</CodeTabs>
|
|
|
|
<Note>
|
|
|
|
You must pass a publishable API key in the request header to store API routes. Learn more in the [Store API reference](!api!/store#publishable-api-key).
|
|
|
|
</Note>
|
|
|
|
If your API route isn't under the `/store` prefix, you must apply the `applyLocale` middleware. For example, add the middleware to the `src/api/middlewares.ts` file:
|
|
|
|
```ts title="src/api/middlewares.ts"
|
|
import { applyLocale, defineMiddlewares } from "@medusajs/framework/http"
|
|
|
|
export default defineMiddlewares({
|
|
routes: [
|
|
{
|
|
matcher: "/posts",
|
|
middlewares: [applyLocale],
|
|
},
|
|
],
|
|
})
|
|
```
|
|
|
|
This allows you to pass the locale in the query parameter or request header for the `/posts` API route.
|
|
|
|
### Handle Translations in API Routes
|
|
|
|
In your custom API routes, you can retrieve the request's locale from the `locale` property of the `MedusaRequest` object. Pass that property to [Query](!docs!/learn/fundamentals/module-links/query) to retrieve your data models with translated fields.
|
|
|
|
For example, to retrieve blog posts with translated titles in the `/store/posts` API route:
|
|
|
|
export const apiRouteHighlights = [
|
|
["15", "locale", "Pass the request locale to the query options."],
|
|
]
|
|
|
|
```ts title="src/api/routes/store/posts.ts" highlights={apiRouteHighlights}
|
|
import { MedusaRequest, MedusaResponse } from "@medusajs/framework/http"
|
|
|
|
export async function GET(
|
|
req: MedusaRequest,
|
|
res: MedusaResponse
|
|
) {
|
|
const query = req.scope.resolve("query")
|
|
|
|
const { data: posts } = await query.graph(
|
|
{
|
|
entity: "post",
|
|
fields: ["id", "title"],
|
|
},
|
|
{
|
|
locale: req.locale,
|
|
}
|
|
)
|
|
|
|
res.json({ posts })
|
|
}
|
|
```
|
|
|
|
In this example, the `locale` option is set to `req.locale`. Medusa will set the `title` field of each post to its translated value if a translation is available for the requested locale. Otherwise, it returns the original value stored in the data model.
|
|
|
|
---
|
|
|
|
## Step 4: Test the Implementation
|
|
|
|
To test the implementation, start the Medusa application if you haven't already:
|
|
|
|
```bash npm2yarn
|
|
npm run dev
|
|
```
|
|
|
|
Then, send a request to your custom API route with the desired locale. For example:
|
|
|
|
```bash
|
|
curl "http://localhost:9000/store/posts?locale=fr-FR" \
|
|
-H 'x-publishable-api-key: {your_publishable_api_key}'
|
|
```
|
|
|
|
This should return the list of blog posts with their French translations for the `title` field if available:
|
|
|
|
```json
|
|
{
|
|
"posts": [
|
|
{
|
|
"id": "post_123",
|
|
"title": "Titre de l'Article"
|
|
},
|
|
{
|
|
"id": "post_456",
|
|
"title": "Un Autre Titre"
|
|
}
|
|
]
|
|
}
|
|
```
|
|
|
|
---
|
|
|
|
## Pass Locale to useQueryGraphStep
|
|
|
|
If your API route executes a workflow and returns its result, you can retrieve data models with translated fields in the workflow by passing the locale to `useQueryGraphStep`.
|
|
|
|
For example:
|
|
|
|
export const workflowHighlights = [
|
|
["5", "locale", "Pass the locale to the workflow"],
|
|
["17", "locale", "Pass the request locale to the query options."],
|
|
]
|
|
|
|
```ts title="src/workflows/handle-posts.ts" highlights={workflowHighlights}
|
|
import { createWorkflow, WorkflowResponse } from "@medusajs/framework/workflows-sdk"
|
|
import { useQueryGraphStep } from "@medusajs/medusa/core-flows"
|
|
|
|
type WorkflowInput = {
|
|
locale: string;
|
|
}
|
|
|
|
export const handlePostsWorkflow = createWorkflow(
|
|
"handle-posts",
|
|
(input: WorkflowInput) => {
|
|
// do something...
|
|
|
|
const { data: posts } = useQueryGraphStep({
|
|
entity: "post",
|
|
fields: ["id", "title"],
|
|
options: {
|
|
locale: input.locale,
|
|
},
|
|
})
|
|
|
|
return new WorkflowResponse({
|
|
posts,
|
|
})
|
|
}
|
|
)
|
|
```
|
|
|
|
In this example, the workflow accepts a `locale` input parameter. You then retrieve the posts with translated titles by passing the `locale` input to `useQueryGraphStep`.
|
|
|
|
The returned posts will have their `title` field set to the translated value if a translation is available for the requested locale.
|
|
|
|
You can execute the workflow in your custom API routes and pass the request locale as an input parameter:
|
|
|
|
```ts title="src/api/routes/store/posts.ts"
|
|
import { MedusaRequest, MedusaResponse } from "@medusajs/framework/http"
|
|
import { handlePostsWorkflow } from "../../workflows/handle-posts"
|
|
|
|
export async function GET(
|
|
req: MedusaRequest,
|
|
res: MedusaResponse
|
|
) {
|
|
const { result } = await handlePostsWorkflow(req.scope)
|
|
.run({
|
|
input: {
|
|
locale: req.locale,
|
|
},
|
|
})
|
|
|
|
res.json(result)
|
|
}
|
|
```
|
|
|
|
The returned posts in the API response will have their `title` field set to the translated value if a translation is available for the requested locale.
|
|
|
|
---
|
|
|
|
## Manage Translations with the Translation Module Service
|
|
|
|
For more complex cases, you can manage translations for your custom data models programmatically using the Translation Module's service. You can create, update, delete, and retrieve translations of any resource using the service's methods.
|
|
|
|
Refer to the [Translation Module service reference](/references/translation) for a full list of available methods and how to use them.
|