* initialized next.js project

* finished markdown sections

* added operation schema component

* change page metadata

* eslint fixes

* fixes related to deployment

* added response schema

* resolve max stack issue

* support for different property types

* added support for property types

* added loading for components

* added more loading

* type fixes

* added oneOf type

* removed console

* fix replace with push

* refactored everything

* use static content for description

* fixes and improvements

* added code examples section

* fix path name

* optimizations

* fixed tag navigation

* add support for admin and store references

* general enhancements

* optimizations and fixes

* fixes and enhancements

* added search bar

* loading enhancements

* added loading

* added code blocks

* added margin top

* add empty response text

* fixed oneOf parameters

* added path and query parameters

* general fixes

* added base path env variable

* small fix for arrays

* enhancements

* design enhancements

* general enhancements

* fix isRequired

* added enum values

* enhancements

* general fixes

* general fixes

* changed oas generation script

* additions to the introduction section

* added copy button for code + other enhancements

* fix response code block

* fix metadata

* formatted store introduction

* move sidebar logic to Tags component

* added test env variables

* fix code block bug

* added loading animation

* added expand param + loading

* enhance operation loading

* made responsive + improvements

* added loading provider

* fixed loading

* adjustments for small devices

* added sidebar label for endpoints

* added feedback component

* fixed analytics

* general fixes

* listen to scroll for other headings

* added sample env file

* update api ref files + support new fields

* fix for external docs link

* added new sections

* fix last item in sidebar not showing

* move docs content to www/docs

* change redirect url

* revert change

* resolve build errors

* configure rewrites

* changed to environment variable url

* revert changing environment variable name

* add environment variable for API path

* fix links

* fix tailwind settings

* remove vercel file

* reconfigured api route

* move api page under api

* fix page metadata

* fix external link in navigation bar

* update api spec

* updated api specs

* fixed google lint error

* add max-height on request samples

* add padding before loading

* fix for one of name

* fix undefined types

* general fixes

* remove response schema example

* redesigned navigation bar

* redesigned sidebar

* fixed up paddings

* added feedback component + report issue

* fixed up typography, padding, and general styling

* redesigned code blocks

* optimization

* added error timeout

* fixes

* added indexing with algolia + fixes

* fix errors with algolia script

* redesign operation sections

* fix heading scroll

* design fixes

* fix padding

* fix padding + scroll issues

* fix scroll issues

* improve scroll performance

* fixes for safari

* optimization and fixes

* fixes to docs + details animation

* padding fixes for code block

* added tab animation

* fixed incorrect link

* added selection styling

* fix lint errors

* redesigned details component

* added detailed feedback form

* api reference fixes

* fix tabs

* upgrade + fixes

* updated documentation links

* optimizations to sidebar items

* fix spacing in sidebar item

* optimizations and fixes

* fix endpoint path styling

* remove margin

* final fixes

* change margin on small devices

* generated OAS

* fixes for mobile

* added feedback modal

* optimize dark mode button

* fixed color mode useeffect

* minimize dom size

* use new style system

* radius and spacing design system

* design fixes

* fix eslint errors

* added meta files

* change cron schedule

* fix docusaurus configurations

* added operating system to feedback data

* change content directory name

* fixes to contribution guidelines

* revert renaming content

* added api-reference to documentation workflow

* fixes for search

* added dark mode + fixes

* oas fixes

* handle bugs

* added code examples for clients

* changed tooltip text

* change authentication to card

* change page title based on selected section

* redesigned mobile navbar

* fix icon colors

* fix key colors

* fix medusa-js installation command

* change external regex in algolia

* change changeset

* fix padding on mobile

* fix hydration error

* update depedencies
16 KiB
description, addHowToData
| description | addHowToData |
|---|---|
| Learn how to create a notification provider in Medusa. This guide explains the different methods available in a Notification provider. | true |
How to Create a Notification Provider
In this document, you’ll learn how to create a Notification Provider in Medusa.
:::note
If you’re unfamiliar with the Notification architecture in Medusa, it is recommended to check out the architecture overview first.
:::
Prerequisites
Before you start creating a Notification Provider, you need to either install a Medusa backend, or create it in a plugin. The Medusa backend must also have an event bus module installed, which is available when using the default Medusa backend starter.
Create a Notification Provider
Creating a Notification Provider is as simple as creating a TypeScript or JavaScript file in src/services. The name of the file is the name of the provider (for example, sendgrid.ts). A Notification Provider is essentially a Service that extends the AbstractNotificationService from @medusajs/medusa.
For example, create the file src/services/email-sender.ts with the following content:
import { AbstractNotificationService } from "@medusajs/medusa"
import { EntityManager } from "typeorm"

class EmailSenderService extends AbstractNotificationService {
  protected manager_: EntityManager
  protected transactionManager_: EntityManager

  sendNotification(
    event: string,
    data: unknown,
    attachmentGenerator: unknown
  ): Promise<{
      to: string;
      status: string;
      data: Record<string, unknown>;
    }> {
    throw new Error("Method not implemented.")
  }
  resendNotification(
    notification: unknown,
    config: unknown,
    attachmentGenerator: unknown
  ): Promise<{
      to: string;
      status: string;
      data: Record<string, unknown>;
    }> {
    throw new Error("Method not implemented.")
  }

}

export default EmailSenderService
Where EmailSenderService is the name of your Notification Provider Service.
Notification Providers must extend NotificationService from medusa-interfaces.
:::info
Following the naming convention of Services, the name of the file should be the slug name of the Notification Provider, and the name of the class should be the camel case name of the Notification Provider suffixed with “Service”. In the example above, the name of the file should be email-sender.js. You can learn more in the service documentation.
:::
identifier
Notification Provider Services must have a static property identifier.
The NotificationProvider entity has 2 properties: identifier and is_installed. The value of the identifier property in the Service class is used when the Notification Provider is created in the database.
The value of this property is also used later when you want to subscribe the Notification Provider to events in a Subscriber.
For example, in the class you created in the previous code snippet you can add the following property:
class EmailSenderService extends AbstractNotificationService {
  static identifier = "email-sender"
  // ...
}
constructor
You can use the constructor of your Notification Provider to have access to different Services in Medusa through dependency injection.
You can also use the constructor to initialize your integration with the third-party provider. For example, if you use a client to connect to the third-party provider’s APIs, you can initialize it in the constructor and use it in other methods in the Service.
Additionally, if you’re creating your Notification Provider as an external plugin to be installed on any Medusa backend and you want to access the options added for the plugin, you can access it in the constructor. The options are passed as a second parameter.
:::info
You can learn more about plugins and how to create them in the Plugins documentation.
:::
Continuing on with the previous example, if you want to use the OrderService later when sending notifications, you can inject it into the constructor:
import {
  AbstractNotificationService,
  OrderService,
} from "@medusajs/medusa"

class EmailSenderService extends AbstractNotificationService {
  protected manager_: EntityManager
  protected transactionManager_: EntityManager
  static identifier = "email-sender"
  protected orderService: OrderService

  constructor(container, options) {
    super(container)
    // you can access options here in case you're
    // using a plugin

    this.orderService = container.orderService
  }

  // ...
}
sendNotification
When an event is triggered that your Notification Provider is registered as a handler for, the NotificationService in Medusa’s core will execute the sendNotification method of your Notification Provider.
In this method, you can perform the necessary operation to send the Notification. Following the example above, you can send an email to the customer when they place an order.
This method receives three parameters:
eventName: This is the name of the event that was triggered. For example,order.placed.eventData: This is the data payload of the event that was triggered. For example, if theorder.placedevent is triggered, theeventDataobject contains the propertyidwhich is the ID of the order that was placed.attachmentGenerator: If you’ve previously attached a generator to theNotificationServiceusing theregisterAttachmentGeneratormethod, you have access to it here. You can use theattachmentGeneratorto generate on-demand invoices or other documents. The default value of this parameter is null.
:::info
You can learn more about what events are triggered in Medusa and their data payload in the Events List documentation.
:::
This method must return an object containing two properties:
to: a string that represents the receiver of the Notification. For example, if you sent an email to the customer thentois the email address of the customer. In other cases, it might be a phone number or a username.data: an object that contains the data used to send the Notification. For example, if you sent an order confirmation email to the customer, then thedataobject might include the order items or the subject of the email. Thisdatais necessary if the notification is resent later as you can use the same data.
Continuing with the previous example you can have the following implementation of the sendNotification method:
class EmailSenderService extends AbstractNotificationService {
  // ...
  async sendNotification(
    event: string,
    data: any,
    attachmentGenerator: unknown
  ): Promise<{
      to: string;
      status: string;
      data: Record<string, unknown>;
    }> {
    if (event === "order.placed") {
      // retrieve order
      const order = await this.orderService.retrieve(data.id)
      // TODO send email

      console.log("Notification sent")
      return {
        to: order.email,
        status: "done",
        data: {
          // any data necessary to send the email
          // for example:
          subject: "You placed a new order!",
          items: order.items,
        },
      }
    }
  }
}
In this code snippet, you check first if the event is order.placed. This can be helpful if you’re handling multiple events using the same Notification Provider.
You then retrieve the order using the ID and send the email. Here, the logic related to sending the email is not implemented as it is generally specific to your Notification Provider.
Finally, you return an object with the to property set to the customer email and the data property is an object that contains data necessary to send the email such as a subject or items.
:::note
The to and data properties are used in the NotificationService in Medusa’s core to create a new Notification record in the database. You can learn more about the Notification entity in the Architecture Overview documentation.
:::
resendNotification
Using the Resend Notification endpoint, an admin user can resend a Notification to the customer. The NotificationService in Medusa’s core then executes the resendNotification method in your Notification Provider.
This method receives three parameters:
notification: This is the original Notification record that was created after you sent the notification withsendNotification. You can get an overview of the entity and its attributes in the architecture overview, but most notably it includes thetoanddataattributes which are populated originally using thetoanddataproperties of the object you return insendNotification.config: In the Resend Notification endpoint you may specify an alternative receiver of the notification using thetorequest body parameter. For example, you may want to resend the order confirmation email to a different email. If that’s the case, you have access to it in theconfigparameter object. Otherwise,configwill be an empty object.attachmentGenerator: If you’ve previously attached a generator to the Notification Service using theregisterAttachmentGeneratormethod, you have access to it here. You can use theattachmentGeneratorto generate on-demand invoices or other documents. The default value of this parameter is null.
Similarly to the sendNotification method, this method must return an object containing two properties:
to: a string that represents the receiver of the Notification. You can either return the sametoavailable in thenotificationparameter or the updated one in theconfigparameter.data: an object that contains the data used to send the Notification. You can either return the samedatain thenotificationparameter or make any necessary updates to it.
Continuing with the previous example you can have the following implementation of the resendNotification method:
class EmailSenderService extends AbstractNotificationService {
  // ...
  async resendNotification(
    notification: any,
    config: any,
    attachmentGenerator: unknown
  ): Promise<{
      to: string;
      status: string;
      data: Record<string, unknown>;
    }> {
    // check if the receiver should be changed
    const to: string = config.to ? config.to : notification.to

    // TODO resend the notification using the same data
    // that is saved under notification.data

    console.log("Notification resent")
    return {
      to,
      status: "done",
      data: notification.data, // make changes to the data
    }
  }
}
In the above snippet, you check if the to should be changed by checking if the config parameter has a to property. Otherwise, you keep the same to address stored in the notification parameter.
You then resend the email. Here, the logic related to sending the email is not implemented as it is generally specific to your Notification Provider.
Finally, you return an object with the to property set to the email (either new or old) and the data property is the same data used before to send the original notification. you can alternatively make any changes to the data.
:::note
The to and data properties are used in the NotificationService in Medusa’s core to create a new Notification record in the database. No changes are made to the original Notification record created after the sendNotification method. This new record is associated with the original Notification record using the parent_id attribute in the entity. You can learn more about the Notification entity in the Architecture Overview documentation.
:::
Create a Subscriber
After creating your Notification Provider Service, you must create a Subscriber that registers this Service as a notification handler of events.
:::note
This section will not cover the basics of Subscribers. You can read the Subscribers documentation to learn more about them and how to create them.
:::
Following the previous example, to make sure the email-sender Notification Provider handles the order.placed event, create the file src/subscribers/notification.js with the following content:
class NotificationSubscriber {
  constructor({ notificationService }) {
    notificationService.subscribe(
      "order.placed",
      "email-sender"
    )
  }
  // ...
}

export default NotificationSubscriber
This subscriber accesses the notificationService using dependency injection. The notificationService contains a subscribe method that accepts 2 parameters. The first one is the name of the event to subscribe to, and the second is the identifier of the Notification Provider that is subscribing to that event.
:::tip
Notice that the value of the identifier static property defined in the EmailSenderService is used to register the Notification Provider to handle the order.placed event.
:::
Test Sending Notifications with your Notification Provider
Make sure you have an event bus module configured in your Medusa backend. You can learn more on how to do that in the Configurations guide.
Then, run the build command in the root directory of your Medusa backend:
npm run build
Next, start your Medusa backend:
npx medusa develop
Try now to place an order either using the REST APIs or using the storefront.
:::tip
If you don’t have a storefront installed you can get started with the Next.js Starter Template in minutes.
:::
After placing an order, you can see in your console the message “Notification Sent”. If you added your own notification sending logic, you should receive an email or alternatively the type of notification you’ve set up.
Test Resending Notifications with your Notification Provider
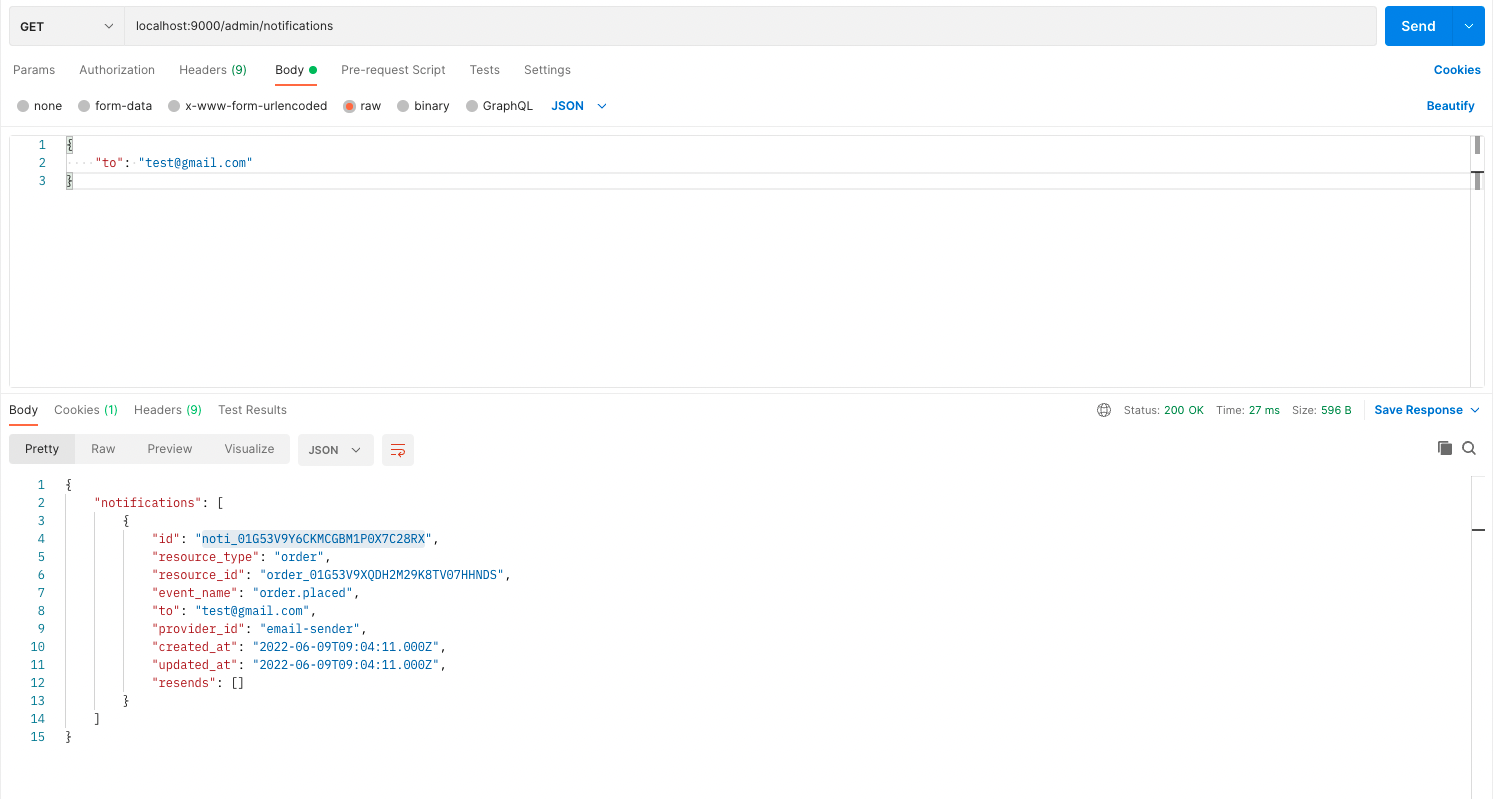
To test resending a notification, first, retrieve the ID of the notification you just sent using the List Notifications admin endpoint. You can pass as a body parameter the to or event_name parameters to filter out the notification you just sent.
:::tip
You must be authenticated as an admin user before sending this request. You can use the Authenticate a User endpoint to get authenticated.
:::
Then, send a request to the Resend Notification endpoint using the ID retrieved from the previous request. You can pass the to parameter in the body to change the receiver of the notification. You should see the message “Notification Resent” in your console and if you implemented your own logic for resending the notification it will be resent.
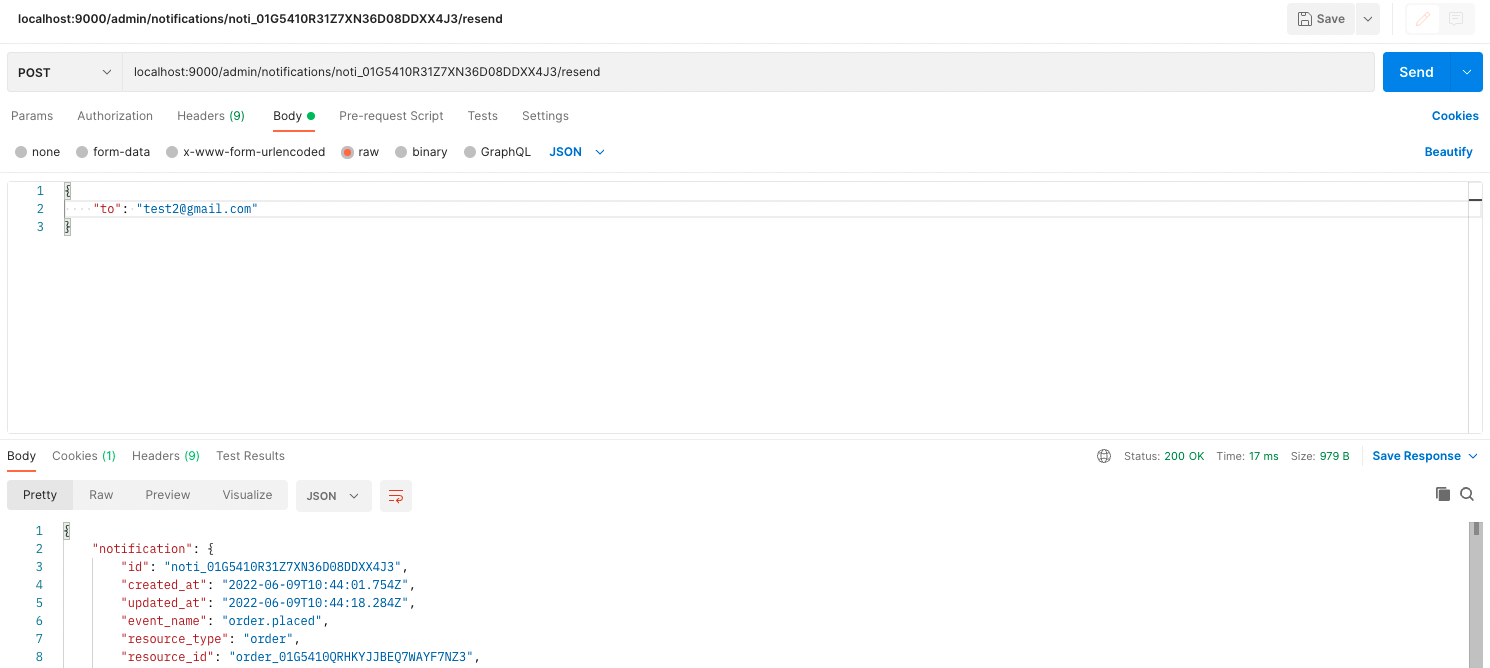
This request returns the same notification object as the List Notifications endpoint, but it now has a new object in the resends array. This is the resent notification. If you supplied a to parameter in the request body, you should see its value in the to property of the resent notification object.