170 lines
6.3 KiB
Plaintext
170 lines
6.3 KiB
Plaintext
import { AcademicCapSolid } from "@medusajs/icons"
|
|
|
|
export const metadata = {
|
|
title: `Point-of-Sale (POS) Recipe`,
|
|
}
|
|
|
|
# {metadata.title}
|
|
|
|
This recipe provides the general steps to build a Point of Sale (POS) system with Medusa.
|
|
|
|
## Overview
|
|
|
|
Building a POS system on top of an ecommerce engine introduces challenges related to the tech stack used, data sync across channels, and feature availability relevant to offline sales in a POS, not just online sales.
|
|
|
|
Medusa's modular architecture solves these challenges. Any frontend can utilize Medusa's commerce features, such as sales channels or multi-warehouse features, through its REST APIs.
|
|
|
|
<Note title="Related use-case">
|
|
|
|
[How Tekla built a POS system with Medusa](https://medusajs.com/blog/tekla-agilo-pos-case/).
|
|
|
|
</Note>
|
|
|
|
---
|
|
|
|
## Freedom in Choosing Your POS Tech Stack
|
|
|
|
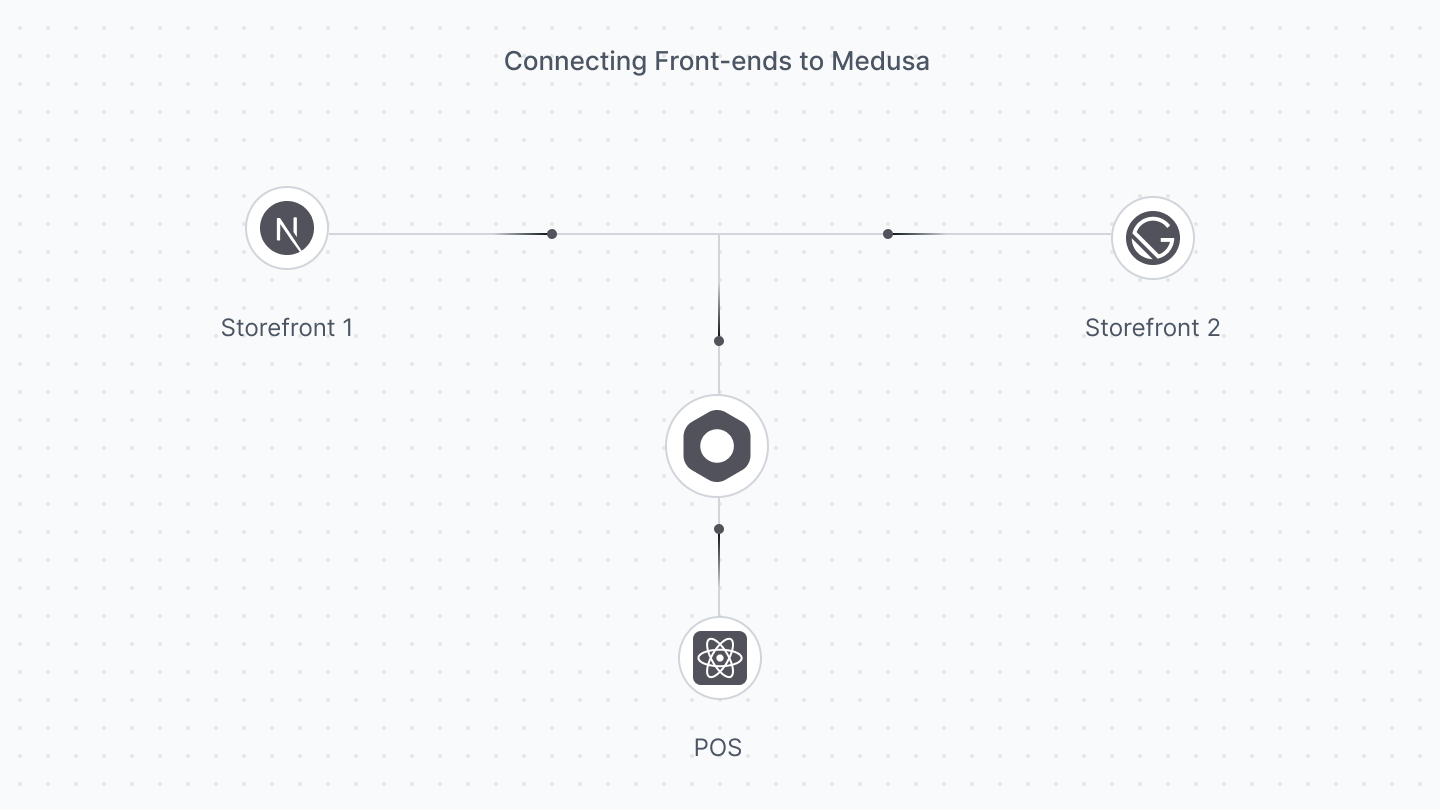
When you build a POS system, you must choose which programming framework, language, or tool you want to use.
|
|
|
|
Medusa's modular architecture removes any restrictions you may have while making this choice. Any client or front end can connect to the Medusa application using its headless REST APIs.
|
|
|
|
|
|
|
|
<Card
|
|
href="!api!/admin"
|
|
title="Admin REST APIs"
|
|
text="Check out available Admin REST APIs in Medusa."
|
|
icon={AcademicCapSolid}
|
|
/>
|
|
|
|
---
|
|
|
|
## Integrate a Barcode Scanner
|
|
|
|
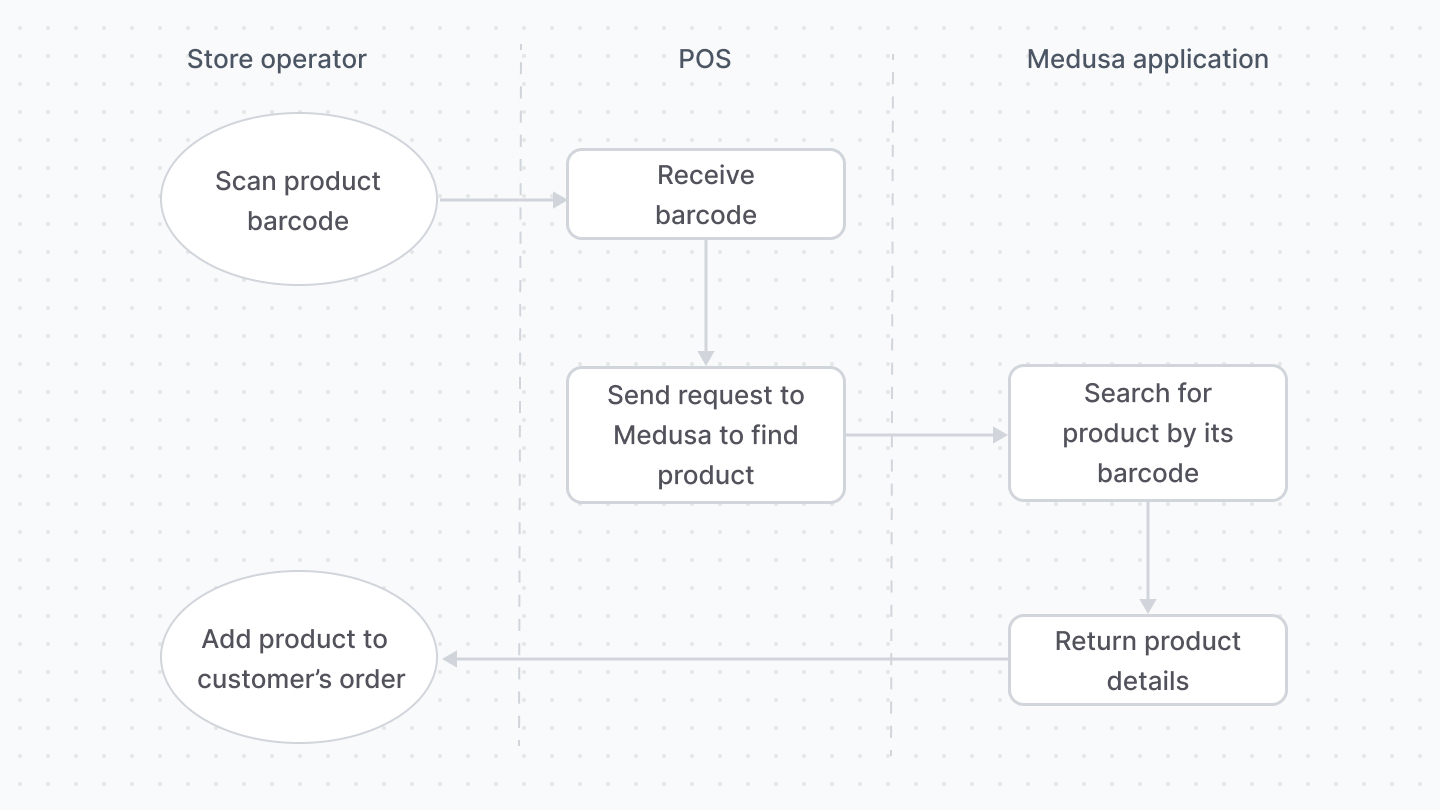
POS systems make the checkout process smoother by integrating a barcode scanner. Merchants scan a product by its barcode to check its details or add it to the customer's purchase.
|
|
|
|
The Product Module's `ProductVariant` data model has the properties to implement this integration, mainly the `barcode` attribute. Other notable properties include `ean`, `upc`, and `hs_code`, among others.
|
|
|
|
To search through product variants by their barcode, create a custom API Route and call it within your POS.
|
|
|
|
|
|
|
|
<CardList
|
|
itemsPerRow={2}
|
|
items={[
|
|
{
|
|
href: "/commerce-modules/product",
|
|
title: "Product Module",
|
|
text: "Learn about the Product Module.",
|
|
icon: AcademicCapSolid,
|
|
},
|
|
{
|
|
href: "!docs!/learn/fundamentals/api-routes",
|
|
title: "Create API Route",
|
|
text: "Learn how to create an API Route.",
|
|
icon: AcademicCapSolid,
|
|
},
|
|
]}
|
|
/>
|
|
|
|
---
|
|
|
|
## Access Accurate Inventory Details
|
|
|
|
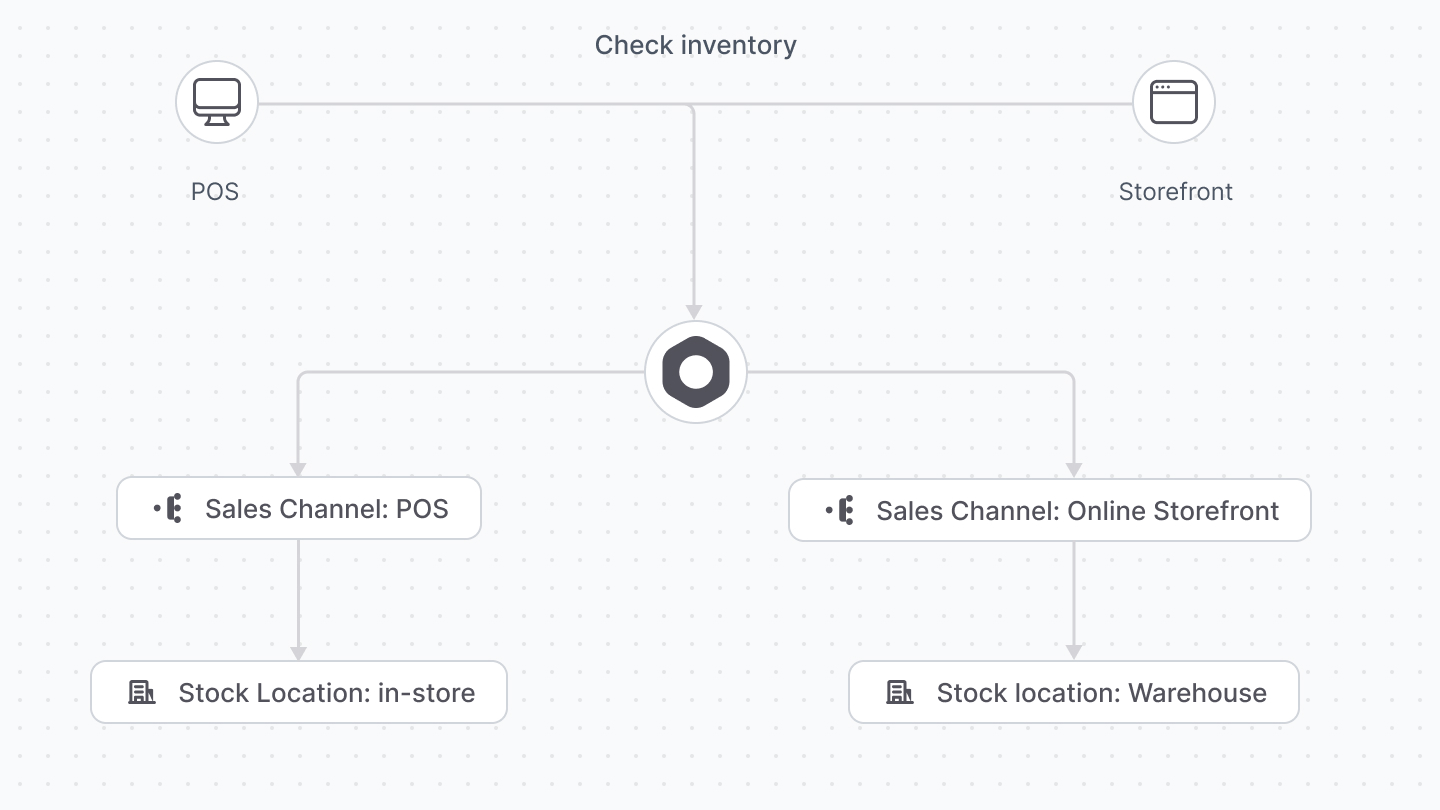
As you manage an online and offline store, it's essential to separate inventory quantity across different locations.
|
|
|
|
Medusa's [Inventory](../../commerce-modules/inventory/page.mdx), [Stock Location](../../commerce-modules/stock-location/page.mdx), and [Sales Channel](../../commerce-modules/sales-channel/page.mdx) modules allow merchants to manage the inventory items and their availability across locations and sales channels.
|
|
|
|
|
|
|
|
Merchants can create a sales channel for their online store and a sales channel for their POS system, then manage the inventory quantity of product variants in each channel.
|
|
|
|
This also opens the door for other business opportunities, such as an endless aisle experience. Suppose a product isn't available in-store but is available in different warehouses. You can allow customers to purchase that item in-store and deliver it to their address.
|
|
|
|
<CardList
|
|
items={[
|
|
{
|
|
href: "/commerce-modules/inventory",
|
|
title: "Inventory Module",
|
|
text: "Learn about the Inventory Module.",
|
|
icon: AcademicCapSolid,
|
|
},
|
|
{
|
|
href: "/commerce-modules/stock-location",
|
|
title: "Stock Location Module",
|
|
text: "Learn about the Stock Location Module.",
|
|
icon: AcademicCapSolid,
|
|
},
|
|
]}
|
|
/>
|
|
|
|
<Card
|
|
href="/commerce-modules/sales-channel"
|
|
title="Sales Channel Module"
|
|
text="Learn about the Sales Channel Module."
|
|
icon={AcademicCapSolid}
|
|
className="mt-1"
|
|
/>
|
|
|
|
---
|
|
|
|
## Build an Omni-channel Customer Experience
|
|
|
|
Using Medusa's [Customer Module](../../commerce-modules/customer/page.mdx), you can retrieve a customer's details from the Medusa application and place an order on the POS under their account. The customer can then view their order details on their online profile as if they had placed the order online.
|
|
|
|
In addition, using Medusa's [Promotion Module](../../commerce-modules/promotion/page.mdx), store operators can create promotions on the fly for customers using the POS system and apply them to their orders.
|
|
|
|
You can also create custom modules to provide features for a better customer experience, such as a rewards system or loyalty points.
|
|
|
|
<CardList
|
|
items={[
|
|
{
|
|
href: "/commerce-modules/customer",
|
|
title: "Customer Module",
|
|
text: "Learn about the Customer Module.",
|
|
icon: AcademicCapSolid,
|
|
},
|
|
{
|
|
href: "/commerce-modules/promotion",
|
|
title: "Promotion Module",
|
|
text: "Learn about the Promotion Module.",
|
|
icon: AcademicCapSolid,
|
|
},
|
|
]}
|
|
/>
|
|
|
|
<Card
|
|
href="!docs!/learn/fundamentals/modules"
|
|
title="Create a Module"
|
|
text="Learn how to create a module."
|
|
icon={AcademicCapSolid}
|
|
className="mt-1"
|
|
/>
|
|
|
|
---
|
|
|
|
## Accept Payment, Place Order, and Use RMA Features
|
|
|
|
Medusa's architecture allows you to integrate any third-party payment provider for your POS and online storefront. For example, you can integrate [Stripe Terminal](https://stripe.com/terminal) to accept in-store payments.
|
|
|
|
Once you accept the payment, place an order in the POS system using the [Draft Order APIs](!api!/admin#draft-orders). Draft orders provide similar features to an online checkout experience, including discounts, payment processing, and more.
|
|
|
|
Then, merchants can view all orders coming from different sales channels using the Medusa Admin. This keeps logistics and order handling consistent between online and in-store customers.
|
|
|
|
<CardList
|
|
items={[
|
|
{
|
|
href: "/references/payment/provider",
|
|
title: "Create a Payment Module Provider",
|
|
text: "Learn how to create a payment module provider.",
|
|
icon: AcademicCapSolid,
|
|
},
|
|
{
|
|
href: "!api!/admin",
|
|
title: "Admin REST APIs",
|
|
text: "Check out available Admin REST APIs.",
|
|
icon: AcademicCapSolid,
|
|
},
|
|
]}
|
|
/>
|