874 lines
38 KiB
Plaintext
874 lines
38 KiB
Plaintext
import { Card, Prerequisites, Details } from "docs-ui"
|
|
import { Github } from "@medusajs/icons"
|
|
|
|
export const ogImage = "https://res.cloudinary.com/dza7lstvk/image/upload/v1732704590/Medusa%20Resources/Integrations_Resend_pam0nf.jpg"
|
|
|
|
export const metadata = {
|
|
title: `Integrate Medusa with Resend (Email Notifications)`,
|
|
openGraph: {
|
|
images: [
|
|
{
|
|
url: ogImage,
|
|
width: 1600,
|
|
height: 900,
|
|
type: "image/jpeg"
|
|
}
|
|
],
|
|
},
|
|
twitter: {
|
|
images: [
|
|
{
|
|
url: ogImage,
|
|
width: 1600,
|
|
height: 900,
|
|
type: "image/jpeg"
|
|
}
|
|
]
|
|
}
|
|
}
|
|
|
|
# {metadata.title}
|
|
|
|
In this guide, you'll learn how to integrate Medusa with Resend.
|
|
|
|
When you install a Medusa application, you get a fully-fledged commerce platform with a framework for customization. Medusa's architecture supports integrating third-party services, such as an email service, that allow you to build your unique requirements around core commerce flows.
|
|
|
|
[Resend](https://resend.com/docs/introduction) is an email service with an intuitive developer experience to send emails from any application type, including Node.js servers. By integrating Resend with Medusa, you can build flows to send an email when a commerce operation is performed, such as when an order is placed.
|
|
|
|
This guide will teach you how to:
|
|
|
|
- Install and set up Medusa.
|
|
- Integrate Resend into Medusa for sending emails.
|
|
- Build a flow to send an email with Resend when a customer places an order.
|
|
|
|
You can follow this guide whether you're new to Medusa or an advanced Medusa developer.
|
|
|
|
<Card
|
|
title="Example Repository"
|
|
text="Find the full code of the guide in this repository."
|
|
href="https://github.com/medusajs/examples/tree/main/resend-integration"
|
|
icon={Github}
|
|
/>
|
|
|
|
---
|
|
|
|
## Step 1: Install a Medusa Application
|
|
|
|
<Prerequisites items={[
|
|
{
|
|
text: "Node.js v20+",
|
|
link: "https://nodejs.org/en/download"
|
|
},
|
|
{
|
|
text: "Git CLI tool",
|
|
link: "https://git-scm.com/downloads"
|
|
},
|
|
{
|
|
text: "PostgreSQL",
|
|
link: "https://www.postgresql.org/download/"
|
|
}
|
|
]} />
|
|
|
|
Start by installing the Medusa application on your machine with the following command:
|
|
|
|
```bash
|
|
npx create-medusa-app@latest
|
|
```
|
|
|
|
You'll first be asked for the project's name. Then, when you're asked whether you want to install the Next.js storefront, choose `Y` for yes.
|
|
|
|
Afterwards, the installation process will start, which will install the Medusa application in a directory with your project's name, and the Next.js storefront in a directory with the `{project-name}-storefront` name.
|
|
|
|
<Note title="Why is the storefront installed separately?">
|
|
|
|
The Medusa application is composed of a headless Node.js server and an admin dashboard. The storefront is installed or custom-built separately and connects to the Medusa application through its REST endpoints, called [API routes](!docs!/learn/fundamentals/api-routes). Learn more about Medusa's architecture in [this documentation](!docs!/learn/introduction/architecture).
|
|
|
|
</Note>
|
|
|
|
Once the installation finishes successfully, the Medusa Admin dashboard will open with a form to create a new user. Enter the user's credential and submit the form. Afterwards, you can login with the new user and explore the dashboard.
|
|
|
|
The Next.js storefront is also running at `http://localhost:8000`.
|
|
|
|
<Note title="Ran to Errors?">
|
|
|
|
Check out the [troubleshooting guides](../../../troubleshooting/create-medusa-app-errors/page.mdx) for help.
|
|
|
|
</Note>
|
|
|
|
---
|
|
|
|
## Step 2: Prepare Resend Account
|
|
|
|
If you don't have a Resend Account, create one on [their website](https://resend.com/emails).
|
|
|
|
In addition, Resend allows you to send emails from the address `onboarding@resend.dev` only to your account's email, which is useful for development purposes. If you have a custom domain to send emails from, add it to your Resend account's domains:
|
|
|
|
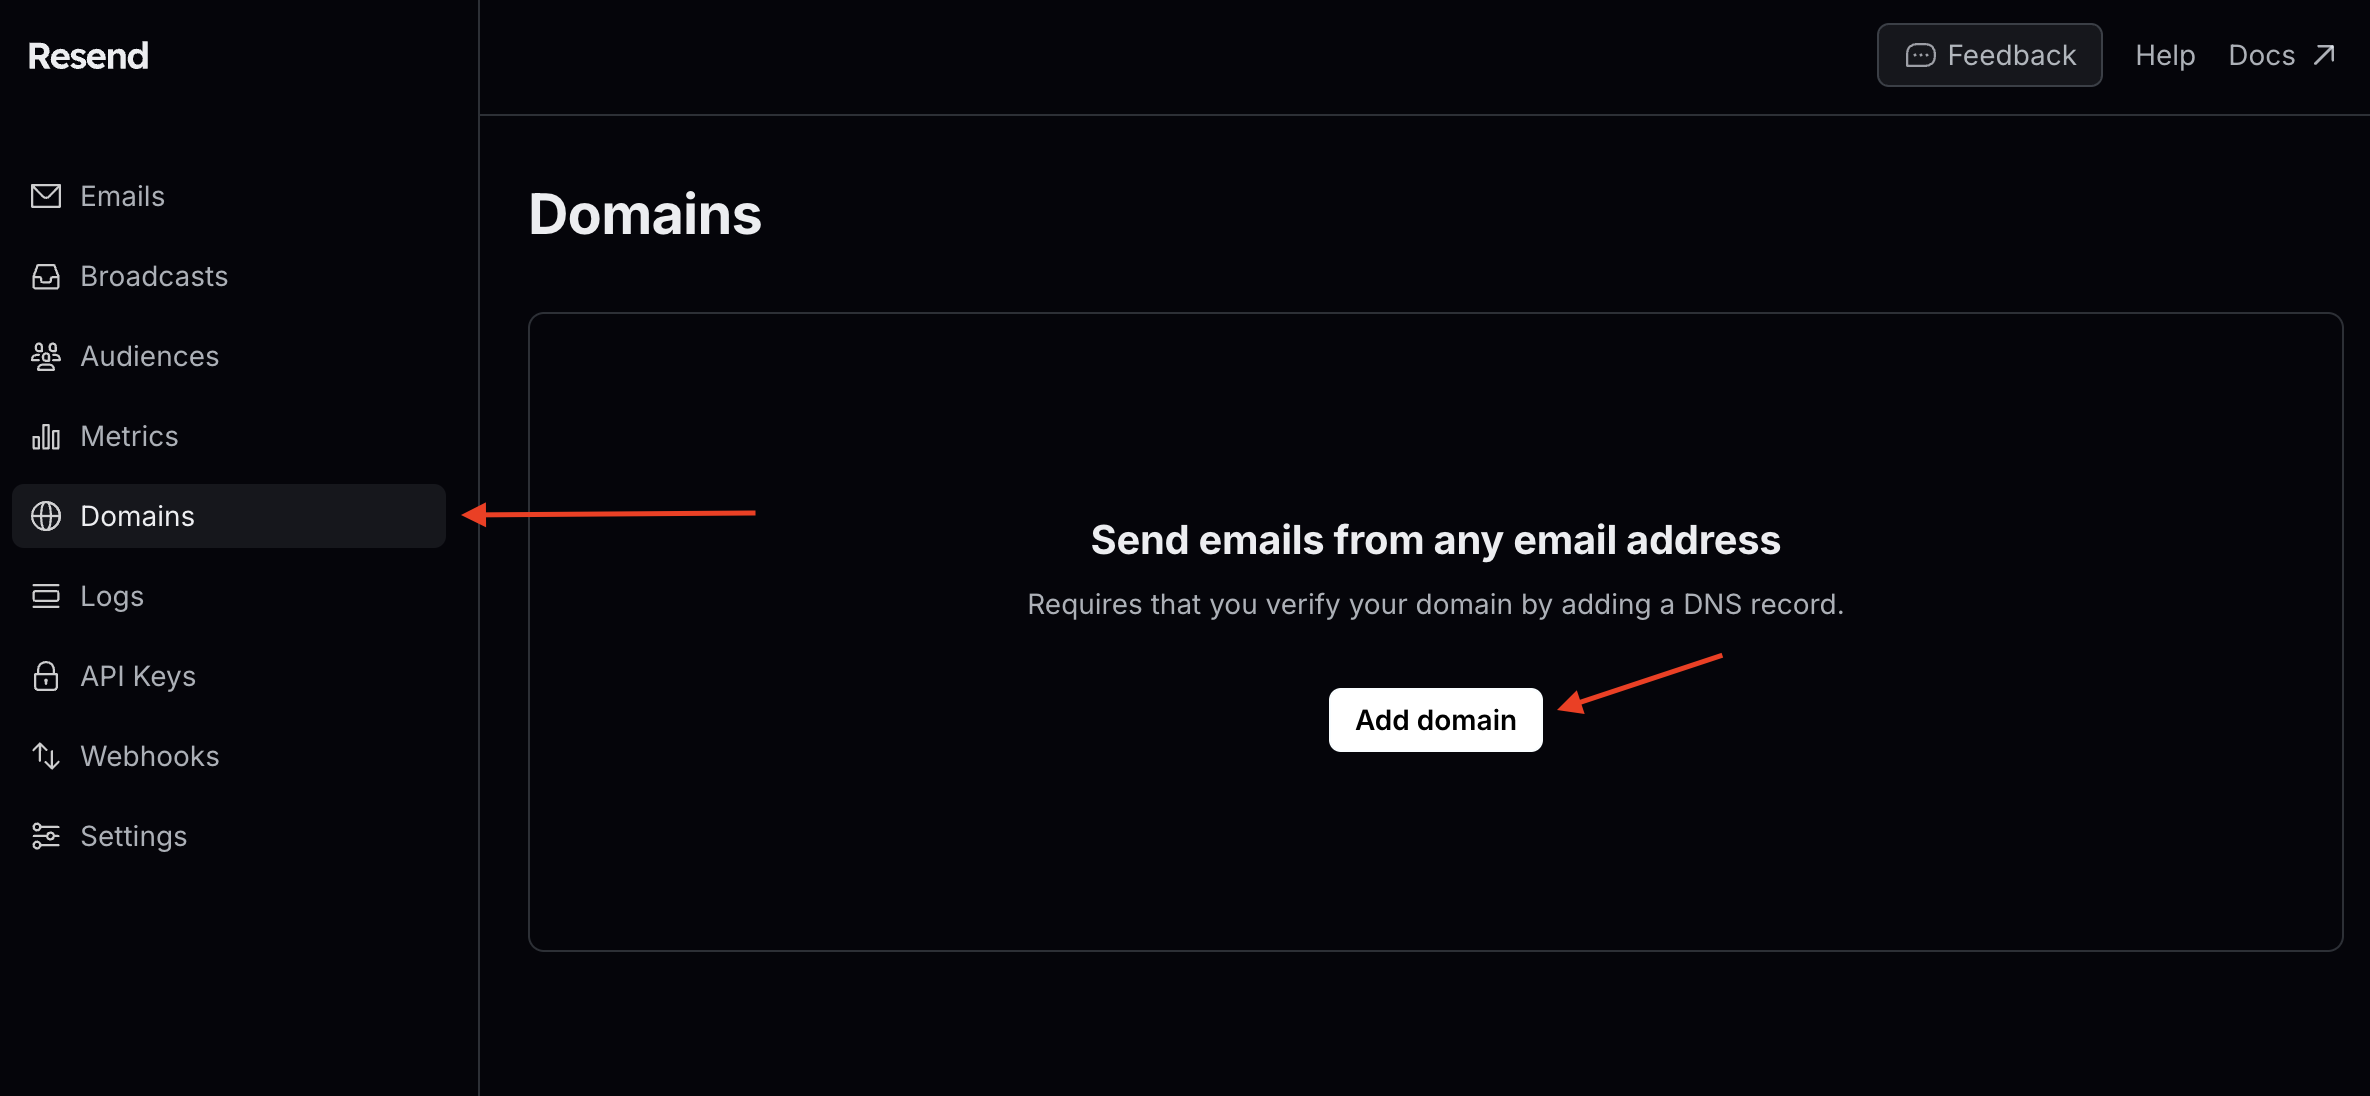
1. Go to Domains from the sidebar.
|
|
2. Click on Add Domain.
|
|
|
|
|
|
|
|
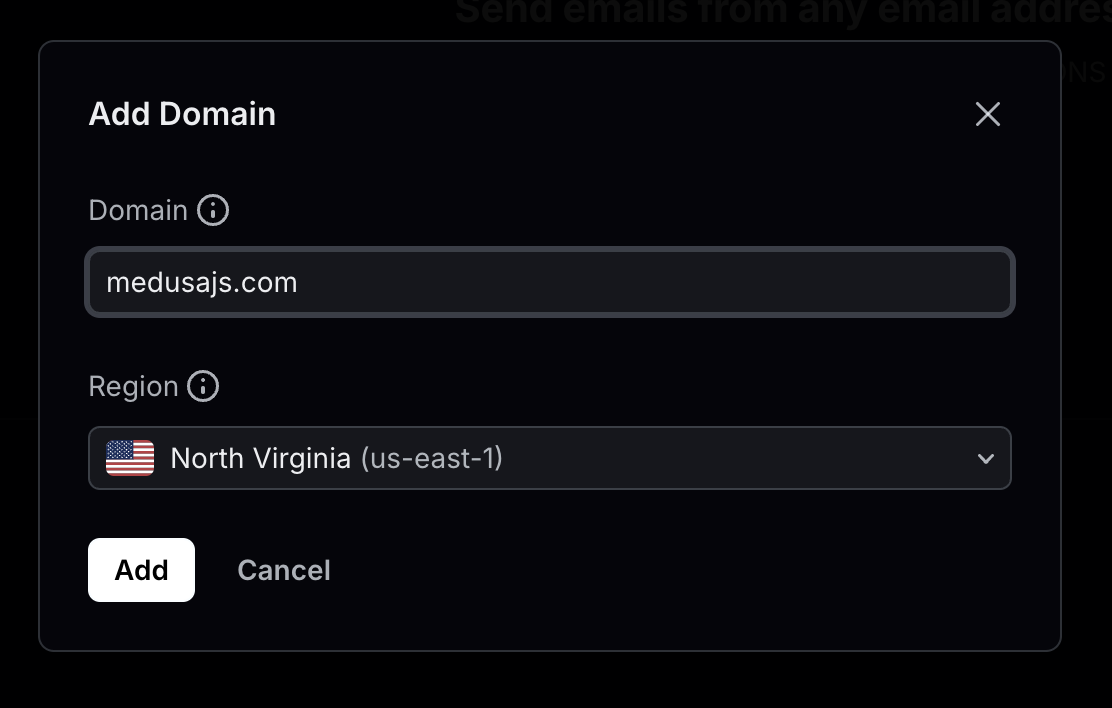
3\. In the form that opens, enter your domain name and select a region close to your users, then click Add.
|
|
|
|
|
|
|
|
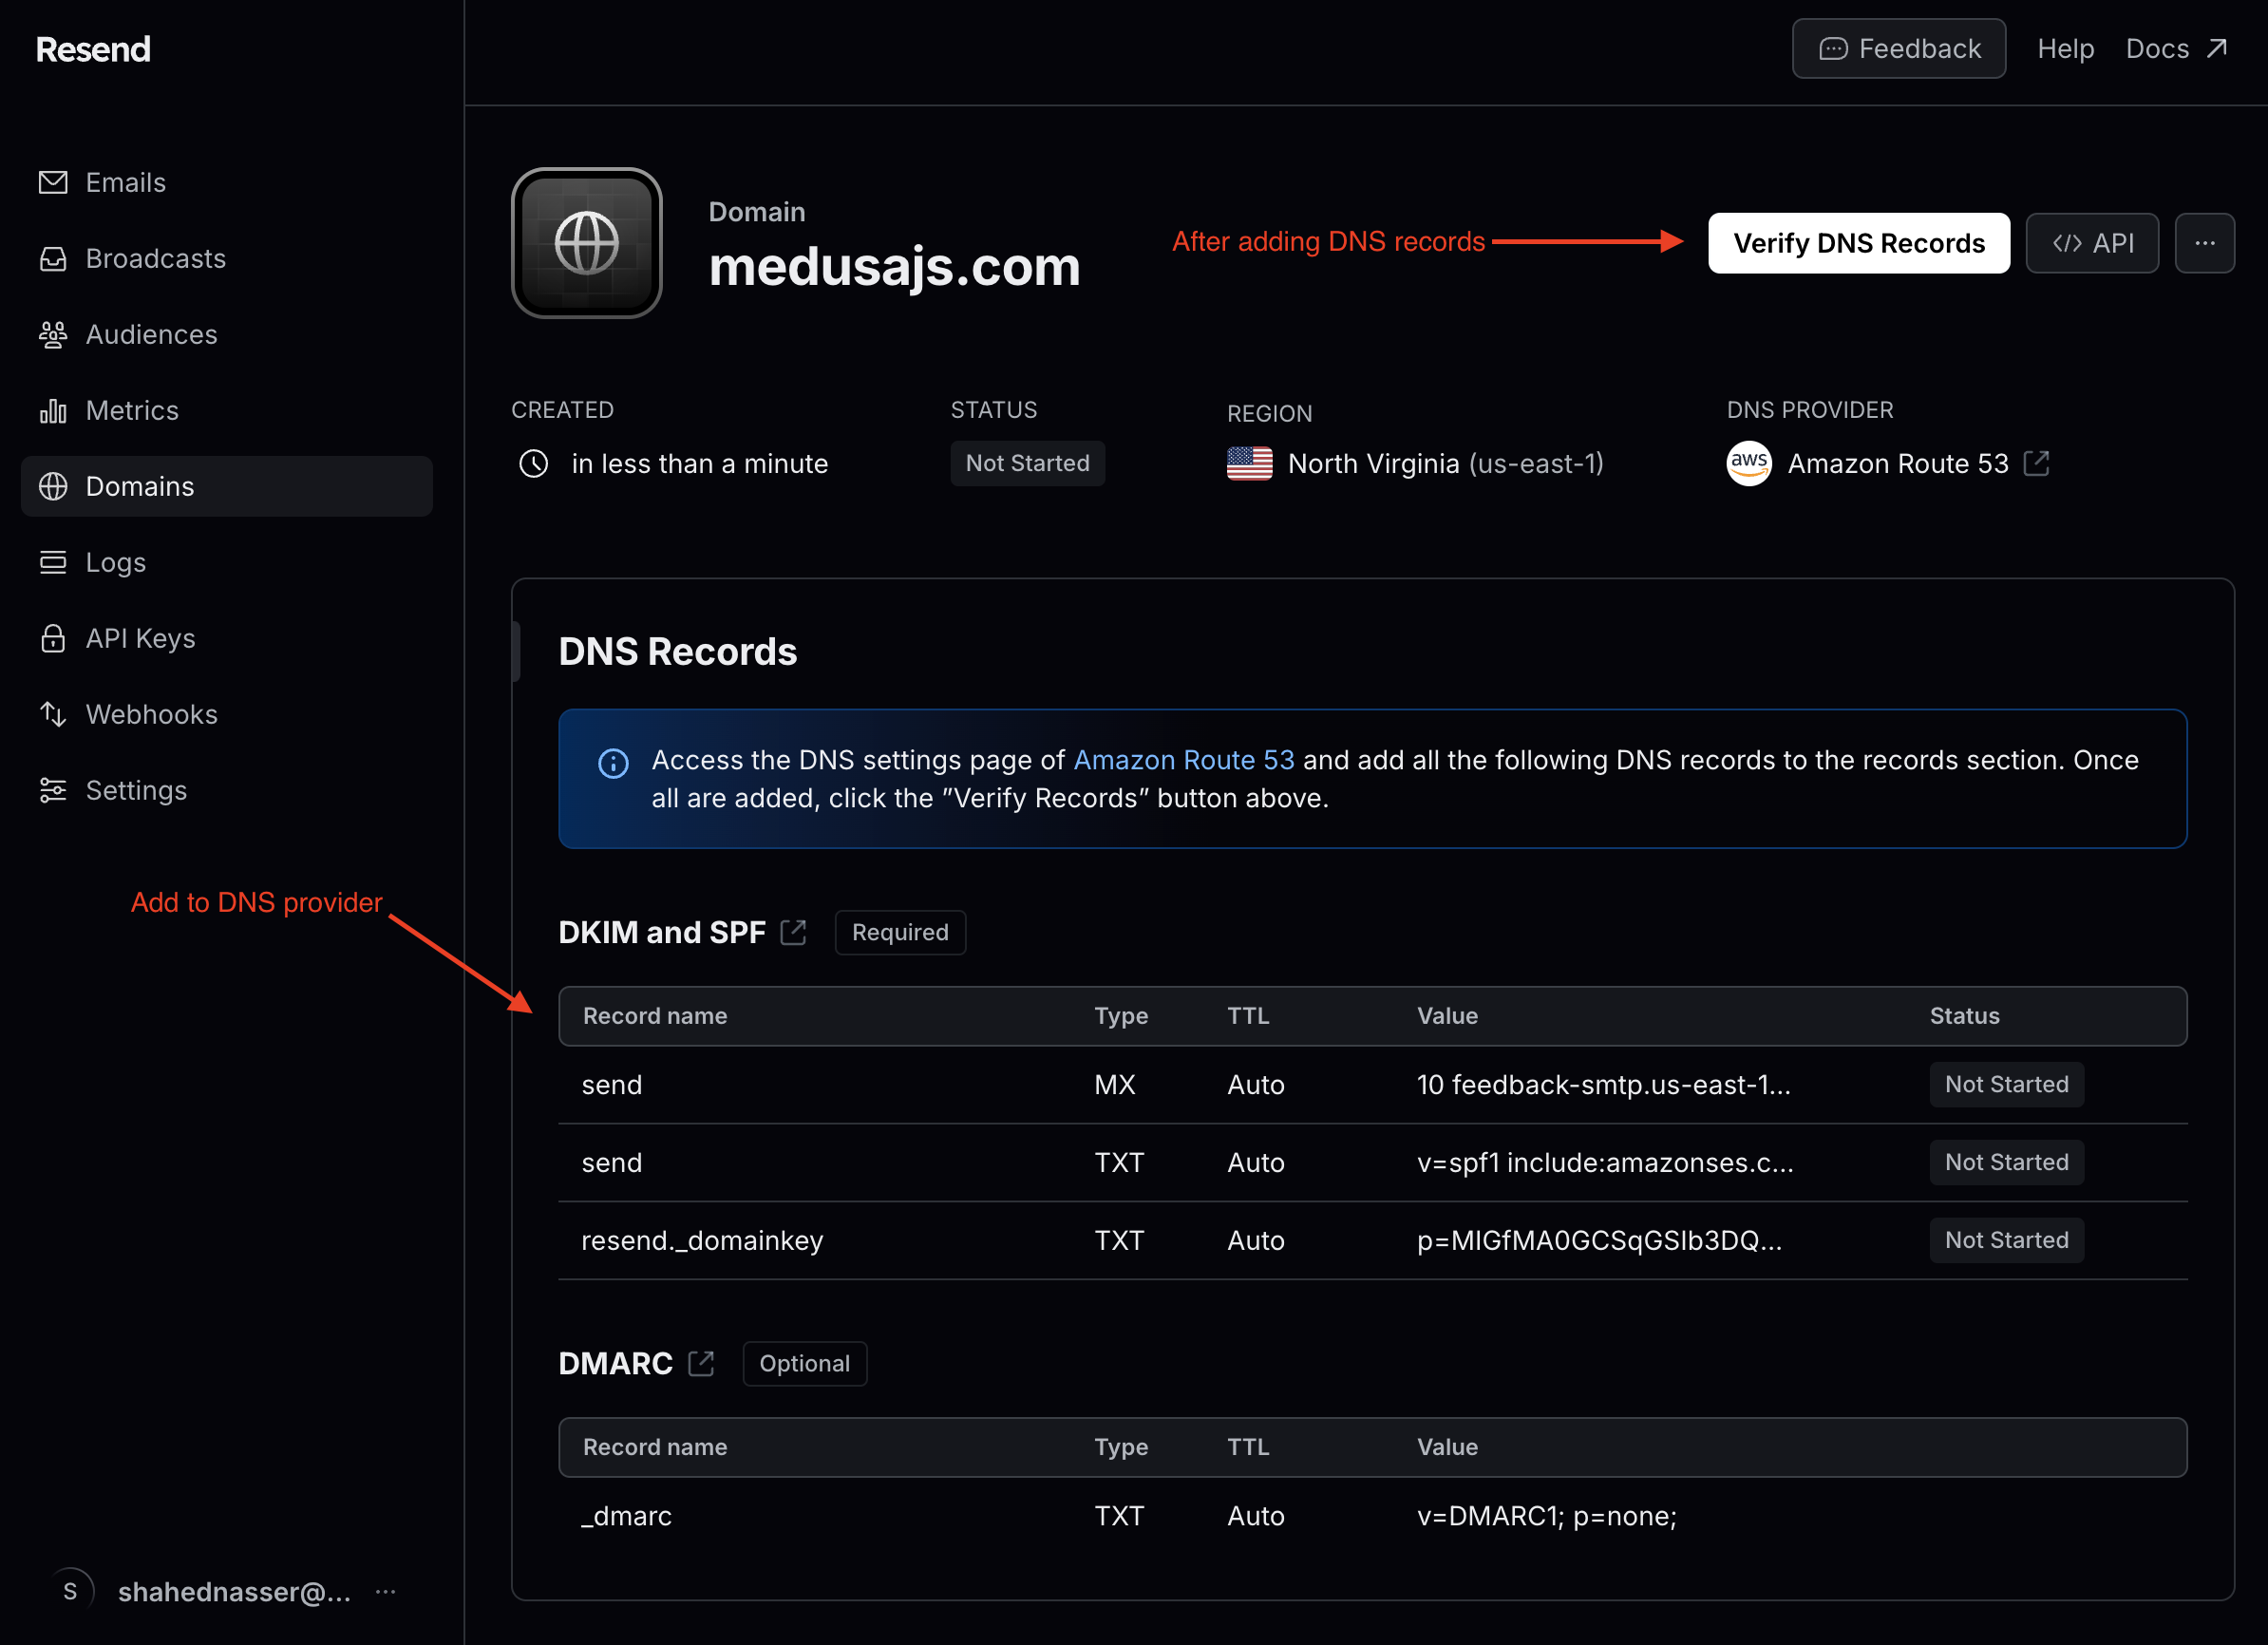
4\. In the domain's details page that opens, you'll find DNS records to add to your DNS provider. After you add them, click on Verify DNS Records. You can start sending emails from your custom domain once it's verified.
|
|
|
|
<Note title="Tip">
|
|
|
|
The steps to add DNS records are different for each provider, so refer to your provider's documentation or knowledge base for more details.
|
|
|
|
</Note>
|
|
|
|
|
|
|
|
You also need an API key to connect to your Resend account from Medusa, but you'll create that one in a later section.
|
|
|
|
---
|
|
|
|
## Step 3: Install Resend Dependencies
|
|
|
|
In this step, you'll install two packages useful for your Resend integration:
|
|
|
|
1. `resend`, which is the Resend SDK:
|
|
|
|
```bash npm2yarn
|
|
npm install resend
|
|
```
|
|
|
|
2\. [react-email](https://github.com/resend/react-email), which is a package created by Resend to create email templates with React:
|
|
|
|
```bash npm2yarn
|
|
npm install @react-email/components -E
|
|
```
|
|
|
|
You'll use these packages in the next steps.
|
|
|
|
---
|
|
|
|
## Step 4: Create Resend Module Provider
|
|
|
|
To integrate third-party services into Medusa, you create a custom module. A module is a re-usable package with functionalities related to a single feature or domain. Medusa integrates the module into your application without implications or side effects on your setup.
|
|
|
|
Medusa's Notification Module delegates sending notifications to other modules, called module providers. In this step, you'll create a Resend Module Provider that implements sending notifications through the email channel. In later steps, you'll send email notifications with Resend when an order is placed through this provider.
|
|
|
|
<Note>
|
|
|
|
Learn more about modules in [this documentation](!docs!/learn/fundamentals/modules).
|
|
|
|
</Note>
|
|
|
|
### Create Module Directory
|
|
|
|
A module is created under the `src/modules` directory of your Medusa application. So, create the directory `src/modules/resend`.
|
|
|
|
### Create Service
|
|
|
|
You define a module's functionalities in a service. A service is a TypeScript or JavaScript class that the module exports. In the service's methods, you can connect to the database, which is useful if your module defines tables in the database, or connect to a third-party service.
|
|
|
|
In this section, you'll create the Resend Module Provider's service and the methods necessary to send an email with Resend.
|
|
|
|
Start by creating the file `src/modules/resend/service.ts` with the following content:
|
|
|
|
export const serviceHighlights1 = [
|
|
["12", "api_key", "The Resend API key."],
|
|
["13", "from", "The email address to send the emails from."],
|
|
["14", "html_templates", "Option to override or provide custom templates."],
|
|
["21", "identifier", "Unique identifier that Medusa will use when registering the provider in the database."],
|
|
["22", "resendClient", "Client to send emails with Resend."],
|
|
["23", "options", "Options passed to the module provider."],
|
|
["24", "logger", "Logger utility to log messages in the terminal."]
|
|
]
|
|
|
|
```ts title="src/modules/resend/service.ts" highlights={serviceHighlights1}
|
|
import {
|
|
AbstractNotificationProviderService,
|
|
} from "@medusajs/framework/utils"
|
|
import {
|
|
Logger,
|
|
} from "@medusajs/framework/types"
|
|
import {
|
|
Resend,
|
|
} from "resend"
|
|
|
|
type ResendOptions = {
|
|
api_key: string
|
|
from: string
|
|
html_templates?: Record<string, {
|
|
subject?: string
|
|
content: string
|
|
}>
|
|
}
|
|
|
|
class ResendNotificationProviderService extends AbstractNotificationProviderService {
|
|
static identifier = "notification-resend"
|
|
private resendClient: Resend
|
|
private options: ResendOptions
|
|
private logger: Logger
|
|
|
|
// ...
|
|
}
|
|
|
|
export default ResendNotificationProviderService
|
|
```
|
|
|
|
A Notification Module Provider's service must extend the `AbstractNotificationProviderService`. It has a `send` method that you'll implement soon. The service must also have an `identifier` static property, which is a unique identifier that the Medusa application will use to register the provider in the database.
|
|
|
|
The `ResendNotificationProviderService` class also has the following properties:
|
|
|
|
- `resendClient` of type `Resend` (from the Resend SDK you installed in the previous step) to send emails through Resend.
|
|
- `options` of type `ResendOptions`. Modules accept options through Medusa's configurations. This ensures that the module is reusable across applications and you don't use sensitive variables like API keys directly in your code. The options that the Resend Module Provider accepts are:
|
|
- `api_key`: The Resend API key.
|
|
- `from`: The email address to send the emails from.
|
|
- `html_templates`: An optional object to replace the default subject and template that the Resend Module uses. This is also useful to support custom emails in different Medusa application setups.
|
|
- `logger` property, which is an instance of Medusa's [Logger](!docs!/learn/debugging-and-testing/logging), to log messages.
|
|
|
|
To send requests using the `resendClient`, you need to initialize it in the class's constructor. So, add the following constructor to `ResendNotificationProviderService`:
|
|
|
|
```ts title="src/modules/resend/service.ts"
|
|
// ...
|
|
|
|
type InjectedDependencies = {
|
|
logger: Logger
|
|
}
|
|
|
|
class ResendNotificationProviderService extends AbstractNotificationProviderService {
|
|
// ...
|
|
constructor(
|
|
{ logger }: InjectedDependencies,
|
|
options: ResendOptions
|
|
) {
|
|
super()
|
|
this.resendClient = new Resend(options.api_key)
|
|
this.options = options
|
|
this.logger = logger
|
|
}
|
|
}
|
|
```
|
|
|
|
A module's service accepts two parameters:
|
|
|
|
1. Dependencies resolved from the [Module's container](!docs!/learn/fundamentals/modules/container), which is the module's local registry that the Medusa application adds framework tools to. In this service, you resolve the [Logger utility](!docs!/learn/debugging-and-testing/logging) from the module's container.
|
|
2. The module's options that are passed to the module in Medusa's configuration as you'll see in a later section.
|
|
|
|
Using the API key passed in the module's options, you initialize the Resend client. You also set the `options` and `logger` properties.
|
|
|
|
#### Validate Options Method
|
|
|
|
A Notification Module Provider's service can implement a static `validateOptions` method that ensures the options passed to the module through Medusa's configurations are valid.
|
|
|
|
So, add to the `ResendNotificationProviderService` the `validateOptions` method:
|
|
|
|
```ts title="src/modules/resend/service.ts"
|
|
// other imports...
|
|
import {
|
|
// other imports...
|
|
MedusaError,
|
|
} from "@medusajs/framework/utils"
|
|
|
|
// ...
|
|
|
|
class ResendNotificationProviderService extends AbstractNotificationProviderService {
|
|
// ...
|
|
static validateOptions(options: Record<any, any>) {
|
|
if (!options.api_key) {
|
|
throw new MedusaError(
|
|
MedusaError.Types.INVALID_DATA,
|
|
"Option `api_key` is required in the provider's options."
|
|
)
|
|
}
|
|
if (!options.from) {
|
|
throw new MedusaError(
|
|
MedusaError.Types.INVALID_DATA,
|
|
"Option `from` is required in the provider's options."
|
|
)
|
|
}
|
|
}
|
|
}
|
|
```
|
|
|
|
In the `validateOptions` method, you throw an error if the `api_key` or `from` options aren't passed to the module. To throw errors, you use `MedusaError` from the Modules SDK. This ensures errors follow Medusa's conventions and are displayed similar to Medusa's errors.
|
|
|
|
#### Implement Template Methods
|
|
|
|
Each email type has a different template and content. For example, order confirmation emails show the order's details, whereas customer confirmation emails show a greeting message to the customer.
|
|
|
|
So, add two methods to the `ResendNotificationProviderService` class that retrieve the email template and subject of a specified template type:
|
|
|
|
export const serviceHighlights2 = [
|
|
["3", "Templates", "Names of supported template types."],
|
|
["7", "templates", "A map of templates for each template type."],
|
|
["13", "getTemplate", "Retrieve the template of a template type."],
|
|
["26", "getTemplateSubject", "Retrieve the subject line of a template type."]
|
|
]
|
|
|
|
```ts title="src/modules/resend/service.ts" highlights={serviceHighlights2}
|
|
// imports and types...
|
|
|
|
enum Templates {
|
|
ORDER_PLACED = "order-placed",
|
|
}
|
|
|
|
const templates: {[key in Templates]?: (props: unknown) => React.ReactNode} = {
|
|
// TODO add templates
|
|
}
|
|
|
|
class ResendNotificationProviderService extends AbstractNotificationProviderService {
|
|
// ...
|
|
getTemplate(template: Templates) {
|
|
if (this.options.html_templates?.[template]) {
|
|
return this.options.html_templates[template].content
|
|
}
|
|
const allowedTemplates = Object.keys(templates)
|
|
|
|
if (!allowedTemplates.includes(template)) {
|
|
return null
|
|
}
|
|
|
|
return templates[template]
|
|
}
|
|
|
|
getTemplateSubject(template: Templates) {
|
|
if (this.options.html_templates?.[template]?.subject) {
|
|
return this.options.html_templates[template].subject
|
|
}
|
|
switch(template) {
|
|
case Templates.ORDER_PLACED:
|
|
return "Order Confirmation"
|
|
default:
|
|
return "New Email"
|
|
}
|
|
}
|
|
}
|
|
```
|
|
|
|
You first define a `Templates` enum, which holds the names of supported template types. You can add more template types to this enum later. You also define a `templates` variable that specifies the React template for each template type. You'll add templates to this variable later.
|
|
|
|
In the `ResendNotificationProviderService` you add two methods:
|
|
|
|
- `getTemplate`: Retrieve the template of a template type. If the `html_templates` option is set for the specified template type, you return its `content`'s value. Otherwise, you retrieve the template from the `templates` variable.
|
|
- `getTemplateSubject`: Retrieve the subject of a template type. If a `subject` is passed for the template type in the `html_templates`, you return its value. Otherwise, you return a subject based on the template type.
|
|
|
|
You'll use these methods in the `send` method next.
|
|
|
|
#### Implement Send Method
|
|
|
|
In this section, you'll implement the `send` method of `ResendNotificationProviderService`. When you send a notification through the email channel later using the Notification Module, the Notification Module's service will use this `send` method under the hood to send the email with Resend.
|
|
|
|
In the `send` method, you'll retrieve the template and subject of the email template, then send the email using the Resend client.
|
|
|
|
Add the `send` method to the `ResendNotificationProviderService` class:
|
|
|
|
export const serviceHighlights3 = [
|
|
["17", "getTemplate", "Get the template of the specified type."],
|
|
["25", "from", "The email address to send the email from."],
|
|
["26", "to", "The email address to send the email to"],
|
|
["27", "getTemplateSubject", "Get the email subject for the template type."],
|
|
["32", "html", "Set the template as an HTML template if its type is `string`."],
|
|
["34", "react", "Set the template as a React template."],
|
|
["38", "send", "Send the email using the Resend client."]
|
|
]
|
|
|
|
```ts title="src/modules/resend/service.ts" highlights={serviceHighlights3}
|
|
// other imports...
|
|
import {
|
|
// ...
|
|
ProviderSendNotificationDTO,
|
|
ProviderSendNotificationResultsDTO,
|
|
} from "@medusajs/framework/types"
|
|
import {
|
|
// ...
|
|
CreateEmailOptions,
|
|
} from "resend"
|
|
|
|
class ResendNotificationProviderService extends AbstractNotificationProviderService {
|
|
// ...
|
|
async send(
|
|
notification: ProviderSendNotificationDTO
|
|
): Promise<ProviderSendNotificationResultsDTO> {
|
|
const template = this.getTemplate(notification.template as Templates)
|
|
|
|
if (!template) {
|
|
this.logger.error(`Couldn't find an email template for ${notification.template}. The valid options are ${Object.values(Templates)}`)
|
|
return {}
|
|
}
|
|
|
|
const emailOptions: CreateEmailOptions = {
|
|
from: this.options.from,
|
|
to: [notification.to],
|
|
subject: this.getTemplateSubject(notification.template as Templates),
|
|
html: "",
|
|
}
|
|
|
|
if (typeof template === "string") {
|
|
emailOptions.html = template
|
|
} else {
|
|
emailOptions.react = template(notification.data)
|
|
delete emailOptions.html
|
|
}
|
|
|
|
const { data, error } = await this.resendClient.emails.send(emailOptions)
|
|
|
|
if (error) {
|
|
this.logger.error(`Failed to send email`, error)
|
|
return {}
|
|
}
|
|
|
|
return { id: data.id }
|
|
}
|
|
}
|
|
```
|
|
|
|
The `send` method receives the notification details object as a parameter. Some of its properties include:
|
|
|
|
- `to`: The address to send the notification to.
|
|
- `template`: The template type of the notification.
|
|
- `data`: The data useful for the email type. For example, when sending an order-confirmation email, `data` would hold the order's details.
|
|
|
|
In the method, you retrieve the template and subject of the email using the methods you defined earlier. Then, you put together the data to pass to Resend, such as the email address to send the notification to and the email address to send from. Also, if the email's template is a string, it's passed as an HTML template. Otherwise, it's passed as a React template.
|
|
|
|
Finally, you use the `emails.send` method of the Resend client to send the email. If an error occurs you log it in the terminal. Otherwise, you return the ID of the send email as received from Resend. Medusa uses this ID when creating the notification in its database.
|
|
|
|
### Export Module Definition
|
|
|
|
The `ResendNotificationProviderService` class now has the methods necessary to start sending emails.
|
|
|
|
Next, you must export the module provider's definition, which lets Medusa know what module this provider belongs to and its service.
|
|
|
|
Create the file `src/modules/resend/index.ts` with the following content:
|
|
|
|
```ts title="src/modules/resend/index.ts"
|
|
import {
|
|
ModuleProvider,
|
|
Modules,
|
|
} from "@medusajs/framework/utils"
|
|
import ResendNotificationProviderService from "./service"
|
|
|
|
export default ModuleProvider(Modules.NOTIFICATION, {
|
|
services: [ResendNotificationProviderService],
|
|
})
|
|
```
|
|
|
|
You export the module provider's definition using `ModuleProvider` from the Modules SDK. It accepts as a first parameter the name of the module that this provider belongs to, which is the Notification Module. It also accepts as a second parameter an object having a `service` property indicating the provider's service.
|
|
|
|
### Add Module to Configurations
|
|
|
|
Finally, to register modules and module providers in Medusa, you must add them to Medusa's configurations.
|
|
|
|
Medusa's configurations are set in the `medusa-config.ts` file, which is at the root directory of your Medusa application. The configuration object accepts a `modules` array, whose value is an array of modules to add to the application.
|
|
|
|
Add the `modules` property to the exported configurations in `medusa-config.ts`:
|
|
|
|
```ts title="medusa-config.ts"
|
|
module.exports = defineConfig({
|
|
// ...
|
|
modules: [
|
|
{
|
|
resolve: "@medusajs/medusa/notification",
|
|
options: {
|
|
providers: [
|
|
{
|
|
resolve: "./src/modules/resend",
|
|
id: "resend",
|
|
options: {
|
|
channels: ["email"],
|
|
api_key: process.env.RESEND_API_KEY,
|
|
from: process.env.RESEND_FROM_EMAIL,
|
|
},
|
|
},
|
|
],
|
|
},
|
|
},
|
|
],
|
|
})
|
|
```
|
|
|
|
In the `modules` array, you pass a module object having the following properties:
|
|
|
|
- `resolve`: The NPM package of the Notification Module. Since the Resend Module is a Notification Module Provider, it'll be passed in the options of the Notification Module.
|
|
- `options`: An object of options to pass to the module. It has a `providers` property which is an array of module providers to register. Each module provider object has the following properties:
|
|
- `resolve`: The path to the module provider to register in the application. It can also be the name of an NPM package.
|
|
- `id`: A unique ID, which Medusa will use along with the `identifier` static property that you set earlier in the class to identify this module provider.
|
|
- `options`: An object of options to pass to the module provider. These are the options you expect and use in the module provider's service. You must also specify the `channels` option, which indicates the channels that this provider sends notifications through.
|
|
|
|
Some of the module's options, such as the Resend API key, are set in environment variables. So, add the following environment variables to `.env`:
|
|
|
|
```shell
|
|
RESEND_FROM_EMAIL=onboarding@resend.dev
|
|
RESEND_API_KEY=
|
|
```
|
|
|
|
Where:
|
|
|
|
- `RESEND_FROM_EMAIL`: The email to send emails from. If you've configured the custom domain as explained in [Step 2](#step-2-prepare-resend-account), change this email to an email from your custom domain. Otherwise, you can use `onboarding@resend.dev` for development purposes.
|
|
- `RESEND_API_KEY` is the API key of your Resend account. To retrieve it:
|
|
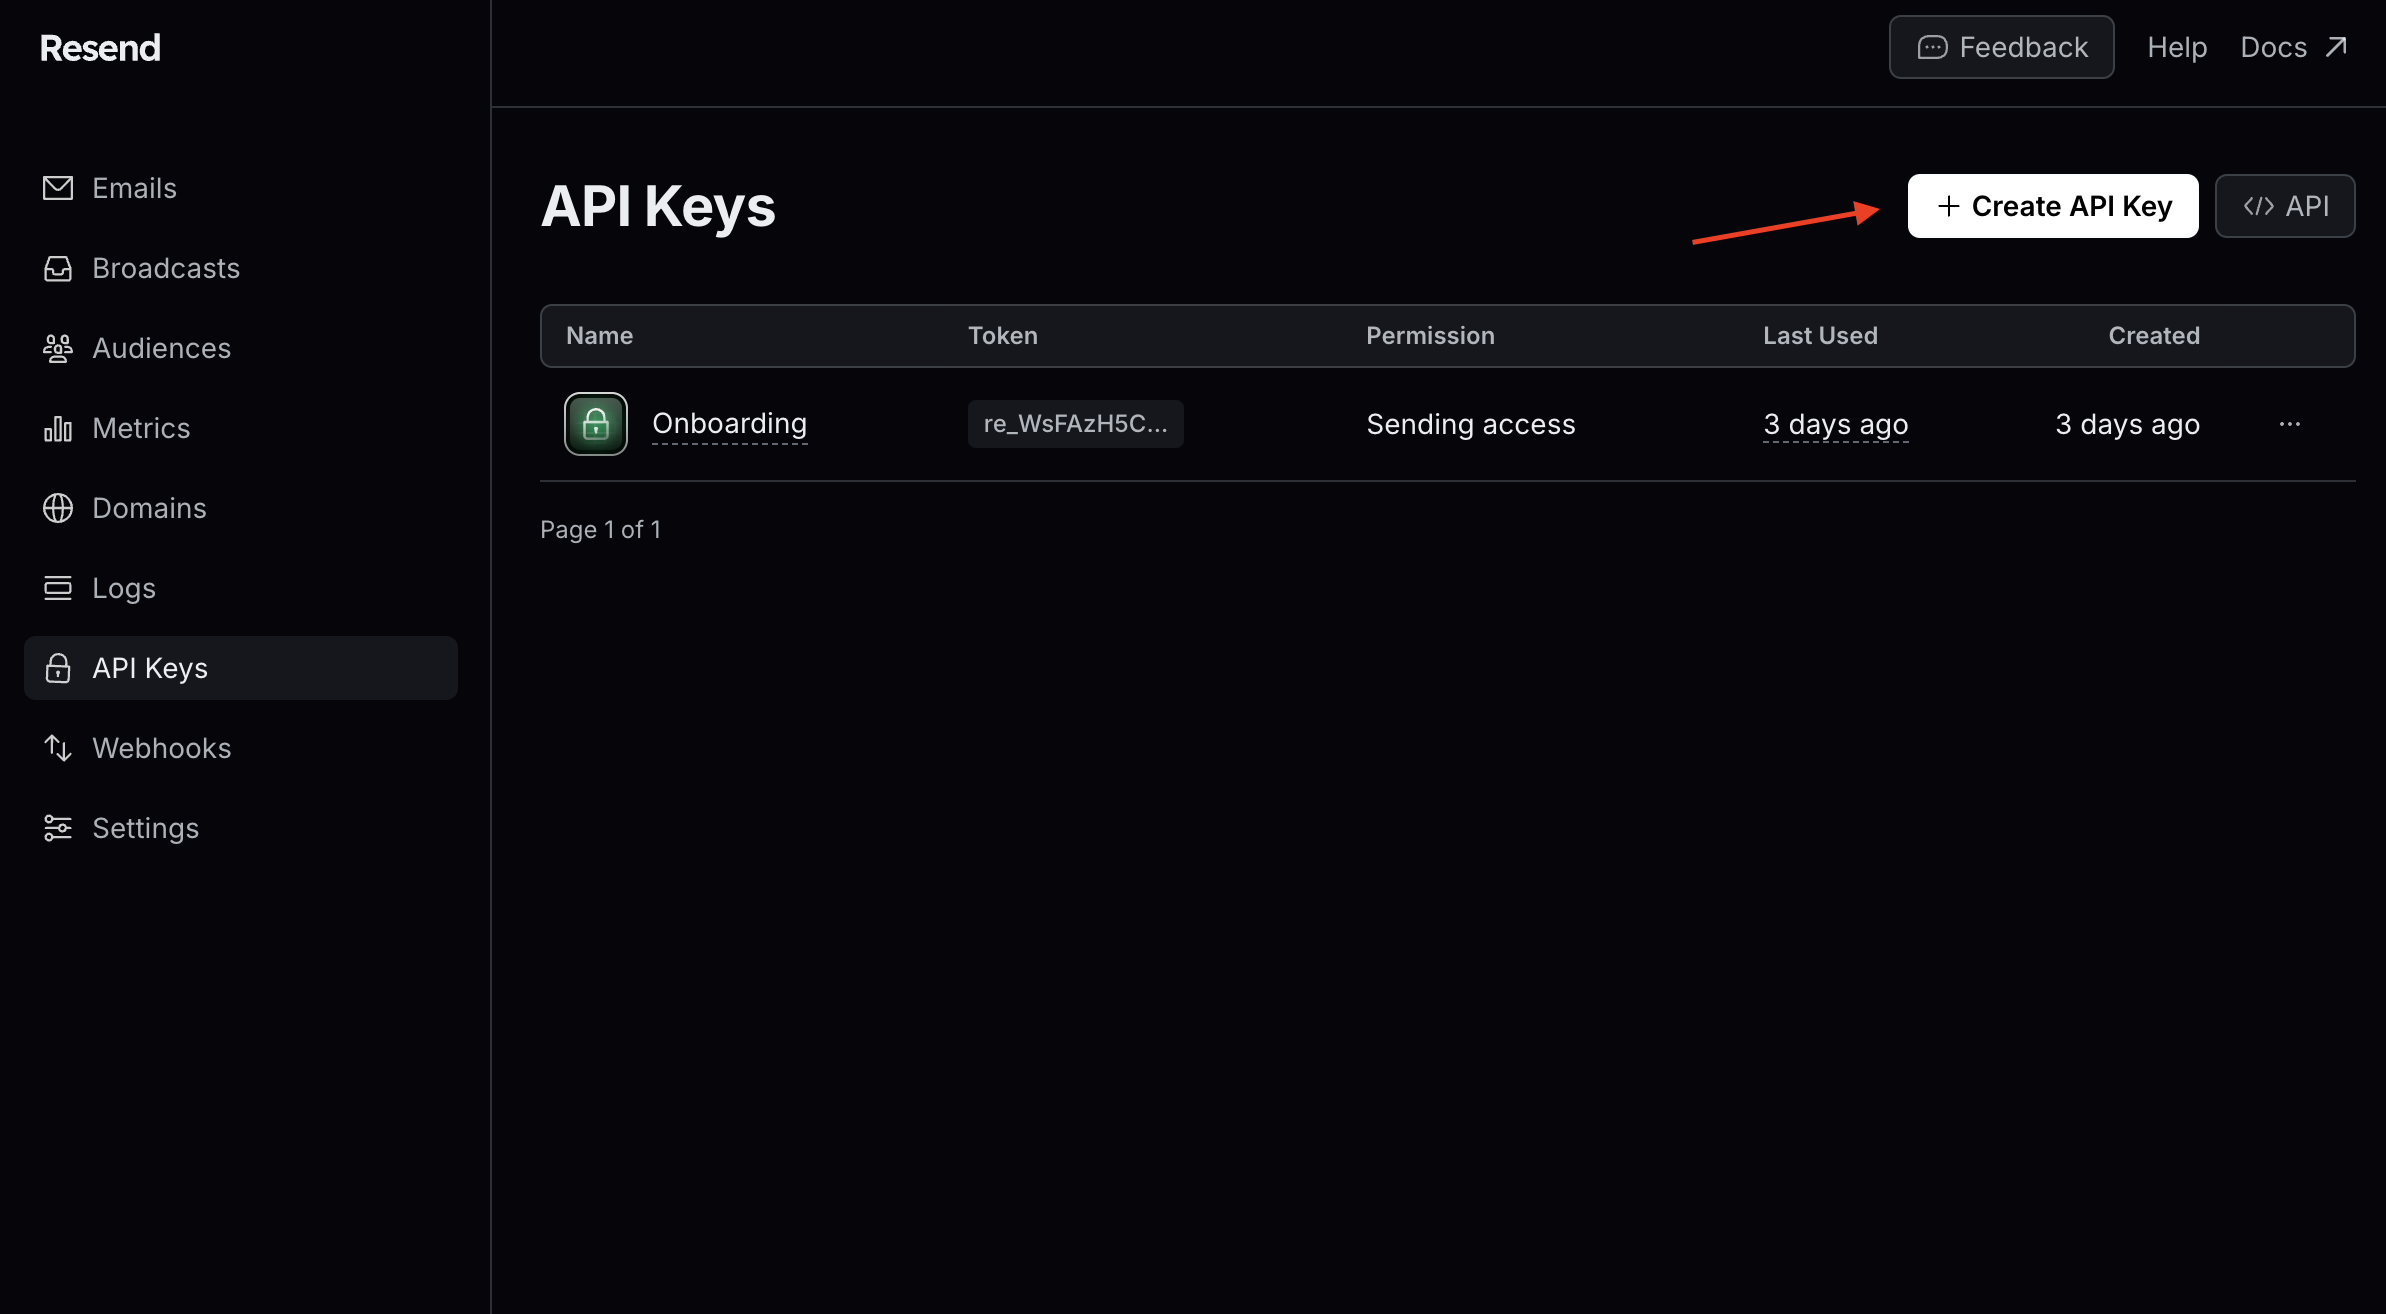
- Go to API Keys in the sidebar.
|
|
- Click on the Create API Key button.
|
|
|
|
|
|
|
|
- In the form that opens, enter a name for the API key (for example, Medusa). You can keep its permissions to Full Access or change it to Sending Access. Once you're done, click Add.
|
|
|
|
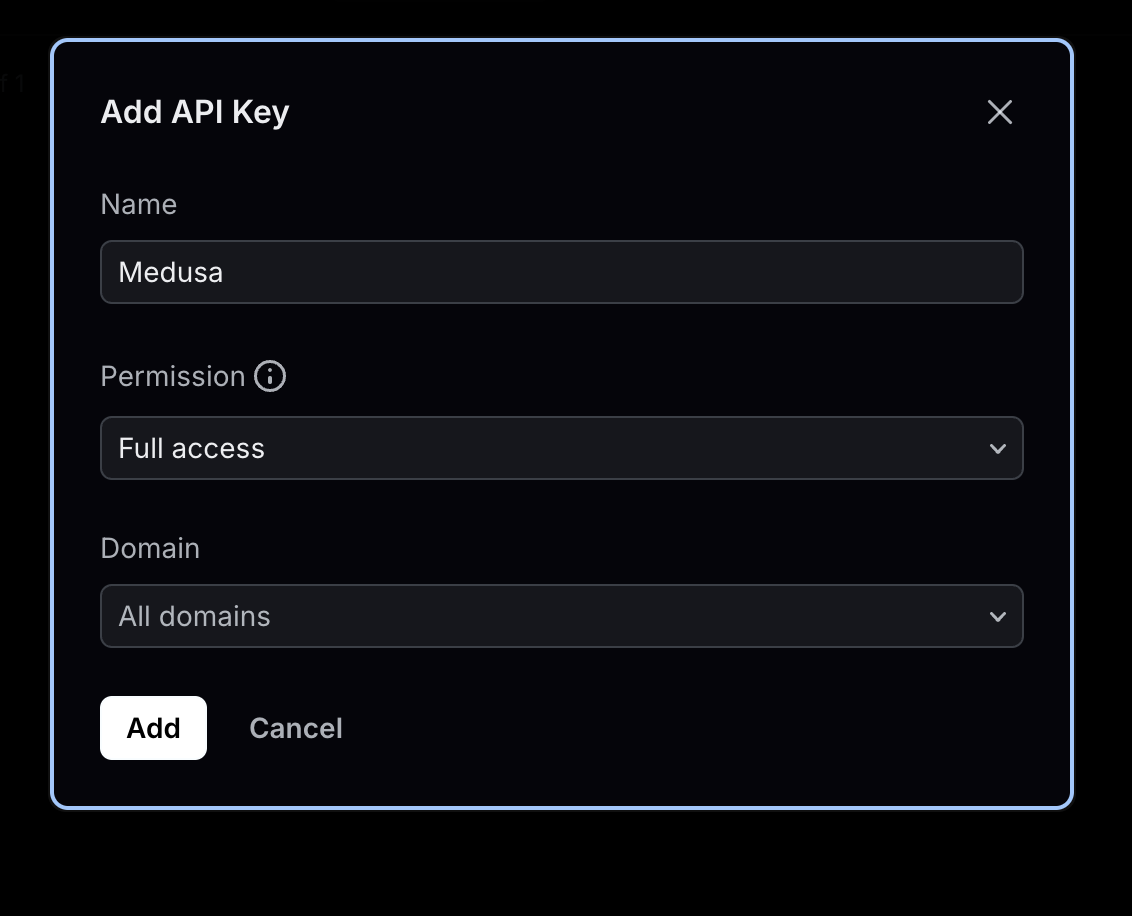
|
|
|
|
- A new pop-up will show with your API key hidden. Copy it before closing the pop-up, since you can't access the key again afterwards. Use its value for the `RESEND_API_KEY` environment variable.
|
|
|
|
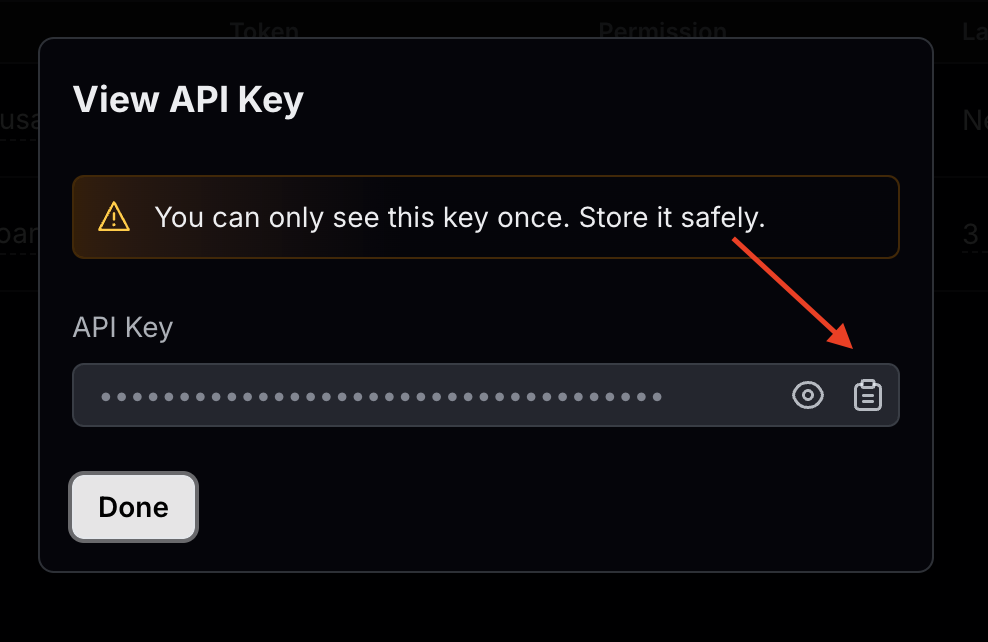
|
|
|
|
Your Resend Module Provider is all set up. You'll test it out in a later section.
|
|
|
|
---
|
|
|
|
## Step 5: Add Order Confirmation Template
|
|
|
|
In this step, you'll add a React template for order confirmation emails. You'll create it using the [react-email](https://github.com/resend/react-email) package you installed earlier. You can follow the same steps for other email templates, such as for customer confirmation.
|
|
|
|
Create the directory `src/modules/resend/emails` that will hold the email templates. Then, to add the template for order confirmation, create the file `src/modules/resend/emails/order-placed.tsx` with the following content:
|
|
|
|
export const templateHighlights = [
|
|
["8", "OrderPlacedEmailComponent", "The template React component for order confirmation emails."],
|
|
["63", "orderPlacedEmail", "A function that returns the JSX `OrderPlacedEmailComponent`."]
|
|
]
|
|
|
|
```tsx title="src/modules/resend/emails/order-placed.tsx" highlights={templateHighlights}
|
|
import { Text, Column, Container, Heading, Html, Img, Row, Section } from "@react-email/components"
|
|
import { BigNumberValue, OrderDTO } from "@medusajs/framework/types"
|
|
|
|
type OrderPlacedEmailProps = {
|
|
order: OrderDTO
|
|
}
|
|
|
|
function OrderPlacedEmailComponent({ order }: OrderPlacedEmailProps) {
|
|
const formatter = new Intl.NumberFormat([], {
|
|
style: "currency",
|
|
currencyDisplay: "narrowSymbol",
|
|
currency: order.currency_code,
|
|
})
|
|
|
|
const formatPrice = (price: BigNumberValue) => {
|
|
if (typeof price === "number") {
|
|
return formatter.format(price)
|
|
}
|
|
|
|
if (typeof price === "string") {
|
|
return formatter.format(parseFloat(price))
|
|
}
|
|
|
|
return price?.toString() || ""
|
|
}
|
|
|
|
return (
|
|
<Html>
|
|
<Heading>Thank you for your order</Heading>
|
|
{order.email}'s Items
|
|
<Container>
|
|
{order.items.map((item) => {
|
|
return (
|
|
<Section
|
|
key={item.id}
|
|
style={{ paddingTop: "40px", paddingBottom: "40px" }}
|
|
>
|
|
<Row>
|
|
<Column>
|
|
<Img
|
|
src={item.thumbnail}
|
|
alt={item.product_title}
|
|
style={{ float: "left" }}
|
|
width="260px"
|
|
/>
|
|
</Column>
|
|
<Column style={{ verticalAlign: "top", paddingLeft: "12px" }}>
|
|
<Text style={{ fontWeight: "500" }}>
|
|
{item.product_title}
|
|
</Text>
|
|
<Text>{item.variant_title}</Text>
|
|
<Text>{formatPrice(item.total)}</Text>
|
|
</Column>
|
|
</Row>
|
|
</Section>
|
|
)
|
|
})}
|
|
</Container>
|
|
</Html>
|
|
)
|
|
}
|
|
|
|
export const orderPlacedEmail = (props: OrderPlacedEmailProps) => (
|
|
<OrderPlacedEmailComponent {...props} />
|
|
)
|
|
```
|
|
|
|
You define the `OrderPlacedEmailComponent` which is a React email template that shows the order's details, such as items and their totals. The component accepts an `order` object as a prop.
|
|
|
|
You also export an `orderPlacedEmail` function, which accepts props as an input and returns the `OrderPlacedEmailComponent` passing it the props. Because you can't use JSX syntax in `src/modules/resend/service.ts`, you'll import this function instead.
|
|
|
|
Next, update the `templates` variable in `src/modules/resend/service.ts` to assign this template to the `order-placed` template type:
|
|
|
|
```ts title="src/modules/resend/service.ts"
|
|
// other imports...
|
|
import { orderPlacedEmail } from "./emails/order-placed"
|
|
|
|
const templates: {[key in Templates]?: (props: unknown) => React.ReactNode} = {
|
|
[Templates.ORDER_PLACED]: orderPlacedEmail,
|
|
}
|
|
```
|
|
|
|
The `ResendNotificationProviderService` will now use the `OrderPlacedEmailComponent` as the template of order confirmation emails.
|
|
|
|
---
|
|
|
|
## Step 6: Send Email when Order is Placed
|
|
|
|
Medusa has an event system that emits an event when a commerce operation is performed. You can then listen and handle that event in an asynchronous function called a subscriber.
|
|
|
|
So, to send a confirmation email when a customer places an order, which is a commerce operation that Medusa already implements, you don't need to extend or hack your way into Medusa's implementation as you would do with other commerce platforms.
|
|
|
|
Instead, you'll create a subscriber that listens to the `order.placed` event and sends an email when the event is emitted.
|
|
|
|
<Note>
|
|
|
|
Learn more about Medusa's event system in [this documentation](!docs!/learn/fundamentals/events-and-subscribers).
|
|
|
|
</Note>
|
|
|
|
### Send Order Confirmation Email Workflow
|
|
|
|
To send the order confirmation email, you need to retrieve the order's details first, then use the Notification Module's service to send the email. To implement this flow, you'll create a workflow.
|
|
|
|
A workflow is a series of queries and actions, called steps, that complete a task. You construct a workflow like you construct a function, but it's a special function that allows you to track its executions' progress, define roll-back logic, and configure other advanced features. Then, you execute the workflow from other customizations, such as in a subscriber.
|
|
|
|
<Note>
|
|
|
|
Learn more about workflows in [this documentation](!docs!/learn/fundamentals/workflows)
|
|
|
|
</Note>
|
|
|
|
#### Send Notification Step
|
|
|
|
You'll start by implementing the step of the workflow that sends the notification. To do that, create the file `src/workflows/steps/send-notification.ts` with the following content:
|
|
|
|
```ts title="src/workflows/steps/send-notification.ts"
|
|
import { Modules } from "@medusajs/framework/utils"
|
|
import { createStep, StepResponse } from "@medusajs/framework/workflows-sdk"
|
|
import { CreateNotificationDTO } from "@medusajs/framework/types"
|
|
|
|
export const sendNotificationStep = createStep(
|
|
"send-notification",
|
|
async (data: CreateNotificationDTO[], { container }) => {
|
|
const notificationModuleService = container.resolve(
|
|
Modules.NOTIFICATION
|
|
)
|
|
const notification = await notificationModuleService.createNotifications(data)
|
|
return new StepResponse(notification)
|
|
}
|
|
)
|
|
```
|
|
|
|
You define the `sendNotificationStep` using the `createStep` function that accepts two parameters:
|
|
|
|
- A string indicating the step's unique name.
|
|
- The step's function definition as a second parameter. It accepts the step's input as a first parameter, and an object of options as a second.
|
|
|
|
The `container` property in the second parameter is an instance of the [Medusa container](!docs!/learn/fundamentals/medusa-container), which is a registry of framework and commerce tools, such a module's service, that you can resolve to utilize their functionalities.
|
|
|
|
<Note title="Tip">
|
|
|
|
The Medusa container is accessible by all customizations, such as workflows and subscribers, except for modules. Each module has its own container with framework tools like the Logger utility.
|
|
|
|
</Note>
|
|
|
|
In the step function, you resolve the Notification Module's service, and use its `createNotifications` method, passing it the notification's data that the step receives as an input.
|
|
|
|
The step returns an instance of `StepResponse`, which must be returned by any step. It accepts as a parameter the data to return to the workflow that executed this step.
|
|
|
|
#### Workflow Implementation
|
|
|
|
You'll now create the workflow that uses the `sendNotificationStep` to send the order confirmation email.
|
|
|
|
Create the file `src/workflows/send-order-confirmation.ts` with the following content:
|
|
|
|
export const workflowHighlights = [
|
|
["12", "sendOrderConfirmationWorkflow", "Create the workflow that sends an order confirmation email."],
|
|
["16", "useQueryGraphStep", "Retrieve the order's details."],
|
|
["30", "sendNotificationStep", "Send the order confirmation email."]
|
|
]
|
|
|
|
```ts title="src/workflows/send-order-confirmation.ts" highlights={workflowHighlights}
|
|
import {
|
|
createWorkflow,
|
|
WorkflowResponse,
|
|
} from "@medusajs/framework/workflows-sdk"
|
|
import { useQueryGraphStep } from "@medusajs/medusa/core-flows"
|
|
import { sendNotificationStep } from "./steps/send-notification"
|
|
|
|
type WorkflowInput = {
|
|
id: string
|
|
}
|
|
|
|
export const sendOrderConfirmationWorkflow = createWorkflow(
|
|
"send-order-confirmation",
|
|
({ id }: WorkflowInput) => {
|
|
// @ts-ignore
|
|
const { data: orders } = useQueryGraphStep({
|
|
entity: "order",
|
|
fields: [
|
|
"id",
|
|
"email",
|
|
"currency_code",
|
|
"total",
|
|
"items.*",
|
|
],
|
|
filters: {
|
|
id,
|
|
},
|
|
})
|
|
|
|
const notification = sendNotificationStep([{
|
|
to: orders[0].email,
|
|
channel: "email",
|
|
template: "order-placed",
|
|
data: {
|
|
order: orders[0],
|
|
},
|
|
}])
|
|
|
|
return new WorkflowResponse(notification)
|
|
}
|
|
)
|
|
```
|
|
|
|
You create a workflow using `createWorkflow` from the Workflows SDK. It accepts the workflow's unique name as a first parameter.
|
|
|
|
It accepts as a second parameter a constructor function, which is the workflow's implementation. The workflow has the following steps:
|
|
|
|
1. `useQueryGraphStep`, which is a step implemented by Medusa that uses [Query](!docs!/learn/fundamentals/module-links/query), a tool that allows you to retrieve data across modules. You use it to retrieve the order's details.
|
|
2. `sendNotificationStep` which is the step you implemented. You pass it an array with one object, which is the notification's details having following properties:
|
|
- `to`: The address to send the email to. You pass the customer's email that is stored in the order.
|
|
- `channel`: The channel to send the notification through, which is `email`. Since you specified `email` in the Resend Module Provider's `channel` option, the Notification Module will delegate the sending to the Resend Module Provider's service.
|
|
- `template`: The email's template type. You retrieve the template content in the `ResendNotificationProviderService`'s `send` method based on the template specified here.
|
|
- `data`: The data to pass to the email template, which is the order's details.
|
|
|
|
<Note title="Tip">
|
|
|
|
A workflow's constructor function has some constraints in implementation. Learn more about them in [this documentation](!docs!/learn/fundamentals/workflows/constructor-constraints).
|
|
|
|
</Note>
|
|
|
|
You'll execute the workflow when you create the subscriber next.
|
|
|
|
#### Add the Order Placed Subscriber
|
|
|
|
Now that you have the workflow to send an order-confirmation email, you'll execute it in a subscriber that's executed whenever an order is placed.
|
|
|
|
You create a subscriber in a TypeScript or JavaScript file under the `src/subscribers` directory. So, create the file `src/subscribers/order-placed.ts` with the following content:
|
|
|
|
export const subscriberHighlights = [
|
|
["7", "orderPlacedHandler", "The subscriber function"],
|
|
["8", "data", "The event's data payload, which has the order's ID."],
|
|
["9", "container", "The Medusa container."],
|
|
["11", "sendOrderConfirmationWorkflow", "Execute the workflow to send an email."],
|
|
["13", "input", "The input to pass to the workflow."],
|
|
["14", "id", "The ID of the order."],
|
|
["19", "config", "The subscriber's configurations."],
|
|
["20", "event", "The event that the subscriber is listening to."]
|
|
]
|
|
|
|
```ts title="src/subscribers/order-placed.ts" highlights={subscriberHighlights}
|
|
import type {
|
|
SubscriberArgs,
|
|
SubscriberConfig,
|
|
} from "@medusajs/framework"
|
|
import { sendOrderConfirmationWorkflow } from "../workflows/send-order-confirmation"
|
|
|
|
export default async function orderPlacedHandler({
|
|
event: { data },
|
|
container,
|
|
}: SubscriberArgs<{ id: string }>) {
|
|
await sendOrderConfirmationWorkflow(container)
|
|
.run({
|
|
input: {
|
|
id: data.id,
|
|
},
|
|
})
|
|
}
|
|
|
|
export const config: SubscriberConfig = {
|
|
event: "order.placed",
|
|
}
|
|
```
|
|
|
|
A subscriber file exports:
|
|
|
|
- An asynchronous function that's executed whenever the associated event is emitted, which is the `order.placed` event.
|
|
- A configuration object with an `event` property indicating the event the subscriber is listening to.
|
|
|
|
The subscriber function accepts the event's details as a first paramter which has a `data` property that holds the data payload of the event. For example, Medusa emits the `order.placed` event with the order's ID in the data payload. The function also accepts as a second parameter the [Medusa container](!docs!/learn/fundamentals/medusa-container).
|
|
|
|
In the function, you execute the `sendOrderConfirmationWorkflow` by invoking it, passing it the `container`, then using its `run` method. The `run` method accepts an object having an `input` property, which is the input to pass to the workflow. You pass the ID of the placed order as received in the event's data payload.
|
|
|
|
This subscriber now runs whenever an order is placed. You'll see this in action in the next section.
|
|
|
|
---
|
|
|
|
## Test it Out: Place an Order
|
|
|
|
To test out the Resend integration, you'll place an order using the [Next.js storefront](!docs!/learn/storefront-development/nextjs-starter) that you installed as part of installing Medusa.
|
|
|
|
Start your Medusa application first:
|
|
|
|
```bash npm2yarn
|
|
npm run dev
|
|
```
|
|
|
|
Then, in the Next.js storefront's directory (which was installed in a directory outside of the Medusa application's directory with the name `{project-name}-storefront`, where `{project-name}` is the name of the Medusa application's directory), run the following command to start the storefront:
|
|
|
|
```bash npm2yarn
|
|
npm run dev
|
|
```
|
|
|
|
Then, open the storefront in your browser at `http://localhost:8000` and:
|
|
|
|
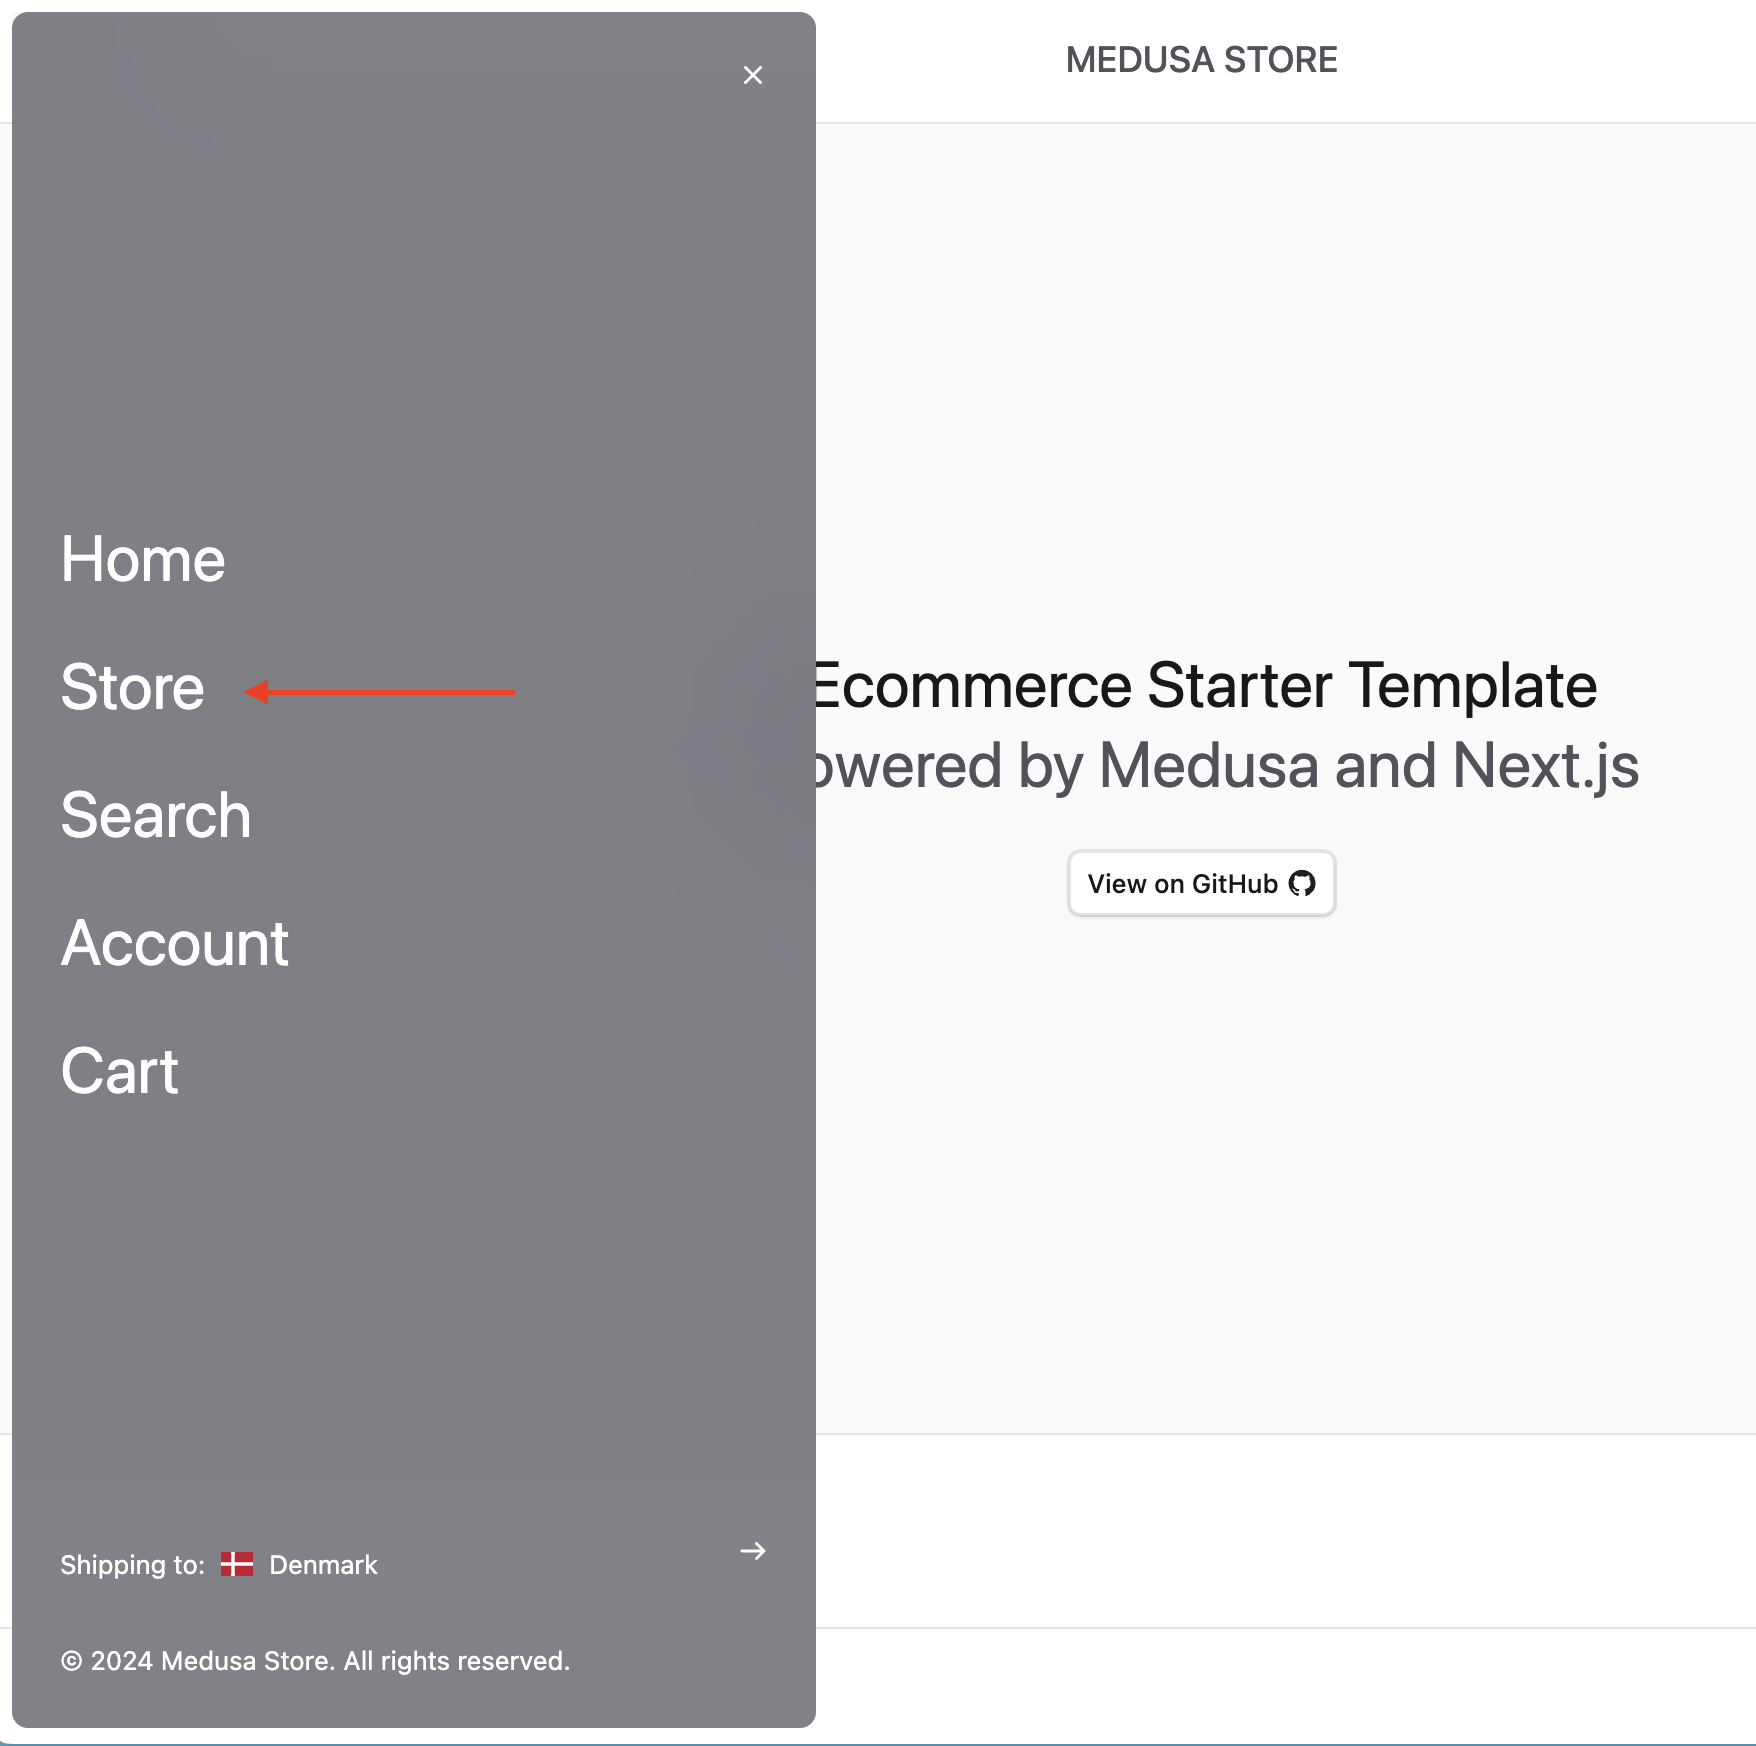
1. Go to Menu -> Store.
|
|
|
|
|
|
|
|
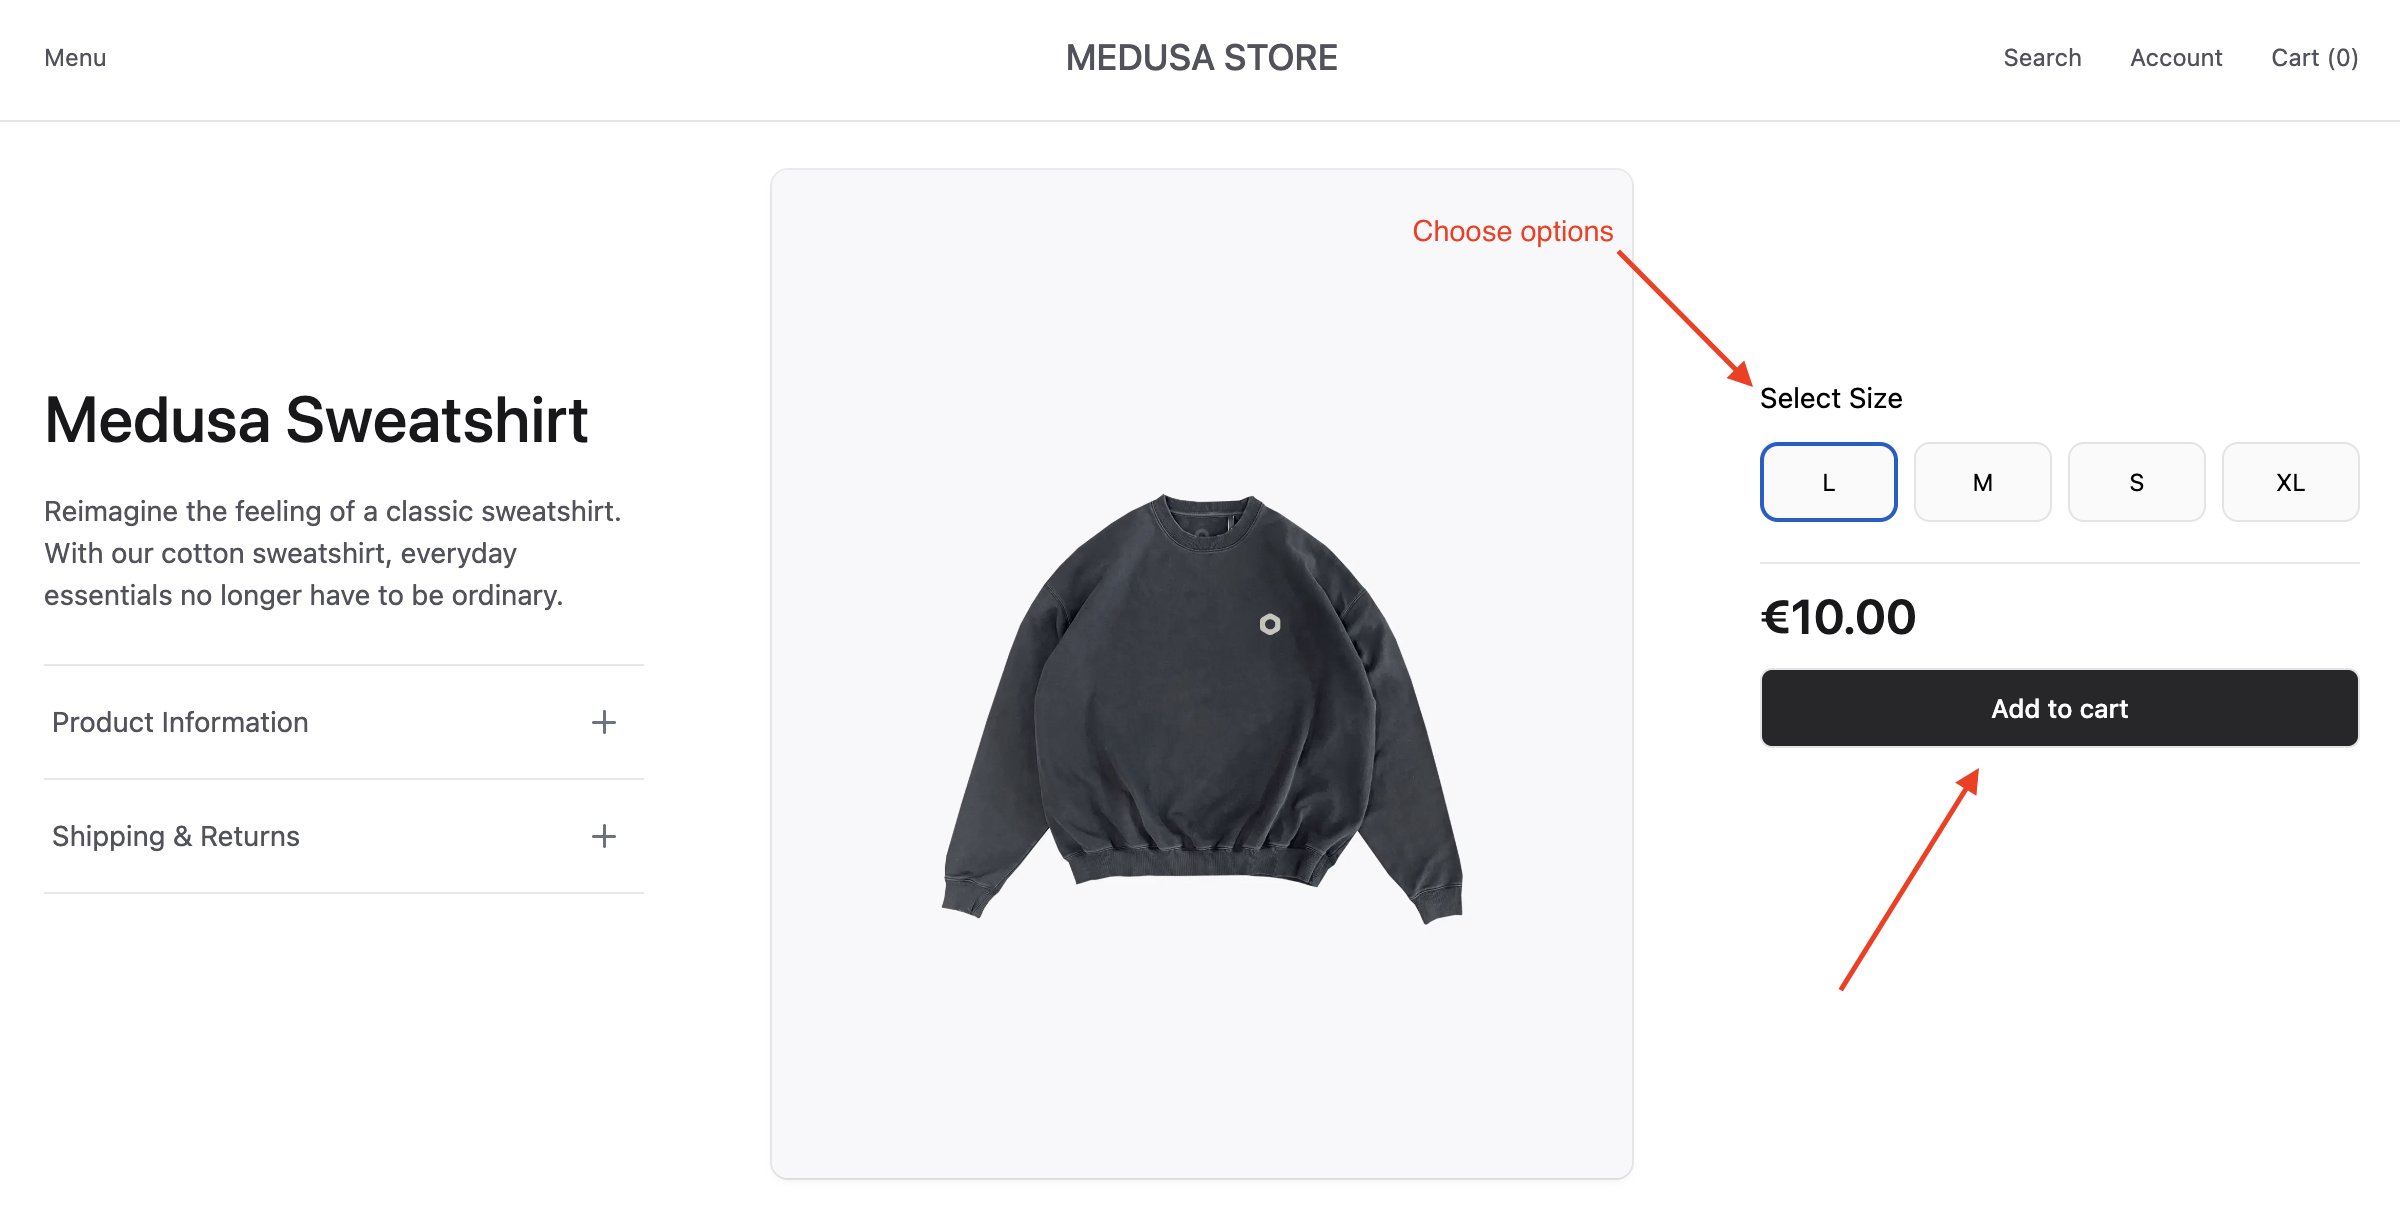
2\. Click on a product, select its options, and add it to the cart.
|
|
|
|
|
|
|
|
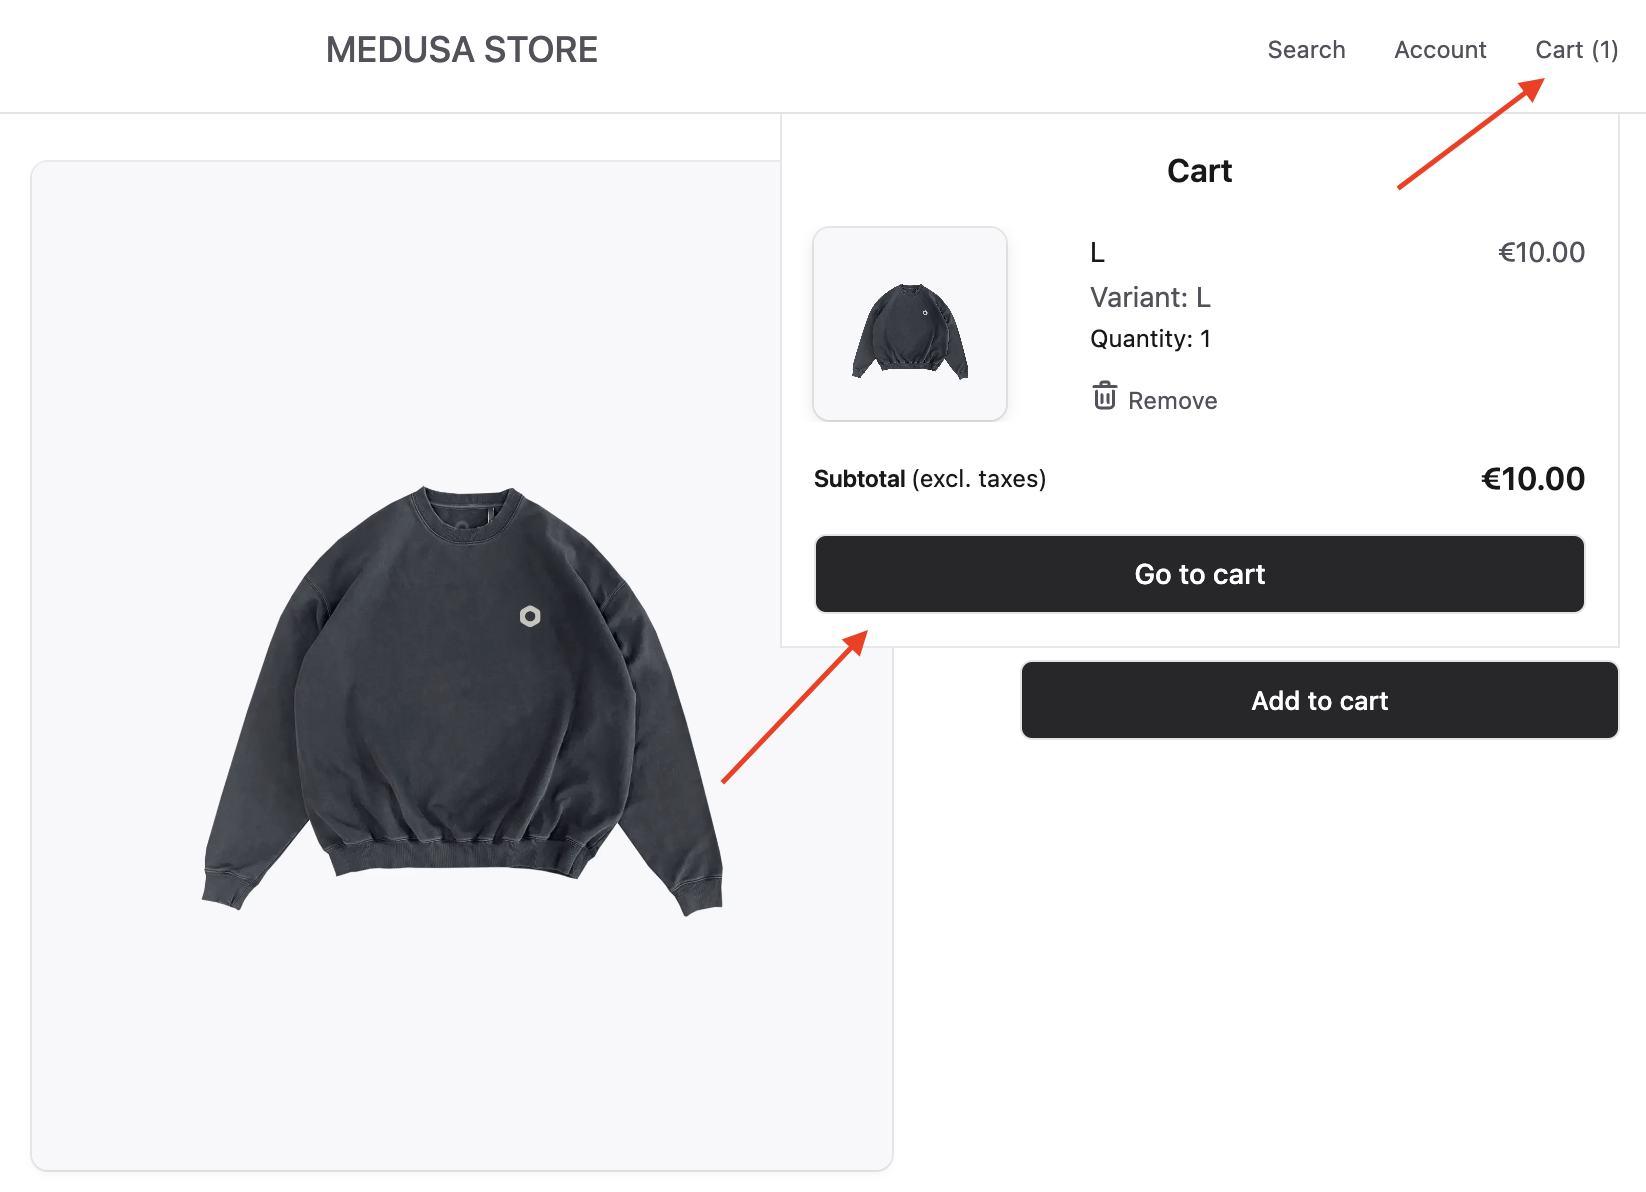
3\. Click on Cart at the top right, then click Go to Cart.
|
|
|
|
|
|
|
|
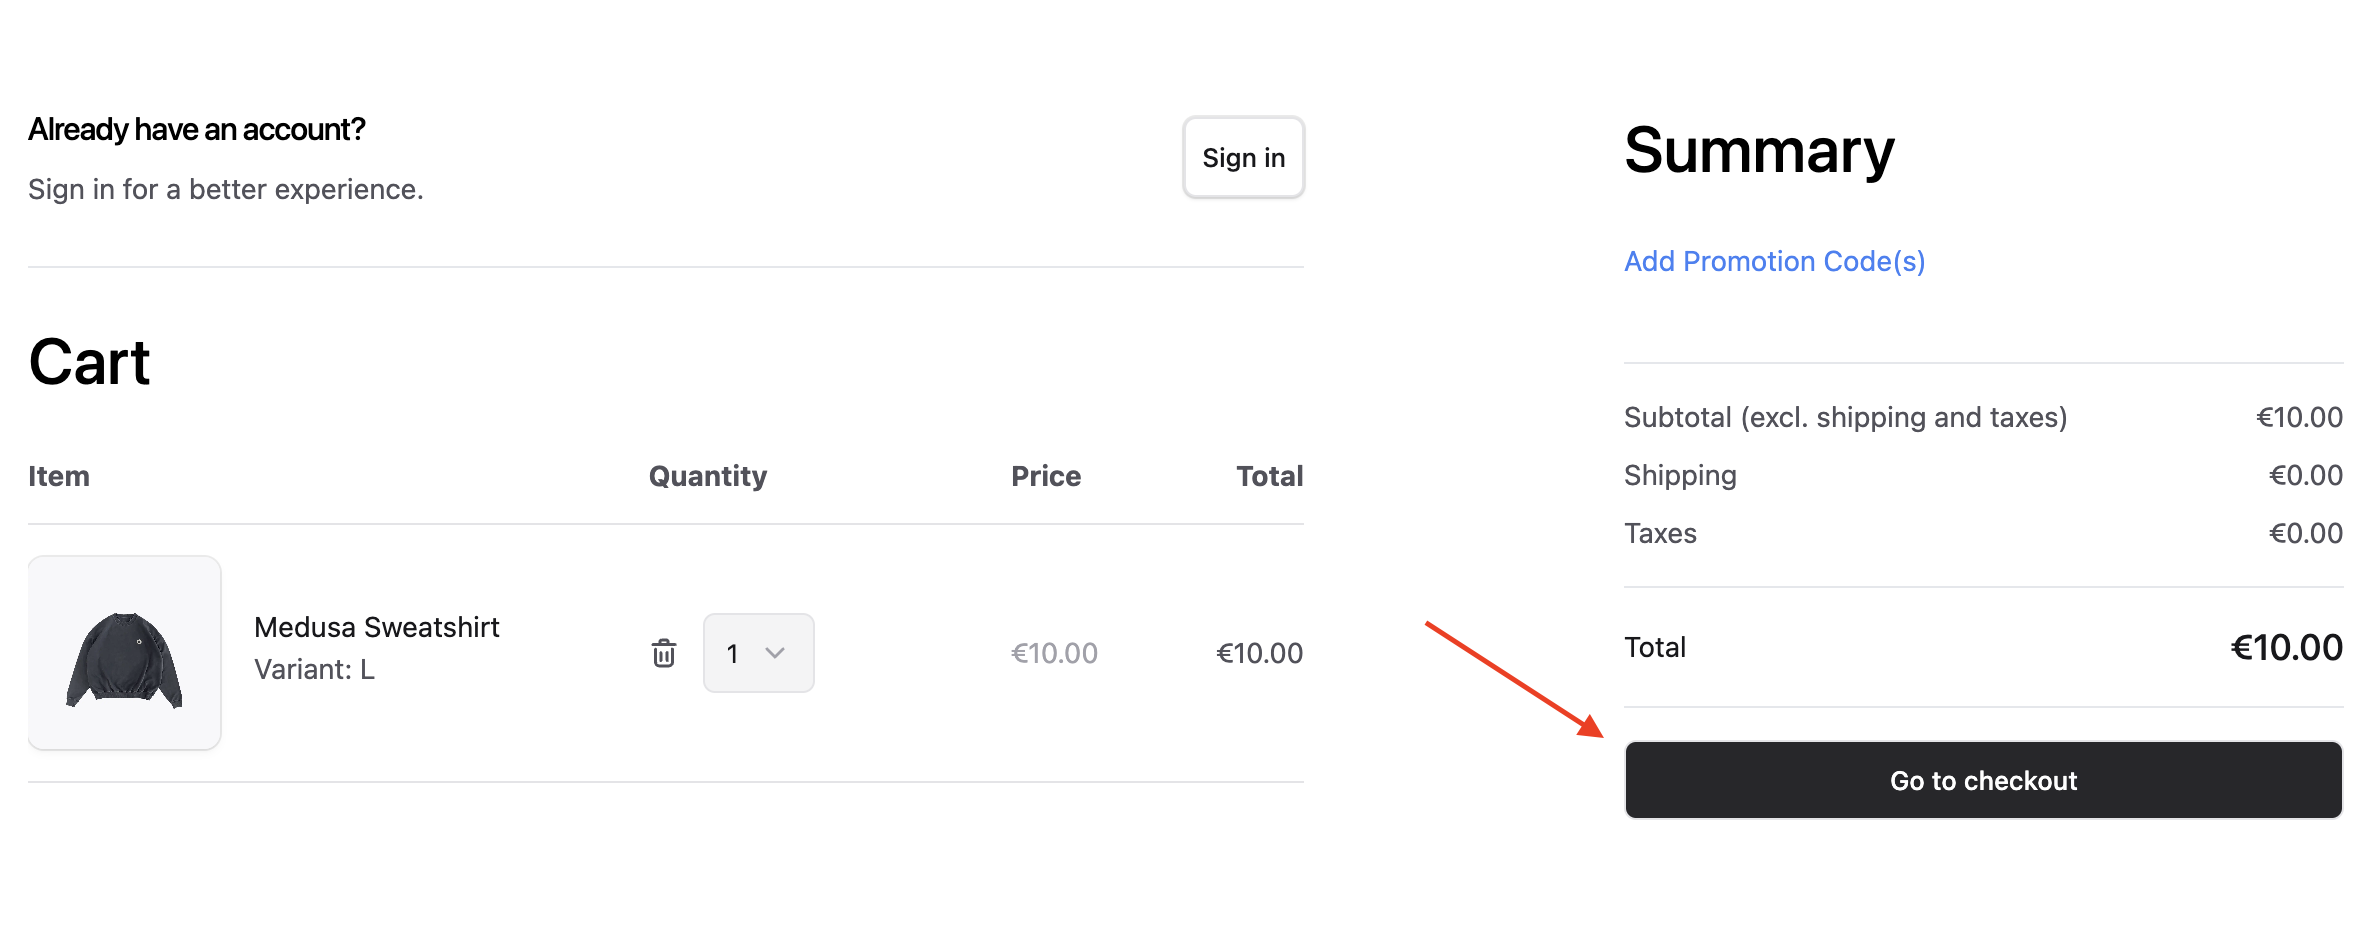
4\. On the cart's page, click on the "Go to checkout" button.
|
|
|
|
|
|
|
|
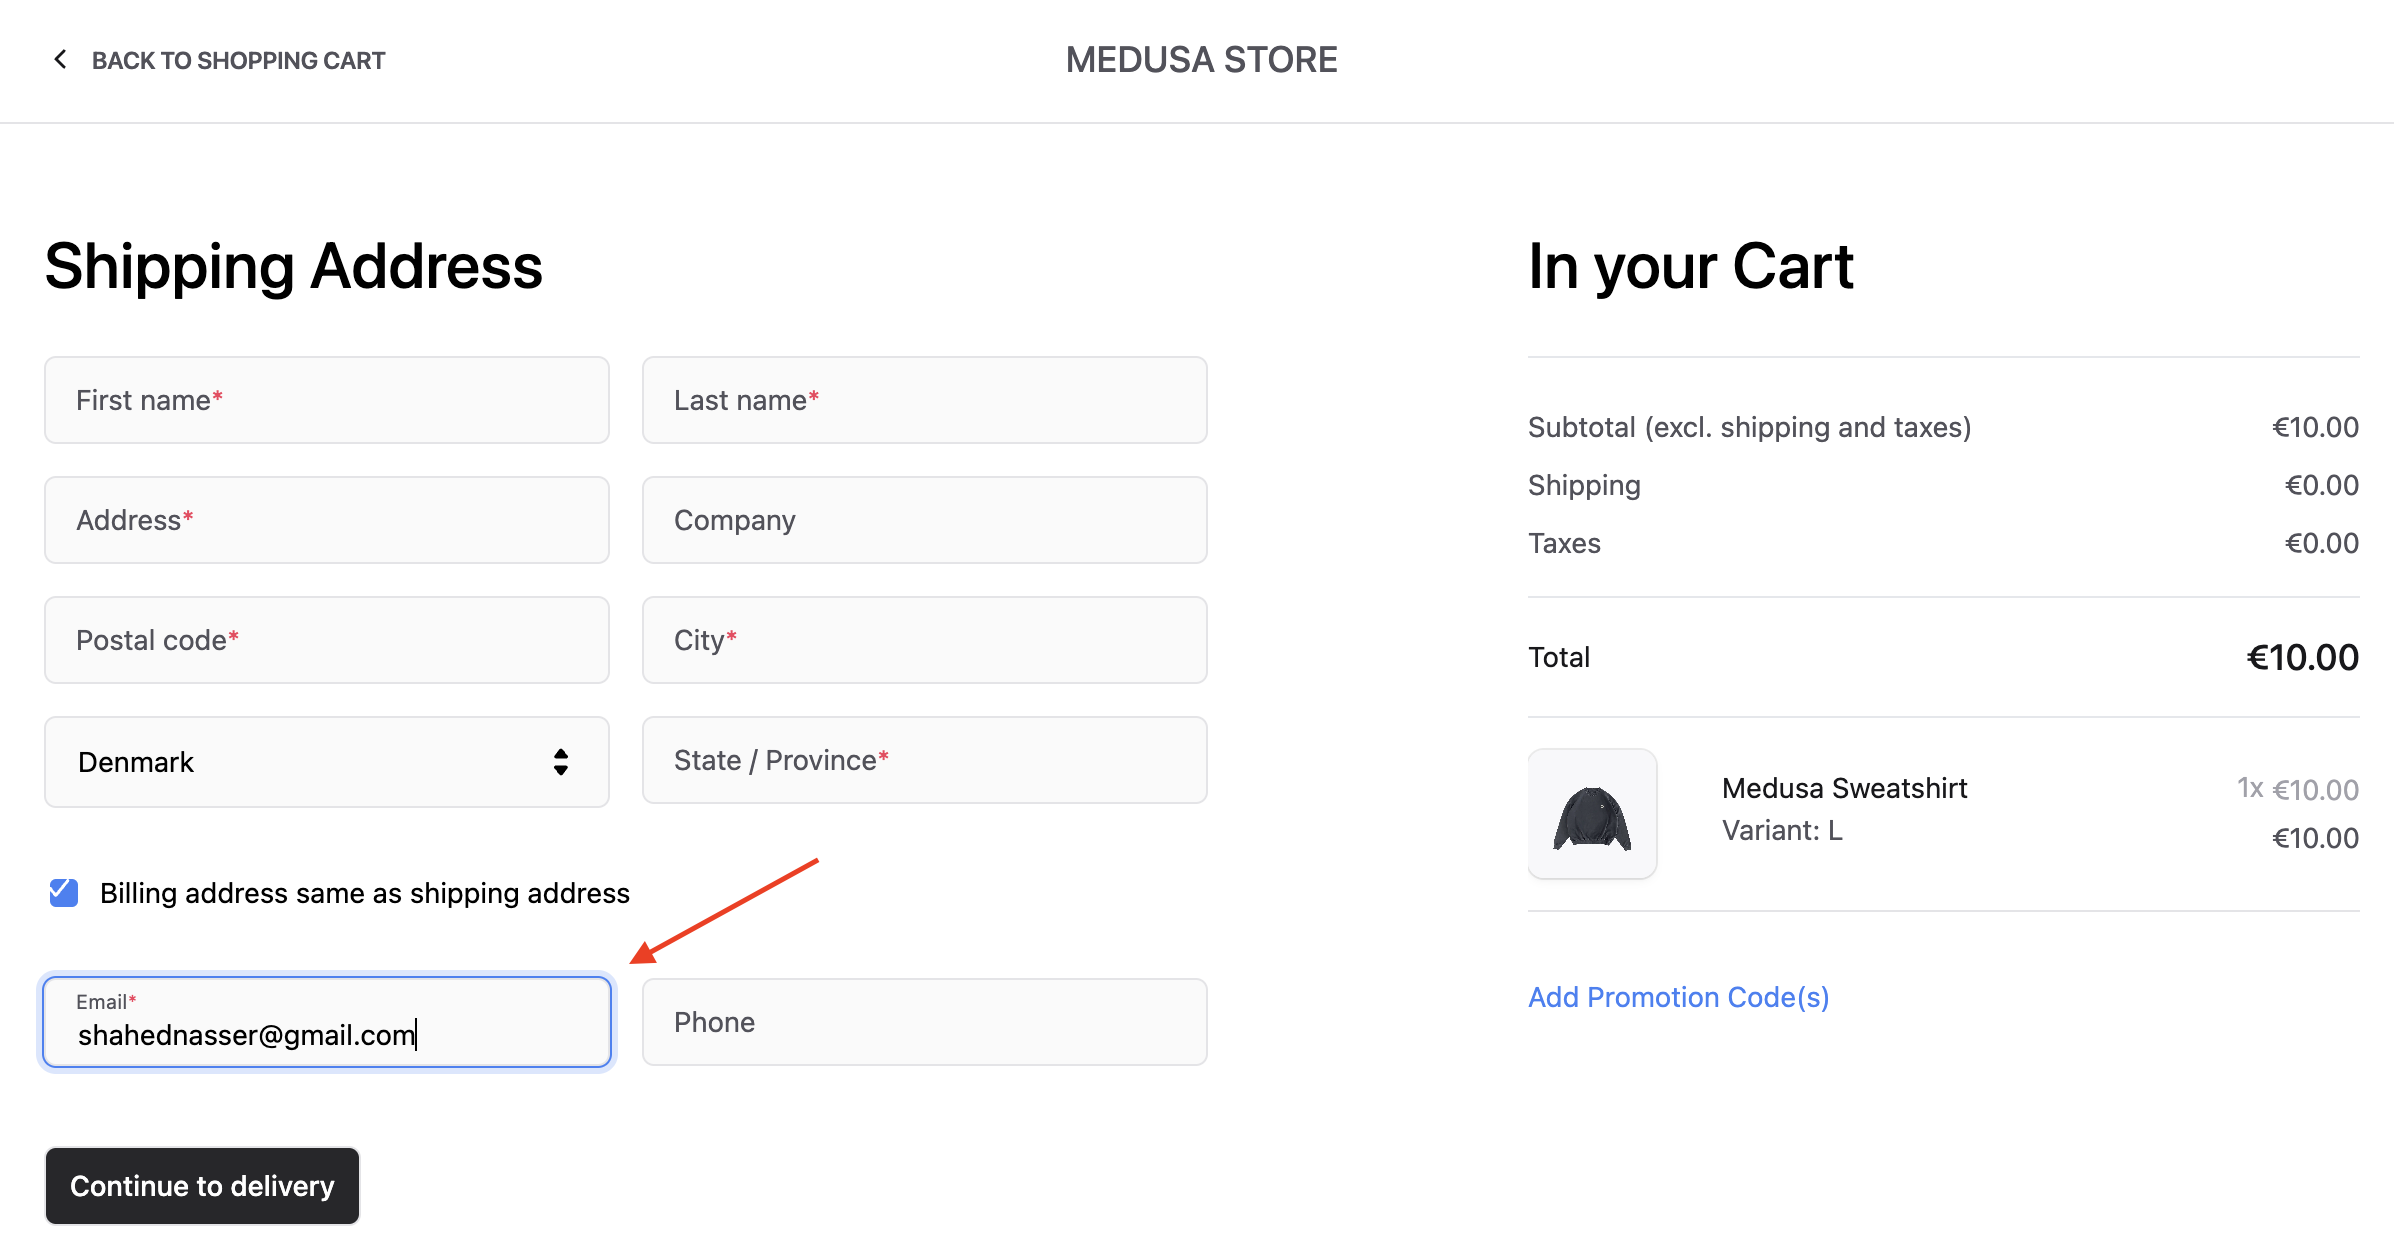
5\. On the checkout page, when entering the shipping address, make sure to set the email to your Resend account's email if you didn't set up a custom domain.
|
|
|
|
|
|
|
|
6\. After entering the shipping address, choose a delivery and payment methods, then click the Place Order button.
|
|
|
|
Once the order is placed, you'll find the following message logged in the Medusa application's terminal:
|
|
|
|
```bash
|
|
info: Processing order.placed which has 1 subscribers
|
|
```
|
|
|
|
This indicates that the `order.placed` event was emitted and its subscriber, which you added in the previous step, is executed.
|
|
|
|
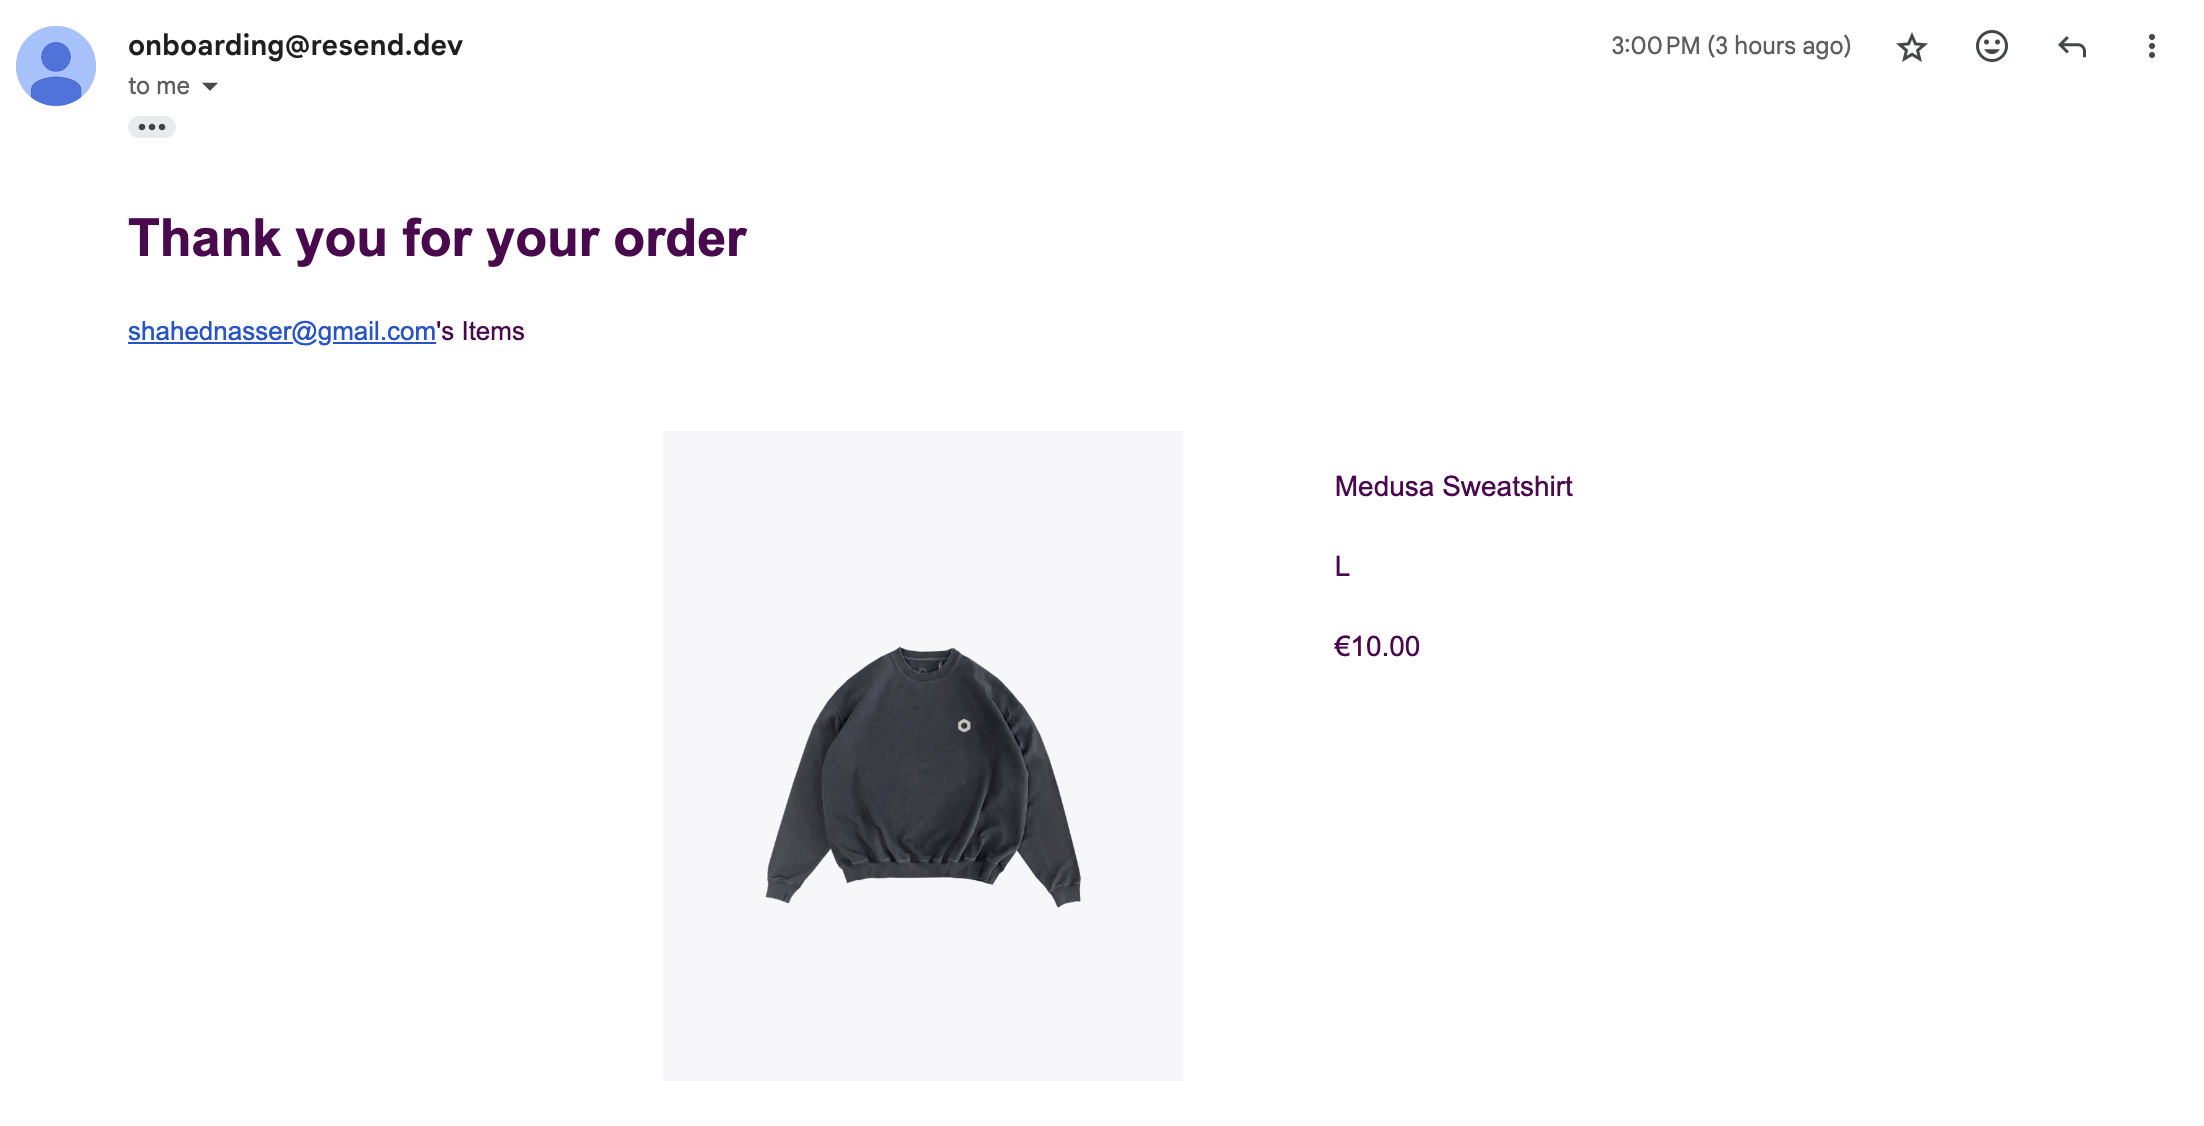
If you check the inbox of the email address you specified in the shipping address, you'll find a new email with the order's details.
|
|
|
|
|
|
|
|
---
|
|
|
|
## Next Steps
|
|
|
|
You've now integrated Medusa with Resend. You can add more templates for other emails, such as customer registration confirmation, user invites, and more. Check out the [Events Reference](../../../events-reference/page.mdx) for a list of all events that the Medusa application emits.
|
|
|
|
If you're new to Medusa, check out the [main documentation](!docs!/learn), where you'll get a more in-depth learning of all the concepts you've used in this guide and more.
|
|
|
|
To learn more about the commerce features that Medusa provides, check out Medusa's [Commerce Modules](../../../commerce-modules/page.mdx).
|