* initialized next.js project

* finished markdown sections

* added operation schema component

* change page metadata

* eslint fixes

* fixes related to deployment

* added response schema

* resolve max stack issue

* support for different property types

* added support for property types

* added loading for components

* added more loading

* type fixes

* added oneOf type

* removed console

* fix replace with push

* refactored everything

* use static content for description

* fixes and improvements

* added code examples section

* fix path name

* optimizations

* fixed tag navigation

* add support for admin and store references

* general enhancements

* optimizations and fixes

* fixes and enhancements

* added search bar

* loading enhancements

* added loading

* added code blocks

* added margin top

* add empty response text

* fixed oneOf parameters

* added path and query parameters

* general fixes

* added base path env variable

* small fix for arrays

* enhancements

* design enhancements

* general enhancements

* fix isRequired

* added enum values

* enhancements

* general fixes

* general fixes

* changed oas generation script

* additions to the introduction section

* added copy button for code + other enhancements

* fix response code block

* fix metadata

* formatted store introduction

* move sidebar logic to Tags component

* added test env variables

* fix code block bug

* added loading animation

* added expand param + loading

* enhance operation loading

* made responsive + improvements

* added loading provider

* fixed loading

* adjustments for small devices

* added sidebar label for endpoints

* added feedback component

* fixed analytics

* general fixes

* listen to scroll for other headings

* added sample env file

* update api ref files + support new fields

* fix for external docs link

* added new sections

* fix last item in sidebar not showing

* move docs content to www/docs

* change redirect url

* revert change

* resolve build errors

* configure rewrites

* changed to environment variable url

* revert changing environment variable name

* add environment variable for API path

* fix links

* fix tailwind settings

* remove vercel file

* reconfigured api route

* move api page under api

* fix page metadata

* fix external link in navigation bar

* update api spec

* updated api specs

* fixed google lint error

* add max-height on request samples

* add padding before loading

* fix for one of name

* fix undefined types

* general fixes

* remove response schema example

* redesigned navigation bar

* redesigned sidebar

* fixed up paddings

* added feedback component + report issue

* fixed up typography, padding, and general styling

* redesigned code blocks

* optimization

* added error timeout

* fixes

* added indexing with algolia + fixes

* fix errors with algolia script

* redesign operation sections

* fix heading scroll

* design fixes

* fix padding

* fix padding + scroll issues

* fix scroll issues

* improve scroll performance

* fixes for safari

* optimization and fixes

* fixes to docs + details animation

* padding fixes for code block

* added tab animation

* fixed incorrect link

* added selection styling

* fix lint errors

* redesigned details component

* added detailed feedback form

* api reference fixes

* fix tabs

* upgrade + fixes

* updated documentation links

* optimizations to sidebar items

* fix spacing in sidebar item

* optimizations and fixes

* fix endpoint path styling

* remove margin

* final fixes

* change margin on small devices

* generated OAS

* fixes for mobile

* added feedback modal

* optimize dark mode button

* fixed color mode useeffect

* minimize dom size

* use new style system

* radius and spacing design system

* design fixes

* fix eslint errors

* added meta files

* change cron schedule

* fix docusaurus configurations

* added operating system to feedback data

* change content directory name

* fixes to contribution guidelines

* revert renaming content

* added api-reference to documentation workflow

* fixes for search

* added dark mode + fixes

* oas fixes

* handle bugs

* added code examples for clients

* changed tooltip text

* change authentication to card

* change page title based on selected section

* redesigned mobile navbar

* fix icon colors

* fix key colors

* fix medusa-js installation command

* change external regex in algolia

* change changeset

* fix padding on mobile

* fix hydration error

* update depedencies
12 KiB
description, addHowToData
| description | addHowToData |
|---|---|
| Learn how to integrate PayPal with the Medusa backend. Learn how to install the PayPal plugin on the Medusa backend and integrate into a storefront. | true |
PayPal
This document guides you through setting up PayPal as a payment processor in your Medusa backend, admin, and storefront using the PayPal plugin.
Overview
PayPal is a payment processor used by millions around the world. It allows customers to purchase orders from your website using their PayPal account rather than the need to enter their card details.
As a developer, you can use PayPal’s SDKs and APIs to integrate PayPal as a payment method into your ecommerce store. You can test out the payment method in sandbox mode before going live with it as a payment method.
Using the medusa-payment-paypal plugin, this guide shows you how to set up your Medusa backend with PayPal as a payment processor.
Prerequisites
Before you proceed with this guide, make sure you create a PayPal account. You also need a PayPal Developer account and retrieve the Client ID and Client Secret. You can learn more about how to do that in PayPal’s documentation.
In addition, you need to configure a webhook listener on your PayPal Developer Dashboard and obtain the webhook ID. This is necessary for Webhooks to work.
Webhooks are used in scenarios where the customer might leave the page during the authorization and before the checkout flow is fully complete. It will then create the order or swap after the payment is authorized if they weren’t created
Additionally, you need a Medusa backend installed and set up. If not, you can follow the quickstart guide to get started.
You also need Medusa Admin installed to enable PayPal as a payment processor. You can alternatively use the REST APIs.
Medusa Backend
Install the PayPal Plugin
In the root of your Medusa backend, run the following command to install the PayPal plugin:
npm install medusa-payment-paypal
Configure the PayPal Plugin
Next, you need to add configurations for your PayPal plugin.
In the .env file add the following new environment variables:
PAYPAL_SANDBOX=true
PAYPAL_CLIENT_ID=<CLIENT_ID>
PAYPAL_CLIENT_SECRET=<CLIENT_SECRET>
PAYPAL_AUTH_WEBHOOK_ID=<WEBHOOK_ID>
Where <CLIENT_ID>, <CLIENT_SECRET>, and <WEBHOOK_ID> are the keys you retrieved from the PayPal Developer dashboard as explained in the Prerequisites section.
Notice that during development it’s highly recommended to set PAYPAL_SANDBOX to true and ensure you have sandbox accounts set up in PayPal.
Then, in medusa-config.js, add the PayPal plugin to the plugins array with the configurations necessary:
const plugins = [
  // other plugins...
  {
    resolve: `medusa-payment-paypal`,
    options: {
      sandbox: process.env.PAYPAL_SANDBOX,
      clientId: process.env.PAYPAL_CLIENT_ID,
      clientSecret: process.env.PAYPAL_CLIENT_SECRET,
      authWebhookId: process.env.PAYPAL_AUTH_WEBHOOK_ID,
    },
  },
]
That’s all you need to install PayPal on your Medusa backend!
The PayPal plugin also accepts the following optional configurations:
capture: : a boolean value that indicates whether payment should be captured manually or automatically. By default, it will be false, leading admins to capture the payment manually.
Admin Setup
This section will guide you through adding PayPal as a payment processor in a region using your Medusa admin dashboard.
This step is required for you to be able to use PayPal as a payment processor in your storefront.
Admin Prerequisites
If you don’t have a Medusa admin installed, make sure to follow along with the guide on how to install it before continuing with this section.
Add PayPal to Regions
You can refer to this documentation in the user guide to learn how to add a payment processor like PayPal to a region.
Storefront Setup
This section will take you through the steps to add PayPal as a payment method on the storefront. It includes the steps necessary when using one of Medusa’s official storefronts as well as your own custom React-based storefront.
Storefront Prerequisites
All storefronts require that you obtain your PayPal Client ID. You can retrieve it from your PayPal developer dashboard.
Process Overview
Aside from the Next.js Starter Template, you need to add the implementation with PayPal manually.
:::note
It is recommended to read through the Frontend Checkout Flow first to fully understand how payment is implemented on the storefront.
:::
Although the next sections have different implementations to add PayPal into your storefront, they essentially follow the same process:
- Show PayPal’s button if the PayPal processor is available for the current cart.
- When the button is clicked, open PayPal’s payment portal and wait for the customer to authorize the payment.
- If the payment is authorized successfully, set PayPal’s Payment Session as the session used to perform the payment for the current cart, then update the Payment Session on the backend with the data received from PayPal’s payment portal. This data is essential to the backend to verify the authorization and perform additional payment processing later such as capturing payment.
- Complete the cart to create the order.
:::info
In Medusa, by default, payments are authorized during checkout, but the payment is not captured right away. The payment should be manually captured from the Medusa Admin.
:::
Add to Next.js Starter Template
Medusa has a Next.js Starter Template that you can easily use with your Medusa backend. If you don’t have the storefront installed, you can follow this quickstart guide.
In your .env.local file (or the file you’re using for your environment variables), add the following variable:
NEXT_PUBLIC_PAYPAL_CLIENT_ID=<YOUR_CLIENT_ID>
Make sure to replace <YOUR_CLIENT_ID> with your PayPal Client ID.
Now, if you run your Medusa backend and your storefront, on checkout you’ll be able to use PayPal].
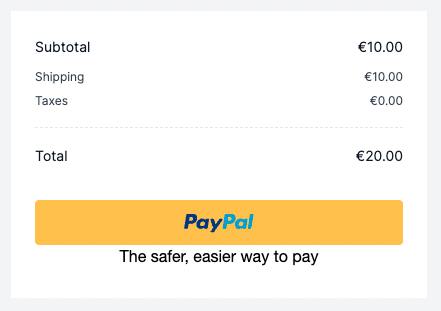
You can test out the payment with PayPal using your sandbox account.
Add to Custom Storefront
This section guides you to add PayPal into a React-based framework. The instructions are general instructions that you can use in your storefront.
In your storefront, you need to install the PayPal React components library and the Medusa JS Client library:
npm install @paypal/react-paypal-js @medusajs/medusa-js
Then, add the Client ID as an environment variable based on the framework you’re using.
Next, create the file that will hold the PayPal component with the following content:
import {
  PayPalButtons,
  PayPalScriptProcessor,
} from "@paypal/react-paypal-js"
import { useEffect, useState } from "react"

import Medusa from "@medusajs/medusa-js"

function Paypal() {
  const client = new Medusa()
  const [errorMessage, setErrorMessage] = useState(undefined)
  const [processing, setProcessing] = useState(false)
  const cart = "..." // TODO retrieve the cart here

  const handlePayment = (data, actions) => {
    actions.order.authorize().then(async (authorization) => {
      if (authorization.status !== "COMPLETED") {
        setErrorMessage(
          `An error occurred, status: ${authorization.status}`
        )
        setProcessing(false)
        return
      }

      const response = await client
        .carts
        .setPaymentSession(cart.id, {
          "processor_id": "paypal",
        })

      if (!response.cart) {
        setProcessing(false)
        return
      }

      await client
        .carts
        .updatePaymentSession(cart.id, "paypal", {
        data: {
          data: {
            ...authorization,
          },
        },
      })

      const { data } = await client.carts.complete(cart.id)

      if (!data || data.object !== "order") {
        setProcessing(false)
        return
      }

      // order successful
      alert("success")
    })
  }

  return (
    <div style={{ marginTop: "10px", marginLeft: "10px" }}>
      {cart !== undefined && (
        <PayPalScriptProcessor options={{
          "client-id": "<CLIENT_ID>",
          "currency": "EUR",
          "intent": "authorize",
        }}>
            {errorMessage && (
              <span className="text-rose-500 mt-4">
                {errorMessage}
              </span>
            )}
            <PayPalButtons
              style={{ layout: "horizontal" }}
              onApprove={handlePayment}
              disabled={processing}
            />
        </PayPalScriptProcessor>
      )}
    </div>
  )
}

export default Paypal
Here’s briefly what this code snippet does:
- At the beginning of the component, the Medusa client is initialized using the JS Client you installed.
- You also need to retrieve the cart. Ideally, the cart should be managed through a context. So, every time the cart has been updated the cart should be updated in the context to be accessed from all components.
- This component renders a PayPal button to initialize the payment using PayPal. You use the components from the PayPal React components library to render the button and you pass the
PayPalScriptProcessorcomponent the Client ID. Make sure to replace<CLIENT_ID>with the environment variable you added. - When the button is clicked, the
handlePaymentfunction is executed. In this method, you initialize the payment authorization usingactions.order.authorize(). It takes the customer to another page to log in with PayPal and authorize the payment. - After the payment is authorized successfully on PayPal’s portal, the fulfillment function passed to
actions.order.authorize().thenwill be executed. - In the fulfillment function, you first ensure that the payment session for the PayPal payment processor is set as the selected Payment Session in the cart. Then, you send a request to the backend to update the payment session data with the authorization data received from PayPal.
- You then complete the cart and place the order. If that is done successfully, you just show a success alert. You can change this based on the behavior you want in your storefront.
You can then import this component where you want to show it in your storefront.
If you run the Medusa backend and the storefront backend, you should see the PayPal button on checkout.

Capture Payments
After the customer places an order, you can see the order on the admin panel. In the payment information under the “Payment” section, you should see a “Capture” button.
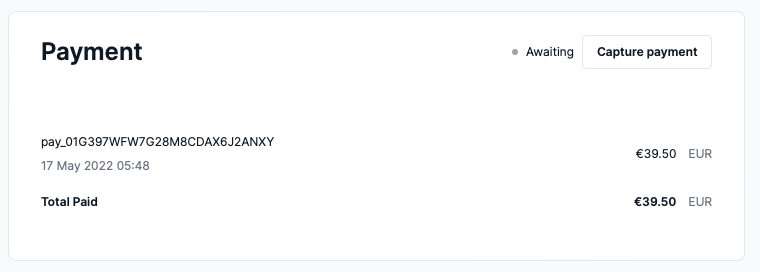
Clicking this button lets you capture the payment for an order. You can also refund payments if an order has captured payments.
Refunding or Capturing payments is reflected in your PayPal dashboard as well.
See Also
- Check out more plugins you can add to your store.