606 lines
17 KiB
Plaintext
606 lines
17 KiB
Plaintext
import Tabs from '@theme/Tabs';
|
||
import TabItem from '@theme/TabItem';
|
||
|
||
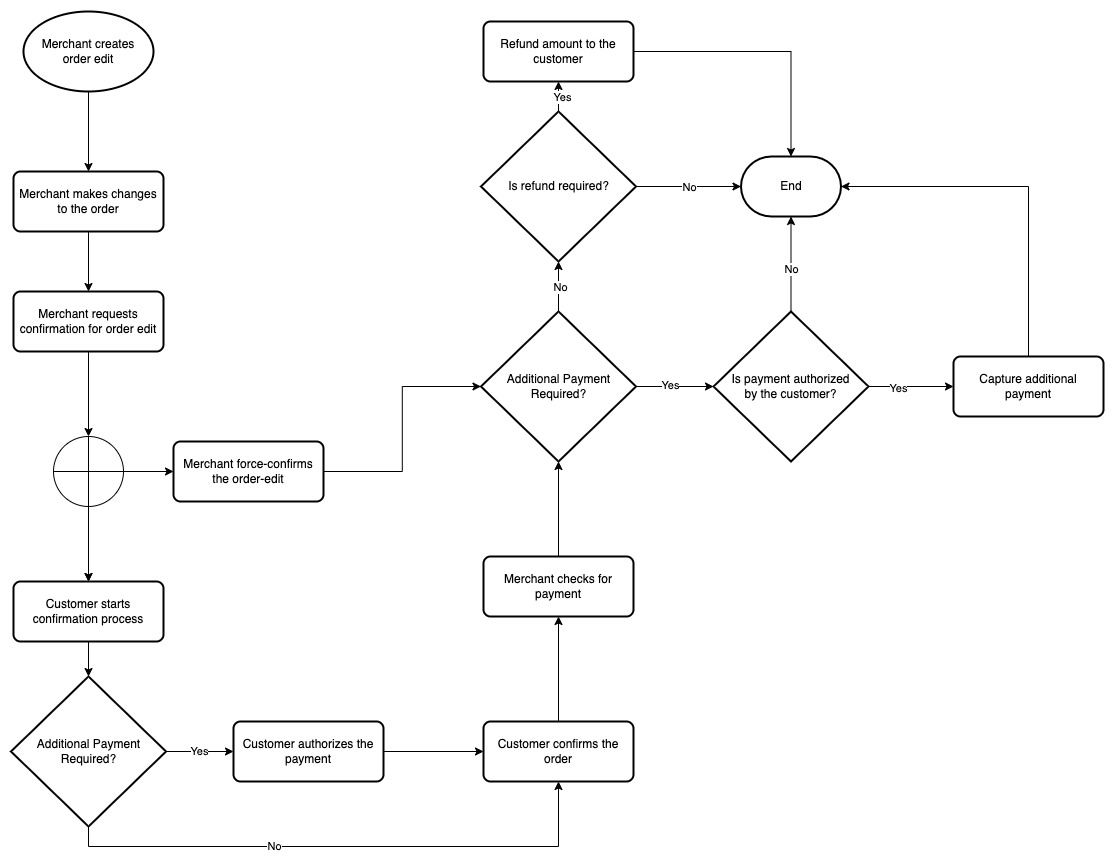
# How to Edit an Order
|
||
|
||
In this document, you’ll learn how to create an order edit using the Admin API endpoints.
|
||
|
||
## Overview
|
||
|
||
The Admin API can be used to edit a customer’s order using the Order Editing feature.
|
||
|
||
The following changes can be made on an order:
|
||
|
||
- Add a new item to the original order
|
||
- Edit an item’s quantity in the original order.
|
||
- Delete an item from the original order.
|
||
|
||
Medusa then takes care of the calculation of subtotals, taxes, and more.
|
||
|
||
The Order Edit can then either be confirmed using the Storefront API as a customer, or force-confirmed using the Admin API as a merchant.
|
||
|
||
The changes are only reflected on the original order once the Order Edit is confirmed.
|
||
|
||
|
||
|
||
### Scenario
|
||
|
||
You want to add or use the following admin functionalities related to Order Editing:
|
||
|
||
- Create an order edit.
|
||
- Add, edit, and delete items from an order.
|
||
- Revert an item change in an order edit.
|
||
- Move order edit into request state.
|
||
- Force-confirm an order edit.
|
||
|
||
:::note
|
||
|
||
You can perform other functionalities related to order editing. To learn more, check out the [API reference](/api/admin/#tag/OrderEdit).
|
||
|
||
:::
|
||
|
||
---
|
||
|
||
## Prerequisites
|
||
|
||
### Medusa Components
|
||
|
||
It is assumed that you already have a Medusa server installed and set up. If not, you can follow our [quickstart guide](../../quickstart/quick-start.mdx) to get started.
|
||
|
||
### JS Client
|
||
|
||
This guide includes code snippets to send requests to your Medusa server using Medusa’s JS Client, JavaScript’s Fetch API, or cURL.
|
||
|
||
If you follow the JS Client code blocks, it’s assumed you already have [Medusa’s JS Client](../../js-client/overview.md) installed and have [created an instance of the client](../../js-client/overview.md#configuration).
|
||
|
||
### Authenticated Admin User
|
||
|
||
You must be an authenticated admin user before following along with the steps in the tutorial.
|
||
|
||
You can learn more about [authenticating as an admin user in the API reference](/api/admin/#section/Authentication).
|
||
|
||
### Previous Steps
|
||
|
||
You must have an existing order that you want to edit.
|
||
|
||
---
|
||
|
||
## Create an Order Edit
|
||
|
||
Before you can start making changes to an order, you have to create a new order edit.
|
||
|
||
To do that, send a request to the [Create an OrderEdit](/api/admin/#tag/OrderEdit/operation/PostOrderEdits) endpoint:
|
||
|
||
<Tabs groupId="request-type" wrapperClassName="code-tabs">
|
||
<TabItem value="client" label="Medusa JS Client" default>
|
||
|
||
```ts
|
||
medusa.admin.orderEdits.create({
|
||
order_id, // required
|
||
})
|
||
.then(({ order_edit }) => {
|
||
console.log(order_edit.id)
|
||
})
|
||
```
|
||
|
||
</TabItem>
|
||
<TabItem value="fetch" label="Fetch API">
|
||
|
||
```ts
|
||
fetch(`<YOUR_SERVER>/admin/order-edits`, {
|
||
method: "POST",
|
||
credentials: "include",
|
||
headers: {
|
||
"Content-Type": "application/json",
|
||
},
|
||
body: JSON.stringify({
|
||
order_id,
|
||
}),
|
||
})
|
||
.then((response) => response.json())
|
||
.then(({ order_edit }) => {
|
||
console.log(order_edit.id)
|
||
})
|
||
```
|
||
|
||
</TabItem>
|
||
<TabItem value="curl" label="cURL">
|
||
|
||
```bash
|
||
curl -L -X POST '<SERVER_URL>/admin/order-edits' \
|
||
-H 'Authorization: Bearer <API_TOKEN>' \
|
||
-H 'Content-Type: application/json' \
|
||
--data-raw '{
|
||
"order_id": "<ORDER_ID>"
|
||
}'
|
||
```
|
||
|
||
</TabItem>
|
||
</Tabs>
|
||
|
||
This endpoint has one required request body parameter `order_id` which is the ID of the order this edit is being created for.
|
||
|
||
This request returns the Order Edit under the `order_edit` property.
|
||
|
||
:::info
|
||
|
||
You can only create one Order Edit at a time. So, if you try to create a new Order Edit for an order that is already being edited, you will receive an error.
|
||
|
||
:::info
|
||
|
||
---
|
||
|
||
## Make Changes to an Order’s Items
|
||
|
||
You can add new items into the original order, edit existing item in the original order, or delete items in the original order.
|
||
|
||
:::info
|
||
|
||
You can only make changes to items that have not been fulfilled yet in the order.
|
||
|
||
:::
|
||
|
||
### Add an Item
|
||
|
||
To add a new item to the original order, send a request to the [Add Line Item](/api/admin/#tag/OrderEdit/operation/PostOrderEditsEditLineItems) endpoint:
|
||
|
||
<Tabs groupId="request-type" wrapperClassName="code-tabs">
|
||
<TabItem value="client" label="Medusa JS Client" default>
|
||
|
||
```ts
|
||
medusa.admin.orderEdits.addLineItem(orderEditId, {
|
||
quantity: 1,
|
||
variant_id,
|
||
})
|
||
.then(({ order_edit }) => {
|
||
console.log(order_edit.changes)
|
||
})
|
||
```
|
||
|
||
</TabItem>
|
||
<TabItem value="fetch" label="Fetch API">
|
||
|
||
```ts
|
||
fetch(`<YOUR_SERVER>/admin/order-edits/${orderEditId}/items`, {
|
||
method: "POST",
|
||
credentials: "include",
|
||
headers: {
|
||
"Content-Type": "application/json",
|
||
},
|
||
body: JSON.stringify({
|
||
quantity: 1,
|
||
variant_id,
|
||
}),
|
||
})
|
||
.then((response) => response.json())
|
||
.then(({ order_edit }) => {
|
||
console.log(order_edit.changes)
|
||
})
|
||
```
|
||
|
||
</TabItem>
|
||
<TabItem value="curl" label="cURL">
|
||
|
||
```bash
|
||
curl -L -X POST '<SERVER_URL>/admin/order-edits/<ORDER_EDIT_ID>/items' \
|
||
-H 'Authorization: Bearer <API_TOKEN>' \
|
||
-H 'Content-Type: application/json' \
|
||
--data-raw '{
|
||
"quantity": 1,
|
||
"variant_id": "<VARIANT_ID>"
|
||
}'
|
||
```
|
||
|
||
</TabItem>
|
||
</Tabs>
|
||
|
||
This request requires the ID of the order edit as a path parameter.
|
||
|
||
In the body of the request, you pass the two parameters `quantity` and `variant_id` which will be used to add a new item into the original order.
|
||
|
||
This request returns the Order Edit object. You can access returned item changes using `order_edit.changes`.
|
||
|
||
### Update an Item
|
||
|
||
You can edit an item’s quantity in the original order.
|
||
|
||
To update an item, send a request to the [Update Line Item](/api/admin/#tag/OrderEdit/operation/PostOrderEditsEditLineItemsLineItem) endpoint:
|
||
|
||
<Tabs groupId="request-type" wrapperClassName="code-tabs">
|
||
<TabItem value="client" label="Medusa JS Client" default>
|
||
|
||
```ts
|
||
medusa.admin.orderEdits.updateLineItem(orderEditId, itemId, {
|
||
quantity: 2,
|
||
})
|
||
.then(({ order_edit }) => {
|
||
console.log(order_edit.changes)
|
||
})
|
||
```
|
||
|
||
</TabItem>
|
||
<TabItem value="fetch" label="Fetch API">
|
||
|
||
```ts
|
||
fetch(`<YOUR_SERVER>/admin/order-edits/${orderEditId}/items/${itemId}`, {
|
||
method: "POST",
|
||
credentials: "include",
|
||
headers: {
|
||
"Content-Type": "application/json",
|
||
},
|
||
body: JSON.stringify({
|
||
quantity: 2,
|
||
}),
|
||
})
|
||
.then((response) => response.json())
|
||
.then(({ order_edit }) => {
|
||
console.log(order_edit.changes)
|
||
})
|
||
```
|
||
|
||
</TabItem>
|
||
<TabItem value="curl" label="cURL">
|
||
|
||
```bash
|
||
curl -L -X POST '<SERVER_URL>/admin/order-edits/<ORDER_EDIT_ID>/items/<ITEM_ID>' \
|
||
-H 'Authorization: Bearer <API_TOKEN>' \
|
||
-H 'Content-Type: application/json' \
|
||
--data-raw '{
|
||
"quantity": 2
|
||
}'
|
||
```
|
||
|
||
</TabItem>
|
||
</Tabs>
|
||
|
||
This request requires the ID of the order edit and the ID of the item in the original order as path parameters.
|
||
|
||
In the body of the request, you can pass the `quantity` parameter, with its value being the new item quantity. In this example, you change the quantity of the item to `2`.
|
||
|
||
This request returns the Order Edit object. You can access returned item changes using `order_edit.changes`.
|
||
|
||
### Remove an Item
|
||
|
||
You can remove an item from the original order by sending a request to the [Remove Line Item](/api/admin/#tag/OrderEdit/operation/DeleteOrderEditsOrderEditLineItemsLineItem) endpoint:
|
||
|
||
<Tabs groupId="request-type" wrapperClassName="code-tabs">
|
||
<TabItem value="client" label="Medusa JS Client" default>
|
||
|
||
```ts
|
||
medusa.admin.orderEdits.removeLineItem(orderEditId, itemId)
|
||
.then(({ order_edit }) => {
|
||
console.log(order_edit.changes)
|
||
})
|
||
```
|
||
|
||
</TabItem>
|
||
<TabItem value="fetch" label="Fetch API">
|
||
|
||
```ts
|
||
fetch(`<YOUR_SERVER>/admin/order-edits/${orderEditId}/items/${itemId}`, {
|
||
method: "DELETE",
|
||
credentials: "include",
|
||
})
|
||
.then((response) => response.json())
|
||
.then(({ order_edit }) => {
|
||
console.log(order_edit.changes)
|
||
})
|
||
```
|
||
|
||
</TabItem>
|
||
<TabItem value="curl" label="cURL">
|
||
|
||
```bash
|
||
curl -L -X DELETE '<SERVER_URL>/admin/order-edits/<ORDER_EDIT_ID>/items/<ITEM_ID>' \
|
||
-H 'Authorization: Bearer <API_TOKEN>'
|
||
```
|
||
|
||
</TabItem>
|
||
</Tabs>
|
||
|
||
This request requires the order edit’s ID and the ID of the item in the original order as path parameters.
|
||
|
||
This request returns the Order Edit object. You can access returned item changes using `order_edit.changes`.
|
||
|
||
---
|
||
|
||
## Revert an Item Change
|
||
|
||
A merchant might make a mistake while making a change to the original order’s items. Using the Admin API, you can revert item changes previously created.
|
||
|
||
To revert an item change, send a request to the [Delete Item Change](/api/admin/#tag/OrderEdit/operation/DeleteOrderEditsOrderEditItemChange) endpoint:
|
||
|
||
<Tabs groupId="request-type" wrapperClassName="code-tabs">
|
||
<TabItem value="client" label="Medusa JS Client" default>
|
||
|
||
```ts
|
||
medusa.admin.orderEdits.deleteItemChange(orderEditId, changeId)
|
||
.then(({ id, object, deleted }) => {
|
||
console.log(id)
|
||
})
|
||
```
|
||
|
||
</TabItem>
|
||
<TabItem value="fetch" label="Fetch API">
|
||
|
||
```ts
|
||
fetch(
|
||
`<YOUR_SERVER>/admin/order-edits/${orderEditId}/changes/${changeId}`,
|
||
{
|
||
method: "DELETE",
|
||
credentials: "include",
|
||
}
|
||
)
|
||
.then((response) => response.json())
|
||
.then(({ id, object, deleted }) => {
|
||
console.log(id, object, deleted)
|
||
})
|
||
```
|
||
|
||
</TabItem>
|
||
<TabItem value="curl" label="cURL">
|
||
|
||
```bash
|
||
curl -L -X DELETE '<SERVER_URL>/admin/order-edits/<ORDER_EDIT_ID>/changes/<CHANGE_ID>' \
|
||
-H 'Authorization: Bearer <API_TOKEN>'
|
||
```
|
||
|
||
</TabItem>
|
||
</Tabs>
|
||
|
||
This request requires the order edit’s ID and the item change’s ID as path parameters.
|
||
|
||
This request returns an object with the following properties:
|
||
|
||
- `id`: The ID of the deleted object. In this case, it’s the ID of the item change.
|
||
- `object`: A string indicating the type of deleted object. In this case, it’s `item_change`.
|
||
- `deleted`: A boolean value indicating whether the item change was deleted.
|
||
|
||
---
|
||
|
||
## Move into Request State
|
||
|
||
After an Order Edit is created and all the item changes are added, it must be moved into the request state.
|
||
|
||
To move an Order Edit into the request state, send a request to the [Request Confirmation](/api/admin/#tag/OrderEdit/operation/PostOrderEditsOrderEditRequest) endpoint:
|
||
|
||
<Tabs groupId="request-type" wrapperClassName="code-tabs">
|
||
<TabItem value="client" label="Medusa JS Client" default>
|
||
|
||
```ts
|
||
medusa.admin.orderEdits.requestConfirmation(orderEditId)
|
||
.then(({ order_edit }) => {
|
||
console.log(order_edit.requested_at, order_edit.requested_by)
|
||
})
|
||
```
|
||
|
||
</TabItem>
|
||
<TabItem value="fetch" label="Fetch API">
|
||
|
||
```ts
|
||
fetch(`<YOUR_SERVER>/admin/order-edits/${orderEditId}/request`, {
|
||
method: "POST",
|
||
credentials: "include",
|
||
})
|
||
.then((response) => response.json())
|
||
.then(({ order_edit }) => {
|
||
console.log(order_edit.requested_at, order_edit.requested_by)
|
||
})
|
||
```
|
||
|
||
</TabItem>
|
||
<TabItem value="curl" label="cURL">
|
||
|
||
```bash
|
||
curl -L -X POST '<SERVER_URL>/admin/order-edits/<ORDER_EDIT_ID>/request' \
|
||
-H 'Authorization: Bearer <API_TOKEN>'
|
||
```
|
||
|
||
</TabItem>
|
||
</Tabs>
|
||
|
||
This request requires the order edit’s ID as a path parameter.
|
||
|
||
It returns the Order Edit object. You can access the following properties related to the confirmation request:
|
||
|
||
- `requested_at`: A timestamp indicating when the request confirmation was created.
|
||
- `requested_by`: The ID of the user that requested this order edit.
|
||
|
||
:::tip
|
||
|
||
💡 This request triggers the event `order-edit.requested`. You can use a subscriber to send an email to the customer with a link to view the order edit on the storefront. You can learn more in the [Events reference](../backend/subscribers/events-list.md).
|
||
|
||
:::
|
||
|
||
---
|
||
|
||
## Force-Confirm an Order Edit
|
||
|
||
There are two ways to confirm an Order Edit:
|
||
|
||
1. Using the Storefront API, which would confirm the Order Edit as a customer;
|
||
2. Or using the Admin API, which would force-confirm the Order Edit as a merchant.
|
||
|
||
Once an Order Edit is confirmed, the changes to the items defined in the Order Edit will be reflected on the original order. So, a change in the totals of the original order, such as the subtotal, will be reflected as well.
|
||
|
||
This change can lead to either required additional payments from the customer, or a refund to be made to the customer.
|
||
|
||
When the merchant force-confirms the order edit, however, it bypasses the payment flow. This means that the admin can’t capture any additional payment.
|
||
|
||
This section covers how the Admin API can be used to force-confirm the Order Edit. You can refer to [this documentation to learn how to implement Order Edit confirmation on the storefront](../storefront/handle-order-edits.mdx).
|
||
|
||
To confirm an Order Edit, send a request to the [Confirm Order Edit](/api/admin/#tag/OrderEdit/operation/PostOrderEditsOrderEditConfirm) endpoint:
|
||
|
||
<Tabs groupId="request-type" wrapperClassName="code-tabs">
|
||
<TabItem value="client" label="Medusa JS Client" default>
|
||
|
||
```ts
|
||
medusa.admin.orderEdits.confirm(orderEditId)
|
||
.then(({ order_edit }) => {
|
||
console.log(order_edit.confirmed_at, order_edit.confirmed_by)
|
||
})
|
||
```
|
||
|
||
</TabItem>
|
||
<TabItem value="fetch" label="Fetch API">
|
||
|
||
```ts
|
||
fetch(`<YOUR_SERVER>/admin/order-edits/${orderEditId}/confirm`, {
|
||
method: "POST",
|
||
credentials: "include",
|
||
})
|
||
.then((response) => response.json())
|
||
.then(({ order_edit }) => {
|
||
console.log(order_edit.confirmed_at, order_edit.confirmed_by)
|
||
})
|
||
```
|
||
|
||
</TabItem>
|
||
<TabItem value="curl" label="cURL">
|
||
|
||
```bash
|
||
curl -L -X POST '<SERVER_URL>/admin/order-edits/<ORDER_EDIT_ID>/confirm' \
|
||
-H 'Authorization: Bearer <API_TOKEN>'
|
||
```
|
||
|
||
</TabItem>
|
||
</Tabs>
|
||
|
||
This request accepts the order edit ID as a path parameter.
|
||
|
||
It returns the Order Edit object. You can access the following properties related to the order edit confirmation:
|
||
|
||
- `confirmed_at`: A timestamp indicating when the order edit was confirmed.
|
||
- `confirmed_by`: The ID of the user that confirmed the order edit.
|
||
|
||
---
|
||
|
||
## Receive Additional Payment
|
||
|
||
When the total after the order edit is greater than the total of the original order, the merchant can capture the difference from the customer.
|
||
|
||
For order edits that are confirmed by the customer, the customer authorizes the payment before confirming it. So, the merchant can capture the payment.
|
||
|
||
For force-confirmed order edits, as the customer didn’t authorize the payment, the merchant can’t capture the payment. It has to be handled manually by the merchant.
|
||
|
||
:::info
|
||
|
||
You can learn how to allow customers to authorize payment on the storefront in [this documentation](../storefront/handle-order-edits.mdx).
|
||
|
||
:::
|
||
|
||
### Capture Payment
|
||
|
||
If the payment is authorized by the customer, it can be captured by sending a request to the [Capture Payment](/api/admin/#tag/Payment/operation/PostPaymentsPaymentCapture) endpoint:
|
||
|
||
<Tabs groupId="request-type" wrapperClassName="code-tabs">
|
||
<TabItem value="client" label="Medusa JS Client" default>
|
||
|
||
```ts
|
||
medusa.admin.payments.capturePayment(paymentId)
|
||
.then(({ payment }) => {
|
||
console.log(payment.captured_at)
|
||
})
|
||
```
|
||
|
||
</TabItem>
|
||
<TabItem value="fetch" label="Fetch API">
|
||
|
||
```ts
|
||
fetch(`<YOUR_SERVER>/admin/payments/${paymentId}/capture`, {
|
||
method: "POST",
|
||
credentials: "include",
|
||
})
|
||
.then((response) => response.json())
|
||
.then(({ payment }) => {
|
||
console.log(payment.captured_at)
|
||
})
|
||
```
|
||
|
||
</TabItem>
|
||
<TabItem value="curl" label="cURL">
|
||
|
||
```bash
|
||
curl -L -X POST '<SERVER_URL>/admin/payments/<PAYMENT_ID>/capture' \
|
||
-H 'Authorization: Bearer <API_TOKEN>'
|
||
```
|
||
|
||
</TabItem>
|
||
</Tabs>
|
||
|
||
This request requires the ID of the payment as a path parameter. The payment can be retrieved from the order by accessing the array property `order.payments`.
|
||
|
||
It returns in the response the full Payment object.
|
||
|
||
## Refund Payment
|
||
|
||
When the total after the order edit is less than the original order total, the merchant can refund the difference to the customer.
|
||
|
||
To refund the difference to the customer, send a request to the [Refund Payment](/api/admin/#tag/Payment/operation/PostPaymentsPaymentRefunds) endpoint:
|
||
|
||
<Tabs groupId="request-type" wrapperClassName="code-tabs">
|
||
<TabItem value="client" label="Medusa JS Client" default>
|
||
|
||
```ts
|
||
medusa.admin.payments.refundPayment(paymentId, {
|
||
amount,
|
||
})
|
||
.then(({ refund }) => {
|
||
console.log(refund.id)
|
||
})
|
||
```
|
||
|
||
</TabItem>
|
||
<TabItem value="fetch" label="Fetch API">
|
||
|
||
```ts
|
||
fetch(`<YOUR_SERVER>/admin/payments/${paymentId}/refund`, {
|
||
method: "POST",
|
||
credentials: "include",
|
||
headers: {
|
||
"Content-Type": "application/json",
|
||
},
|
||
body: JSON.stringify({
|
||
amount,
|
||
}),
|
||
})
|
||
.then((response) => response.json())
|
||
.then(({ refund }) => {
|
||
console.log(refund.id)
|
||
})
|
||
```
|
||
|
||
</TabItem>
|
||
<TabItem value="curl" label="cURL">
|
||
|
||
```bash
|
||
curl -L -X POST '<SERVER_URL>/admin/payments/<PAYMENT_ID>/refund' \
|
||
-H 'Authorization: Bearer <API_TOKEN>' \
|
||
-H 'Content-Type: application/json' \
|
||
--data-raw '{
|
||
"amount": 1000
|
||
}'
|
||
```
|
||
|
||
</TabItem>
|
||
</Tabs>
|
||
|
||
This request requires the ID of the payment as a path parameter. The payment can be retrieved from the order by accessing the array property `order.payments`.
|
||
|
||
In the request’s body parameters, the `amount` field parameter is required. It is the amount to be refunded.
|
||
|
||
:::note
|
||
|
||
Check out what other parameters can be sent in the [API reference](/api/admin/#tag/Payment/operation/PostPaymentsPaymentRefunds).
|
||
|
||
:::
|
||
|
||
It returns in the response the full Refund object.
|
||
|
||
---
|
||
|
||
## See Also
|
||
|
||
- [Handle order edits on the storefront](../storefront/handle-order-edits).
|
||
- [Order Edits API reference](/api/admin/#tag/OrderEdit).
|