* docs(refactoring): configured eslint and typescript (#3511)

* docs: configured eslint and typescript

* fixed yarn.lock

* docs(refactoring): migrate components directory to typescript (#3517)

* docs: migrate components directory to typescript

* removed vscode settings

* fix following merge

* docs: refactored QueryNote component (#3576)

* docs: refactored first batch of theme components (#3579)

* docs: refactored second batch of theme components (#3580)

* added missing badge styles

* fix after merge

* docs(refactoring): migrated remaining component to TypeScript (#3770)

* docs(refactoring): configured eslint and typescript (#3511)

* docs: configured eslint and typescript

* fixed yarn.lock

* docs(refactoring): migrate components directory to typescript (#3517)

* docs: migrate components directory to typescript

* removed vscode settings

* fix following merge

* docs: refactored QueryNote component (#3576)

* docs: refactored first batch of theme components (#3579)

* docs: refactored second batch of theme components (#3580)

* added missing badge styles

* docs: refactoring second batch of theme components

* fix after merge

* refactored icons and other components

* docs: refactored all components

* docs(refactoring): set up and configured Tailwind Css (#3841)

* docs: added tailwind config

* docs: added more tailwind configurations

* add includes option

* added more tailwind configurations

* fix to configurations

* docs(refactoring): use tailwind css (#4134)

* docs: added tailwind config

* docs: added more tailwind configurations

* add includes option

* added more tailwind configurations

* fix to configurations

* docs(refactoring): refactored all styles to use tailwind css (#4132)

* refactored Badge component to use tailwind css

* refactored Bordered component to use tailwind css

* updated to latest docusaurus

* refactored BorderedIcon component to use tailwind css

* refactored Feedback component to use tailwind css

* refactored icons and footersociallinks to tailwind css

* start refactoring of large card

* refactored large card styling

* refactored until admonitions

* refactored until codeblock

* refactored until Tabs

* refactored Tabs (without testing

* finished refactoring styles to tailwind css

* upgraded to version 2.4.1

* general fixes

* adjusted eslint configurations

* fixed ignore files

* fixes to large card

* fix search styling

* fix npx command

* updated tabs to use isCodeTabs prop

* fixed os tabs

* removed os-tabs class in favor of general styling

* improvements to buttons

* fix for searchbar

* fixed redocly download button

* chore: added eslint code action (#4135)

* small change in commerce modules page
690 lines
18 KiB
Plaintext
690 lines
18 KiB
Plaintext
---
|
||
description: 'Learn how to manage item allocations in orders using the admin APIs. This includes how to manage reservations and specify a location for fulfillments and returns.'
|
||
addHowToData: true
|
||
---
|
||
|
||
import Tabs from '@theme/Tabs';
|
||
import TabItem from '@theme/TabItem';
|
||
|
||
# How to Manage Item Allocations in Orders
|
||
|
||
In this document, you’ll learn how to manage item allocations in orders using the admin APIs.
|
||
|
||
:::note
|
||
|
||
The terms “item allocation” and “reservation” are synonymous and are used interchangeably throughout this guide.
|
||
|
||
:::
|
||
|
||
## Overview
|
||
|
||
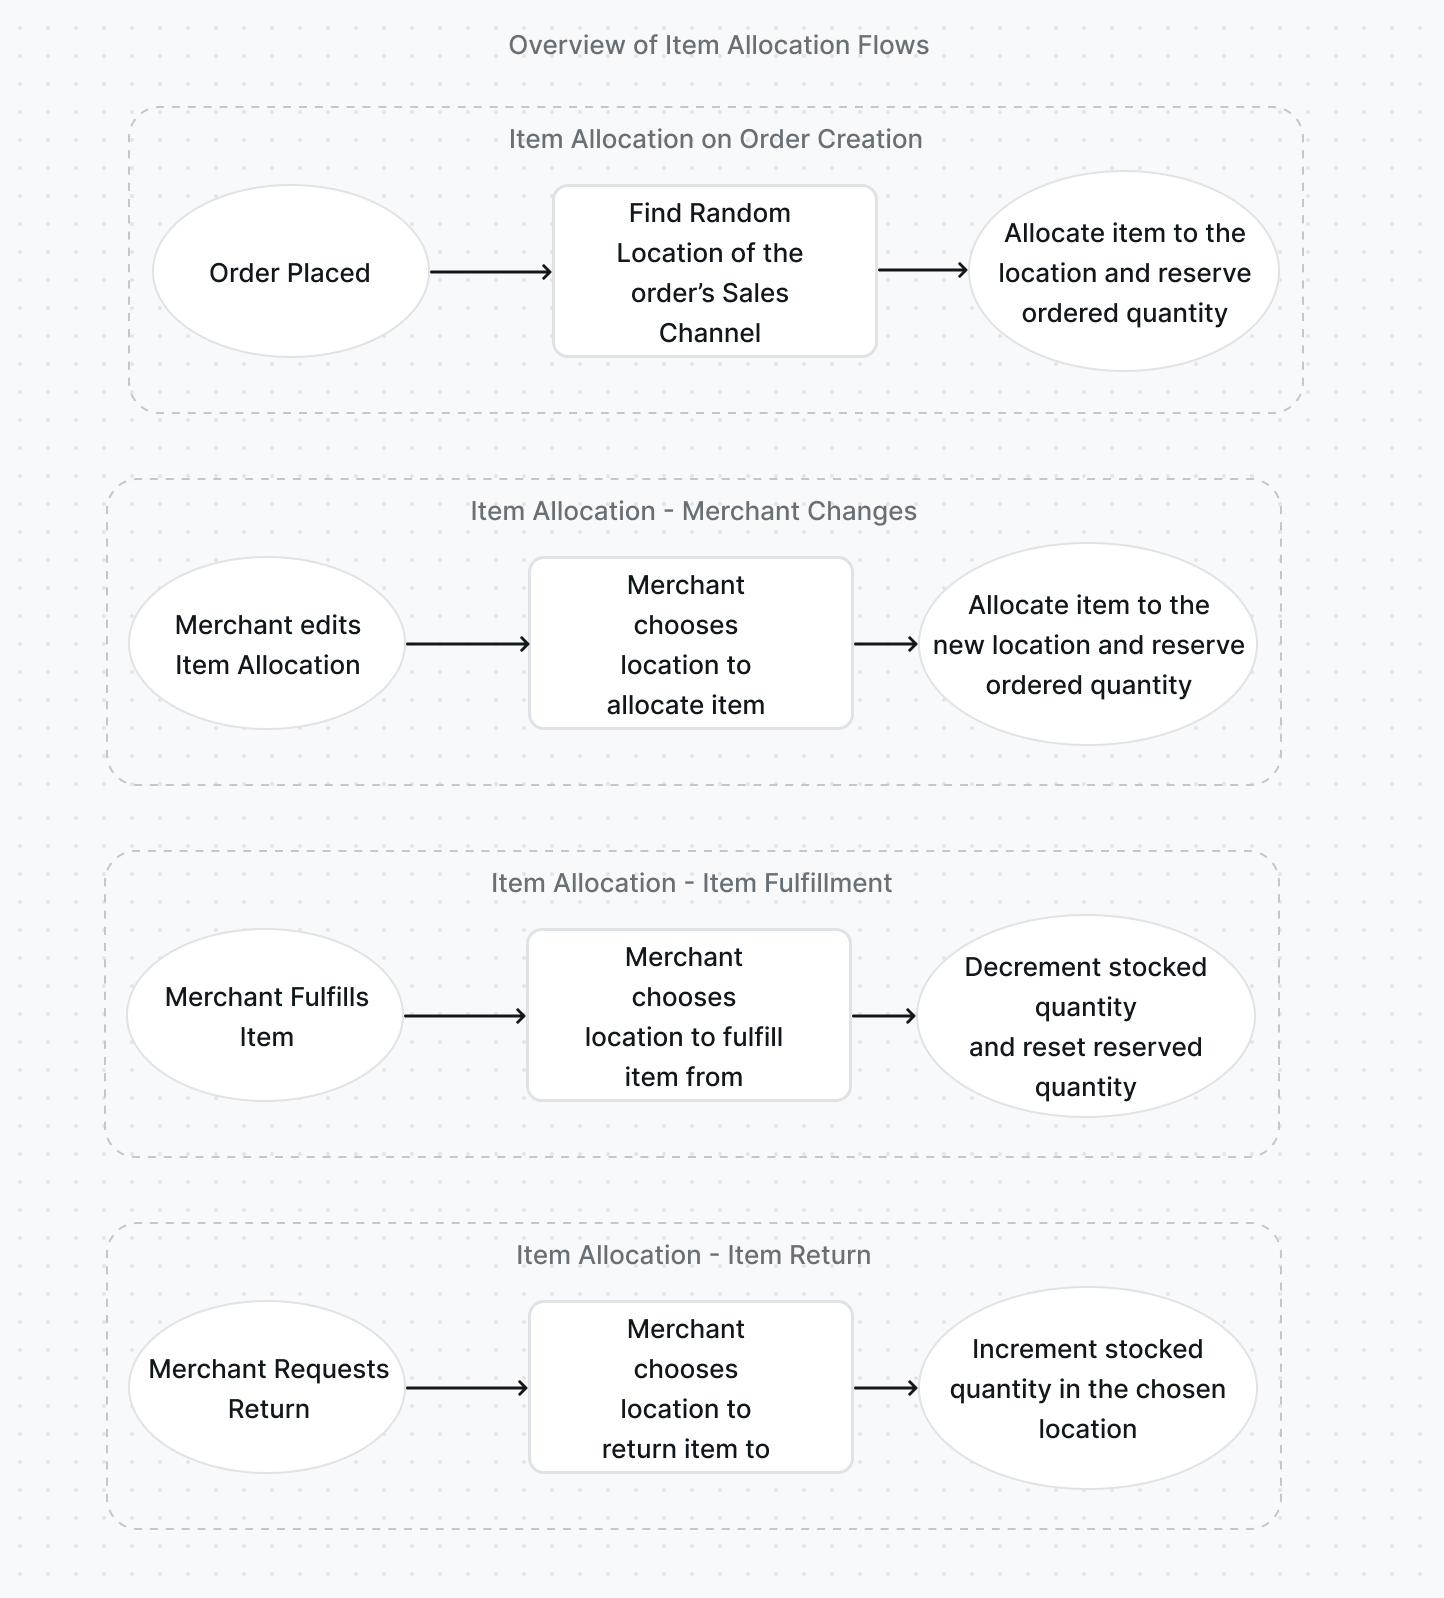
When an order is placed, the ordered quantity is reserved from the stocked quantity of each product variant having `manage_inventory` enabled. The reserved quantity is allocated to a random location associated with the order’s sales channel, but can also be changed afterward.
|
||
|
||
When a fulfillment is created, a location can be specified to fulfill the item from. This will deduct the stocked quantity and reset the reserved quantity in the chosen location based on the quantity chosen for fulfillment.
|
||
|
||
When a return is requested, a location can be specified to return the item to. The will increment the stocked quantity in the chosen location based on the returned quantity.
|
||
|
||
|
||
|
||
### Scenario
|
||
|
||
You want to add or use the following admin functionalities:
|
||
|
||
- Manage an item allocation for any resource, and not just for an item in an order. This includes listing, updating, or deleting item allocation.
|
||
- Specify location when creating fulfillment.
|
||
- Specify location when creating a return. This also applies to returns that are part of a swap or a claim.
|
||
|
||
---
|
||
|
||
## Prerequisites
|
||
|
||
### Medusa Components
|
||
|
||
It is assumed that you already have a Medusa backend installed and set up. If not, you can follow the [quickstart guide](../../../development/backend/install.mdx) to get started.
|
||
|
||
### Required Module
|
||
|
||
This guide assumes you have a stock location and inventory modules installed. You can use Medusa’s [Stock Location and Inventory modules](../install-modules.md) or create your own modules.
|
||
|
||
### JS Client
|
||
|
||
This guide includes code snippets to send requests to your Medusa backend using Medusa’s JS Client, among other methods.
|
||
|
||
If you follow the JS Client code blocks, it’s assumed you already have [Medusa’s JS Client](../../../js-client/overview.md) installed and have [created an instance of the client](../../../js-client/overview.md#configuration).
|
||
|
||
### Medusa React
|
||
|
||
This guide also includes code snippets to send requests to your Medusa backend using Medusa React, among other methods.
|
||
|
||
If you follow the Medusa React code blocks, it's assumed you already have [Medusa React installed](../../../medusa-react/overview.md) and have [used MedusaProvider higher in your component tree](../../../medusa-react/overview.md#usage).
|
||
|
||
### Authenticated Admin User
|
||
|
||
You must be an authenticated admin user before following along with the steps in the tutorial.
|
||
|
||
You can learn more about [authenticating as an admin user in the API reference](/api/admin/#section/Authentication).
|
||
|
||
---
|
||
|
||
## Manage Item Allocations in an Order
|
||
|
||
Using the reservations admin REST APIs, you can create an item allocation or reservation for any resource, and not just items in an order. This gives you more options in how you handle item allocations.
|
||
|
||
In this guide, however, the focus will be on how to use these endpoints for order-related functionalities.
|
||
|
||
### Create Item Allocation
|
||
|
||
Item allocations are created automatically for items that are associated with product variants having the `manage_inventory` attribute enabled. You typically don’t need to create an item allocation, unless you delete the previous item allocation.
|
||
|
||
You can create an item allocation by sending a request to the [Create a Reservation endpoint](/api/admin#tag/Reservations/operation/PostReservations):
|
||
|
||
<Tabs groupId="request-type" isCodeTabs={true}>
|
||
<TabItem value="client" label="Medusa JS Client" default>
|
||
|
||
```ts
|
||
medusa.admin.reservations.create({
|
||
line_item_id,
|
||
location_id,
|
||
inventory_item_id,
|
||
quantity,
|
||
})
|
||
.then(({ reservation }) => {
|
||
console.log(reservation.id)
|
||
})
|
||
```
|
||
|
||
</TabItem>
|
||
<TabItem value="medusa-react" label="Medusa React">
|
||
|
||
```tsx
|
||
import { useAdminCreateReservation } from "medusa-react"
|
||
|
||
const CreateReservation = () => {
|
||
const createReservation = useAdminCreateReservation()
|
||
// ...
|
||
|
||
const handleCreate = () => {
|
||
createReservation.mutate({
|
||
line_item_id,
|
||
location_id,
|
||
inventory_item_id,
|
||
quantity,
|
||
})
|
||
}
|
||
|
||
// ...
|
||
}
|
||
|
||
export default CreateReservation
|
||
```
|
||
|
||
</TabItem>
|
||
<TabItem value="fetch" label="Fetch API">
|
||
|
||
```ts
|
||
fetch(`<BACKEND_URL>/admin/reservations`, {
|
||
credentials: "include",
|
||
method: "POST",
|
||
headers: {
|
||
"Content-Type": "application/json",
|
||
},
|
||
body: JSON.stringify({
|
||
line_item_id,
|
||
location_id,
|
||
inventory_item_id,
|
||
quantity,
|
||
}),
|
||
})
|
||
.then((response) => response.json())
|
||
.then(({ reservation }) => {
|
||
console.log(reservation.id)
|
||
})
|
||
```
|
||
|
||
</TabItem>
|
||
<TabItem value="curl" label="cURL">
|
||
|
||
```bash
|
||
curl -L -X POST '<BACKEND_URL>/admin/reservations' \
|
||
-H 'Authorization: Bearer <API_TOKEN>' \
|
||
-H 'Content-Type: application/json' \
|
||
--data-raw '{
|
||
"line_item_id": "<LINE_ITEM_ID>",
|
||
"location_id": "<LOC_ID>",
|
||
"inventory_item_id": "<INV_ITEM_ID>",
|
||
"quantity": 1
|
||
}'
|
||
```
|
||
|
||
</TabItem>
|
||
</Tabs>
|
||
|
||
This endpoint requires the following body parameters:
|
||
|
||
- `line_item_id`: The ID of the order’s line item the allocation is being created for.
|
||
- `location_id`: The ID of the location the item is being allocated from.
|
||
- `inventory_item_id`: The ID of the inventory item the line item’s variant is associated with.
|
||
- `quantity`: The quantity to allocate.
|
||
|
||
The request returns the created reservation as an object.
|
||
|
||
### List Item Allocations
|
||
|
||
When listing item allocations, by default, you’ll be retrieving all item allocations in your commerce system. You can, however, provide optional fields to filter the item allocations retrieved.
|
||
|
||
You can retrieve the item allocations of a line item in an order using the [List Reservations endpoint](/api/admin#tag/Reservations/operation/GetReservations):
|
||
|
||
<Tabs groupId="request-type" isCodeTabs={true}>
|
||
<TabItem value="client" label="Medusa JS Client" default>
|
||
|
||
```ts
|
||
medusa.admin.reservations.list({
|
||
line_item_id,
|
||
})
|
||
.then(({ reservations, count, limit, offset }) => {
|
||
console.log(reservations.length)
|
||
})
|
||
```
|
||
|
||
</TabItem>
|
||
<TabItem value="medusa-react" label="Medusa React">
|
||
|
||
```tsx
|
||
import { useAdminReservations } from "medusa-react"
|
||
|
||
function Reservations() {
|
||
const { reservations, isLoading } = useAdminReservations({
|
||
line_item_id,
|
||
})
|
||
|
||
return (
|
||
<div>
|
||
{isLoading && <span>Loading...</span>}
|
||
{reservations && !reservations.length && (
|
||
<span>No Reservations</span>
|
||
)}
|
||
{reservations && reservations.length > 0 && (
|
||
<ul>
|
||
{reservations.map((reservation) => (
|
||
<li key={reservation.id}>{reservation.quantity}</li>
|
||
))}
|
||
</ul>
|
||
)}
|
||
</div>
|
||
)
|
||
}
|
||
|
||
export default Reservations
|
||
```
|
||
|
||
</TabItem>
|
||
<TabItem value="fetch" label="Fetch API">
|
||
|
||
<!-- eslint-disable max-len -->
|
||
|
||
```ts
|
||
fetch(`<BACKEND_URL>/admin/reservations?line_item_id=${lineItemId}`, {
|
||
credentials: "include",
|
||
})
|
||
.then((response) => response.json())
|
||
.then(({ reservations, count, limit, offset }) => {
|
||
console.log(reservations.length)
|
||
})
|
||
```
|
||
|
||
</TabItem>
|
||
<TabItem value="curl" label="cURL">
|
||
|
||
```bash
|
||
curl -L -X GET '<BACKEND_URL>/admin/reservations?line_item_id=<LINE_ITEM_ID>' \
|
||
-H 'Authorization: Bearer <API_TOKEN>'
|
||
```
|
||
|
||
</TabItem>
|
||
</Tabs>
|
||
|
||
This endpoint does not require any path or query parameters. As mentioned earlier, you can pass query parameters to filter the reservations. In the code snippets above, you filter the reservations by a line item ID. You can, however, filter by other attributes, such as the ID of the location. You can refer to the [API reference](/api/admin#tag/Reservations/operation/GetReservations) for a full list of query parameters.
|
||
|
||
The request returns the reservations along with [pagination fields](/api/admin#section/Pagination).
|
||
|
||
### Retrieve Item Allocation
|
||
|
||
You can retrieve a single item allocation by its ID using the [Get a Reservation endpoint](/api/admin#tag/Reservations/operation/GetReservationsReservation):
|
||
|
||
<Tabs groupId="request-type" isCodeTabs={true}>
|
||
<TabItem value="client" label="Medusa JS Client" default>
|
||
|
||
```ts
|
||
medusa.admin.reservations.retrieve(reservationId)
|
||
.then(({ reservation }) => {
|
||
console.log(reservation.id)
|
||
})
|
||
```
|
||
|
||
</TabItem>
|
||
<TabItem value="medusa-react" label="Medusa React">
|
||
|
||
```tsx
|
||
import { useAdminReservation } from "medusa-react"
|
||
|
||
function Reservation() {
|
||
const {
|
||
reservation,
|
||
isLoading } = useAdminReservation(reservationId)
|
||
|
||
return (
|
||
<div>
|
||
{isLoading && <span>Loading...</span>}
|
||
{reservation && (
|
||
<span>{reservation.quantity}</span>
|
||
)}
|
||
</div>
|
||
)
|
||
}
|
||
|
||
export default Reservation
|
||
```
|
||
|
||
</TabItem>
|
||
<TabItem value="fetch" label="Fetch API">
|
||
|
||
```ts
|
||
fetch(`<BACKEND_URL>/admin/reservations/${reservationId}`, {
|
||
credentials: "include",
|
||
})
|
||
.then((response) => response.json())
|
||
.then(({ reservation }) => {
|
||
console.log(reservation.id)
|
||
})
|
||
```
|
||
|
||
</TabItem>
|
||
<TabItem value="curl" label="cURL">
|
||
|
||
```bash
|
||
curl -L -X GET '<BACKEND_URL>/admin/reservations/<RESERVATION_ID>' \
|
||
-H 'Authorization: Bearer <API_TOKEN>'
|
||
```
|
||
|
||
</TabItem>
|
||
</Tabs>
|
||
|
||
This endpoint requires the reservation’s ID as a path parameter.
|
||
|
||
The request returns the reservation as an object.
|
||
|
||
### Update Item Allocation
|
||
|
||
You can update an item allocation to change the location to allocate from or the quantity to allocate by sending a request to the [Update Reservation endpoint](/api/admin#tag/Reservations/operation/PostReservationsReservation):
|
||
|
||
<Tabs groupId="request-type" isCodeTabs={true}>
|
||
<TabItem value="client" label="Medusa JS Client" default>
|
||
|
||
```ts
|
||
medusa.admin.reservations.update(reservationId, {
|
||
quantity,
|
||
})
|
||
.then(({ reservation }) => {
|
||
console.log(reservation.id)
|
||
})
|
||
```
|
||
|
||
</TabItem>
|
||
<TabItem value="medusa-react" label="Medusa React">
|
||
|
||
```tsx
|
||
import { useAdminUpdateReservation } from "medusa-react"
|
||
|
||
const UpdateReservation = () => {
|
||
const updateReservation = useAdminUpdateReservation(
|
||
reservationId
|
||
)
|
||
// ...
|
||
|
||
const handleCreate = () => {
|
||
updateReservation.mutate({
|
||
quantity,
|
||
})
|
||
}
|
||
|
||
// ...
|
||
}
|
||
|
||
export default UpdateReservation
|
||
```
|
||
|
||
</TabItem>
|
||
<TabItem value="fetch" label="Fetch API">
|
||
|
||
```ts
|
||
fetch(`<BACKEND_URL>/admin/reservations/${reservationId}`, {
|
||
credentials: "include",
|
||
method: "POST",
|
||
headers: {
|
||
"Content-Type": "application/json",
|
||
},
|
||
body: JSON.stringify({
|
||
quantity,
|
||
}),
|
||
})
|
||
.then((response) => response.json())
|
||
.then(({ reservation }) => {
|
||
console.log(reservation.id)
|
||
})
|
||
```
|
||
|
||
</TabItem>
|
||
<TabItem value="curl" label="cURL">
|
||
|
||
```bash
|
||
curl -L -X POST '<BACKEND_URL>/admin/reservations/<RESERVATION_ID>' \
|
||
-H 'Authorization: Bearer <API_TOKEN>' \
|
||
-H 'Content-Type: application/json' \
|
||
--data-raw '{
|
||
"quantity": 3
|
||
}'
|
||
```
|
||
|
||
</TabItem>
|
||
</Tabs>
|
||
|
||
This endpoint requires the ID of the reservation as a path parameter.
|
||
|
||
In the request body parameters, you can optionally pass any of the following parameters to make updates to the reservation:
|
||
|
||
- `quantity`: The quantity that should be reserved.
|
||
- `location_id`: The ID of the location that the item should be allocated from.
|
||
- `metadata`: set or change the reservation’s metadata.
|
||
|
||
The request returns the updated reservation as an object.
|
||
|
||
### Delete Item Allocation
|
||
|
||
Deleting an item allocation means that the quantity that was previously reserved is no longer reserved.
|
||
|
||
You can delete an item allocation by sending a request to the [Delete Reservation endpoint](/api/admin#tag/Reservations/operation/DeleteReservationsReservation):
|
||
|
||
<Tabs groupId="request-type" isCodeTabs={true}>
|
||
<TabItem value="client" label="Medusa JS Client" default>
|
||
|
||
```ts
|
||
medusa.admin.reservations.delete(reservationId)
|
||
.then(({ id, object, deleted }) => {
|
||
console.log(id)
|
||
})
|
||
```
|
||
|
||
</TabItem>
|
||
<TabItem value="medusa-react" label="Medusa React">
|
||
|
||
```tsx
|
||
import { useAdminDeleteReservation } from "medusa-react"
|
||
|
||
const DeleteReservation = () => {
|
||
const deleteReservation = useAdminDeleteReservation(
|
||
reservationId
|
||
)
|
||
// ...
|
||
|
||
const handleDelete = () => {
|
||
deleteReservation.mutate()
|
||
}
|
||
|
||
// ...
|
||
}
|
||
|
||
export default DeleteReservation
|
||
```
|
||
|
||
</TabItem>
|
||
<TabItem value="fetch" label="Fetch API">
|
||
|
||
```ts
|
||
fetch(`<BACKEND_URL>/admin/reservations/${reservationId}`, {
|
||
credentials: "include",
|
||
method: "DELETE",
|
||
})
|
||
.then((response) => response.json())
|
||
.then(({ id, object, deleted }) => {
|
||
console.log(id)
|
||
})
|
||
```
|
||
|
||
</TabItem>
|
||
<TabItem value="curl" label="cURL">
|
||
|
||
```bash
|
||
curl -L -X DELETE '<BACKEND_URL>/admin/reservations/<RESERVATION_ID>' \
|
||
-H 'Authorization: Bearer <API_TOKEN>'
|
||
```
|
||
|
||
</TabItem>
|
||
</Tabs>
|
||
|
||
This endpoint requires the reservation ID to be passed as a path parameter.
|
||
|
||
The request returns the following fields:
|
||
|
||
- `id`: The ID of the reservation.
|
||
- `object`: The type of object that was removed. In this case, the value will be `reservation`.
|
||
- `deleted`: A boolean value indicating whether the reservation was successfully deleted.
|
||
|
||
---
|
||
|
||
## Specify Location when Creating Fulfillment
|
||
|
||
When you create a fulfillment of an order, you can specify the location to fulfill the item from by passing the `location_id` parameter:
|
||
|
||
<Tabs groupId="request-type" isCodeTabs={true}>
|
||
<TabItem value="client" label="Medusa JS Client" default>
|
||
|
||
```ts
|
||
medusa.admin.orders.createFulfillment(orderId, {
|
||
items: [
|
||
{
|
||
item_id,
|
||
quantity,
|
||
},
|
||
],
|
||
// ...other parameters
|
||
location_id,
|
||
})
|
||
.then(({ order }) => {
|
||
console.log(order.id)
|
||
})
|
||
```
|
||
|
||
</TabItem>
|
||
<TabItem value="medusa-react" label="Medusa React">
|
||
|
||
```tsx
|
||
import { useAdminCreateFulfillment } from "medusa-react"
|
||
|
||
const CreateFulfillment = () => {
|
||
const createFulfillment = useAdminCreateFulfillment(orderId)
|
||
// ...
|
||
|
||
const handleCreate = () => {
|
||
createFulfillment.mutate({
|
||
items: [
|
||
{
|
||
item_id,
|
||
quantity,
|
||
},
|
||
],
|
||
// ...other parameters
|
||
location_id,
|
||
})
|
||
}
|
||
|
||
// ...
|
||
}
|
||
|
||
export default CreateFulfillment
|
||
```
|
||
|
||
</TabItem>
|
||
<TabItem value="fetch" label="Fetch API">
|
||
|
||
```ts
|
||
fetch(`<BACKEND_URL>/admin/orders/${orderId}/fulfillment`, {
|
||
credentials: "include",
|
||
method: "POST",
|
||
headers: {
|
||
"Content-Type": "application/json",
|
||
},
|
||
body: JSON.stringify({
|
||
items: [
|
||
{
|
||
item_id,
|
||
quantity,
|
||
},
|
||
],
|
||
// ...other parameters
|
||
location_id,
|
||
}),
|
||
})
|
||
.then((response) => response.json())
|
||
.then(({ order }) => {
|
||
console.log(order.id)
|
||
})
|
||
```
|
||
|
||
</TabItem>
|
||
<TabItem value="curl" label="cURL">
|
||
|
||
```bash
|
||
curl -L -X POST '<BACKEND_URL>/admin/orders/<ORDER_ID>/fulfillment' \
|
||
-H 'Authorization: Bearer <API_TOKEN>' \
|
||
-H 'Content-Type: application/json' \
|
||
--data-raw '{
|
||
"items": [
|
||
{
|
||
"item_id": "<LINE_ITEM_ID>",
|
||
"quantity": 1
|
||
}
|
||
],
|
||
"location_id": "<LOC_ID>"
|
||
}'
|
||
```
|
||
|
||
</TabItem>
|
||
</Tabs>
|
||
|
||
The `location_id` is an optional parameter that allows you to specify where to fulfill the item from. This subsequently decrements the stock quantity of the product variant in that location.
|
||
|
||
You can learn more about this endpoint’s parameters and response in the [API reference](/api/admin#tag/Orders/operation/PostOrdersOrderFulfillments).
|
||
|
||
---
|
||
|
||
## Specify Location when Requesting Return
|
||
|
||
When requesting a return, you can specify the location to return the item to by passing the `location_id` parameter:
|
||
|
||
<Tabs groupId="request-type" isCodeTabs={true}>
|
||
<TabItem value="client" label="Medusa JS Client" default>
|
||
|
||
```ts
|
||
medusa.admin.orders.requestReturn(orderId, {
|
||
items: [
|
||
{
|
||
item_id,
|
||
quantity: 1,
|
||
},
|
||
],
|
||
// other parameters...
|
||
location_id,
|
||
})
|
||
.then(({ order }) => {
|
||
console.log(order.id)
|
||
})
|
||
```
|
||
|
||
</TabItem>
|
||
<TabItem value="medusa-react" label="Medusa React">
|
||
|
||
```tsx
|
||
import { useAdminRequestReturn } from "medusa-react"
|
||
|
||
const RequestReturn = () => {
|
||
const requestReturn = useAdminRequestReturn(orderId)
|
||
// ...
|
||
|
||
const handleRequest = () => {
|
||
requestReturn.mutate({
|
||
items: [
|
||
{
|
||
item_id,
|
||
quantity,
|
||
},
|
||
],
|
||
// ...other parameters
|
||
location_id,
|
||
})
|
||
}
|
||
|
||
// ...
|
||
}
|
||
|
||
export default RequestReturn
|
||
```
|
||
|
||
</TabItem>
|
||
<TabItem value="fetch" label="Fetch API">
|
||
|
||
```ts
|
||
fetch(`<BACKEND_URL>/admin/orders/${orderId}/return`, {
|
||
credentials: "include",
|
||
method: "POST",
|
||
headers: {
|
||
"Content-Type": "application/json",
|
||
},
|
||
body: JSON.stringify({
|
||
items: [
|
||
{
|
||
item_id,
|
||
quantity,
|
||
},
|
||
],
|
||
// ...other parameters
|
||
location_id,
|
||
}),
|
||
})
|
||
.then((response) => response.json())
|
||
.then(({ order }) => {
|
||
console.log(order.id)
|
||
})
|
||
```
|
||
|
||
</TabItem>
|
||
<TabItem value="curl" label="cURL">
|
||
|
||
```bash
|
||
curl -L -X POST '<BACKEND_URL>/admin/orders/<ORDER_ID>/return' \
|
||
-H 'Authorization: Bearer <API_TOKEN>' \
|
||
-H 'Content-Type: application/json' \
|
||
--data-raw '{
|
||
"items": [
|
||
{
|
||
"item_id": "<LINE_ITEM_ID>",
|
||
"quantity": 1
|
||
}
|
||
],
|
||
"location_id": "<LOC_ID>"
|
||
}'
|
||
```
|
||
|
||
</TabItem>
|
||
</Tabs>
|
||
|
||
The `location_id` is an optional parameter that allows you to specify where to return the item to. This subsequently increments the stock quantity of the product variant in that location.
|
||
|
||
You can learn more about this endpoint’s parameters and response in [the API reference](/api/admin#tag/Orders/operation/PostOrdersOrderReturns).
|
||
|
||
---
|
||
|
||
## See Also
|
||
|
||
- [How to manage inventory items](./manage-inventory-items.mdx)
|
||
- [How to manage stock locations](./manage-stock-locations.mdx)
|