404 lines
14 KiB
Plaintext
404 lines
14 KiB
Plaintext
export const metadata = {
|
|
title: `How to Use Authentication Routes`,
|
|
}
|
|
|
|
# {metadata.title}
|
|
|
|
In this document, you'll learn about the authentication routes and how to use them to create and log-in users, and reset their password.
|
|
|
|
<Note>
|
|
|
|
These routes are added by Medusa's HTTP layer, not the Auth Module.
|
|
|
|
</Note>
|
|
|
|
## Types of Authentication Flows
|
|
|
|
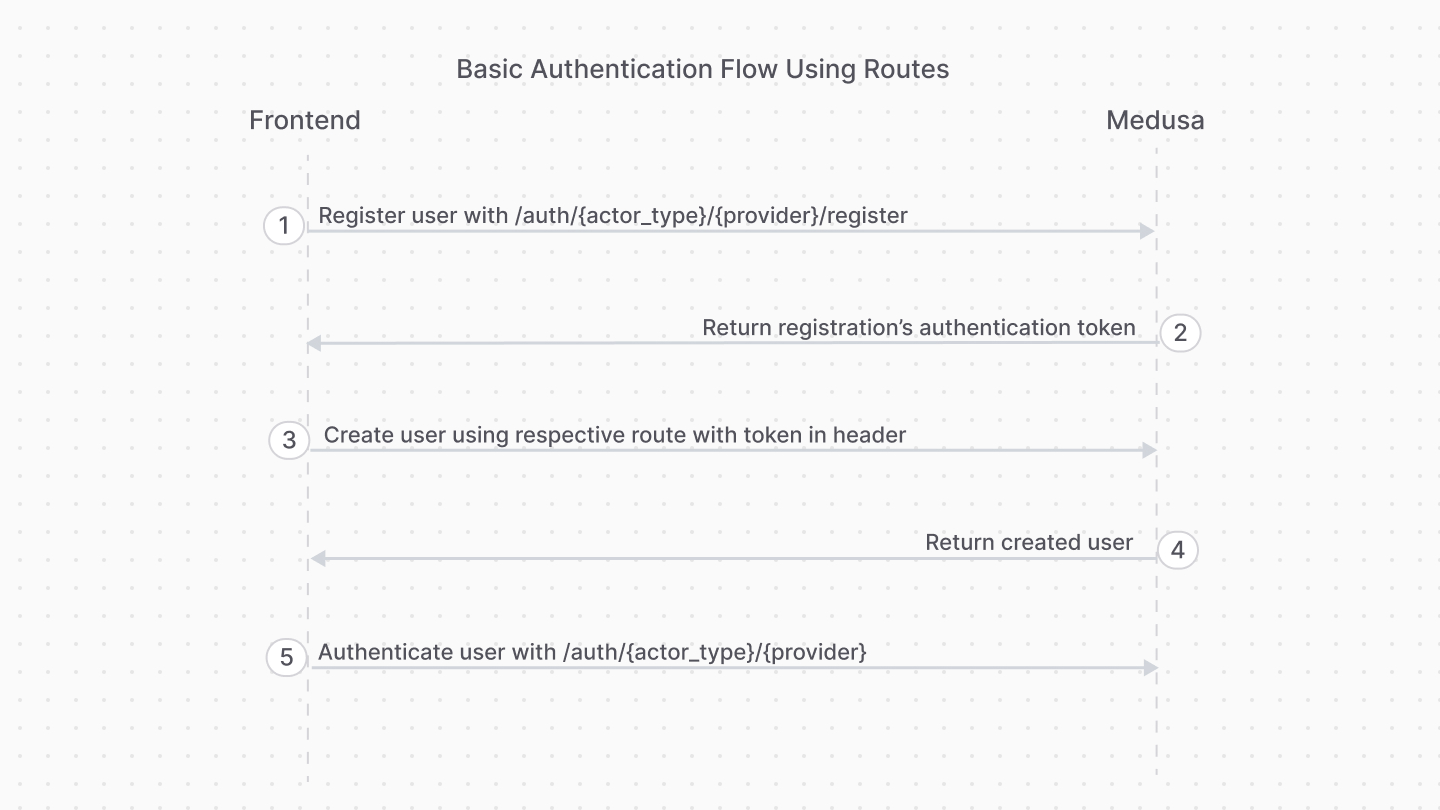
### 1. Basic Authentication Flow
|
|
|
|
This authentication flow doesn't require validation with third-party services.
|
|
|
|
<Note title="Example">
|
|
|
|
[How to register customer in storefront using basic authentication flow](../../../storefront-development/customers/register/page.mdx).
|
|
|
|
</Note>
|
|
|
|
The steps are:
|
|
|
|
|
|
|
|
1. Register the user with the [Register Route](#register-route).
|
|
2. Use the authentication token to create the user with their respective API route.
|
|
- For example, for customers you would use the [Create Customer API route](!api!/store#customers_postcustomers).
|
|
- For admin users, you accept an invite using the [Accept Invite API route](!api!/admin#invites_postinvitesaccept)
|
|
3. Authenticate the user with the [Auth Route](#login-route).
|
|
|
|
After registration, you only use the [Auth Route](#login-route) for subsequent authentication.
|
|
|
|
<Note>
|
|
|
|
To handle errors related to existing identities, refer to [this section](#handling-existing-identities).
|
|
|
|
</Note>
|
|
|
|
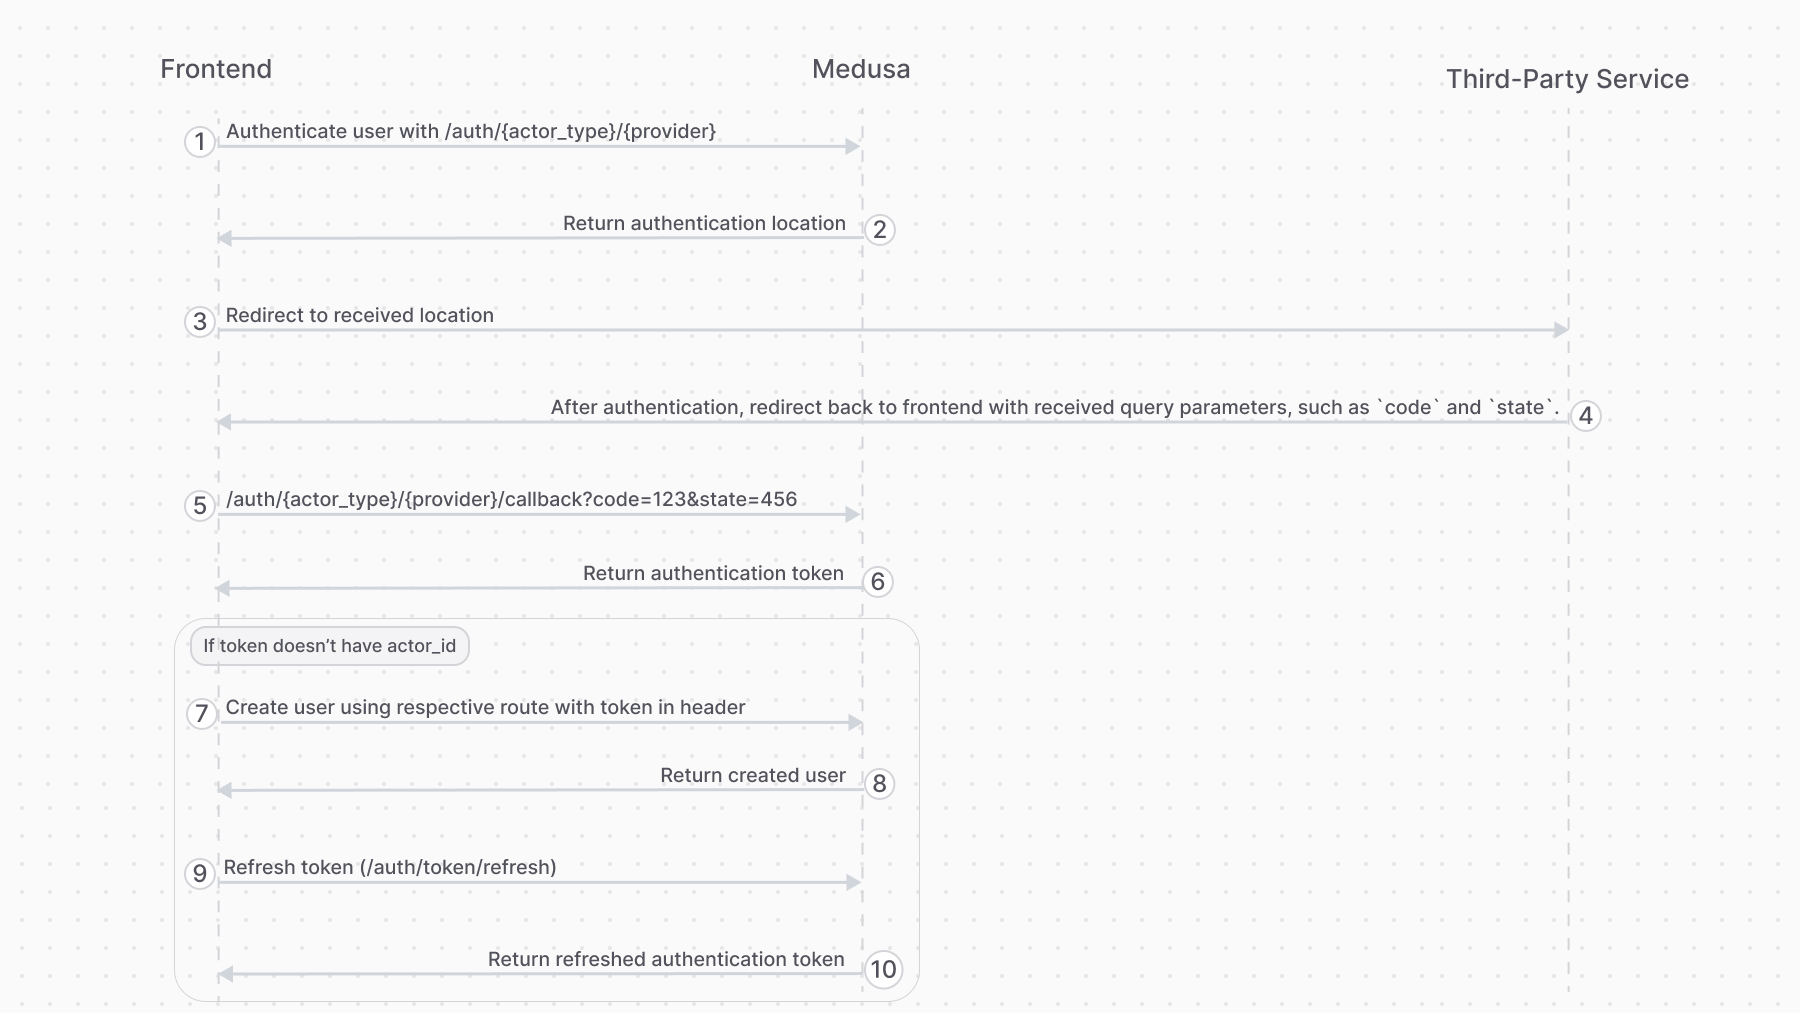
### 2. Third-Party Service Authenticate Flow
|
|
|
|
This authentication flow authenticates the user with a third-party service, such as Google.
|
|
|
|
<Note title="Example">
|
|
|
|
[How to authenticate customer with a third-party provider in the storefront.](../../../storefront-development/customers/third-party-login/page.mdx).
|
|
|
|
</Note>
|
|
|
|
It requires the following steps:
|
|
|
|
|
|
|
|
1. Authenticate the user with the [Auth Route](#login-route).
|
|
2. The auth route returns a URL to authenticate with third-party service, such as login with Google. The frontend (such as a storefront), when it receives a `location` property in the response, must redirect to the returned location.
|
|
3. Once the authentication with the third-party service finishes, it redirects back to the frontend with a `code` query parameter. So, make sure your third-party service is configured to redirect to your frontend page after successful authentication.
|
|
4. The frontend sends a request to the [Validate Callback Route](#validate-callback-route) passing it the query parameters received from the third-party service, such as the `code` and `state` query parameters.
|
|
5. If the callback validation is successful, the frontend receives the authentication token.
|
|
6. Decode the received token in the frontend using tools like [react-jwt](https://www.npmjs.com/package/react-jwt).
|
|
- If the decoded data has an `actor_id` property, then the user is already registered. So, use this token for subsequent authenticated requests.
|
|
- If not, follow the rest of the steps.
|
|
7. The frontend uses the authentication token to create the user with their respective API route.
|
|
- For example, for customers you would use the [Create Customer API route](!api!/store#customers_postcustomers).
|
|
- For admin users, you accept an invite using the [Accept Invite API route](!api!/admin#invites_postinvitesaccept)
|
|
8. The frontend sends a request to the [Refresh Token Route](#refresh-token-route) to retrieve a new token with the user information populated.
|
|
|
|
|
|
---
|
|
|
|
## Register Route
|
|
|
|
The Medusa application defines an API route at `/auth/{actor_type}/{provider}/register` that creates an auth identity for an actor type, such as a `customer`. It returns a JWT token that you pass to an API route that creates the user.
|
|
|
|
```bash
|
|
curl -X POST http://localhost:9000/auth/{actor_type}/{providers}/register
|
|
-H 'Content-Type: application/json' \
|
|
--data-raw '{
|
|
"email": "Whitney_Schultz@gmail.com"
|
|
// ...
|
|
}'
|
|
```
|
|
|
|
<Note>
|
|
|
|
This API route is useful for providers like `emailpass` that uses custom logic to authenticate a user. For authentication providers that authenticate with third-party services, such as Google, use the [Auth Route](#login-route) instead.
|
|
|
|
</Note>
|
|
|
|
For example, if you're registering a customer, you:
|
|
|
|
1. Send a request to `/auth/customer/emailpass/register` to retrieve the registration JWT token.
|
|
2. Send a request to the [Create Customer API route](!api!/store#customers_postcustomers) to create the customer, passing the [JWT token in the header](!api!/store#authentication).
|
|
|
|
### Path Parameters
|
|
|
|
Its path parameters are:
|
|
|
|
- `{actor_type}`: the actor type of the user you're authenticating. For example, `customer`.
|
|
- `{provider}`: the auth provider to handle the authentication. For example, `emailpass`.
|
|
|
|
### Request Body Parameters
|
|
|
|
This route accepts in the request body the data that the specified authentication provider requires to handle authentication.
|
|
|
|
For example, the EmailPass provider requires an `email` and `password` fields in the request body.
|
|
|
|
### Response Fields
|
|
|
|
If the authentication is successful, you'll receive a `token` field in the response body object:
|
|
|
|
```json
|
|
{
|
|
"token": "..."
|
|
}
|
|
```
|
|
|
|
Use that token in the header of subsequent requests to send authenticated requests.
|
|
|
|
### Handling Existing Identities
|
|
|
|
An auth identity with the same email may already exist in Medusa. This can happen if:
|
|
|
|
- Another actor type is using that email. For example, an admin user is trying to register as a customer.
|
|
- The same email belongs to a record of the same actor type. For example, another customer has the same email.
|
|
|
|
In these scenarios, the Register Route will return an error instead of a token:
|
|
|
|
```json
|
|
{
|
|
"type": "unauthorized",
|
|
"message": "Identity with email already exists"
|
|
}
|
|
```
|
|
|
|
To handle these scenarios, you can use the [Login Route](#login-route) to validate that the email and password match the existing identity. If so, you can allow the admin user, for example, to register as a customer.
|
|
|
|
Otherwise, if the email and password don't match the existing identity, such as when the email belongs to another customer, the [Login Route](#login-route) returns an error:
|
|
|
|
```json
|
|
{
|
|
"type": "unauthorized",
|
|
"message": "Invalid email or password"
|
|
}
|
|
```
|
|
|
|
You can show that error message to the customer.
|
|
|
|
---
|
|
|
|
## Login Route
|
|
|
|
The Medusa application defines an API route at `/auth/{actor_type}/{provider}` that authenticates a user of an actor type. It returns a JWT token that can be passed in [the header of subsequent requests](!api!/store#authentication) to send authenticated requests.
|
|
|
|
```bash
|
|
curl -X POST http://localhost:9000/auth/{actor_type}/{providers}
|
|
-H 'Content-Type: application/json' \
|
|
--data-raw '{
|
|
"email": "Whitney_Schultz@gmail.com"
|
|
// ...
|
|
}'
|
|
```
|
|
|
|
For example, if you're authenticating a customer, you send a request to `/auth/customer/emailpass`.
|
|
|
|
### Path Parameters
|
|
|
|
Its path parameters are:
|
|
|
|
- `{actor_type}`: the actor type of the user you're authenticating. For example, `customer`.
|
|
- `{provider}`: the auth provider to handle the authentication. For example, `emailpass`.
|
|
|
|
### Request Body Parameters
|
|
|
|
This route accepts in the request body the data that the specified authentication provider requires to handle authentication.
|
|
|
|
For example, the EmailPass provider requires an `email` and `password` fields in the request body.
|
|
|
|
#### Overriding Callback URL
|
|
|
|
For the [GitHub](../auth-providers/github/page.mdx) and [Google](../auth-providers/google/page.mdx) providers, you can pass a `callback_url` body parameter that overrides the `callbackUrl` set in the provider's configurations.
|
|
|
|
This is useful if you want to redirect the user to a different URL after authentication based on their actor type. For example, you can set different `callback_url` for admin users and customers.
|
|
|
|
### Response Fields
|
|
|
|
If the authentication is successful, you'll receive a `token` field in the response body object:
|
|
|
|
```json
|
|
{
|
|
"token": "..."
|
|
}
|
|
```
|
|
|
|
Use that token in the header of subsequent requests to send authenticated requests.
|
|
|
|
If the authentication requires more action with a third-party service, you'll receive a `location` property:
|
|
|
|
```json
|
|
{
|
|
"location": "https://..."
|
|
}
|
|
```
|
|
|
|
Redirect to that URL in the frontend to continue the authentication process with the third-party service.
|
|
|
|
<Note title="Example">
|
|
|
|
[How to login Customers using the authentication route](../../../storefront-development/customers/login/page.mdx).
|
|
|
|
</Note>
|
|
|
|
---
|
|
|
|
## Validate Callback Route
|
|
|
|
The Medusa application defines an API route at `/auth/{actor_type}/{provider}/callback` that's useful for validating the authentication callback or redirect from third-party services like Google.
|
|
|
|
```bash
|
|
curl -X POST http://localhost:9000/auth/{actor_type}/{providers}/callback?code=123&state=456
|
|
```
|
|
|
|
<Note title="Tip">
|
|
|
|
Refer to the [third-party authentication flow](#2-third-party-service-authenticate-flow) section to see how this route fits into the authentication flow.
|
|
|
|
</Note>
|
|
|
|
### Path Parameters
|
|
|
|
Its path parameters are:
|
|
|
|
- `{actor_type}`: the actor type of the user you're authenticating. For example, `customer`.
|
|
- `{provider}`: the auth provider to handle the authentication. For example, `google`.
|
|
|
|
### Query Parameters
|
|
|
|
This route accepts all the query parameters that the third-party service sends to the frontend after the user completes the authentication process, such as the `code` and `state` query parameters.
|
|
|
|
### Response Fields
|
|
|
|
If the authentication is successful, you'll receive a `token` field in the response body object:
|
|
|
|
```json
|
|
{
|
|
"token": "..."
|
|
}
|
|
```
|
|
|
|
In your frontend, decode the token using tools like [react-jwt](https://www.npmjs.com/package/react-jwt):
|
|
|
|
- If the decoded data has an `actor_id` property, the user is already registered. So, use this token for subsequent authenticated requests.
|
|
- If not, use the token in the header of a request that creates the user, such as the [Create Customer API route](!api!/store#customers_postcustomers).
|
|
|
|
The decoded data may look like this:
|
|
|
|
```json
|
|
{
|
|
"actor_id": "", // Empty if the user is not registered
|
|
"user_metadata": {
|
|
"email": "Whitney_Schultz@gmail.com"
|
|
}
|
|
// other fields...
|
|
}
|
|
```
|
|
|
|
---
|
|
|
|
## Refresh Token Route
|
|
|
|
The Medusa application defines an API route at `/auth/token/refresh` that's useful after authenticating a user with a third-party service to populate the user's token with their new information.
|
|
|
|
It requires the user's JWT token that they received from the authentication or callback routes.
|
|
|
|
```bash
|
|
curl -X POST http://localhost:9000/auth/token/refresh \
|
|
-H 'Authorization: Bearer {token}'
|
|
```
|
|
|
|
### Response Fields
|
|
|
|
If the token was refreshed successfully, you'll receive a `token` field in the response body object:
|
|
|
|
```json
|
|
{
|
|
"token": "..."
|
|
}
|
|
```
|
|
|
|
Use that token in the header of subsequent requests to send authenticated requests.
|
|
|
|
---
|
|
|
|
## Reset Password Routes
|
|
|
|
To reset a user's password:
|
|
|
|
1. Generate a token using the [Generate Reset Password Token API route](#generate-reset-password-token-route).
|
|
- The API route emits the `auth.password_reset` event, passing the token in the payload.
|
|
- You can create a subscriber, as seen in [this guide](../reset-password/page.mdx), that listens to the event and send a notification to the user.
|
|
2. Pass the token to the [Reset Password API route](#reset-password-route) to reset the password.
|
|
- The URL in the user's notification should direct them to a frontend URL, which sends a request to this route.
|
|
|
|
<Note title="Example">
|
|
|
|
[Storefront Development: How to Reset a Customer's Password.](../../../storefront-development/customers/reset-password/page.mdx)
|
|
|
|
</Note>
|
|
|
|
### Generate Reset Password Token Route
|
|
|
|
The Medusa application defines an API route at `/auth/{actor_type}/{auth_provider}/reset-password` that emits the `auth.password_reset` event, passing the token in the payload.
|
|
|
|
```bash
|
|
curl -X POST http://localhost:9000/auth/{actor_type}/{providers}/reset-password
|
|
-H 'Content-Type: application/json' \
|
|
--data-raw '{
|
|
"identifier": "Whitney_Schultz@gmail.com"
|
|
}'
|
|
```
|
|
|
|
<Note>
|
|
|
|
This API route is useful for providers like `emailpass` that store a user's password and use it for authentication.
|
|
|
|
</Note>
|
|
|
|
#### Path Parameters
|
|
|
|
Its path parameters are:
|
|
|
|
- `{actor_type}`: the actor type of the user you're authenticating. For example, `customer`.
|
|
- `{provider}`: the auth provider to handle the authentication. For example, `emailpass`.
|
|
|
|
#### Request Body Parameters
|
|
|
|
This route accepts in the request body an object having the following property:
|
|
|
|
- `identifier`: The user's identifier in the specified auth provider. For example, for the `emailpass` auth provider, you pass the user's email.
|
|
|
|
#### Response Fields
|
|
|
|
If the authentication is successful, the request returns a `201` response code.
|
|
|
|
### Reset Password Route
|
|
|
|
The Medusa application defines an API route at `/auth/{actor_type}/{auth_provider}/update` that accepts a token and, if valid, updates the user's password.
|
|
|
|
```bash
|
|
curl -X POST http://localhost:9000/auth/{actor_type}/{providers}/update
|
|
-H 'Content-Type: application/json' \
|
|
-H 'Authorization: Bearer {token}' \
|
|
--data-raw '{
|
|
"email": "Whitney_Schultz@gmail.com",
|
|
"password": "supersecret"
|
|
}'
|
|
```
|
|
|
|
<Note>
|
|
|
|
This API route is useful for providers like `emailpass` that store a user's password and use it for logging them in.
|
|
|
|
</Note>
|
|
|
|
#### Path Parameters
|
|
|
|
Its path parameters are:
|
|
|
|
- `{actor_type}`: the actor type of the user you're authenticating. For example, `customer`.
|
|
- `{provider}`: the auth provider to handle the authentication. For example, `emailpass`.
|
|
|
|
#### Pass Token in Authorization Header
|
|
|
|
<Note>
|
|
|
|
Before [Medusa v2.6](https://github.com/medusajs/medusa/releases/tag/v2.6), you passed the token as a query parameter. Now, you must pass it in the `Authorization` header.
|
|
|
|
</Note>
|
|
|
|
In the request's authorization header, you must pass the token generated using the [Generate Reset Password Token route](#generate-reset-password-token-route). You pass it as a bearer token.
|
|
|
|
### Request Body Parameters
|
|
|
|
This route accepts in the request body an object that has the data necessary for the provider to update the user's password.
|
|
|
|
For the `emailpass` provider, you must pass the following properties:
|
|
|
|
- `email`: The user's email.
|
|
- `password`: The new password.
|
|
|
|
### Response Fields
|
|
|
|
If the authentication is successful, the request returns an object with a `success` property set to `true`:
|
|
|
|
```json
|
|
{
|
|
"success": "true"
|
|
}
|
|
```
|