1270 lines
48 KiB
Plaintext
1270 lines
48 KiB
Plaintext
---
|
||
products:
|
||
- product
|
||
---
|
||
|
||
import { Card, Prerequisites, Details, WorkflowDiagram } from "docs-ui"
|
||
import { Github, PlaySolid } from "@medusajs/icons"
|
||
|
||
export const metadata = {
|
||
title: `Integrate Meilisearch with Medusa`,
|
||
}
|
||
|
||
# {metadata.title}
|
||
|
||
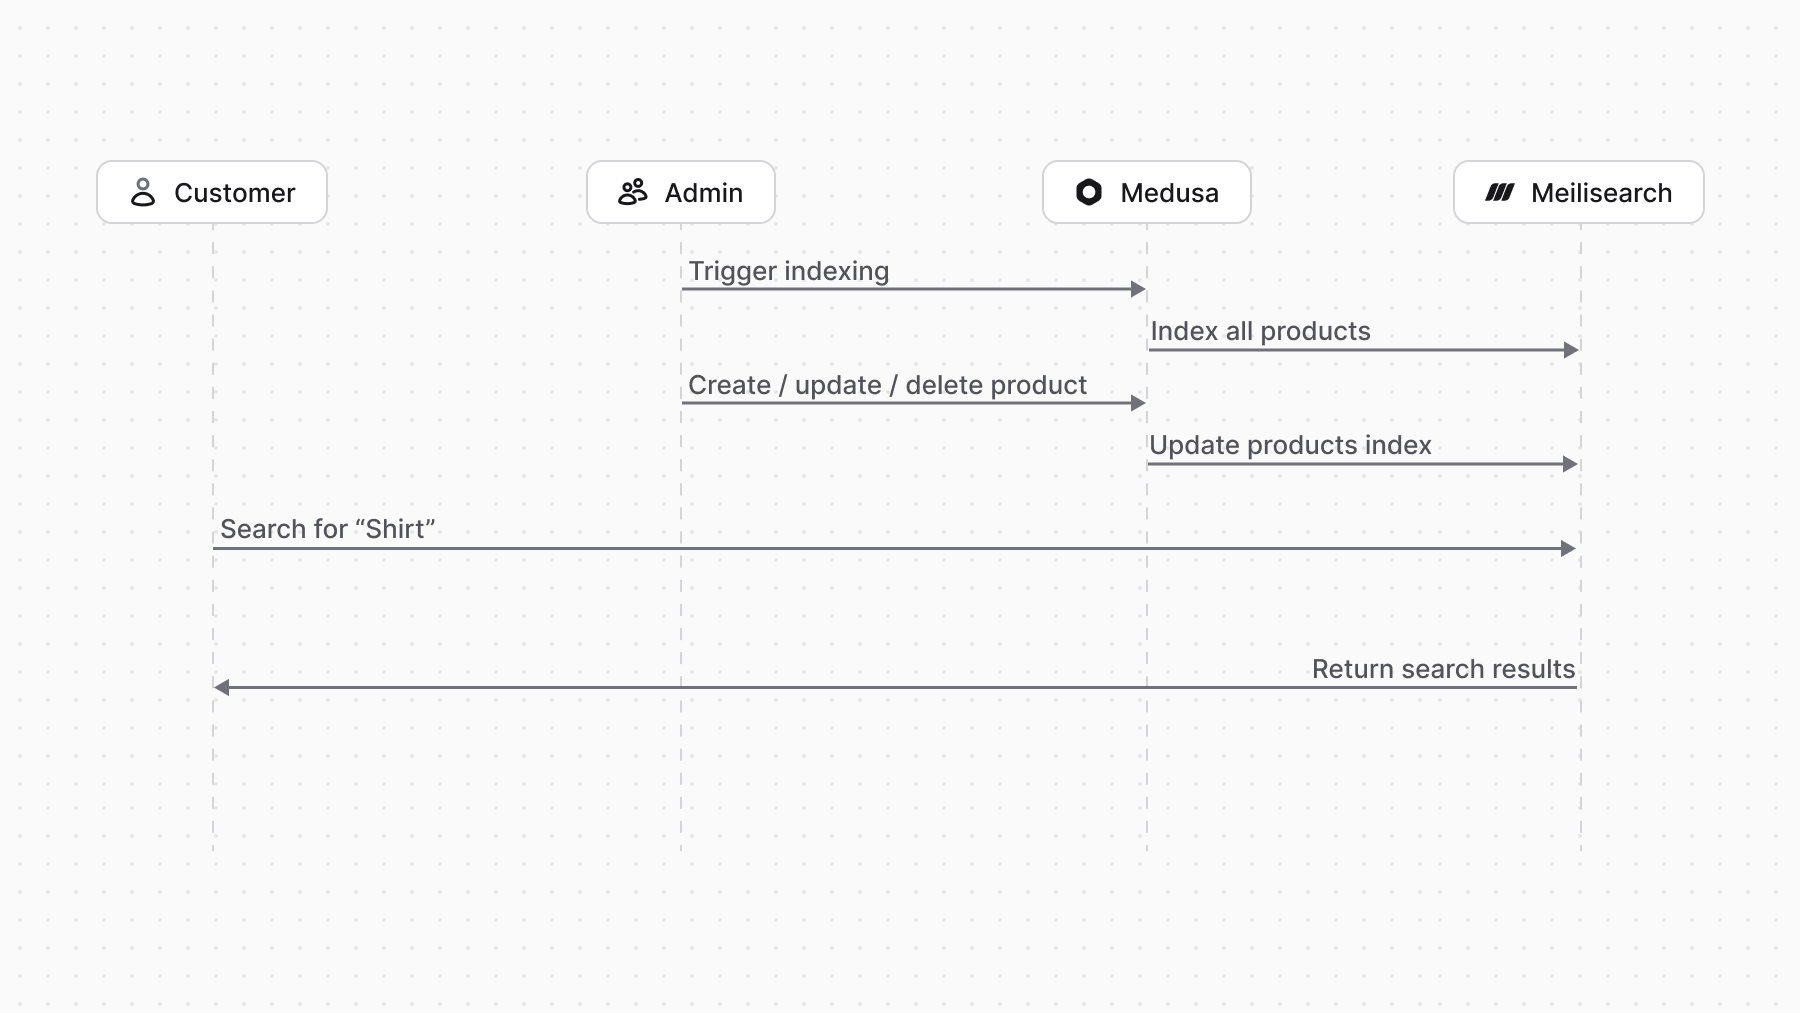
In this tutorial, you'll learn how to integrate Meilisearch with Medusa to enable advanced search capabilities in your storefront.
|
||
|
||
When you install a Medusa application, you get a fully-fledged commerce platform with a Framework for customization. Medusa's architecture supports integrating third-party services, such as search engines, allowing you to build custom features around core commerce flows.
|
||
|
||
[Meilisearch](https://www.meilisearch.com/) is an open-source, fast, and relevant search engine that you can integrate with Medusa to enhance your storefront's search functionality.
|
||
|
||
## Summary
|
||
|
||
By following this tutorial, you'll learn how to:
|
||
|
||
- Install and set up Medusa.
|
||
- Integrate Meilisearch into Medusa.
|
||
- Trigger Meilisearch reindexing when a product is created, updated, or deleted, or when an admin manually triggers a reindex.
|
||
- Customize the Next.js Starter Storefront to search for products through Meilisearch.
|
||
|
||
You can follow this tutorial whether you're new to Medusa or an advanced Medusa developer.
|
||
|
||
|
||
|
||
<Card
|
||
title="Example Repository"
|
||
text="Find the full code of the guide in this repository."
|
||
href="https://github.com/medusajs/examples/tree/main/meilisearch-integration"
|
||
icon={Github}
|
||
/>
|
||
|
||
---
|
||
|
||
## Step 1: Install a Medusa Application
|
||
|
||
<Prerequisites items={[
|
||
{
|
||
text: "Node.js v20+",
|
||
link: "https://nodejs.org/en/download"
|
||
},
|
||
{
|
||
text: "Git CLI tool",
|
||
link: "https://git-scm.com/downloads"
|
||
},
|
||
{
|
||
text: "PostgreSQL",
|
||
link: "https://www.postgresql.org/download/"
|
||
}
|
||
]} />
|
||
|
||
Start by installing the Medusa application on your machine with the following command:
|
||
|
||
```bash
|
||
npx create-medusa-app@latest
|
||
```
|
||
|
||
You'll first be asked for the project's name. Then, when asked whether you want to install the [Next.js Starter Storefront](../../../nextjs-starter/page.mdx), choose "Yes."
|
||
|
||
Afterwards, the installation process will start, which will install the Medusa application in a directory with your project's name and the Next.js Starter Storefront in a separate directory named `{project-name}-storefront`.
|
||
|
||
<Note title="Why is the storefront installed separately">
|
||
|
||
The Medusa application is composed of a headless Node.js server and an admin dashboard. The storefront is installed or custom-built separately and connects to the Medusa application through its REST endpoints, called [API routes](!docs!/learn/fundamentals/api-routes). Learn more in [Medusa's Architecture documentation](!docs!/learn/introduction/architecture).
|
||
|
||
</Note>
|
||
|
||
Once the installation finishes successfully, the Medusa Admin dashboard will open with a form to create a new user. Enter the user's credentials and submit the form. Afterwards, you can log in with the new user and explore the dashboard.
|
||
|
||
<Note title="Ran into Errors">
|
||
|
||
Check out the [troubleshooting guides](../../../troubleshooting/create-medusa-app-errors/page.mdx) for help.
|
||
|
||
</Note>
|
||
|
||
---
|
||
|
||
## Step 2: Create Meilisearch Module
|
||
|
||
<Prerequisites
|
||
items={[
|
||
{
|
||
text: "Meilisearch instance (Cloud or local)",
|
||
link: "https://www.meilisearch.com/docs/learn/getting_started/cloud_quick_start"
|
||
}
|
||
]}
|
||
/>
|
||
|
||
To integrate third-party services into Medusa, you create a custom module. A module is a reusable package with functionalities related to a single feature or domain. Medusa integrates the module into your application without side effects on your setup.
|
||
|
||
In this step, you'll create a custom module that provides the necessary functionalities to integrate Meilisearch with Medusa.
|
||
|
||
<Note>
|
||
|
||
Refer to the [Modules documentation](!docs!/learn/fundamentals/modules) to learn more.
|
||
|
||
</Note>
|
||
|
||
Before building the module, you need to install Meilisearch's JavaScript client. Run the following command in your Medusa application's root directory:
|
||
|
||
```bash npm2yarn
|
||
npm install meilisearch
|
||
```
|
||
|
||
### Create Module Directory
|
||
|
||
A module is created under the `src/modules` directory of your Medusa application. So, create the directory `src/modules/meilisearch`.
|
||
|
||
### Create Service
|
||
|
||
You define a module's functionalities in a service. A service is a TypeScript or JavaScript class that the module exports. In the service's methods, you can connect to the database, which is useful if your module defines tables in the database, or connect to third-party services.
|
||
|
||
In this section, you'll create the Meilisearch Module's service and the methods necessary to manage indexed products in Meilisearch and search through them.
|
||
|
||
To create the Meilisearch Module's service, create the file `src/modules/meilisearch/service.ts` with the following content:
|
||
|
||
```ts title="src/modules/meilisearch/service.ts"
|
||
const { Meilisearch } = require("meilisearch")
|
||
import { MedusaError } from "@medusajs/framework/utils"
|
||
|
||
type MeilisearchOptions = {
|
||
host: string;
|
||
apiKey: string;
|
||
productIndexName: string;
|
||
}
|
||
|
||
export type MeilisearchIndexType = "product"
|
||
|
||
export default class MeilisearchModuleService {
|
||
private client: typeof Meilisearch
|
||
private options: MeilisearchOptions
|
||
|
||
constructor({}, options: MeilisearchOptions) {
|
||
if (!options.host || !options.apiKey || !options.productIndexName) {
|
||
throw new MedusaError(
|
||
MedusaError.Types.INVALID_ARGUMENT,
|
||
"Meilisearch options are required"
|
||
)
|
||
}
|
||
this.client = new Meilisearch({
|
||
host: options.host,
|
||
apiKey: options.apiKey,
|
||
})
|
||
this.options = options
|
||
}
|
||
|
||
// TODO: Add methods
|
||
}
|
||
```
|
||
|
||
You export a class that serves as the Meilisearch Module's service. In the service, you define two properties:
|
||
|
||
- `client`: An instance of the Meilisearch Client, which you'll use to perform actions with Meilisearch's API.
|
||
- `options`: An object of options that the module receives when it's registered, which you'll learn about later. The options contain:
|
||
- `apiKey`: The Meilisearch API key.
|
||
- `host`: The Meilisearch host.
|
||
- `productIndexName`: The name of the index where products are stored.
|
||
|
||
<Note title="Tip">
|
||
|
||
If you want to index other types of data, such as product categories, you can add new properties for their index names in the `MeilisearchOptions` type.
|
||
|
||
</Note>
|
||
|
||
A module's service receives the module's options as a second parameter in its constructor. In the constructor, you initialize the Meilisearch client using the module's options.
|
||
|
||
<Note title="What is the first constructor parameter?">
|
||
|
||
A module has a container that holds all resources registered in that module, and you can access those resources in the first parameter of the constructor. Learn more about it in the [Module Container documentation](!docs!/learn/fundamentals/modules/container).
|
||
|
||
</Note>
|
||
|
||
#### Index Data Method
|
||
|
||
The first method you need to add to the service is a method that receives an array of data to add or update in Meilisearch's index.
|
||
|
||
Add the following methods to the `MeilisearchModuleService` class:
|
||
|
||
```ts title="src/modules/meilisearch/service.ts"
|
||
export default class MeilisearchModuleService {
|
||
// ...
|
||
async getIndexName(type: MeilisearchIndexType) {
|
||
switch (type) {
|
||
case "product":
|
||
return this.options.productIndexName
|
||
default:
|
||
throw new Error(`Invalid index type: ${type}`)
|
||
}
|
||
}
|
||
|
||
async indexData(data: Record<string, unknown>[], type: MeilisearchIndexType = "product") {
|
||
const indexName = await this.getIndexName(type)
|
||
const index = this.client.index(indexName)
|
||
|
||
// Transform data to include id as primary key for Meilisearch
|
||
const documents = data.map((item) => ({
|
||
...item,
|
||
id: item.id,
|
||
}))
|
||
|
||
await index.addDocuments(documents)
|
||
}
|
||
}
|
||
```
|
||
|
||
You define two methods:
|
||
|
||
1. `getIndexName`: A method that receives an `MeilisearchIndexType` (defined in the previous snippet) and returns the index name for that type. In this case, you only have one type, `product`, so you return the product index name.
|
||
- If you want to index other types of data, you can add more cases to the switch statement.
|
||
2. `indexData`: A method that receives an array of data and an `MeilisearchIndexType`. The method indexes the data in the Meilisearch index for the given type.
|
||
|
||
### Retrieve and Delete Methods
|
||
|
||
The next methods you'll add to the service are methods to retrieve and delete data from the Meilisearch index. You'll use these later to keep the Meilisearch index in sync with Medusa.
|
||
|
||
Add the following methods to the `MeilisearchModuleService` class:
|
||
|
||
```ts title="src/modules/meilisearch/service.ts"
|
||
export default class MeilisearchModuleService {
|
||
// ...
|
||
|
||
async retrieveFromIndex(documentIds: string[], type: MeilisearchIndexType = "product") {
|
||
const indexName = await this.getIndexName(type)
|
||
const index = this.client.index(indexName)
|
||
|
||
const results = await Promise.all(
|
||
documentIds.map(async (id) => {
|
||
try {
|
||
return await index.getDocument(id)
|
||
} catch (error) {
|
||
// Document not found, return null
|
||
return null
|
||
}
|
||
})
|
||
)
|
||
|
||
return results.filter(Boolean)
|
||
}
|
||
|
||
async deleteFromIndex(documentIds: string[], type: MeilisearchIndexType = "product") {
|
||
const indexName = await this.getIndexName(type)
|
||
const index = this.client.index(indexName)
|
||
|
||
await index.deleteDocuments(documentIds)
|
||
}
|
||
}
|
||
```
|
||
|
||
You define two methods:
|
||
|
||
1. `retrieveFromIndex`: A method that receives an array of document IDs and a `MeilisearchIndexType`. The method retrieves the documents with the given IDs from the Meilisearch index.
|
||
2. `deleteFromIndex`: A method that receives an array of document IDs and a `MeilisearchIndexType`. The method deletes the documents with the given IDs from the Meilisearch index.
|
||
|
||
#### Search Method
|
||
|
||
The last method you'll implement is a method to search through the Meilisearch index. This method lets you expose search functionality to clients through Medusa's API routes.
|
||
|
||
Add the following method to the `MeilisearchModuleService` class:
|
||
|
||
```ts title="src/modules/meilisearch/service.ts"
|
||
export default class MeilisearchModuleService {
|
||
// ...
|
||
|
||
async search(query: string, type: MeilisearchIndexType = "product") {
|
||
const indexName = await this.getIndexName(type)
|
||
const index = this.client.index(indexName)
|
||
|
||
return await index.search(query)
|
||
}
|
||
}
|
||
```
|
||
|
||
The `search` method receives a query string and a `MeilisearchIndexType`. The method searches through the Meilisearch index for the given type, such as products, and returns the results.
|
||
|
||
|
||
### Export Module Definition
|
||
|
||
The final piece of a module is its definition, which you export in an `index.ts` file at its root directory. This definition tells Medusa the name of the module and its service.
|
||
|
||
So, create the file `src/modules/meilisearch/index.ts` with the following content:
|
||
|
||
```ts title="src/modules/meilisearch/index.ts"
|
||
import { Module } from "@medusajs/framework/utils"
|
||
import MeilisearchModuleService from "./service"
|
||
|
||
export const MEILISEARCH_MODULE = "meilisearch"
|
||
|
||
export default Module(MEILISEARCH_MODULE, {
|
||
service: MeilisearchModuleService,
|
||
})
|
||
```
|
||
|
||
You use the `Module` function from the Modules SDK to create the module's definition. It accepts two parameters:
|
||
|
||
1. The module's name, which is `meilisearch`.
|
||
2. An object with a required property `service` indicating the module's service.
|
||
|
||
You also export the module's name as `MEILISEARCH_MODULE` so you can reference it later.
|
||
|
||
### Add Module to Medusa's Configurations
|
||
|
||
Once you finish building the module, add it to Medusa's configurations to start using it.
|
||
|
||
In `medusa-config.ts`, add a `modules` property and pass an array with your custom module:
|
||
|
||
```ts title="medusa-config.ts"
|
||
module.exports = defineConfig({
|
||
// ...
|
||
modules: [
|
||
{
|
||
resolve: "./src/modules/meilisearch",
|
||
options: {
|
||
host: process.env.MEILISEARCH_HOST!,
|
||
apiKey: process.env.MEILISEARCH_API_KEY!,
|
||
productIndexName: process.env.MEILISEARCH_PRODUCT_INDEX_NAME!,
|
||
},
|
||
},
|
||
],
|
||
})
|
||
```
|
||
|
||
Each object in the `modules` array has a `resolve` property, whose value is either a path to the module's directory, or an `npm` package’s name.
|
||
|
||
You also pass an `options` property with the module's options, including the Meilisearch host, API Key, and the product index name.
|
||
|
||
### Add Environment Variables
|
||
|
||
Before you can start using the Meilisearch Module, you need to set the environment variables for the Meilisearch host, API Key, and the product index name.
|
||
|
||
Add the following environment variables to your `.env` file:
|
||
|
||
```env
|
||
MEILISEARCH_HOST=your-meilisearch-host
|
||
MEILISEARCH_API_KEY=your-meilisearch-api-key
|
||
MEILISEARCH_PRODUCT_INDEX_NAME=your-product-index-name
|
||
```
|
||
- `your-meilisearch-host` is the host of your Meilisearch instance. If you're running Meilisearch locally, it should be `http://127.0.0.1:7700`.
|
||
- `your-meilisearch-api-key` is the master key of your Meilisearch instance. If you're running Meilisearch locally, you should have set it when starting Meilisearch. If you're using Meilisearch Cloud, you can find it in the dashboard under "API Keys." Learn more in the [Meilisearch documentation](https://www.meilisearch.com/docs/learn/security/basic_security).
|
||
- `your-product-index-name` is the name of the index where you'll store products. You can choose any name you want. Even if the index doesn't exist, Meilisearch will create it when you add documents to it.
|
||
|
||
Your module is now ready for use. You'll see how to use it in the next steps.
|
||
|
||
---
|
||
|
||
## Step 3: Sync Products to Meilisearch Workflow
|
||
|
||
To keep the Meilisearch index in sync with Medusa, you need to trigger indexing when products are created, updated, or deleted in Medusa. You can also allow admins to manually trigger a reindex.
|
||
|
||
To implement the indexing functionality, you need to create a [workflow](!docs!/learn/fundamentals/workflows). A workflow is a series of actions, called steps, that complete a task. You construct a workflow like you construct a function, but it's a special function that allows you to track its executions' progress, define roll-back logic, and configure other advanced features.
|
||
|
||
<Note>
|
||
|
||
Learn more about workflows in the [Workflows documentation](!docs!/learn/fundamentals/workflows).
|
||
|
||
</Note>
|
||
|
||
In this step, you'll create a workflow that indexes products in Meilisearch. In the next steps, you'll learn how to use the workflow when products are created, updated, or deleted, or when admins manually trigger a reindex.
|
||
|
||
The workflow has the following steps:
|
||
|
||
<WorkflowDiagram
|
||
workflow={{
|
||
name: "syncProductsWorkflow",
|
||
steps: [
|
||
{
|
||
type: "step",
|
||
name: "useQueryGraphStep",
|
||
description: "Retrieve products matching specified filters and pagination parameters.",
|
||
link: "/references/helper-steps/useQueryGraphStep",
|
||
depth: 1
|
||
},
|
||
{
|
||
type: "step",
|
||
name: "syncProductsStep",
|
||
description: "Index products in Meilisearch.",
|
||
depth: 1
|
||
}
|
||
]
|
||
}}
|
||
hideLegend
|
||
/>
|
||
|
||
Medusa provides the `useQueryGraphStep` in its `@medusajs/medusa/core-flows` package. You only need to implement the second step.
|
||
|
||
### syncProductsStep
|
||
|
||
In the second step of the workflow, you create or update indexes in Meilisearch for the products retrieved in the first step.
|
||
|
||
To create the step, create the file `src/workflows/steps/sync-products.ts` with the following content:
|
||
|
||
<Note>
|
||
|
||
If you get a type error on resolving the Meilisearch Module, run the Medusa application once with the `npm run dev` or `yarn dev` command to generate the necessary type definitions, as explained in the [Automatically Generated Types guide](!docs!/learn/fundamentals/generated-types).
|
||
|
||
</Note>
|
||
|
||
```ts title="src/workflows/steps/sync-products.ts"
|
||
import { createStep, StepResponse } from "@medusajs/framework/workflows-sdk"
|
||
import { MEILISEARCH_MODULE } from "../../modules/meilisearch"
|
||
import MeilisearchModuleService from "../../modules/meilisearch/service"
|
||
|
||
export type SyncProductsStepInput = {
|
||
products: {
|
||
id: string
|
||
title: string
|
||
description?: string
|
||
handle: string
|
||
thumbnail?: string
|
||
categories: {
|
||
id: string
|
||
name: string
|
||
handle: string
|
||
}[]
|
||
tags: {
|
||
id: string
|
||
value: string
|
||
}[]
|
||
}[]
|
||
}
|
||
|
||
export const syncProductsStep = createStep(
|
||
"sync-products",
|
||
async ({ products }: SyncProductsStepInput, { container }) => {
|
||
const meilisearchModuleService = container.resolve<MeilisearchModuleService>(
|
||
MEILISEARCH_MODULE
|
||
)
|
||
const existingProducts = await meilisearchModuleService.retrieveFromIndex(
|
||
products.map((product) => product.id),
|
||
"product"
|
||
)
|
||
const newProducts = products.filter((product) => !existingProducts.some(
|
||
(p) => p.id === product.id)
|
||
)
|
||
await meilisearchModuleService.indexData(
|
||
products as unknown as Record<string, unknown>[],
|
||
"product"
|
||
)
|
||
|
||
return new StepResponse(undefined, {
|
||
newProducts: newProducts.map((product) => product.id),
|
||
existingProducts,
|
||
})
|
||
}
|
||
// TODO add compensation
|
||
)
|
||
```
|
||
|
||
You create a step with `createStep` from the Workflows SDK. It accepts two parameters:
|
||
|
||
1. The step's unique name, which is `sync-products`.
|
||
2. An async function that receives two parameters:
|
||
- The step's input, which is an object holding an array of products to sync into Meilisearch.
|
||
- An object that has properties including the [Medusa container](!docs!/learn/fundamentals/medusa-container), which is a registry of Framework and commerce tools that you can access in the step.
|
||
|
||
In the step function, you resolve the Meilisearch Module's service from the Medusa container using the name you exported in the module definition's file.
|
||
|
||
Then, you retrieve the products that are already indexed in Meilisearch and determine which products are new. You'll learn why this is useful in a bit.
|
||
|
||
Finally, you pass the products you received in the input to Meilisearch to create or update its indices.
|
||
|
||
A step function must return a `StepResponse` instance. The `StepResponse` constructor accepts two parameters:
|
||
|
||
1. The step's output, which in this case is `undefined`.
|
||
2. Data to pass to the step's compensation function.
|
||
|
||
#### Compensation Function
|
||
|
||
The compensation function undoes the actions performed in a step. Then, if an error occurs during the workflow's execution, the compensation functions of executed steps are called to roll back the changes. This mechanism ensures data consistency in your application, especially as you integrate external systems.
|
||
|
||
To add a compensation function to a step, pass it as a third parameter to `createStep`:
|
||
|
||
```ts title="src/workflows/steps/sync-products.ts"
|
||
export const syncProductsStep = createStep(
|
||
// ...
|
||
async (input, { container }) => {
|
||
if (!input) {
|
||
return
|
||
}
|
||
|
||
const meilisearchModuleService = container.resolve<MeilisearchModuleService>(
|
||
MEILISEARCH_MODULE
|
||
)
|
||
|
||
if (input.newProducts) {
|
||
await meilisearchModuleService.deleteFromIndex(
|
||
input.newProducts,
|
||
"product"
|
||
)
|
||
}
|
||
|
||
if (input.existingProducts) {
|
||
await meilisearchModuleService.indexData(
|
||
input.existingProducts,
|
||
"product"
|
||
)
|
||
}
|
||
}
|
||
)
|
||
```
|
||
|
||
The compensation function receives two parameters:
|
||
|
||
1. The data you passed as a second parameter of `StepResponse` in the step function.
|
||
2. A context object similar to the step function that holds the Medusa container.
|
||
|
||
In the compensation function, you resolve the Meilisearch Module's service from the container. Then, you delete from Meilisearch the products that were newly indexed and revert the existing products to their original data.
|
||
|
||
### Add Sync Products Workflow
|
||
|
||
You can now create the workflow that syncs products to Meilisearch.
|
||
|
||
To create the workflow, create the file `src/workflows/sync-products.ts` with the following content:
|
||
|
||
```ts title="src/workflows/sync-products.ts"
|
||
import { createWorkflow, WorkflowResponse } from "@medusajs/framework/workflows-sdk"
|
||
import { useQueryGraphStep } from "@medusajs/medusa/core-flows"
|
||
import { syncProductsStep, SyncProductsStepInput } from "./steps/sync-products"
|
||
|
||
type SyncProductsWorkflowInput = {
|
||
filters?: Record<string, unknown>
|
||
limit?: number
|
||
offset?: number
|
||
}
|
||
|
||
export const syncProductsWorkflow = createWorkflow(
|
||
"sync-products",
|
||
({ filters, limit, offset }: SyncProductsWorkflowInput) => {
|
||
const { data, metadata } = useQueryGraphStep({
|
||
entity: "product",
|
||
fields: [
|
||
"id",
|
||
"title",
|
||
"description",
|
||
"handle",
|
||
"thumbnail",
|
||
"categories.id",
|
||
"categories.name",
|
||
"categories.handle",
|
||
"tags.id",
|
||
"tags.value",
|
||
],
|
||
pagination: {
|
||
take: limit,
|
||
skip: offset,
|
||
},
|
||
filters: {
|
||
status: "published",
|
||
...filters,
|
||
},
|
||
})
|
||
|
||
syncProductsStep({
|
||
products: data,
|
||
} as SyncProductsStepInput)
|
||
|
||
// @ts-ignore
|
||
return new WorkflowResponse({
|
||
products: data,
|
||
metadata,
|
||
})
|
||
}
|
||
)
|
||
```
|
||
|
||
You create a workflow using `createWorkflow` from the Workflows SDK. It accepts the workflow's unique name as a first parameter.
|
||
|
||
It accepts as a second parameter a constructor function, which is the workflow's implementation. The function can accept input, which in this case is pagination and filter parameters for the products to retrieve.
|
||
|
||
In the workflow's constructor function, you:
|
||
|
||
1. Retrieve products from Medusa's database using `useQueryGraphStep`. This step uses Medusa's [Query](!docs!/learn/fundamentals/module-links/query) tool to retrieve data across modules. You pass it the pagination and filter parameters you received in the input.
|
||
2. Index the products in Meilisearch using `syncProductsStep`. You pass it the products you retrieved in the previous step.
|
||
|
||
A workflow must return an instance of `WorkflowResponse`. The `WorkflowResponse` constructor accepts the workflow's output as a parameter, which is an object holding the retrieved products and their pagination details.
|
||
|
||
In the next step, you'll learn how to execute this workflow.
|
||
|
||
---
|
||
|
||
## Step 4: Trigger Meilisearch Sync Manually
|
||
|
||
As mentioned earlier, you'll trigger the Meilisearch sync automatically when product events occur. You also want to allow admins to manually trigger a reindex.
|
||
|
||
In this step, you'll add the functionality to trigger the `syncProductsWorkflow` manually from the Medusa Admin dashboard. This requires:
|
||
|
||
1. Creating a subscriber that listens to a custom `meilisearch.sync` event to trigger syncing products to Meilisearch.
|
||
2. Creating an API route that the Medusa Admin dashboard can call to emit the `meilisearch.sync` event, which triggers the subscriber.
|
||
3. Adding a new page or UI route to the Medusa Admin dashboard to allow admins to trigger the reindex.
|
||
|
||
### Create Products Sync Subscriber
|
||
|
||
A subscriber is an asynchronous function that listens to one or more events and performs actions when these events are emitted. A subscriber is useful when syncing data across systems, as the operation can be time-consuming and should be performed in the background.
|
||
|
||
<Note>
|
||
|
||
Learn more about subscribers in the [Events and Subscribers documentation](!docs!/learn/fundamentals/events-and-subscribers).
|
||
|
||
</Note>
|
||
|
||
You create a subscriber in a TypeScript or JavaScript file under the `src/subscribers` directory. So, to create the subscriber that listens to the `meilisearch.sync` event, create the file `src/subscribers/meilisearch-sync.ts` with the following content:
|
||
|
||
```ts title="src/subscribers/meilisearch-sync.ts"
|
||
import {
|
||
SubscriberArgs,
|
||
type SubscriberConfig,
|
||
} from "@medusajs/framework"
|
||
import { syncProductsWorkflow } from "../workflows/sync-products"
|
||
|
||
export default async function meilisearchSyncHandler({
|
||
container,
|
||
}: SubscriberArgs) {
|
||
const logger = container.resolve("logger")
|
||
|
||
let hasMore = true
|
||
let offset = 0
|
||
const limit = 50
|
||
let totalIndexed = 0
|
||
|
||
logger.info("Starting product indexing...")
|
||
|
||
while (hasMore) {
|
||
const { result: { products, metadata } } = await syncProductsWorkflow(container)
|
||
.run({
|
||
input: {
|
||
limit,
|
||
offset,
|
||
},
|
||
})
|
||
|
||
hasMore = offset + limit < (metadata?.count ?? 0)
|
||
offset += limit
|
||
totalIndexed += products.length
|
||
}
|
||
|
||
logger.info(`Successfully indexed ${totalIndexed} products`)
|
||
}
|
||
|
||
export const config: SubscriberConfig = {
|
||
event: "meilisearch.sync",
|
||
}
|
||
```
|
||
|
||
A subscriber file must export:
|
||
|
||
1. An asynchronous function, which is the subscriber that is executed when the event is emitted.
|
||
2. A configuration object that holds the name of the event the subscriber listens to, which is `meilisearch.sync` in this case.
|
||
|
||
The subscriber function receives an object as a parameter that has a `container` property, which is the Medusa container.
|
||
|
||
In the subscriber function, you initialize variables to keep track of pagination and the total number of products indexed.
|
||
|
||
Then, you start a loop that retrieves products in batches of 50. It indexes them in Meilisearch using the `syncProductsWorkflow`. Finally, you log the total number of products indexed.
|
||
|
||
You'll learn how to emit the `meilisearch.sync` event next.
|
||
|
||
<Note title="Tip">
|
||
|
||
If you want to sync other data types, you can do it in this subscriber as well.
|
||
|
||
</Note>
|
||
|
||
### Create API Route to Trigger Sync
|
||
|
||
To allow the Medusa Admin dashboard to trigger the `meilisearch.sync` event, you need to create an API route that emits the event.
|
||
|
||
An API Route is an endpoint that exposes commerce features to external applications and clients, such as storefronts.
|
||
|
||
<Note>
|
||
|
||
Learn more about API routes in [this documentation](!docs!/learn/fundamentals/api-routes).
|
||
|
||
</Note>
|
||
|
||
An API route is created in a `route.ts` file under a subdirectory of the `src/api` directory. The path of the API route is the file's path relative to `src/api`.
|
||
|
||
So, to create an API route at the path `/admin/meilisearch/sync`, create the file `src/api/admin/meilisearch/sync/route.ts` with the following content:
|
||
|
||
```ts title="src/api/admin/meilisearch/sync/route.ts"
|
||
import { MedusaRequest, MedusaResponse } from "@medusajs/framework/http"
|
||
import { Modules } from "@medusajs/framework/utils"
|
||
|
||
export async function POST(
|
||
req: MedusaRequest,
|
||
res: MedusaResponse
|
||
) {
|
||
const eventModuleService = req.scope.resolve(Modules.EVENT_BUS)
|
||
await eventModuleService.emit({
|
||
name: "meilisearch.sync",
|
||
data: {},
|
||
})
|
||
res.send({
|
||
message: "Syncing data to Meilisearch",
|
||
})
|
||
}
|
||
|
||
```
|
||
|
||
Since you export a `POST` route handler function, you expose a `POST` API route at `/admin/meilisearch/sync`. The route handler function accepts two parameters:
|
||
|
||
1. A request object with details and context on the request, such as body parameters or authenticated user details.
|
||
2. A response object to manipulate and send the response.
|
||
|
||
In the route handler, you use the Medusa container that is available in the request object. You resolve the [Event Module](../../../infrastructure-modules/event/page.mdx). This module manages events and their subscribers.
|
||
|
||
Then, you emit the `meilisearch.sync` event using the Event Module's `emit` method. You pass it the event name.
|
||
|
||
Finally, you send a response with a message indicating that data is being synced to Meilisearch.
|
||
|
||
### Add Meilisearch Sync Page to Admin Dashboard
|
||
|
||
The last step is to add a new page to the admin dashboard. This page allows admins to trigger the reindex. You add a new page using a [UI Route](!docs!/learn/fundamentals/admin/ui-routes).
|
||
|
||
A UI route is a React component that specifies the content to be shown in a new page in the Medusa Admin dashboard. You'll create a UI route to display a button that triggers the reindex when clicked.
|
||
|
||
<Note>
|
||
|
||
Learn more about UI routes in the [UI Routes documentation](!docs!/learn/fundamentals/admin/ui-routes).
|
||
|
||
</Note>
|
||
|
||
#### Configure JS SDK
|
||
|
||
Before creating the UI route, you'll configure Medusa's [JS SDK](../../../js-sdk/page.mdx). You can use it to send requests to the Medusa server from any client application, including your Medusa Admin customizations.
|
||
|
||
The JS SDK is installed by default in your Medusa application. To configure it, create the file `src/admin/lib/sdk.ts` with the following content:
|
||
|
||
```ts title="src/admin/lib/sdk.ts"
|
||
import Medusa from "@medusajs/js-sdk"
|
||
|
||
export const sdk = new Medusa({
|
||
baseUrl: import.meta.env.VITE_BACKEND_URL || "/",
|
||
debug: import.meta.env.DEV,
|
||
auth: {
|
||
type: "session",
|
||
},
|
||
})
|
||
```
|
||
|
||
You create an instance of the JS SDK using the `Medusa` class from the JS SDK. You pass it an object having the following properties:
|
||
|
||
- `baseUrl`: The base URL of the Medusa server.
|
||
- `debug`: A boolean indicating whether to log debug information into the console.
|
||
- `auth`: An object specifying the authentication type. When using the JS SDK for admin customizations, you use the `session` authentication type.
|
||
|
||
#### Create UI Route
|
||
|
||
You'll now create the UI route that displays a button to trigger the reindex. You create a UI route in a `page.tsx` file under a subdirectory of `src/admin/routes` directory. The file's path relative to `src/admin/routes` determines its path in the dashboard.
|
||
|
||
So, to create a new page under the Settings section of the Medusa Admin, create the file `src/admin/routes/settings/meilisearch/page.tsx` with the following content:
|
||
|
||
```tsx title="src/admin/routes/settings/meilisearch/page.tsx"
|
||
import { Container, Heading, Button, toast } from "@medusajs/ui"
|
||
import { useMutation } from "@tanstack/react-query"
|
||
import { sdk } from "../../../lib/sdk"
|
||
import { defineRouteConfig } from "@medusajs/admin-sdk"
|
||
|
||
const MeilisearchPage = () => {
|
||
const { mutate, isPending } = useMutation({
|
||
mutationFn: () =>
|
||
sdk.client.fetch("/admin/meilisearch/sync", {
|
||
method: "POST",
|
||
}),
|
||
onSuccess: () => {
|
||
toast.success("Successfully triggered data sync to Meilisearch")
|
||
},
|
||
onError: (err) => {
|
||
console.error(err)
|
||
toast.error("Failed to sync data to Meilisearch")
|
||
},
|
||
})
|
||
|
||
const handleSync = () => {
|
||
mutate()
|
||
}
|
||
|
||
return (
|
||
<Container className="divide-y p-0">
|
||
<div className="flex items-center justify-between px-6 py-4">
|
||
<Heading level="h2">Meilisearch Sync</Heading>
|
||
</div>
|
||
<div className="px-6 py-8">
|
||
<Button
|
||
variant="primary"
|
||
onClick={handleSync}
|
||
isLoading={isPending}
|
||
>
|
||
Sync Data to Meilisearch
|
||
</Button>
|
||
</div>
|
||
</Container>
|
||
)
|
||
}
|
||
|
||
export const config = defineRouteConfig({
|
||
label: "Meilisearch",
|
||
})
|
||
|
||
export default MeilisearchPage
|
||
```
|
||
|
||
A UI route's file must export:
|
||
|
||
1. A React component that defines the content of the page.
|
||
2. A configuration object that specifies the route's label in the dashboard. This label is used to show a sidebar item for the new route.
|
||
|
||
In the React component, you use `useMutation` hook from `@tanstack/react-query` to create a mutation that sends a `POST` request to the API route you created earlier. In the mutation function, you use the JS SDK to send the request.
|
||
|
||
Then, in the return statement, you display a button that triggers the mutation when clicked, which sends a request to the API route you created earlier.
|
||
|
||
### Test it Out
|
||
|
||
You'll now test out the entire flow. Start by triggering the reindex manually from the Medusa Admin dashboard, then check the Meilisearch dashboard for the indexed products.
|
||
|
||
Run the following command to start the Medusa application:
|
||
|
||
```bash npm2yarn
|
||
npm run dev
|
||
```
|
||
|
||
Then, open the Medusa Admin at `http://localhost:9000/app` and log in with the credentials you set up in the first step.
|
||
|
||
<Note>
|
||
|
||
Can't remember the credentials? Learn how to create a user in the [Medusa CLI reference](../../../medusa-cli/commands/user/page.mdx).
|
||
|
||
</Note>
|
||
|
||
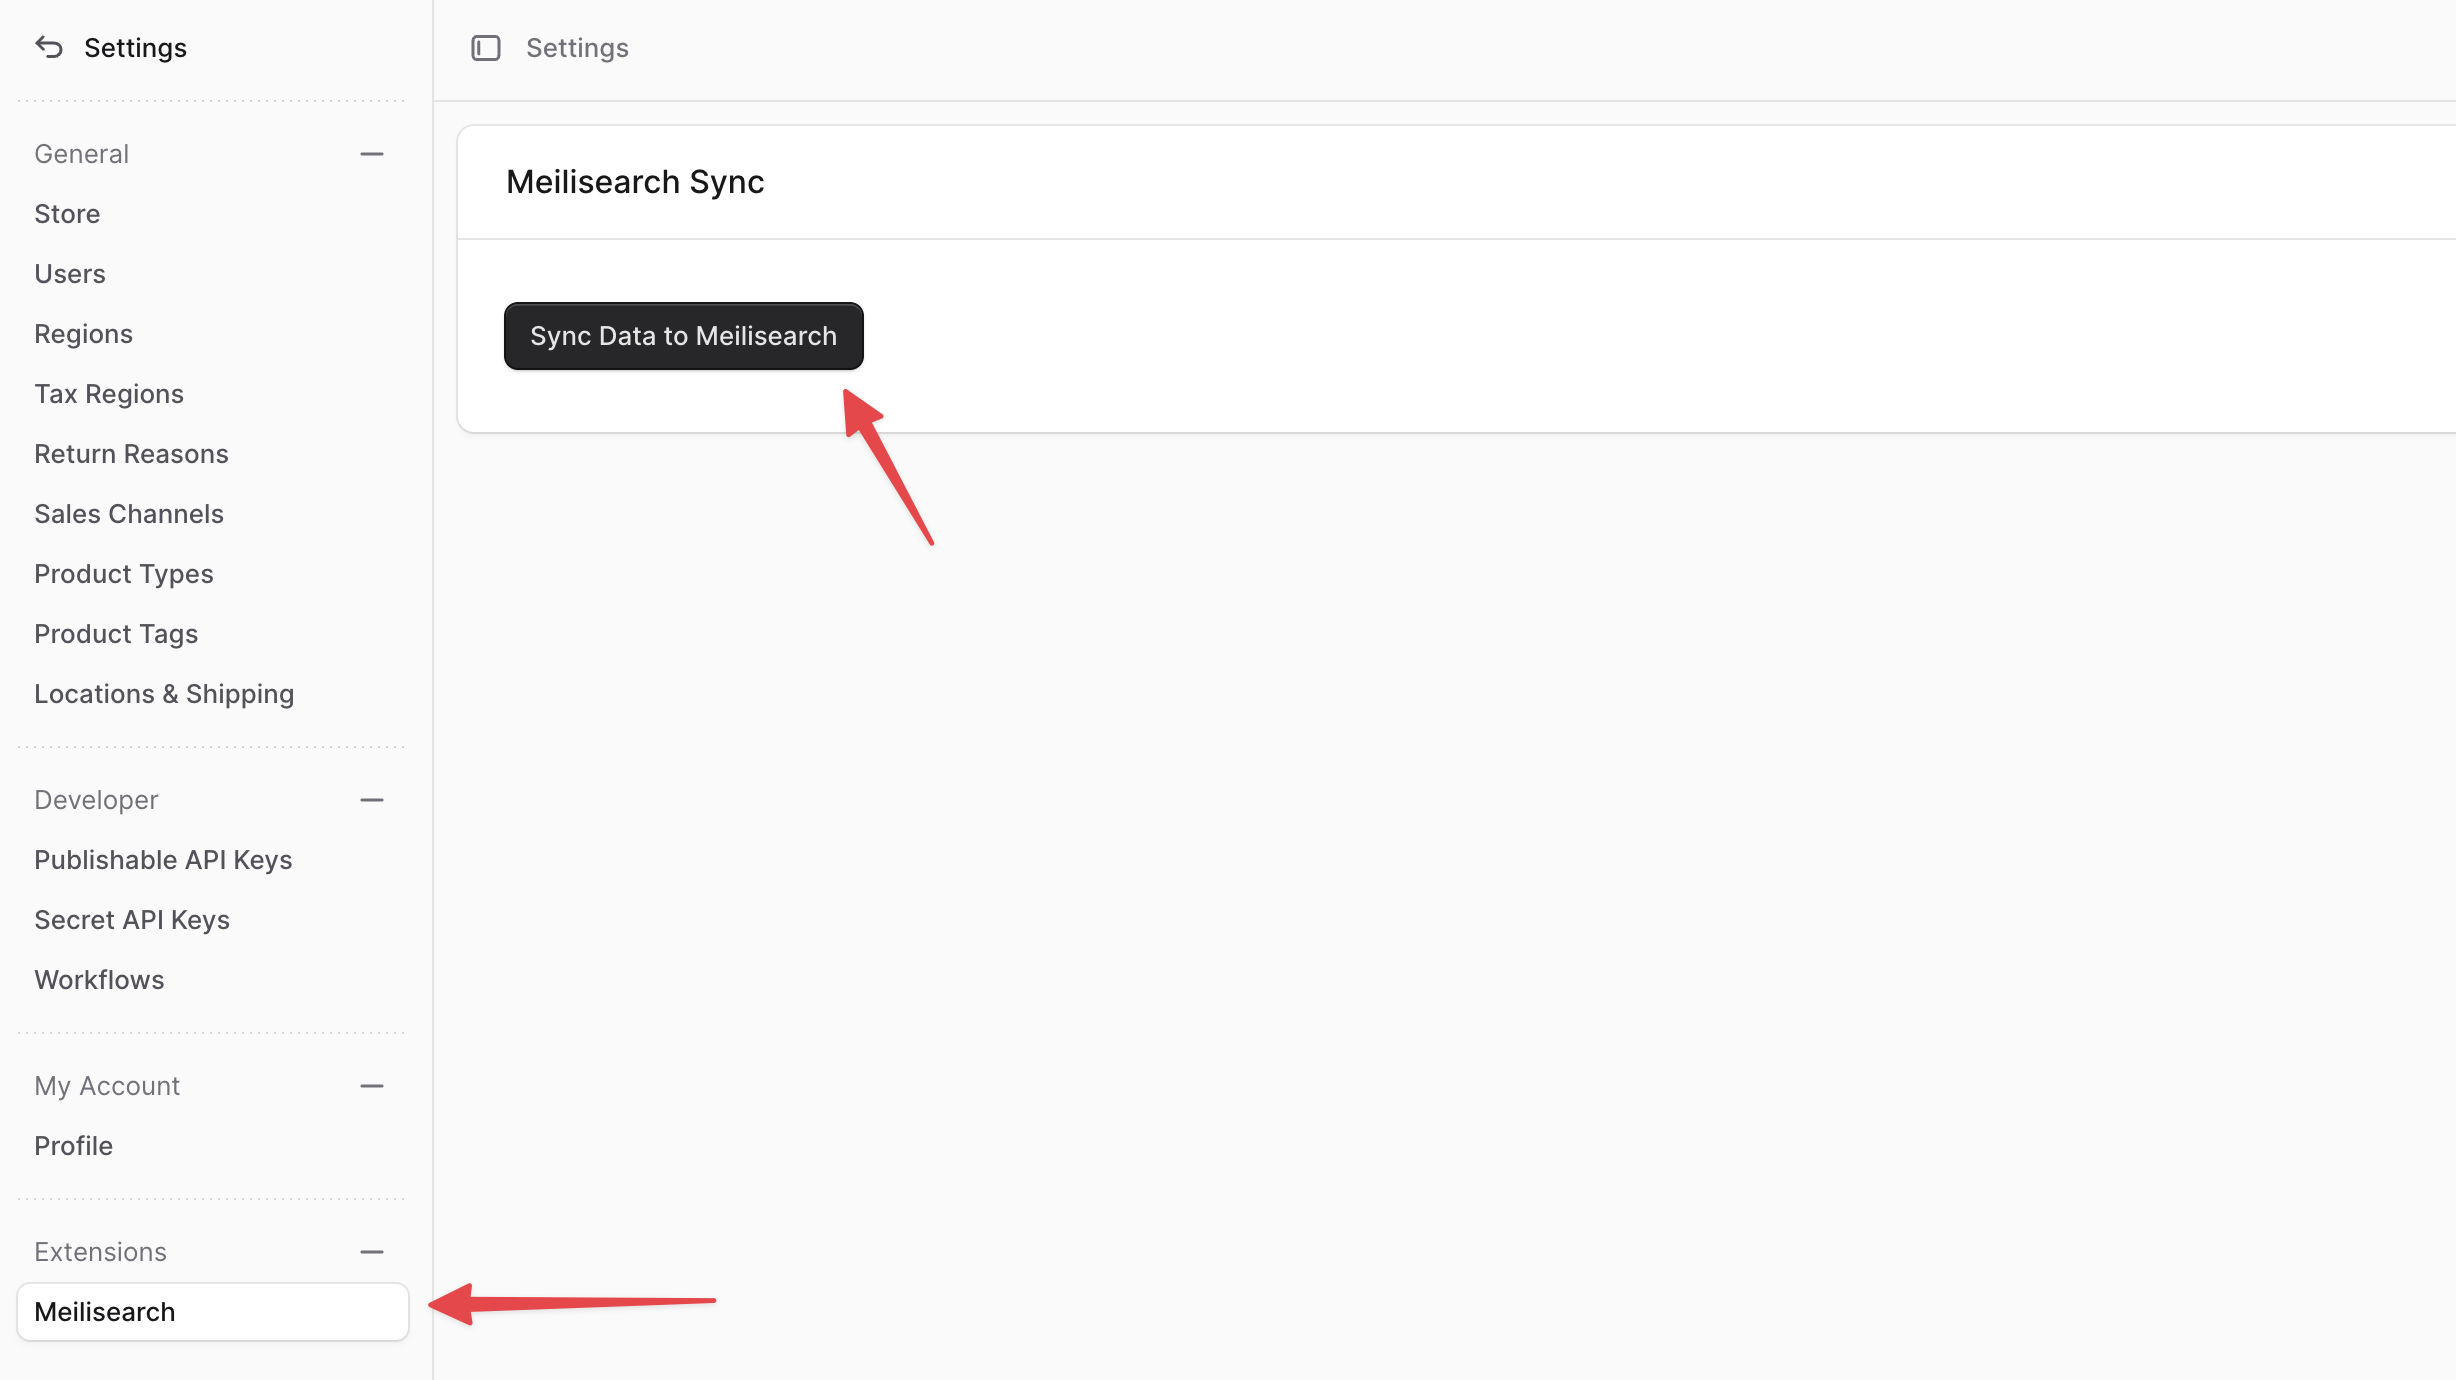
After you log in, go to Settings from the sidebar. You'll find a new "Meilisearch" item in the Settings' sidebar. If you click on it, you'll find the page you created with the button to sync products to Meilisearch.
|
||
|
||
If you click on the button, the products will be synced to Meilisearch.
|
||
|
||
|
||
|
||
You can check that the sync ran and was completed by checking the Medusa logs in the terminal where you started the Medusa application. You should find the following messages:
|
||
|
||
```bash
|
||
info: Processing meilisearch.sync which has 1 subscribers
|
||
info: Starting product indexing...
|
||
info: Successfully indexed 4 products
|
||
```
|
||
|
||
These messages indicate that the `meilisearch.sync` event was emitted, which triggered the subscriber you created to sync the products using the `syncProductsWorkflow`.
|
||
|
||
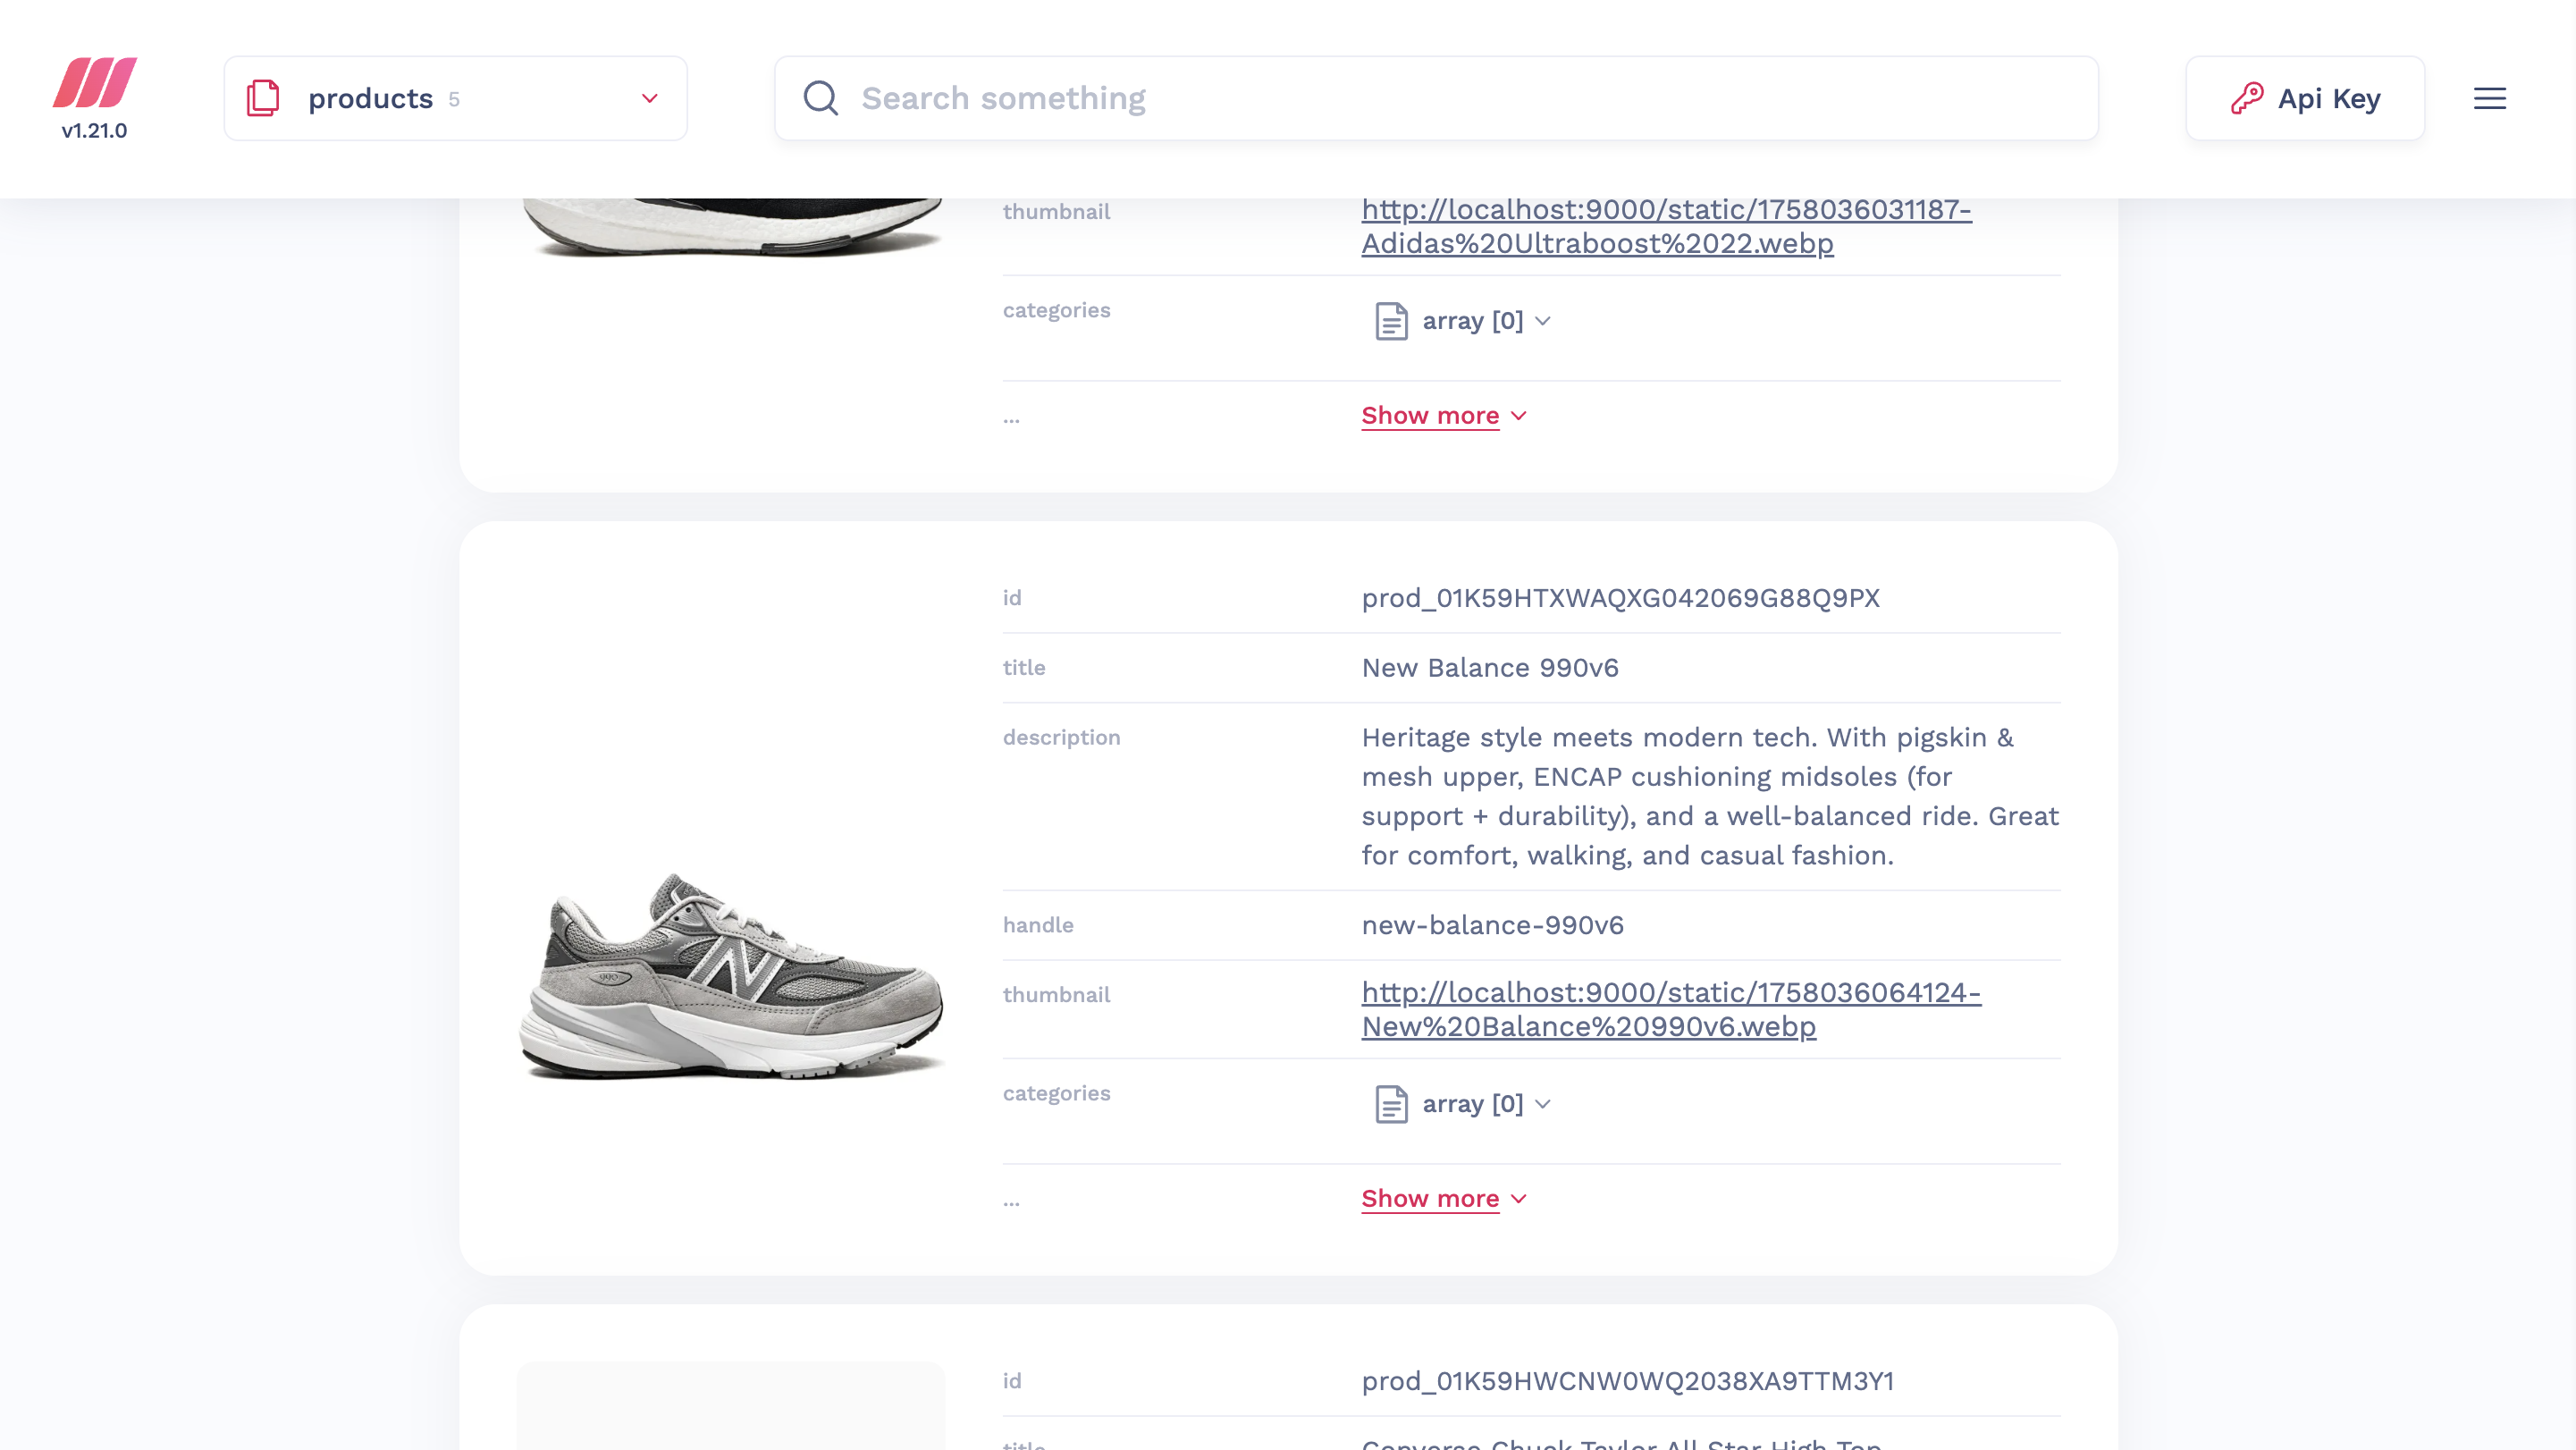
Finally, you can check the Meilisearch dashboard to see the indexed products. Open the Meilisearch dashboard, either Cloud or local, and choose the index you specified for products in the environment variable `MEILISEARCH_PRODUCT_INDEX_NAME`. You'll find your Medusa products indexed there.
|
||
|
||
|
||
|
||
---
|
||
|
||
## Step 5: Update Index on Product Changes
|
||
|
||
You'll now automate the indexing of products whenever a change occurs. This includes when a product is created, updated, or deleted.
|
||
|
||
Similar to before, you'll create subscribers to listen to these events.
|
||
|
||
### Handle Create and Update Products
|
||
|
||
The action to perform when a product is created or updated is the same. You'll use the `syncProductsWorkflow` to sync the product to Meilisearch.
|
||
|
||
So, you only need one subscriber to handle these two events. To create the subscriber, create the file `src/subscribers/product-sync.ts` with the following content:
|
||
|
||
```ts title="src/subscribers/product-sync.ts"
|
||
import {
|
||
SubscriberArgs,
|
||
type SubscriberConfig,
|
||
} from "@medusajs/framework"
|
||
import { syncProductsWorkflow } from "../workflows/sync-products"
|
||
|
||
export default async function handleProductEvents({
|
||
event: { data },
|
||
container,
|
||
}: SubscriberArgs<{ id: string }>) {
|
||
await syncProductsWorkflow(container)
|
||
.run({
|
||
input: {
|
||
filters: {
|
||
id: data.id,
|
||
},
|
||
},
|
||
})
|
||
}
|
||
|
||
export const config: SubscriberConfig = {
|
||
event: ["product.created", "product.updated"],
|
||
}
|
||
```
|
||
|
||
The subscriber listens to the `product.created` and `product.updated` events. When either of these events is emitted, the subscriber triggers the `syncProductsWorkflow` to sync the product to Meilisearch.
|
||
|
||
When the `product.created` and `product.updated` events are emitted, the product's ID is passed in the event data payload. You can access this in the `event.data` property of the subscriber function's parameter.
|
||
|
||
So, you pass the product's ID to the `syncProductsWorkflow` as a filter to retrieve only the product that was created or updated.
|
||
|
||
#### Test it Out
|
||
|
||
To test it out, start the Medusa application:
|
||
|
||
```bash npm2yarn
|
||
npm run dev
|
||
```
|
||
|
||
Then, either create a product or update an existing one using the Medusa Admin dashboard. If you check the Meilisearch dashboard, you'll find that the product's index was created or updated.
|
||
|
||
### Handle Product Deletion
|
||
|
||
When a product is deleted, you need to remove it from the Meilisearch index. This requires a different action than creating or updating a product. You'll create a new workflow that deletes the product from Meilisearch, then create a subscriber that listens to the `product.deleted` event to trigger the workflow.
|
||
|
||
#### Create Delete Product Step
|
||
|
||
The workflow to delete a product from Meilisearch will have only one step that deletes products by their IDs from Meilisearch.
|
||
|
||
So, create the step at `src/workflows/steps/delete-products-from-meilisearch.ts` with the following content:
|
||
|
||
```ts title="src/workflows/steps/delete-products-from-meilisearch.ts"
|
||
import {
|
||
createStep,
|
||
StepResponse,
|
||
} from "@medusajs/framework/workflows-sdk"
|
||
import { MEILISEARCH_MODULE } from "../../modules/meilisearch"
|
||
|
||
export type DeleteProductsFromMeilisearchStep = {
|
||
ids: string[]
|
||
}
|
||
|
||
export const deleteProductsFromMeilisearchStep = createStep(
|
||
"delete-products-from-meilisearch-step",
|
||
async (
|
||
{ ids }: DeleteProductsFromMeilisearchStep,
|
||
{ container }
|
||
) => {
|
||
const meilisearchModuleService = container.resolve(MEILISEARCH_MODULE)
|
||
|
||
const existingRecords = await meilisearchModuleService.retrieveFromIndex(
|
||
ids,
|
||
"product"
|
||
)
|
||
await meilisearchModuleService.deleteFromIndex(
|
||
ids,
|
||
"product"
|
||
)
|
||
|
||
return new StepResponse(undefined, existingRecords)
|
||
},
|
||
async (existingRecords, { container }) => {
|
||
if (!existingRecords) {
|
||
return
|
||
}
|
||
const meilisearchModuleService = container.resolve(MEILISEARCH_MODULE)
|
||
|
||
await meilisearchModuleService.indexData(
|
||
existingRecords,
|
||
"product"
|
||
)
|
||
}
|
||
)
|
||
```
|
||
|
||
The step receives the IDs of the products to delete as an input.
|
||
|
||
In the step, you resolve the Meilisearch Module's service and retrieve the existing records from Meilisearch. This is useful to revert the deletion if an error occurs.
|
||
|
||
Then, you delete the products from Meilisearch and pass the existing records to the compensation function.
|
||
|
||
In the compensation function, you reindex the existing records if an error occurs.
|
||
|
||
#### Create Delete Product Workflow
|
||
|
||
You can now create the workflow that deletes products from Meilisearch. Create the file `src/workflows/delete-products-from-meilisearch.ts` with the following content:
|
||
|
||
```ts title="src/workflows/delete-products-from-meilisearch.ts"
|
||
import { createWorkflow } from "@medusajs/framework/workflows-sdk"
|
||
import { deleteProductsFromMeilisearchStep } from "./steps/delete-products-from-meilisearch"
|
||
|
||
type DeleteProductsFromMeilisearchWorkflowInput = {
|
||
ids: string[]
|
||
}
|
||
|
||
export const deleteProductsFromMeilisearchWorkflow = createWorkflow(
|
||
"delete-products-from-meilisearch",
|
||
(input: DeleteProductsFromMeilisearchWorkflowInput) => {
|
||
deleteProductsFromMeilisearchStep(input)
|
||
}
|
||
)
|
||
```
|
||
|
||
The workflow receives an object with the IDs of the products to delete. It then executes the `deleteProductsFromMeilisearchStep` to delete the products from Meilisearch.
|
||
|
||
#### Create Delete Product Subscriber
|
||
|
||
Finally, you'll create the subscriber that listens to the `product.deleted` event to trigger the above workflow.
|
||
|
||
Create the file `src/subscribers/product-delete.ts` with the following content:
|
||
|
||
```ts title="src/subscribers/product-delete.ts"
|
||
import {
|
||
SubscriberArgs,
|
||
type SubscriberConfig,
|
||
} from "@medusajs/framework"
|
||
import { deleteProductsFromMeilisearchWorkflow } from "../workflows/delete-products-from-meilisearch"
|
||
|
||
export default async function productDeleteHandler({
|
||
event: { data },
|
||
container,
|
||
}: SubscriberArgs<{ id: string }>) {
|
||
const logger = container.resolve("logger")
|
||
|
||
logger.info(`Deleting product ${data.id} from Meilisearch`)
|
||
|
||
await deleteProductsFromMeilisearchWorkflow(container)
|
||
.run({
|
||
input: {
|
||
ids: [data.id],
|
||
},
|
||
})
|
||
}
|
||
|
||
export const config: SubscriberConfig = {
|
||
event: "product.deleted",
|
||
}
|
||
```
|
||
|
||
The subscriber listens to the `product.deleted` event. When the event is emitted, the subscriber triggers the `deleteProductsFromMeilisearchWorkflow`, passing it the ID of the product to delete.
|
||
|
||
#### Test it Out
|
||
|
||
To test product deletion, start the Medusa application:
|
||
|
||
```bash npm2yarn
|
||
npm run dev
|
||
```
|
||
|
||
Then, delete a product from the Medusa Admin dashboard. If you check the Meilisearch dashboard, you'll find that the product index was deleted there as well.
|
||
|
||
---
|
||
|
||
## Step 6: Search Products in Next.js Starter Storefront
|
||
|
||
The last step is to provide search functionalities to customers on your storefront. In the first step, you installed the [Next.js Starter Storefront](../../../nextjs-starter/page.mdx) along with the Medusa application.
|
||
|
||
In this step, you'll customize the Next.js Starter Storefront to add search functionality.
|
||
|
||
<Note title="Reminder" forceMultiline>
|
||
|
||
The Next.js Starter Storefront was installed in a separate directory from Medusa. The directory's name is `{your-project}-storefront`.
|
||
|
||
So, if your Medusa application's directory is `medusa-search`, you can find the storefront by going back to the parent directory and changing to the `medusa-search-storefront` directory:
|
||
|
||
```bash
|
||
cd ../medusa-search-storefront # change based on your project name
|
||
```
|
||
|
||
</Note>
|
||
|
||
### Install Meilisearch Packages
|
||
|
||
Before adding the implementation of search functionality, you need to install the Meilisearch packages necessary to add search functionality in your storefront.
|
||
|
||
Run the following command in the directory of your Next.js Starter Storefront:
|
||
|
||
```bash npm2yarn
|
||
npm install @meilisearch/instant-meilisearch react-instantsearch
|
||
```
|
||
|
||
This installs the Meilisearch InstantSearch JavaScript library and the React InstantSearch library. You'll use these to build the search functionality.
|
||
|
||
### Add Search Client Configuration
|
||
|
||
Next, you need to configure the Meilisearch search client.
|
||
|
||
In `src/lib/config.ts`, add the following imports at the top of the file:
|
||
|
||
```ts title="src/lib/config.ts" badgeLabel="Storefront" badgeColor="blue"
|
||
import {
|
||
instantMeiliSearch,
|
||
} from "@meilisearch/instant-meilisearch"
|
||
```
|
||
|
||
Then, add the following at the end of the file:
|
||
|
||
```ts title="src/lib/config.ts" badgeLabel="Storefront" badgeColor="blue"
|
||
export const { searchClient } = instantMeiliSearch(
|
||
process.env.NEXT_PUBLIC_MEILISEARCH_HOST || "",
|
||
process.env.NEXT_PUBLIC_MEILISEARCH_API_KEY || ""
|
||
)
|
||
```
|
||
|
||
In the code above, you create a `searchClient` object that initializes the Meilisearch client with your Meilisearch host and API Key.
|
||
|
||
### Set Environment Variables
|
||
|
||
In the storefront's `.env.local` file, add the following Meilisearch-related environment variables:
|
||
|
||
```plain badgeLabel="Storefront" badgeColor="blue"
|
||
NEXT_PUBLIC_MEILISEARCH_HOST=your_meilisearch_host
|
||
NEXT_PUBLIC_MEILISEARCH_API_KEY=your_meilisearch_api_key
|
||
NEXT_PUBLIC_MEILISEARCH_INDEX_NAME=your-products-index-name
|
||
```
|
||
|
||
Where:
|
||
|
||
- `your_meilisearch_host` is your Meilisearch host, as explained in the [Add Environment Variables section](#add-environment-variables) earlier.
|
||
- `your_meilisearch_api_key` is your Meilisearch API key with search permissions. You can retrieve it as explained in the [Meilisearch Documentation](https://www.meilisearch.com/docs/learn/security/basic_security#obtaining-api-keys).
|
||
- `your-products-index-name` is the name of the index you created in Meilisearch to store the products. You can retrieve this as explained in the [Add Environment Variables section](#add-environment-variables) earlier. You'll use this variable later.
|
||
|
||
<Note type="warning">
|
||
|
||
Do not use the `masterKey` as the API key in the storefront, as it has all permissions, including write permissions. Only use an API key with search permissions.
|
||
|
||
</Note>
|
||
|
||
### Add Search Modal Component
|
||
|
||
You'll now add a search modal component that customers can use to search for products. The search modal will display search results in real-time as the customer types in the search query.
|
||
|
||
Later, you'll add the search modal to the navigation bar. This allows customers to open the search modal from any page.
|
||
|
||
Create the file `src/modules/search/components/modal/index.tsx` with the following content:
|
||
|
||
```tsx title="src/modules/search/components/modal/index.tsx" badgeLabel="Storefront" badgeColor="blue"
|
||
"use client"
|
||
|
||
import React, { useEffect, useState } from "react"
|
||
import { Hits, InstantSearch, SearchBox } from "react-instantsearch"
|
||
import { searchClient } from "../../../../lib/config"
|
||
import Modal from "../../../common/components/modal"
|
||
import { Button } from "@medusajs/ui"
|
||
import Image from "next/image"
|
||
import Link from "next/link"
|
||
import { usePathname } from "next/navigation"
|
||
|
||
type Hit = {
|
||
id: string;
|
||
title: string;
|
||
description: string;
|
||
handle: string;
|
||
thumbnail: string;
|
||
categories: {
|
||
id: string
|
||
name: string
|
||
handle: string
|
||
}[]
|
||
tags: {
|
||
id: string
|
||
value: string
|
||
}[]
|
||
}
|
||
|
||
export default function SearchModal() {
|
||
const [isOpen, setIsOpen] = useState(false)
|
||
const pathname = usePathname()
|
||
|
||
useEffect(() => {
|
||
setIsOpen(false)
|
||
}, [pathname])
|
||
|
||
return (
|
||
<>
|
||
<div className="hidden small:flex items-center gap-x-6 h-full">
|
||
<Button
|
||
onClick={() => setIsOpen(true)}
|
||
variant="transparent"
|
||
className="hover:text-ui-fg-base text-small-regular px-0 hover:bg-transparent focus:!bg-transparent"
|
||
>
|
||
Search
|
||
</Button>
|
||
</div>
|
||
<Modal isOpen={isOpen} close={() => setIsOpen(false)}>
|
||
<InstantSearch
|
||
// @ts-expect-error - searchClient type issue
|
||
searchClient={searchClient}
|
||
indexName={process.env.NEXT_PUBLIC_MEILISEARCH_INDEX_NAME}
|
||
>
|
||
<SearchBox className="w-full [&_input]:w-[94%] [&_input]:outline-none [&_button]:w-[3%]" />
|
||
<Hits hitComponent={Hit} />
|
||
</InstantSearch>
|
||
</Modal>
|
||
</>
|
||
)
|
||
}
|
||
|
||
const Hit = ({ hit }: { hit: Hit }) => {
|
||
return (
|
||
<div className="flex flex-row gap-x-2 mt-4 relative" key={hit.id}>
|
||
<Image src={hit.thumbnail} alt={hit.title} width={100} height={100} />
|
||
<div className="flex flex-col gap-y-1">
|
||
<h3>{hit.title}</h3>
|
||
<p className="text-sm text-gray-500">{hit.description}</p>
|
||
</div>
|
||
<Link href={`/products/${hit.handle}`} className="absolute right-0 top-0 w-full h-full" aria-label={`View Product: ${hit.title}`} />
|
||
</div>
|
||
)
|
||
}
|
||
```
|
||
|
||
You create a `SearchModal` component that displays a search box and search results using widgets from the `react-instantsearch` library.
|
||
|
||
To display each result item (or hit), you create a `Hit` component. This component displays the product's title, description, and thumbnail. You also add a link to the product's page.
|
||
|
||
Finally, you show the search modal when the customer clicks a "Search" button. You'll add this button to the navigation bar next.
|
||
|
||
### Add Search Button to Navigation Bar
|
||
|
||
The last step is to show the search button in the navigation bar.
|
||
|
||
In `src/modules/layout/templates/nav/index.tsx`, add the following imports at the top of the file:
|
||
|
||
```tsx title="src/modules/layout/templates/nav/index.tsx" badgeLabel="Storefront" badgeColor="blue"
|
||
import SearchModal from "@modules/search/components/modal"
|
||
```
|
||
|
||
Then, in the return statement of the `Nav` component, add the `SearchModal` component before the `div` surrounding the "Account" link:
|
||
|
||
```tsx title="src/modules/layout/templates/nav/index.tsx" badgeLabel="Storefront" badgeColor="blue"
|
||
<SearchModal />
|
||
```
|
||
|
||
The search button will now appear in the navigation bar before the Account link.
|
||
|
||
### Test it Out
|
||
|
||
To test out the storefront changes and the search API route, start the Medusa application:
|
||
|
||
```bash npm2yarn
|
||
npm run dev
|
||
```
|
||
|
||
Then, start the Next.js Starter Storefront from its directory:
|
||
|
||
```bash npm2yarn
|
||
npm run dev
|
||
```
|
||
|
||
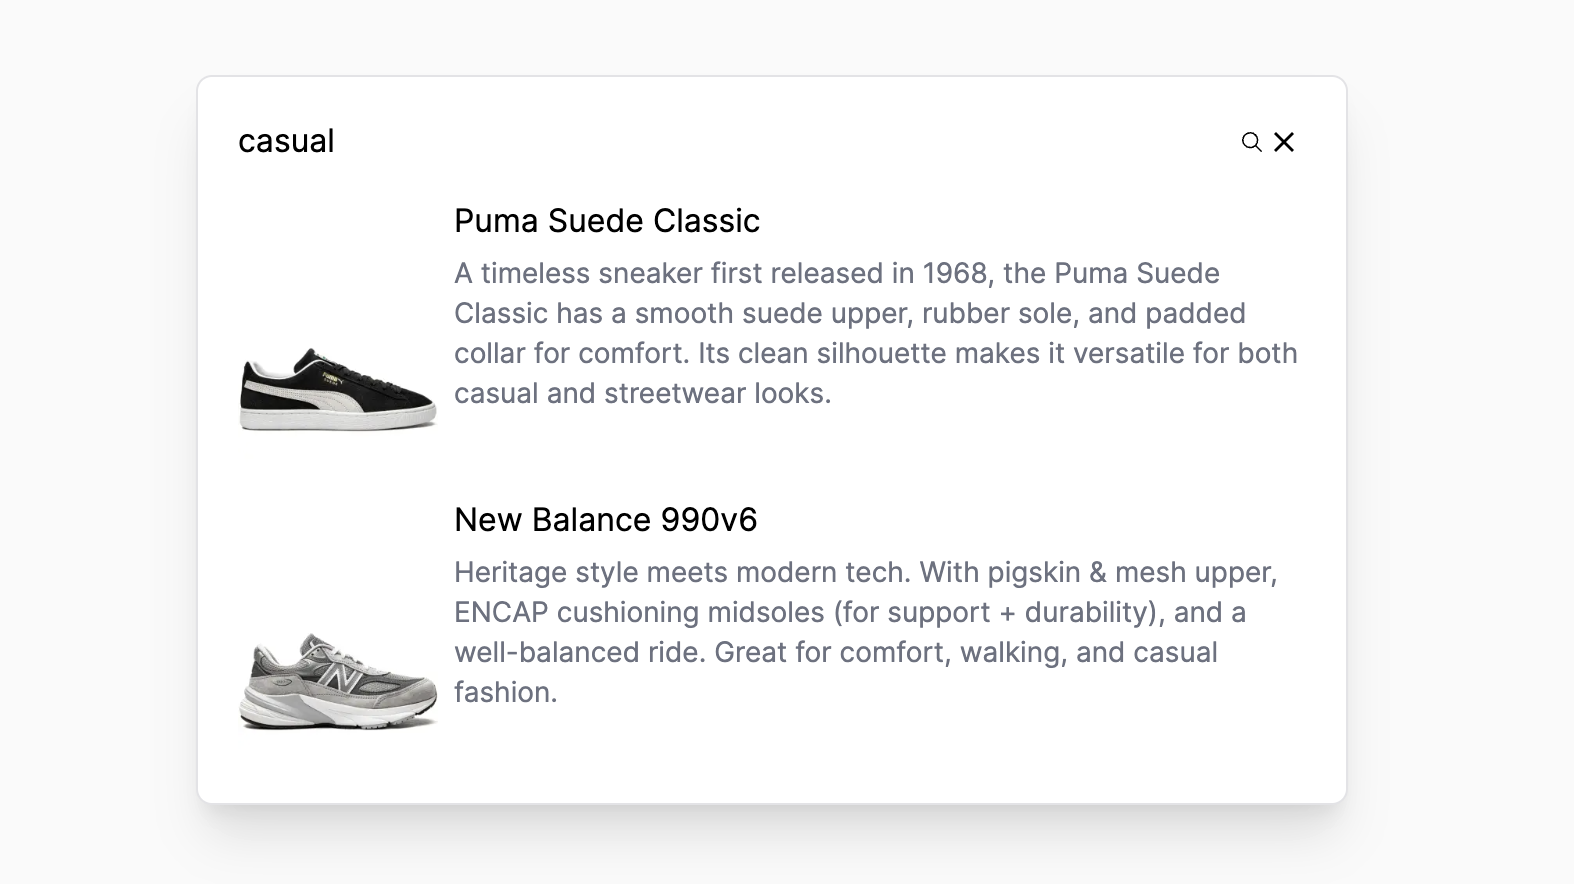
Next, go to `localhost:8000`. You'll find a Search button at the top right of the navigation bar. If you click on it, you can search through your products. You can also click on a product to view its page.
|
||
|
||
|
||
|
||
---
|
||
|
||
## Next Steps
|
||
|
||
You've now integrated Meilisearch with Medusa and added search functionality to your storefront. You can expand on these features to:
|
||
|
||
- Add filters to the search results. You can do that using [react-instantsearch widgets](https://www.algolia.com/doc/guides/building-search-ui/widgets/showcase/react/).
|
||
- Support indexing other data types, such as product categories. You can create subscribers and workflows for categories similar to products.
|
||
|
||
### Learn More about Medusa
|
||
|
||
If you're new to Medusa, check out the [main documentation](!docs!/learn), where you'll get a more in-depth understanding of all the concepts you've used in this guide and more.
|
||
|
||
To learn more about the commerce features that Medusa provides, check out Medusa's [Commerce Modules](../../../commerce-modules/page.mdx).
|
||
|
||
### Troubleshooting
|
||
|
||
If you encounter issues during your development, check out the [troubleshooting guides](../../../troubleshooting/page.mdx).
|
||
|
||
### Getting Help
|
||
|
||
If you encounter issues not covered in the troubleshooting guides:
|
||
|
||
1. Visit the [Medusa GitHub repository](https://github.com/medusajs/medusa) to report issues or ask questions.
|
||
2. Join the [Medusa Discord community](https://discord.gg/medusajs) for real-time support from community members.
|