1030 lines
35 KiB
Plaintext
1030 lines
35 KiB
Plaintext
import { Prerequisites } from "docs-ui"
|
||
|
||
export const ogImage = "https://res.cloudinary.com/dza7lstvk/image/upload/v1734007558/Medusa%20Resources/integrations-stripe_qfnwtf.jpg"
|
||
|
||
export const metadata = {
|
||
title: `Customize the Stripe Integration in the Next.js Starter`,
|
||
openGraph: {
|
||
images: [
|
||
{
|
||
url: ogImage,
|
||
width: 800,
|
||
height: 450,
|
||
type: "image/jpeg"
|
||
}
|
||
],
|
||
},
|
||
twitter: {
|
||
images: [
|
||
{
|
||
url: ogImage,
|
||
width: 800,
|
||
height: 450,
|
||
type: "image/jpeg"
|
||
}
|
||
]
|
||
}
|
||
}
|
||
|
||
# {metadata.title}
|
||
|
||
Stripe is a popular payment provider amongst Medusa users. While the Next.js Starter comes with basic Stripe card payments, you can customize it to accept different payment methods through the Stripe Payment Element. The Payment Element is a web UI component that supports over 40 payment methods (like PayPal, local banks, etc) while handling input validation and error management.
|
||
|
||
In this guide, you'll learn how to customize the starter's Stripe integration to accept multiple payment methods, such as PayPal, through Stripe.
|
||
|
||
## Step 1: Setup Medusa Project
|
||
|
||
In this step, you'll setup a Medusa application and configure the Stripe Module Provider.
|
||
|
||
### Install Medusa Application
|
||
|
||
<Prerequisites items={[
|
||
{
|
||
text: "Node.js v20+",
|
||
link: "https://nodejs.org/en/download"
|
||
},
|
||
{
|
||
text: "Git CLI tool",
|
||
link: "https://git-scm.com/downloads"
|
||
},
|
||
{
|
||
text: "PostgreSQL",
|
||
link: "https://www.postgresql.org/download/"
|
||
}
|
||
]} />
|
||
|
||
To install the Medusa application, run the following command:
|
||
|
||
```bash
|
||
npx create-medusa-app@latest
|
||
```
|
||
|
||
You'll first be asked for the project's name. Then, when you're asked whether you want to install the Next.js storefront, choose `Y` for yes.
|
||
|
||
Afterwards, the installation process will start, which will install the Medusa application in a directory with your project's name, and the Next.js storefront in a directory with the `{project-name}-storefront` name.
|
||
|
||
<Note title="Why is the storefront installed separately?">
|
||
|
||
The Medusa application is composed of a headless Node.js server and an admin dashboard. The storefront is installed or custom-built separately and connects to the Medusa application through its REST endpoints, called [API routes](!docs!/learn/fundamentals/api-routes). Learn more about Medusa's architecture in [this documentation](!docs!/learn/introduction/architecture).
|
||
|
||
</Note>
|
||
|
||
Once the installation finishes successfully, the Medusa Admin dashboard will open with a form to create a new user. Enter the user's credential and submit the form.
|
||
|
||
Afterwards, you can login with the new user and explore the dashboard. The Next.js storefront is also running at `http://localhost:8000`.
|
||
|
||
<Note title="Ran to Errors?">
|
||
|
||
Check out the [troubleshooting guides](../../../troubleshooting/create-medusa-app-errors/page.mdx) for help.
|
||
|
||
</Note>
|
||
|
||
### Configure Stripe Module Provider
|
||
|
||
<Prerequisites items={[
|
||
{
|
||
text: "Stripe account↗",
|
||
link: "https://stripe.com"
|
||
},
|
||
{
|
||
text: "Stripe Secret API Key",
|
||
link: "https://support.stripe.com/questions/locate-api-keys-in-the-dashboard"
|
||
}
|
||
]} />
|
||
|
||
The Stripe Module Provider is installed by default in your application. To use it, add it to the array of providers passed to the Payment Module in `medusa-config.ts`:
|
||
|
||
```ts title="medusa-config.ts"
|
||
module.exports = defineConfig({
|
||
// ...
|
||
modules: [
|
||
{
|
||
resolve: "@medusajs/medusa/payment",
|
||
options: {
|
||
providers: [
|
||
{
|
||
resolve: "@medusajs/medusa/payment-stripe",
|
||
id: "stripe",
|
||
options: {
|
||
apiKey: process.env.STRIPE_API_KEY,
|
||
capture: true,
|
||
},
|
||
},
|
||
],
|
||
},
|
||
},
|
||
],
|
||
})
|
||
```
|
||
|
||
For more details about the available options and Stripe Webhook Endpoint URLs, refer to the [Stripe Module Provider docs](../../../commerce-modules/payment/payment-provider/stripe/page.mdx).
|
||
|
||
### Environment Variables
|
||
|
||
Make sure to add the necessary environment variables for the above options in `.env` in your Medusa application:
|
||
|
||
```bash
|
||
STRIPE_API_KEY=<YOUR_STRIPE_API_KEY>
|
||
```
|
||
|
||
You also need to add the Stripe publishable API key in the Next.js Starter's environment variables:
|
||
|
||
```bash
|
||
NEXT_PUBLIC_STRIPE_KEY=<YOUR_STRIPE_PUBLISHABLE_API_KEY>
|
||
```
|
||
|
||
### Enable Stripe in a Region
|
||
|
||
Lastly, you need to add Stripe as a payment provider to one or more regions in your Medusa Admin. To do so:
|
||
|
||
1. Log in to you Medusa Admin dashboard at `http://localhost:9000/app` and go to Settings -> Regions.
|
||
2. Create or select a region.
|
||
3. Click the three dots on the upper right corner, then click “Edit”.
|
||
4. For the Payment Providers field, select “Stripe (Stripe)”
|
||
5. Click the Save button.
|
||
|
||
---
|
||
|
||
## Step 2: Update the Payment Element
|
||
|
||
<Note title="Tip">
|
||
|
||
To use Stripe Payment components in a checkout form, you needs to wrap it in a [Stripe Elements](https://stripe.com/en-nl/payments/elements) context provider. Since the Next.js Starter already comes with a simple Stripe Card Element integration, the necessary context is already provided. You don’t have to edit this part for the customizations made in this guide, but in case you wish to make any changes to the provider, the logic is handled in the `src/modules/checkout/components/payment-wrapper/index.tsx` and `src/modules/checkout/components/payment-wrapper/stripe-wrapper.tsx` files.
|
||
|
||
</Note>
|
||
|
||
Within the `<Payment>` (`src/modules/checkout/components/payment/index.tsx`) component, you present the different payment options to the user. In this file, you'll change the payment integration approach by replacing the custom payment method selection with Stripe's Payment Element component.
|
||
|
||
<Note>
|
||
|
||
The full final code is available at the end of the section.
|
||
|
||
</Note>
|
||
|
||
First, import the `PaymentElement` component, two Stripe hooks and the type for change events within `PaymentElement`:
|
||
|
||
```tsx title="src/modules/checkout/components/payment/index.tsx"
|
||
// ...other imports
|
||
import { PaymentElement, useElements, useStripe } from "@stripe/react-stripe-js"
|
||
import { StripePaymentElementChangeEvent } from "@stripe/stripe-js"
|
||
```
|
||
|
||
Next, alter the state management within the component to:
|
||
|
||
1. Remove the `cardBrand` state.
|
||
2. Rename `cardComplete` to `stripeComplete`.
|
||
3. Keep the loading and error states.
|
||
4. Update the type for `selectedPaymentMethod` to `string` and remove the default value.
|
||
|
||
```tsx title="src/modules/checkout/components/payment/index.tsx"
|
||
const [isLoading, setIsLoading] = useState(false)
|
||
const [error, setError] = useState<string | null>(null)
|
||
const [stripeComplete, setStripeComplete] = useState(false)
|
||
const [selectedPaymentMethod, setSelectedPaymentMethod] = useState<string>()
|
||
```
|
||
|
||
As a next step you can remove the `isStripe` check on line 42. The Medusa payment provider will always be Stripe in this setup, managing different payment methods within the Payment Element. Also remove the `useOptions` object on line 51, as it’s no longer needed.
|
||
|
||
Next, initiate the two Stripe hooks you imported earlier, but only if the Stripe context is ready:
|
||
|
||
```tsx title="src/modules/checkout/components/payment/index.tsx"
|
||
const stripe = stripeReady ? useStripe() : null
|
||
const elements = stripeReady ? useElements() : null
|
||
```
|
||
|
||
To track changes in the `PaymentElemement`, add within the component a handler that handles different change events:
|
||
|
||
```tsx title="src/modules/checkout/components/payment/index.tsx"
|
||
const handlePaymentElementChange = async (
|
||
event: StripePaymentElementChangeEvent
|
||
) => {
|
||
// Catches the selected payment method and sets it to state
|
||
if (event.value.type) {
|
||
setSelectedPaymentMethod(event.value.type)
|
||
}
|
||
|
||
// Sets stripeComplete on form completion
|
||
setStripeComplete(event.complete)
|
||
|
||
// Clears any errors on successful completion
|
||
if (event.complete) {
|
||
setError(null)
|
||
}
|
||
}
|
||
```
|
||
|
||
Then, edit the `handleSubmit` function to handle user submissions of the payment step. This will not trigger the payment yet, but submit the payment details and render the final Review step in the checkout:
|
||
|
||
```tsx title="src/modules/checkout/components/payment/index.tsx"
|
||
const handleSubmit = async () => {
|
||
setIsLoading(true)
|
||
setError(null)
|
||
|
||
try {
|
||
// Check if the necessary context is ready
|
||
if (!stripe || !elements) {
|
||
setError("Payment processing not ready. Please try again.")
|
||
return
|
||
}
|
||
|
||
// Submit the payment method details
|
||
await elements.submit().catch((err) => {
|
||
console.error(err)
|
||
setError(err.message || "An error occurred with the payment")
|
||
return
|
||
})
|
||
|
||
// Navigate to the final checkout step
|
||
router.push(pathname + "?" + createQueryString("step", "review"), {
|
||
scroll: false,
|
||
})
|
||
} catch (err: any) {
|
||
setError(err.message)
|
||
} finally {
|
||
setIsLoading(false)
|
||
}
|
||
}
|
||
```
|
||
|
||
To make sure a payment session is initiated on the current Medusa cart once a user reaches the payment step, add within the component an `initStripe` function and call it from a `useEffect` hook:
|
||
|
||
```tsx title="src/modules/checkout/components/payment/index.tsx"
|
||
const initStripe = async () => {
|
||
try {
|
||
await initiatePaymentSession(cart, {
|
||
provider_id: "pp_stripe_stripe",
|
||
})
|
||
} catch (err) {
|
||
console.error("Failed to initialize Stripe session:", err)
|
||
setError("Failed to initialize payment. Please try again.")
|
||
}
|
||
}
|
||
|
||
useEffect(() => {
|
||
if (!activeSession && isOpen) {
|
||
initStripe()
|
||
}
|
||
}, [cart, isOpen, activeSession])
|
||
```
|
||
|
||
Now that you have all the necessary setup in place, you'll add the Stripe `PaymentElement` to the Payment component. Replace the code inside the `!paidByGiftcard && availablePaymentMethods?.length` condition with the following:
|
||
|
||
```tsx title="src/modules/checkout/components/payment/index.tsx"
|
||
{!paidByGiftcard &&
|
||
availablePaymentMethods?.length &&
|
||
stripeReady && (
|
||
<div className="mt-5 transition-all duration-150 ease-in-out">
|
||
<PaymentElement
|
||
onChange={handlePaymentElementChange}
|
||
options={{
|
||
layout: "accordion",
|
||
}}
|
||
/>
|
||
</div>
|
||
)
|
||
}
|
||
```
|
||
|
||
And refactor the button to reflect the new changes:
|
||
|
||
```tsx title="src/modules/checkout/components/payment/index.tsx"
|
||
<Button
|
||
size="large"
|
||
className="mt-6"
|
||
onClick={handleSubmit}
|
||
isLoading={isLoading}
|
||
disabled={
|
||
!stripeComplete ||
|
||
!stripe ||
|
||
!elements ||
|
||
(!selectedPaymentMethod && !paidByGiftcard)
|
||
}
|
||
data-testid="submit-payment-button"
|
||
>
|
||
Continue to review
|
||
</Button>
|
||
```
|
||
|
||
Then, add a check for `selectedPaymentMethod` to the condition for the collapsed state (`cart && paymentReady && activeSession`):
|
||
|
||
```
|
||
{cart && paymentReady && activeSession && selectedPaymentMethod ? (
|
||
// rest of code...
|
||
)}
|
||
```
|
||
|
||
Finally, remove the card brand check on line 229 (`isStripeFunc(selectedPaymentMethod) && cardBrand`) as you no longer support that. Just render the following text to indicate that the user will be redirected to an external payment environment:
|
||
|
||
```tsx
|
||
<Text>Another step will appear</Text>
|
||
```
|
||
|
||
<Details summaryContent="Full updated code for src/modules/checkout/components/payment/index.tsx">
|
||
```tsx title="src/modules/checkout/components/payment/index.tsx"
|
||
"use client"
|
||
|
||
import { paymentInfoMap } from "@lib/constants"
|
||
import { initiatePaymentSession } from "@lib/data/cart"
|
||
import { CheckCircleSolid, CreditCard } from "@medusajs/icons"
|
||
import { Button, Container, Heading, Text, clx } from "@medusajs/ui"
|
||
import ErrorMessage from "@modules/checkout/components/error-message"
|
||
import { StripeContext } from "@modules/checkout/components/payment-wrapper/stripe-wrapper"
|
||
import Divider from "@modules/common/components/divider"
|
||
import { PaymentElement, useElements, useStripe } from "@stripe/react-stripe-js"
|
||
import { StripePaymentElementChangeEvent } from "@stripe/stripe-js"
|
||
import { usePathname, useRouter, useSearchParams } from "next/navigation"
|
||
import { useCallback, useContext, useEffect, useState } from "react"
|
||
|
||
const Payment = ({
|
||
cart,
|
||
availablePaymentMethods,
|
||
}: {
|
||
cart: any
|
||
availablePaymentMethods: any[]
|
||
}) => {
|
||
const [isLoading, setIsLoading] = useState(false)
|
||
const [error, setError] = useState<string | null>(null)
|
||
const [stripeComplete, setStripeComplete] = useState(false)
|
||
const [selectedPaymentMethod, setSelectedPaymentMethod] = useState<string>()
|
||
|
||
const searchParams = useSearchParams()
|
||
const router = useRouter()
|
||
const pathname = usePathname()
|
||
|
||
const isOpen = searchParams.get("step") === "payment"
|
||
|
||
const stripeReady = useContext(StripeContext)
|
||
|
||
const activeSession = cart.payment_collection?.payment_sessions?.find(
|
||
(paymentSession: any) => paymentSession.status === "pending"
|
||
)
|
||
const paidByGiftcard =
|
||
cart?.gift_cards && cart?.gift_cards?.length > 0 && cart?.total === 0
|
||
|
||
const paymentReady =
|
||
(activeSession && cart?.shipping_methods.length !== 0) || paidByGiftcard
|
||
|
||
const createQueryString = useCallback(
|
||
(name: string, value: string) => {
|
||
const params = new URLSearchParams(searchParams)
|
||
params.set(name, value)
|
||
|
||
return params.toString()
|
||
},
|
||
[searchParams]
|
||
)
|
||
|
||
const handleEdit = () => {
|
||
router.push(pathname + "?" + createQueryString("step", "payment"), {
|
||
scroll: false,
|
||
})
|
||
}
|
||
|
||
const stripe = stripeReady ? useStripe() : null
|
||
const elements = stripeReady ? useElements() : null
|
||
|
||
const handlePaymentElementChange = async (
|
||
event: StripePaymentElementChangeEvent
|
||
) => {
|
||
if (event.value.type) {
|
||
setSelectedPaymentMethod(event.value.type)
|
||
}
|
||
setStripeComplete(event.complete)
|
||
|
||
if (event.complete) {
|
||
setError(null)
|
||
}
|
||
}
|
||
|
||
const handleSubmit = async () => {
|
||
setIsLoading(true)
|
||
setError(null)
|
||
|
||
try {
|
||
if (!stripe || !elements) {
|
||
setError("Payment processing not ready. Please try again.")
|
||
return
|
||
}
|
||
|
||
await elements.submit().catch((err) => {
|
||
console.error(err)
|
||
setError(err.message || "An error occurred with the payment")
|
||
return
|
||
})
|
||
|
||
router.push(pathname + "?" + createQueryString("step", "review"), {
|
||
scroll: false,
|
||
})
|
||
} catch (err: any) {
|
||
setError(err.message)
|
||
} finally {
|
||
setIsLoading(false)
|
||
}
|
||
}
|
||
|
||
const initStripe = async () => {
|
||
try {
|
||
await initiatePaymentSession(cart, {
|
||
provider_id: "pp_stripe_stripe",
|
||
})
|
||
} catch (err) {
|
||
console.error("Failed to initialize Stripe session:", err)
|
||
setError("Failed to initialize payment. Please try again.")
|
||
}
|
||
}
|
||
|
||
useEffect(() => {
|
||
if (!activeSession && isOpen) {
|
||
initStripe()
|
||
}
|
||
}, [cart, isOpen, activeSession])
|
||
|
||
useEffect(() => {
|
||
setError(null)
|
||
}, [isOpen])
|
||
|
||
return (
|
||
<div className="bg-white">
|
||
<div className="flex flex-row items-center justify-between mb-6">
|
||
<Heading
|
||
level="h2"
|
||
className={clx(
|
||
"flex flex-row text-3xl-regular gap-x-2 items-baseline",
|
||
{
|
||
"opacity-50 pointer-events-none select-none":
|
||
!isOpen && !paymentReady,
|
||
}
|
||
)}
|
||
>
|
||
Payment
|
||
{!isOpen && paymentReady && <CheckCircleSolid />}
|
||
</Heading>
|
||
{!isOpen && paymentReady && (
|
||
<Text>
|
||
<button
|
||
onClick={handleEdit}
|
||
className="text-ui-fg-interactive hover:text-ui-fg-interactive-hover"
|
||
data-testid="edit-payment-button"
|
||
>
|
||
Edit
|
||
</button>
|
||
</Text>
|
||
)}
|
||
</div>
|
||
<div>
|
||
<div className={isOpen ? "block" : "hidden"}>
|
||
{!paidByGiftcard &&
|
||
availablePaymentMethods?.length &&
|
||
stripeReady && (
|
||
<div className="mt-5 transition-all duration-150 ease-in-out">
|
||
<PaymentElement
|
||
onChange={handlePaymentElementChange}
|
||
options={{
|
||
layout: "accordion",
|
||
}}
|
||
/>
|
||
</div>
|
||
)}
|
||
{paidByGiftcard && (
|
||
<div className="flex flex-col w-1/3">
|
||
<Text className="txt-medium-plus text-ui-fg-base mb-1">
|
||
Payment method
|
||
</Text>
|
||
<Text
|
||
className="txt-medium text-ui-fg-subtle"
|
||
data-testid="payment-method-summary"
|
||
>
|
||
Gift card
|
||
</Text>
|
||
</div>
|
||
)}
|
||
|
||
<ErrorMessage
|
||
error={error}
|
||
data-testid="payment-method-error-message"
|
||
/>
|
||
|
||
<Button
|
||
size="large"
|
||
className="mt-6"
|
||
onClick={handleSubmit}
|
||
isLoading={isLoading}
|
||
disabled={
|
||
!stripeComplete ||
|
||
!stripe ||
|
||
!elements ||
|
||
(!selectedPaymentMethod && !paidByGiftcard)
|
||
}
|
||
data-testid="submit-payment-button"
|
||
>
|
||
Continue to review
|
||
</Button>
|
||
</div>
|
||
|
||
<div className={isOpen ? "hidden" : "block"}>
|
||
{cart && paymentReady && activeSession && selectedPaymentMethod ? (
|
||
<div className="flex items-start gap-x-1 w-full">
|
||
<div className="flex flex-col w-1/3">
|
||
<Text className="txt-medium-plus text-ui-fg-base mb-1">
|
||
Payment method
|
||
</Text>
|
||
<Text
|
||
className="txt-medium text-ui-fg-subtle"
|
||
data-testid="payment-method-summary"
|
||
>
|
||
{paymentInfoMap[selectedPaymentMethod]?.title ||
|
||
selectedPaymentMethod}
|
||
</Text>
|
||
</div>
|
||
<div className="flex flex-col w-1/3">
|
||
<Text className="txt-medium-plus text-ui-fg-base mb-1">
|
||
Payment details
|
||
</Text>
|
||
<div
|
||
className="flex gap-2 txt-medium text-ui-fg-subtle items-center"
|
||
data-testid="payment-details-summary"
|
||
>
|
||
<Container className="flex items-center h-7 w-fit p-2 bg-ui-button-neutral-hover">
|
||
{paymentInfoMap[selectedPaymentMethod]?.icon || (
|
||
<CreditCard />
|
||
)}
|
||
</Container>
|
||
<Text>Another step will appear</Text>
|
||
</div>
|
||
</div>
|
||
</div>
|
||
) : paidByGiftcard ? (
|
||
<div className="flex flex-col w-1/3">
|
||
<Text className="txt-medium-plus text-ui-fg-base mb-1">
|
||
Payment method
|
||
</Text>
|
||
<Text
|
||
className="txt-medium text-ui-fg-subtle"
|
||
data-testid="payment-method-summary"
|
||
>
|
||
Gift card
|
||
</Text>
|
||
</div>
|
||
) : null}
|
||
</div>
|
||
</div>
|
||
<Divider className="mt-8" />
|
||
</div>
|
||
)
|
||
}
|
||
|
||
export default Payment
|
||
|
||
```
|
||
</Details>
|
||
|
||
### Test it out
|
||
|
||
To test out the changes you've made so far:
|
||
|
||
1. Start both your Medusa and Next.js dev servers by running `yarn dev` in both projects.
|
||
2. Navigate to `http://localhost:8000` in your browser.
|
||
3. Click a product and add it to cart.
|
||
4. Navigate to `http://localhost:8000/dk/checkout?step=address` to start the checkout process.
|
||
5. Fill out the Address and Delivery steps.
|
||
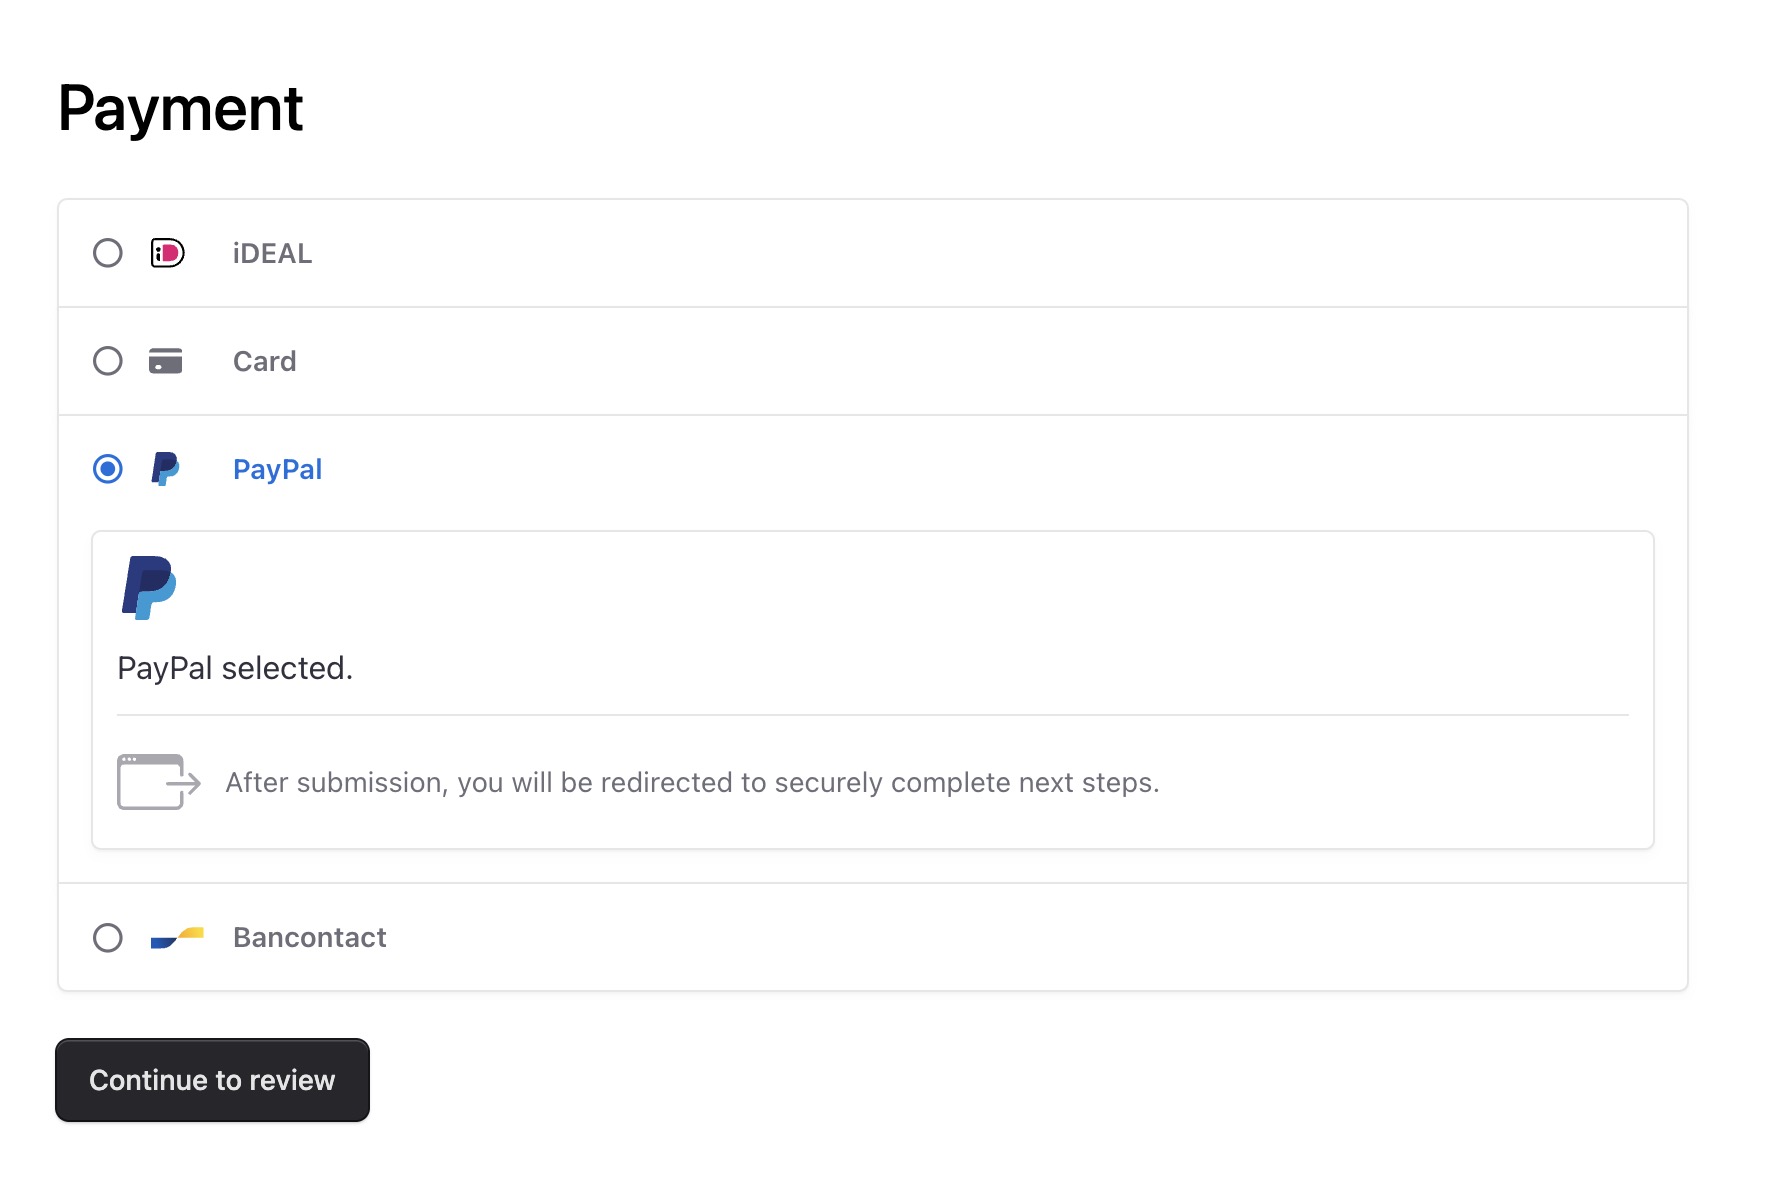
6. Once you reach the Payment step, your Stripe Payment Element should show up and list the different payment methods you’ve enabled in your Stripe account. It looks something like this:
|
||
|
||
|
||
|
||
---
|
||
|
||
## Step 3: Update Payment Method Titles and Icons
|
||
|
||
To show a user-friendly payment method title and icon when the method is selected, update the `paymentInfoMap` object in `src/lib/constants.tsx`:
|
||
|
||
```tsx title="src/lib/constants.tsx"
|
||
/* Map of payment provider_id to their title and icon. Add in any payment providers you want to use. */
|
||
export const paymentInfoMap: Record<
|
||
string,
|
||
{ title: string; icon: React.JSX.Element }
|
||
> = {
|
||
card: {
|
||
title: "Credit card",
|
||
icon: <CreditCard />,
|
||
},
|
||
ideal: {
|
||
title: "iDeal",
|
||
icon: <Ideal />,
|
||
},
|
||
bancontact: {
|
||
title: "Bancontact",
|
||
icon: <Bancontact />,
|
||
},
|
||
paypal: {
|
||
title: "PayPal",
|
||
icon: <PayPal />,
|
||
},
|
||
pp_system_default: {
|
||
title: "Manual Payment",
|
||
icon: <CreditCard />,
|
||
},
|
||
// Add more payment providers here
|
||
}
|
||
```
|
||
|
||
The `paymentInfoMap` object's keys must match [the type enum in the Stripe PaymentMethod object](https://docs.stripe.com/api/payment_methods/object#payment_method_object-type). The value of each is an object having the following properties:
|
||
|
||
- `title`: The title to show when the payment method is selected.
|
||
- `icon`: A JSX element that is rendered for the icon.
|
||
|
||
Make sure to add an entry for every payment method you’re using.
|
||
|
||
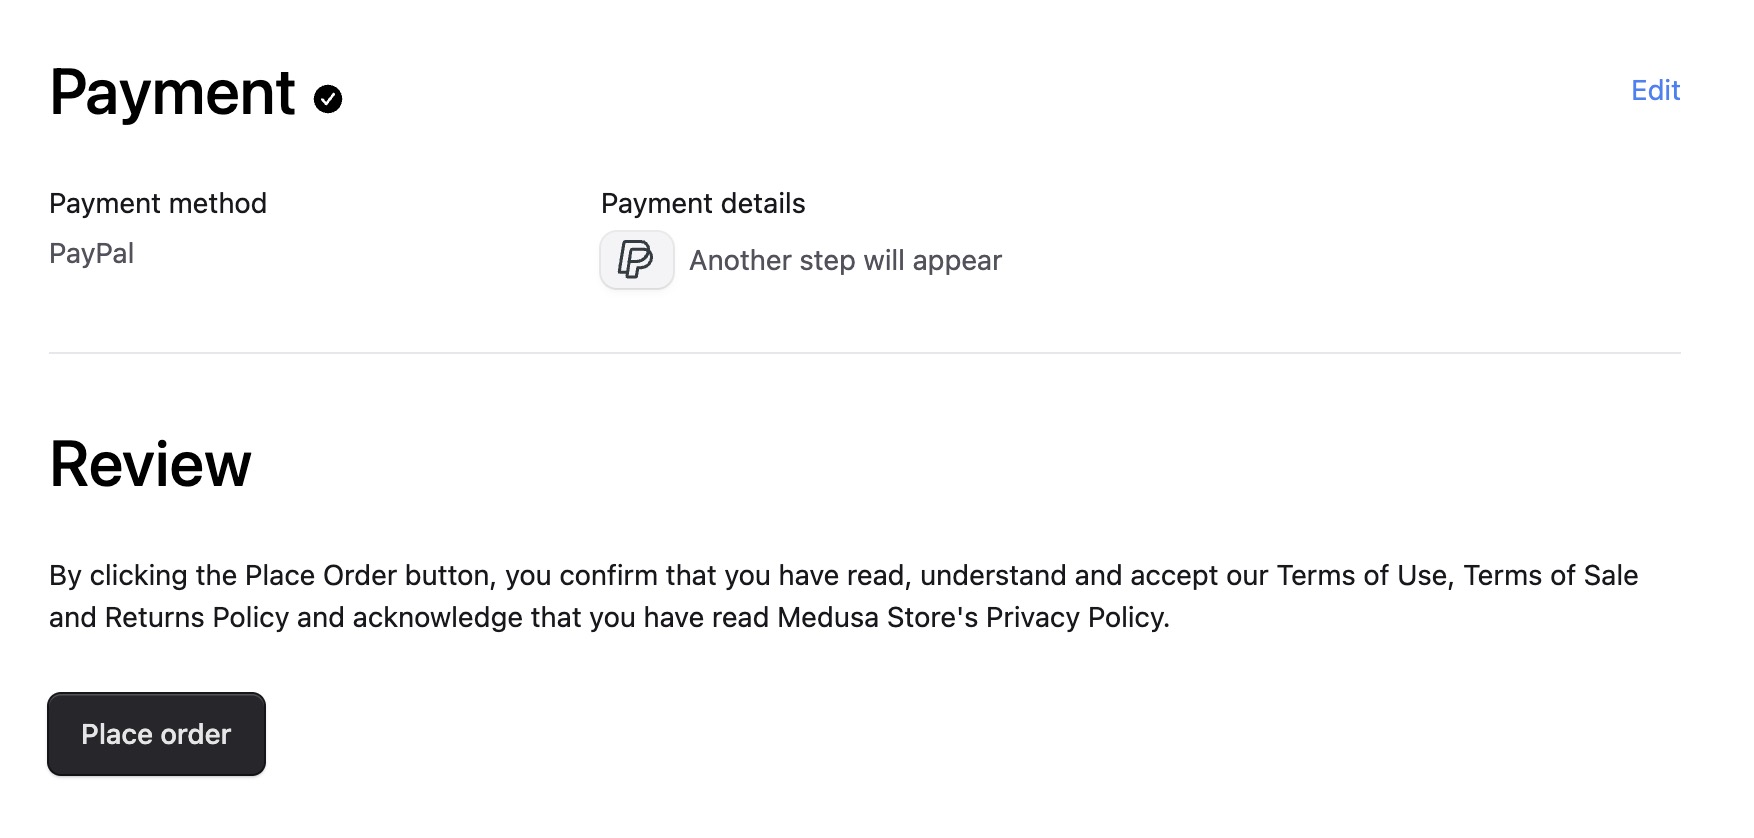
For example, when PayPal is selected as the payment method in Stripe, the collapsed state will look like this:
|
||
|
||

|
||
|
||
---
|
||
|
||
## Step 4: Update the Payment Button
|
||
|
||
The `<PaymentButton>` component in `src/modules/checkout/components/payment-button/index.tsx` finalizes the checkout and initiates the payment for the user at the Review step.
|
||
|
||
|
||
|
||
In this section, you'll simplify the payment button implementation by focusing solely on Stripe integration and removing other payment options. The new implementation will work exclusively with Stripe's updated payment flow. You'll replace the card-specific confirmation method with Stripe's unified payment confirmation system, add support for redirect-based payment methods, and implement automatic order completion upon successful authorization if no redirect is needed.
|
||
|
||
<Note>
|
||
|
||
The full final code is available at the end of the section.
|
||
|
||
</Note>
|
||
|
||
You'll first clean up the file and remove payment buttons that are no longer needed. You can completely remove `PayPalPaymentButton`, `GiftCardPaymentButton` and `ManualTestPaymentButton`. It’s also safe to remove the `isManual` and `isPaypal` cases from the switch statement.
|
||
|
||
The `PaymentButton` component should now look like this:
|
||
|
||
```tsx title="src/modules/checkout/components/payment-button/index.tsx"
|
||
const PaymentButton: React.FC<PaymentButtonProps> = ({
|
||
cart,
|
||
"data-testid": dataTestId,
|
||
}) => {
|
||
const notReady =
|
||
!cart ||
|
||
!cart.shipping_address ||
|
||
!cart.billing_address ||
|
||
!cart.email ||
|
||
(cart.shipping_methods?.length ?? 0) < 1
|
||
|
||
const paymentSession = cart.payment_collection?.payment_sessions?.[0]
|
||
|
||
switch (true) {
|
||
case isStripe(paymentSession?.provider_id):
|
||
return (
|
||
<StripePaymentButton
|
||
notReady={notReady}
|
||
cart={cart}
|
||
data-testid={dataTestId}
|
||
/>
|
||
)
|
||
default:
|
||
return <Button disabled>Select a payment method</Button>
|
||
}
|
||
}
|
||
```
|
||
|
||
Since you're only using Stripe, you could decide to completely kill the switch statement and always return the Stripe button. However, if you might add more payment providers in the future, it could come in handy to have this logic in place.
|
||
|
||
Next, import at the top of the file `useParams` and add `useEffect` to the React imports:
|
||
|
||
```tsx title="src/modules/checkout/components/payment-button/index.tsx"
|
||
// ...other imports
|
||
import { useParams } from "next/navigation"
|
||
import React, { useEffect, useState } from "react"
|
||
```
|
||
|
||
In `StripePaymentButton`, grab the `countryCode` from the route params as you're going to need it later:
|
||
|
||
```tsx title="src/modules/checkout/components/payment-button/index.tsx"
|
||
const { countryCode } = useParams()
|
||
```
|
||
|
||
Then, remove the `card` and `session` variables. and add the following line below `countryCode` to find the Stripe payment session:
|
||
|
||
```tsx title="src/modules/checkout/components/payment-button/index.tsx"
|
||
const paymentSession = cart.payment_collection?.payment_sessions?.find(
|
||
(session) => session.provider_id === "pp_stripe_stripe"
|
||
)
|
||
```
|
||
|
||
After that, alter the `handlePayment` function to work with the Payment Element by removing the `!card` condition as the variable no longer exists:
|
||
|
||
```tsx title="src/modules/checkout/components/payment-button/index.tsx"
|
||
const handlePayment = async () => {
|
||
if (!stripe || !elements || !cart) {
|
||
return
|
||
}
|
||
|
||
setSubmitting(true)
|
||
|
||
// ...rest of code
|
||
}
|
||
```
|
||
|
||
Next, grab the Stripe `clientSecret` from Stripe's payment session in Medusa:
|
||
|
||
```tsx title="src/modules/checkout/components/payment-button/index.tsx"
|
||
const clientSecret = paymentSession?.data?.client_secret as string
|
||
```
|
||
|
||
To confirm the payment, you'll use `stripe.confirmPayment` instead of `stripe.confirmCardPayment` which expects different options:
|
||
|
||
```tsx title="src/modules/checkout/components/payment-button/index.tsx"
|
||
await stripe
|
||
.confirmPayment({
|
||
elements,
|
||
clientSecret,
|
||
confirmParams: {
|
||
return_url: `${window.location.origin}/api/capture-payment/${cart.id}?country_code=${countryCode}`,
|
||
payment_method_data: {
|
||
billing_details: {
|
||
name:
|
||
cart.billing_address?.first_name +
|
||
" " +
|
||
cart.billing_address?.last_name,
|
||
address: {
|
||
city: cart.billing_address?.city ?? undefined,
|
||
country: cart.billing_address?.country_code ?? undefined,
|
||
line1: cart.billing_address?.address_1 ?? undefined,
|
||
line2: cart.billing_address?.address_2 ?? undefined,
|
||
postal_code: cart.billing_address?.postal_code ?? undefined,
|
||
state: cart.billing_address?.province ?? undefined,
|
||
},
|
||
email: cart.email,
|
||
phone: cart.billing_address?.phone ?? undefined,
|
||
},
|
||
},
|
||
},
|
||
redirect: "if_required",
|
||
})
|
||
.then(({ error }) => {
|
||
if (error) {
|
||
const pi = error.payment_intent
|
||
|
||
if (
|
||
(pi && pi.status === "requires_capture") ||
|
||
(pi && pi.status === "succeeded")
|
||
) {
|
||
onPaymentCompleted()
|
||
}
|
||
|
||
setErrorMessage(error.message || null)
|
||
return
|
||
}
|
||
|
||
return
|
||
})
|
||
```
|
||
|
||
You pass in `elements` the `clientSecret` you defined earlier, and a `confirmParams` object containing customer data and a `return_url`. This is the URL the user gets redirected to after completing an external payment. You'll create this route later.
|
||
|
||
By setting `redirect: "if_required"`, you'll only redirect to this route if the payment is completed externally. If not, add the following `useEffect` hook to call the `onPaymentCompleted` function that completes the order:
|
||
|
||
```tsx title="src/modules/checkout/components/payment-button/index.tsx"
|
||
useEffect(() => {
|
||
if (cart.payment_collection?.status === "authorized") {
|
||
onPaymentCompleted()
|
||
}
|
||
}, [cart.payment_collection?.status])
|
||
```
|
||
|
||
The returned `<Button>` component remains unchanged.
|
||
|
||
<Details summaryContent="Full updated code for src/modules/checkout/components/payment-button/index.tsx">
|
||
```tsx title="src/modules/checkout/components/payment-button/index.tsx"
|
||
"use client"
|
||
|
||
import { isStripe } from "@lib/constants"
|
||
import { placeOrder } from "@lib/data/cart"
|
||
import { HttpTypes } from "@medusajs/types"
|
||
import { Button } from "@medusajs/ui"
|
||
import { useElements, useStripe } from "@stripe/react-stripe-js"
|
||
import { useParams } from "next/navigation"
|
||
import React, { useEffect, useState } from "react"
|
||
import ErrorMessage from "../error-message"
|
||
|
||
type PaymentButtonProps = {
|
||
cart: HttpTypes.StoreCart
|
||
"data-testid": string
|
||
}
|
||
|
||
const PaymentButton: React.FC<PaymentButtonProps> = ({
|
||
cart,
|
||
"data-testid": dataTestId,
|
||
}) => {
|
||
const notReady =
|
||
!cart ||
|
||
!cart.shipping_address ||
|
||
!cart.billing_address ||
|
||
!cart.email ||
|
||
(cart.shipping_methods?.length ?? 0) < 1
|
||
|
||
const paymentSession = cart.payment_collection?.payment_sessions?.[0]
|
||
|
||
switch (true) {
|
||
case isStripe(paymentSession?.provider_id):
|
||
return (
|
||
<StripePaymentButton
|
||
notReady={notReady}
|
||
cart={cart}
|
||
data-testid={dataTestId}
|
||
/>
|
||
)
|
||
default:
|
||
return <Button disabled>Select a payment method</Button>
|
||
}
|
||
}
|
||
|
||
const StripePaymentButton = ({
|
||
cart,
|
||
notReady,
|
||
"data-testid": dataTestId,
|
||
}: {
|
||
cart: HttpTypes.StoreCart
|
||
notReady: boolean
|
||
"data-testid"?: string
|
||
}) => {
|
||
const [submitting, setSubmitting] = useState(false)
|
||
const [errorMessage, setErrorMessage] = useState<string | null>(null)
|
||
|
||
const { countryCode } = useParams()
|
||
|
||
const paymentSession = cart.payment_collection?.payment_sessions?.find(
|
||
(session) => session.provider_id === "pp_stripe_stripe"
|
||
)
|
||
|
||
const onPaymentCompleted = async () => {
|
||
await placeOrder()
|
||
.catch((err) => {
|
||
setErrorMessage(err.message)
|
||
})
|
||
.finally(() => {
|
||
setSubmitting(false)
|
||
})
|
||
}
|
||
|
||
const stripe = useStripe()
|
||
const elements = useElements()
|
||
|
||
const disabled = !stripe || !elements ? true : false
|
||
|
||
const handlePayment = async () => {
|
||
if (!stripe || !elements || !cart) {
|
||
return
|
||
}
|
||
|
||
setSubmitting(true)
|
||
|
||
const clientSecret = paymentSession?.data?.client_secret as string
|
||
|
||
await stripe
|
||
.confirmPayment({
|
||
elements,
|
||
clientSecret,
|
||
confirmParams: {
|
||
return_url: `${window.location.origin}/api/capture-payment/${cart.id}?country_code=${countryCode}`,
|
||
payment_method_data: {
|
||
billing_details: {
|
||
name:
|
||
cart.billing_address?.first_name +
|
||
" " +
|
||
cart.billing_address?.last_name,
|
||
address: {
|
||
city: cart.billing_address?.city ?? undefined,
|
||
country: cart.billing_address?.country_code ?? undefined,
|
||
line1: cart.billing_address?.address_1 ?? undefined,
|
||
line2: cart.billing_address?.address_2 ?? undefined,
|
||
postal_code: cart.billing_address?.postal_code ?? undefined,
|
||
state: cart.billing_address?.province ?? undefined,
|
||
},
|
||
email: cart.email,
|
||
phone: cart.billing_address?.phone ?? undefined,
|
||
},
|
||
},
|
||
},
|
||
redirect: "if_required",
|
||
})
|
||
.then(({ error }) => {
|
||
if (error) {
|
||
const pi = error.payment_intent
|
||
|
||
if (
|
||
(pi && pi.status === "requires_capture") ||
|
||
(pi && pi.status === "succeeded")
|
||
) {
|
||
onPaymentCompleted()
|
||
}
|
||
|
||
setErrorMessage(error.message || null)
|
||
return
|
||
}
|
||
|
||
return
|
||
})
|
||
}
|
||
|
||
useEffect(() => {
|
||
if (cart.payment_collection?.status === "authorized") {
|
||
onPaymentCompleted()
|
||
}
|
||
}, [cart.payment_collection?.status])
|
||
|
||
return (
|
||
<>
|
||
<Button
|
||
disabled={disabled || notReady}
|
||
onClick={handlePayment}
|
||
size="large"
|
||
isLoading={submitting}
|
||
data-testid={dataTestId}
|
||
>
|
||
Place order
|
||
</Button>
|
||
<ErrorMessage
|
||
error={errorMessage}
|
||
data-testid="stripe-payment-error-message"
|
||
/>
|
||
</>
|
||
)
|
||
}
|
||
|
||
export default PaymentButton
|
||
|
||
```
|
||
</Details>
|
||
|
||
---
|
||
|
||
## Step 5: Handle External Payment Callbacks
|
||
|
||
Many payment methods redirect users away from your store to complete payment (for example, to their banking app) before returning the customer back to your store. You need to handle these redirects and check if the payment was successful. If so, you create a Medusa order and redirect the customer to the order confirmation page.
|
||
|
||
To handle this, you'll set up a Next.js API route. This is the route you passed as the `return_url` in `stripe.confirmPayment` in the previous step.
|
||
|
||
Create a `route.ts` file in `src/app/api/capture-payment/[cartId]` with the following content:
|
||
|
||
```tsx title="src/app/api/capture-payment/[cartId]/route.ts"
|
||
import { placeOrder, retrieveCart } from "@lib/data/cart"
|
||
import { NextRequest, NextResponse } from "next/server"
|
||
|
||
type Params = Promise<{ cartId: string }>
|
||
|
||
export async function GET(req: NextRequest, { params }: { params: Params }) {
|
||
const { cartId } = await params
|
||
const { origin, searchParams } = req.nextUrl
|
||
|
||
const paymentIntent = searchParams.get("payment_intent")
|
||
const paymentIntentClientSecret = searchParams.get(
|
||
"payment_intent_client_secret"
|
||
)
|
||
const redirectStatus = searchParams.get("redirect_status") || ""
|
||
const countryCode = searchParams.get("country_code")
|
||
|
||
const cart = await retrieveCart(cartId)
|
||
|
||
if (!cart) {
|
||
return NextResponse.redirect(`${origin}/${countryCode}`)
|
||
}
|
||
|
||
const paymentSession = cart.payment_collection?.payment_sessions?.find(
|
||
(payment) => payment.data.id === paymentIntent
|
||
)
|
||
|
||
if (
|
||
!paymentSession ||
|
||
paymentSession.data.client_secret !== paymentIntentClientSecret ||
|
||
!["pending", "succeeded"].includes(redirectStatus) ||
|
||
!["pending", "authorized"].includes(paymentSession.status)
|
||
) {
|
||
return NextResponse.redirect(
|
||
`${origin}/${countryCode}/cart?step=review&error=payment_failed`
|
||
)
|
||
}
|
||
|
||
const order = await placeOrder(cartId)
|
||
|
||
return NextResponse.redirect(
|
||
`${origin}/${countryCode}/order/${order.id}/confirmed`
|
||
)
|
||
}
|
||
|
||
```
|
||
|
||
This route validates a payment intent from Stripe by checking the URL parameters (`payment_intent`, `client_secret`, and `redirect_status`) against the cart's payment session data. If the cart doesn't exist, or if payment validation fails (mismatched secrets, invalid status, etc...), the route redirects the customer back to the cart where you can display an error to the customer.
|
||
|
||
If the validation succeeds, you places the order using the `placeOrder` function and redirects the user to an order confirmation page.
|
||
|
||
### Test it Out
|
||
|
||
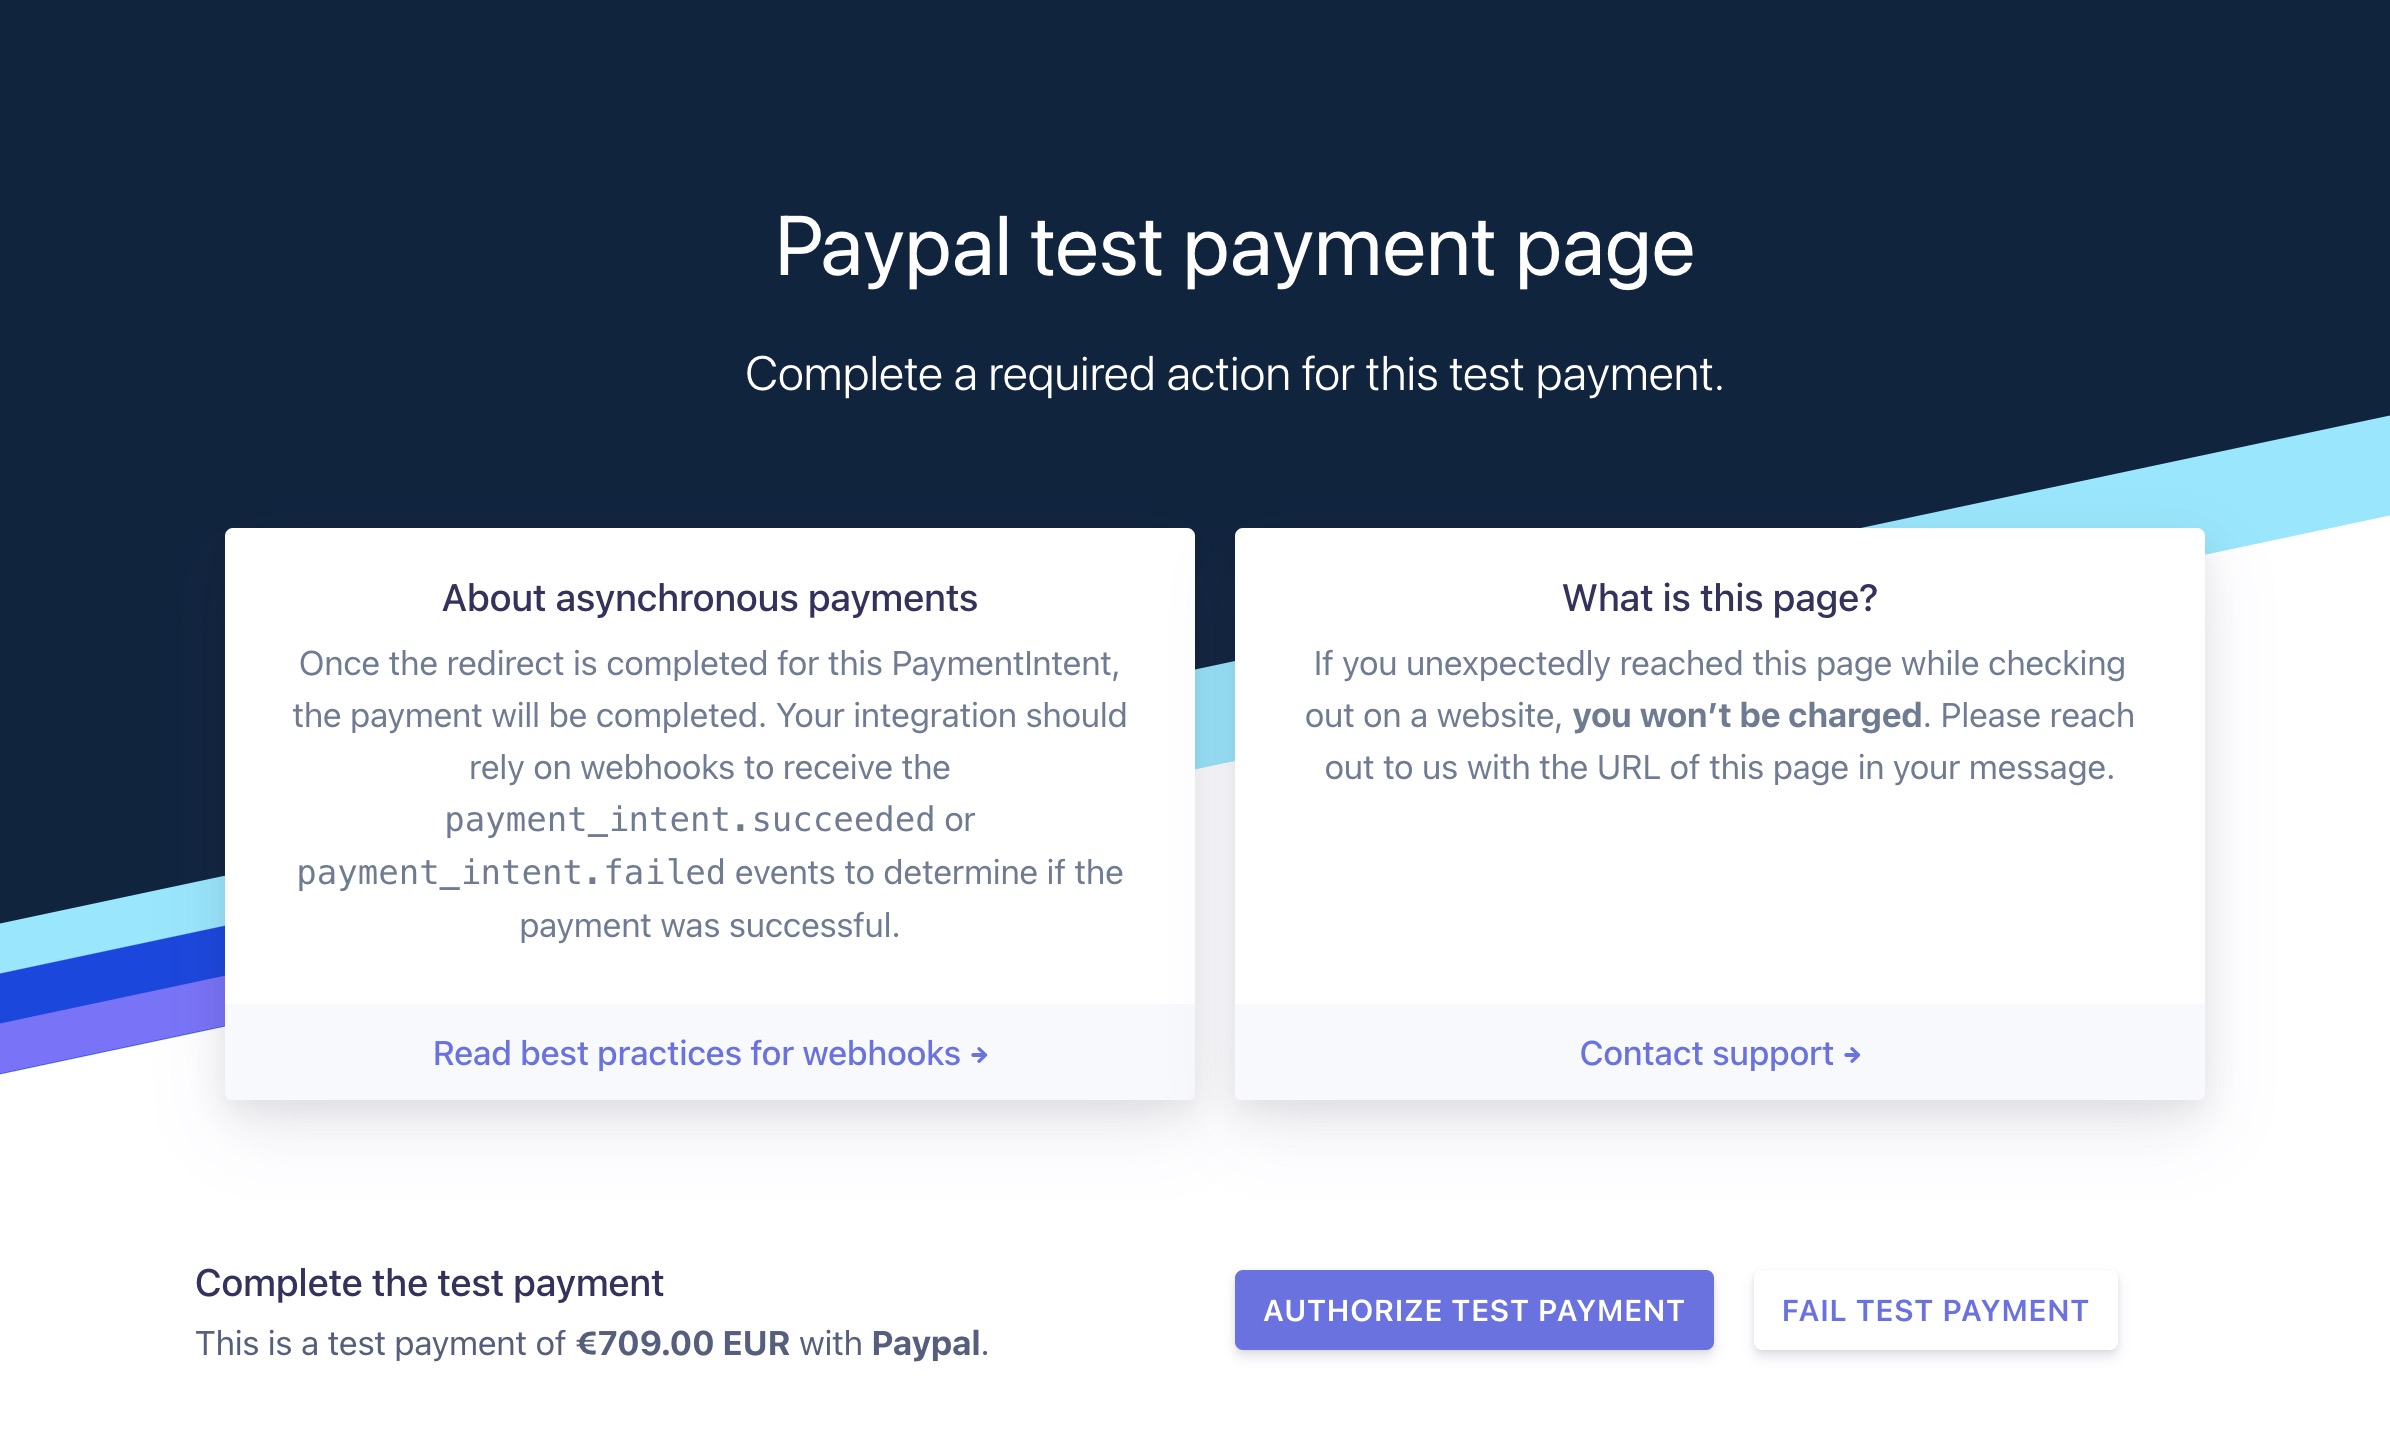
Switch back to the checkout page on your storefront and try to place an order with an external payment method (For example, PayPal). Stripe will redirect you to a payment page where you can either authorize or reject the payment.
|
||
|
||
|
||
|
||
When you click “Authorize Test Payment”, you’ll be redirected to your newly created API route. If the validation passes, you should now see the order confirmation page.
|
||
|
||

|