* initial

* finish first draft

* finish odoo and erp guides

* add mention of completeCartWorkflow

* lint content

* iteration to intro

* add meta image

* small fix
756 lines
31 KiB
Plaintext
756 lines
31 KiB
Plaintext
import { Prerequisites } from "docs-ui"
|
|
|
|
export const ogImage = "https://res.cloudinary.com/dza7lstvk/image/upload/v1740556002/Medusa%20Resources/erp-guide_sucmxz.jpg"
|
|
|
|
export const metadata = {
|
|
title: `Integrate ERP with Medusa`,
|
|
openGraph: {
|
|
images: [
|
|
{
|
|
url: ogImage,
|
|
width: 1600,
|
|
height: 836,
|
|
type: "image/jpeg"
|
|
}
|
|
],
|
|
},
|
|
twitter: {
|
|
images: [
|
|
{
|
|
url: ogImage,
|
|
width: 1600,
|
|
height: 836,
|
|
type: "image/jpeg"
|
|
}
|
|
]
|
|
}
|
|
}
|
|
|
|
# {metadata.title}
|
|
|
|
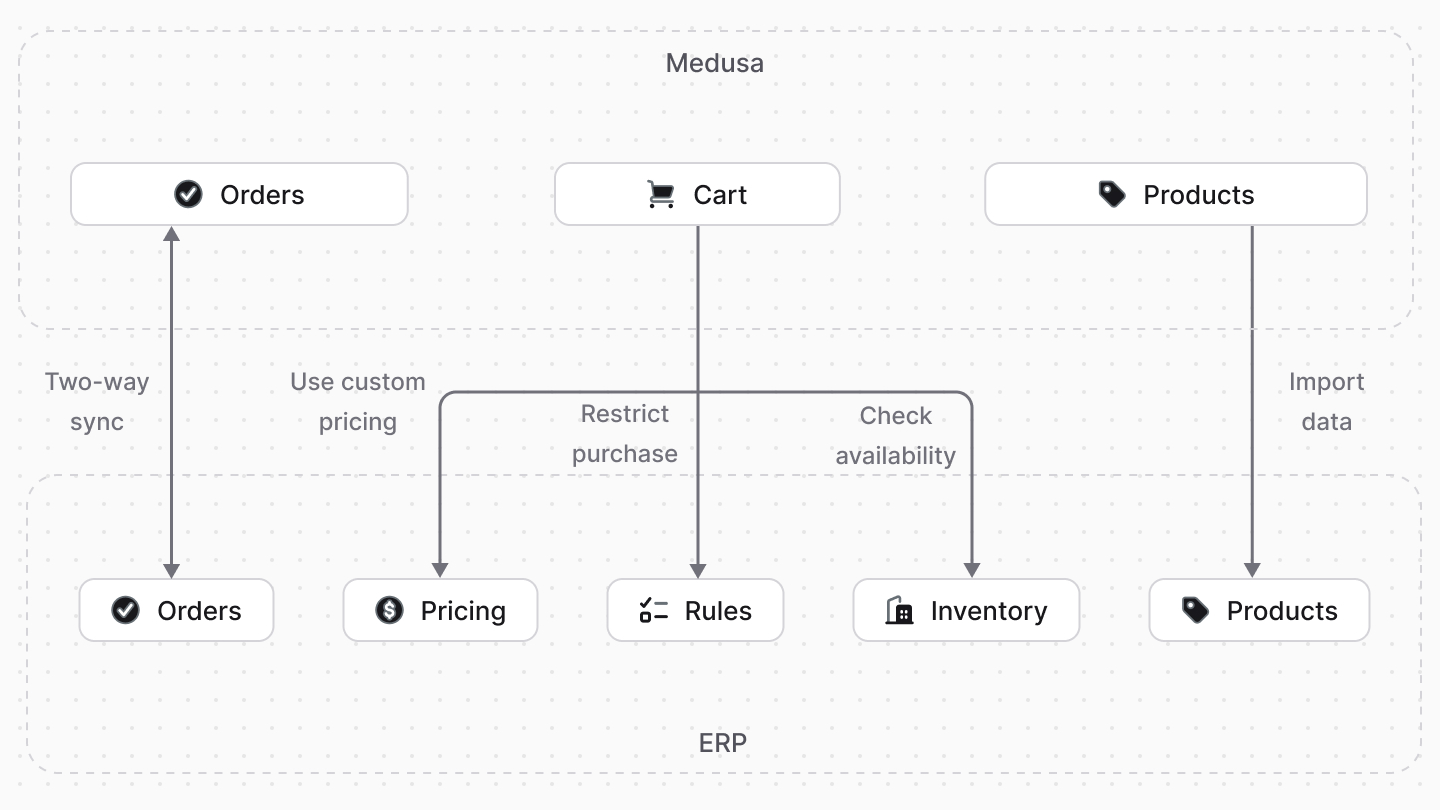
In this recipe, you'll learn about the general approach to integrating an ERP system with Medusa.
|
|
|
|
Businesses often rely on an ERP system to centralize their data and custom business rules and operations. This includes using the ERP to store special product prices, manage custom business rules that change how their customers make purchases, and handle the fulfillment and processing of orders.
|
|
|
|
When integrating the ERP system with other ecommerce platforms, you'll face complications maintaining data consistency across systems and customizing the platform's existing flows to accommodate the ERP system's data and operations. For example, the ecommerce platform may not support purchasing products with custom pricing or restricting certain products from purchase under certain conditions.
|
|
|
|
Medusa's framework for customization solves these challenges by giving you a durable execution engine to orchestrate operations through custom flows, and the flexibility to customize the platform's existing flows. You can wrap existing flows with custom logic, inject custom features into existing flows, and create new flows that interact with the ERP system and sync data between the two systems.
|
|
|
|
|
|
|
|
In this recipe, you'll learn how to implement some common use cases when integrating an ERP system with Medusa. This includes how to purchase products with custom pricing, restrict products from purchase under conditions in the ERP, sync orders to the ERP, and more.
|
|
|
|
You can use the code snippets in the recipe as a starting point for your ERP integration, making changes as necessary for your use case. You can also implement other use cases using the same Medusa concepts.
|
|
|
|
---
|
|
|
|
## Prerequisite: Install Medusa
|
|
|
|
If you don't have a Medusa application yet, you can install it with the following command:
|
|
|
|
<Prerequisites items={[
|
|
{
|
|
text: "Node.js v20+",
|
|
link: "https://nodejs.org/en/download"
|
|
},
|
|
{
|
|
text: "Git CLI tool",
|
|
link: "https://git-scm.com/downloads"
|
|
},
|
|
{
|
|
text: "PostgreSQL",
|
|
link: "https://www.postgresql.org/download/"
|
|
}
|
|
]} />
|
|
|
|
```bash
|
|
npx create-medusa-app@latest
|
|
```
|
|
|
|
You'll first be asked for the project's name. You can also optionally choose to install the [Next.js starter storefront](../../nextjs-starter/page.mdx).
|
|
|
|
Afterwards, the installation process will start, which will install the Medusa application in a directory with your project's name. If you chose to install the Next.js starter, it'll be installed in a separate directory with the `{project-name}-storefront` name.
|
|
|
|
<Note title="Why is the storefront installed separately">
|
|
|
|
The Medusa application is composed of a headless Node.js server and an admin dashboard. The storefront is installed or custom-built separately and connects to the Medusa application through its REST endpoints, called [API routes](!docs!/learn/fundamentals/api-routes). Learn more about Medusa's architecture in [this documentation](!docs!/learn/introduction/architecture).
|
|
|
|
</Note>
|
|
|
|
Once the installation finishes successfully, the Medusa Admin dashboard will open with a form to create a new user. Enter the user's credentials and submit the form. Afterwards, you can log in with the new user and explore the dashboard.
|
|
|
|
<Note title="Ran into Errors">
|
|
|
|
Check out the [troubleshooting guides](../../troubleshooting/create-medusa-app-errors/page.mdx) for help.
|
|
|
|
</Note>
|
|
|
|
---
|
|
|
|
## Integrate ERP in a Module
|
|
|
|
Before you start integrating the ERP system into existing or new flows in Medusa, you must build the integration layer that allows you to communicate with the ERP in your customizations.
|
|
|
|
In Medusa, you implement integrations or features around a single commerce domain in a [module](!docs!/learn/fundamentals/modules). A module is a reusable package that can interact with the database or external APIs. The module integrates into your Medusa application without side effects to the existing setup.
|
|
|
|
So, you can create a module that exports a class called a service, and in that service, you implement the logic to connect to your ERP system, fetch data from it, and send data to it. The service may look like this:
|
|
|
|
```ts title="src/modules/erp/service.ts"
|
|
type Options = {
|
|
apiKey: string
|
|
}
|
|
|
|
export default class ErpModuleService {
|
|
private options: Options
|
|
private client
|
|
|
|
constructor({}, options: Options) {
|
|
this.options = options
|
|
// TODO initialize client that connects to ERP
|
|
}
|
|
|
|
async getProducts() {
|
|
// assuming client has a method to fetch products
|
|
return this.client.getProducts()
|
|
}
|
|
|
|
// TODO add more methods
|
|
}
|
|
```
|
|
|
|
You can then use the module's service in the custom flows and customizations that you'll see in later sections.
|
|
|
|
### How to Create Module
|
|
|
|
Refer to [this documentation](!docs!/learn/fundamentals/modules) on how to create a module. You can also refer to the [Odoo Integration guide](./odoo/page.mdx) as an example of how to build a module that integrates an ERP into Medusa.
|
|
|
|
The rest of this recipe assumes you have an ERP Module with some methods to retrieve products, prices, and other relevant data.
|
|
|
|
---
|
|
|
|
## Sync Products from ERP
|
|
|
|
If you store products in the ERP system, you want to sync them into Medusa to allow customers to purchase them. You may sync them once or periodically to keep the products in Medusa up-to-date with the ERP.
|
|
|
|
Syncing data between systems is a big challenge and it's often the pitfall of most ecommerce platforms, as you need to ensure data consistency and handle errors gracefully. Medusa solves this challenge by providing a durable execution engine to complete tasks that span multiple systems, allowing you to orchestrate your operations across systems in Medusa instead of managing it yourself.
|
|
|
|
Medusa's workflows are a series of queries and actions, called steps, that complete a task. You construct a workflow similar to how you create a JavaScript function, but with additional features like defining rollback logic for each step, performing long actions asynchronously, and tracking the progress of the steps. You can then use these workflows in other customizations, such as:
|
|
|
|
- [API routes](!docs!/learn/fundamentals/api-routes) to allow clients to trigger the workflow's execution.
|
|
- [Subscribers](!docs!/learn/fundamentals/events-and-subscribers) to trigger the workflow when an event occurs.
|
|
- [Scheduled jobs](!docs!/learn/fundamentals/scheduled-jobs) to run the workflow periodically.
|
|
|
|
So, to sync products from the ERP system to Medusa, you can create a custom workflow that fetches the products from the ERP system and adds them to Medusa. Then, you can create a scheduled job that syncs the products once a day, for example.
|
|
|
|
### 1. Create Workflow to Sync Products
|
|
|
|
The workflow that syncs products from the ERP system to Medusa will have a step that fetches the product from the ERP, and another step that adds the product to Medusa.
|
|
|
|
For example, you can create the following workflow:
|
|
|
|
```ts title="src/workflows/sync-products.ts"
|
|
import {
|
|
createStep, createWorkflow, StepResponse,
|
|
transform, WorkflowResponse,
|
|
} from "@medusajs/framework/workflows-sdk"
|
|
import { createProductsWorkflow } from "@medusajs/medusa/core-flows"
|
|
|
|
const getProductsFromErpStep = createStep(
|
|
"get-products-from-erp",
|
|
async (_, { container }) => {
|
|
const erpModuleService = container.resolve("erp")
|
|
|
|
const products = await erpModuleService.getProducts()
|
|
|
|
return new StepResponse(products)
|
|
}
|
|
)
|
|
|
|
export const syncFromErpWorkflow = createWorkflow(
|
|
"sync-from-erp",
|
|
() => {
|
|
const erpProducts = getProductsFromErpStep()
|
|
|
|
const productsToCreate = transform({
|
|
erpProducts,
|
|
}, (data) => {
|
|
// TODO prepare ERP products to be created in Medusa
|
|
return data.erpProducts.map((erpProduct) => {
|
|
return {
|
|
title: erpProduct.title,
|
|
external_id: erpProduct.id,
|
|
variants: erpProduct.variants.map((variant) => ({
|
|
title: variant.title,
|
|
metadata: {
|
|
external_id: variant.id,
|
|
},
|
|
})),
|
|
// other data...
|
|
}
|
|
})
|
|
})
|
|
|
|
createProductsWorkflow.runAsStep({
|
|
input: {
|
|
products: productsToCreate,
|
|
},
|
|
})
|
|
|
|
return new WorkflowResponse({
|
|
erpProducts,
|
|
})
|
|
}
|
|
)
|
|
```
|
|
|
|
In the above file, you first create a `getProductsFromErpStep` that resolves the ERP Module's service from the [Medusa container](!docs!/learn/fundamentals/medusa-container), which is a registry of framework and commerce tools, including your modules, that you can access in your customizations. You can then call the `getProducts` method in the ERP Module's service to fetch the products from the ERP and return them.
|
|
|
|
Then, you create a `syncFromErpWorkflow` that executes the `getProductsFromErpStep` to get the products from the ERP, then prepare the products to be created in Medusa. For example, you can set the product's title, and specify its ID in the ERP using the `external_id` field. Also, assuming the ERP products have variants, you can map the variants to Medusa's format, setting the variant's title and its ERP ID in the metadata.
|
|
|
|
Finally, you pass the products to be created to the `createProductsWorkflow`, which is a built-in Medusa workflow that creates products.
|
|
|
|
Learn more about creating workflows and steps in [this documentation](!docs!/learn/fundamentals/workflows).
|
|
|
|
<Note title="Tip">
|
|
|
|
Find a detailed example of implementing this workflow in the [Odoo Integration guide](./odoo/page.mdx).
|
|
|
|
</Note>
|
|
|
|
### 2. Create Scheduled Job to Sync Products
|
|
|
|
After creating a workflow, you can create a scheduled job that runs the workflow periodically to sync the products from the ERP to Medusa.
|
|
|
|
For example, you can create the following scheduled job:
|
|
|
|
```ts title="src/scheduled-jobs/sync-products.ts"
|
|
import {
|
|
MedusaContainer,
|
|
} from "@medusajs/framework/types"
|
|
import { syncFromErpWorkflow } from "../workflows/sync-from-erp"
|
|
|
|
export default async function syncProductsJob(container: MedusaContainer) {
|
|
await syncFromErpWorkflow(container).run({})
|
|
}
|
|
|
|
export const config = {
|
|
name: "daily-product-sync",
|
|
schedule: "0 0 * * *", // Every day at midnight
|
|
}
|
|
```
|
|
|
|
You create a scheduled job that runs once a day, executing the `syncFromErpWorkflow` to sync the products from the ERP to Medusa.
|
|
|
|
Learn more about creating scheduled jobs in [this documentation](!docs!/learn/fundamentals/scheduled-jobs).
|
|
|
|
---
|
|
|
|
## Retrieve Custom Prices from ERP
|
|
|
|
Consider you store products in an ERP system with fixed prices, or prices based on different conditions. You want to display these prices in the storefront and allow customers to purchase products with these prices. To do that, you need the mechanism to fetch the custom prices from the ERP system and add the product to the cart with the custom price.
|
|
|
|
To do that, you can build a custom workflow that uses the ERP Module to retrieve the custom price of a product variant, then add the product to the cart with that price.
|
|
|
|
<Note title="Tip">
|
|
|
|
You can also follow [this guide](../../examples/guides/custom-item-price/page.mdx) for a step-by-step guide on how to add items with custom prices to the cart.
|
|
|
|
</Note>
|
|
|
|
### 1. Create Step to Get Variant Price
|
|
|
|
One of the steps in the custom add-to-cart workflow is to retrieve the custom price of the product variant from the ERP system. The step's implementation will differ based on the ERP system you're integrating. Here's a general implementation of how the step would look like:
|
|
|
|
```ts title="src/workflows/steps/get-erp-price.ts"
|
|
import { MedusaError } from "@medusajs/framework/utils"
|
|
import { createStep, StepResponse } from "@medusajs/framework/workflows-sdk"
|
|
|
|
export type GetVariantErpPriceStepInput = {
|
|
variant_external_id: string
|
|
currencyCode: string
|
|
quantity: number
|
|
}
|
|
|
|
export const getVariantErpPriceStep = createStep(
|
|
"get-variant-erp-price",
|
|
async (input: GetVariantErpPriceStepInput, { container }) => {
|
|
const { variant_external_id, currencyCode, quantity } = input
|
|
|
|
const erpModuleService = container.resolve("erp")
|
|
|
|
const price = await erpModuleService.getErpPrice(
|
|
variant_external_id,
|
|
currencyCode
|
|
)
|
|
|
|
return new StepResponse(
|
|
price * quantity
|
|
)
|
|
}
|
|
)
|
|
```
|
|
|
|
You create the step using the `createStep` from the Workflows SDK. The step has a function that receives the variant's ID in the ERP, the currency code, and the quantity as input.
|
|
|
|
The function then resolves the ERP Module's service from the [Medusa container](!docs!/learn/fundamentals/medusa-container) and, assuming you have a `getErpPrice` method in your ERP Module's service, you call it to retrieve that price, and return it multiplied by the quantity.
|
|
|
|
### 2. Create Custom Add-to-Cart Workflow
|
|
|
|
You can now create the custom workflow that uses the previous step to retrieve a variant's custom price from the ERP, then add it to the cart with that price.
|
|
|
|
For example, you can create the following workflow:
|
|
|
|
```ts title="src/workflows/add-custom-to-cart.ts"
|
|
import { createWorkflow, transform, WorkflowResponse } from "@medusajs/framework/workflows-sdk"
|
|
import { addToCartWorkflow, useQueryGraphStep } from "@medusajs/medusa/core-flows"
|
|
import { getVariantErpPriceStep } from "./steps/get-erp-price"
|
|
|
|
type AddCustomToCartWorkflowInput = {
|
|
cart_id: string
|
|
item: {
|
|
variant_id: string
|
|
quantity: number
|
|
}
|
|
}
|
|
|
|
export const addCustomToCartWorkflow = createWorkflow(
|
|
"add-custom-to-cart",
|
|
({ cart_id, item }: AddCustomToCartWorkflowInput) => {
|
|
// Retrieve the cart's currency code
|
|
const { data: carts } = useQueryGraphStep({
|
|
entity: "cart",
|
|
filters: { id: cart_id },
|
|
fields: ["id", "currency_code"],
|
|
})
|
|
|
|
// Retrieve the variant's metadata to get its ERP ID
|
|
const { data: variants } = useQueryGraphStep({
|
|
entity: "variant",
|
|
fields: [
|
|
"id",
|
|
"metadata",
|
|
],
|
|
filters: {
|
|
id: item.variant_id,
|
|
},
|
|
options: {
|
|
throwIfKeyNotFound: true,
|
|
},
|
|
}).config({ name: "retrieve-variant" })
|
|
|
|
// get the variant's price from the ERP
|
|
const price = getVariantErpPriceStep({
|
|
variant_external_id: variants[0].metadata?.external_id as string,
|
|
currencyCode: carts[0].currency_code,
|
|
quantity: item.quantity,
|
|
})
|
|
|
|
// prepare to add the variant to the cart
|
|
const itemToAdd = transform({
|
|
item,
|
|
price,
|
|
variants,
|
|
}, (data) => {
|
|
return [{
|
|
...data.item,
|
|
unit_price: data.price,
|
|
metadata: data.variants[0].metadata,
|
|
}]
|
|
})
|
|
|
|
// add the variant to the cart
|
|
addToCartWorkflow.runAsStep({
|
|
input: {
|
|
items: itemToAdd,
|
|
cart_id,
|
|
},
|
|
})
|
|
}
|
|
)
|
|
```
|
|
|
|
In this workflow, you first fetch the details of the cart and the variant from the database using the [useQueryGraphStep](/references/helper-steps/useQueryGraphStep) that Medusa defines.
|
|
|
|
Then, you use the `getVariantErpPriceStep` you created to retrieve the price from the ERP. You pass it the variant's ERP ID, supposedly stored in the variant's metadata as shown in the [previous section](#1-create-workflow-to-sync-products), the cart's currency code, and the quantity of the item.
|
|
|
|
Finally, you prepare the item to be added to the cart, setting the unit price to the price you retrieved from the ERP. You then call the `addToCartWorkflow` to add the item to the cart.
|
|
|
|
### 3. Execute Workflow in API Route
|
|
|
|
To allow clients to add products to the cart with custom prices, you can create an [API route](!docs!/learn/fundamentals/api-routes) that exposes the workflow's functionality. An API Route is an endpoint that exposes commerce features to external applications and clients, such as storefronts.
|
|
|
|
For example, you can create the following API route:
|
|
|
|
```ts title="src/api/store/cart/[id]/custom-line-items/route.ts"
|
|
import { MedusaRequest, MedusaResponse } from "@medusajs/framework"
|
|
import { HttpTypes } from "@medusajs/framework/types"
|
|
import { addCustomToCartWorkflow } from "../../../../../workflows/add-custom-to-cart"
|
|
|
|
export const POST = async (
|
|
req: MedusaRequest,
|
|
res: MedusaResponse
|
|
) => {
|
|
const { id } = req.params
|
|
const item = req.body
|
|
|
|
await addCustomToCartWorkflow(req.scope)
|
|
.run({
|
|
input: {
|
|
cart_id: id,
|
|
item,
|
|
},
|
|
})
|
|
|
|
res.status(200).json({ success: true })
|
|
}
|
|
```
|
|
|
|
In this API route, you receive the cart's ID from the route's parameters, and the item to be added to the cart from the request body. You then call the `addCustomToCartWorkflow` to add the item to the cart with the custom price.
|
|
|
|
Learn more about how to create an API route in [this documentation](!docs!/learn/fundamentals/api-routes). You can also add request body validation as explained in [this documentation](!docs!/learn/fundamentals/api-routes/validation).
|
|
|
|
---
|
|
|
|
## Restrict Purchase with Custom ERP Rules
|
|
|
|
Your ERP may store restrictions on who can purchase what products. For example, you may allow only some companies to purchase certain products.
|
|
|
|
Since Medusa implements the add-to-cart functionality within a workflow, it allows you to inject custom logic into the workflow using [workflow hooks](!docs!/learn/fundamentals/workflows/workflow-hooks). A workflow hook is a point in a workflow where you can inject a step and perform a custom functionality.
|
|
|
|
So, to implement the use case of product-purchase restriction, you can use the `validate` hook of the `addToCartWorkflow` or the [completeCartWorkflow](/references/medusa-workflows/completeCartWorkflow) to check if the customer is allowed to purchase the product. For example:
|
|
|
|
```ts title="src/workflows/hooks/validate-purchase.ts"
|
|
import { MedusaError } from "@medusajs/framework/utils"
|
|
import { addToCartWorkflow } from "@medusajs/medusa/core-flows"
|
|
|
|
addToCartWorkflow.hooks.validate(
|
|
async ({ input, cart }, { container }) => {
|
|
const erpModuleService = container.resolve("erp")
|
|
const productModuleService = container.resolve("product")
|
|
const customerModuleService = container.resolve("customer")
|
|
|
|
const customer = cart.customer_id ? await customerModuleService.retrieveCustomer(cart.customer_id) : undefined
|
|
const productVariants = await productModuleService.listProductVariants({
|
|
id: input.items.map((item) => item.variant_id).filter(Boolean) as string[],
|
|
}, {
|
|
relations: ["product"],
|
|
})
|
|
|
|
await Promise.all(
|
|
productVariants.map(async (productVariant) => {
|
|
if (!productVariant.product?.external_id) {
|
|
// product isn't in ERP
|
|
return
|
|
}
|
|
|
|
const isAllowed = await erpModuleService.canCompanyPurchaseProduct(
|
|
productVariant.product.external_id,
|
|
customer?.company_name || undefined
|
|
)
|
|
|
|
if (!isAllowed) {
|
|
throw new MedusaError(
|
|
MedusaError.Types.NOT_ALLOWED,
|
|
`Company ${customer?.company_name || ""} is not allowed to purchase product ${productVariant.product.id}`
|
|
)
|
|
}
|
|
})
|
|
)
|
|
}
|
|
)
|
|
```
|
|
|
|
You consume a hook using the workflow's `hooks` property. In the above example, you consume the `validate` hook of the `addToCartWorkflow` to inject a step.
|
|
|
|
In the step, you resolve the ERP Module's service, the Product Module's service, and the Customer Module's service from the [Medusa container](!docs!/learn/fundamentals/medusa-container). You then retrieve the cart's customer and the product variants to be added to the cart.
|
|
|
|
Then, for each product variant, you use a `canCompanyPurchaseProduct` method in the ERP Module's service that checks if the customer's company is allowed to purchase the product. If not, you throw a `MedusaError` with a message that the company is not allowed to purchase the product.
|
|
|
|
So, only customers who are allowed in the ERP system to purchase a product can add it to the cart.
|
|
|
|
Learn more about workflow hooks and how to consume them in [this documentation](/docs/learn/fundamentals/workflows/workflow-hooks).
|
|
|
|
---
|
|
|
|
## Two-Way Order Syncing
|
|
|
|
After a customer places an order in Medusa, you may want to sync the order to the ERP system where you handle its fulfillment and processing. However, you may also want to sync the order back to Medusa, where you handle customer-service related operations, such as returns and refunds.
|
|
|
|
As explained earlier, workflows facilitate the orchestration of operations across systems while maintaining data consistency. So, you can create two workflows:
|
|
|
|
1. A workflow that syncs the order from Medusa to the ERP system. You can execute this workflow in a [subscriber](!docs!/learn/fundamentals/events-and-subscribers) that is triggered when an order is created in Medusa.
|
|
2. A workflow that syncs the order from the ERP system back to Medusa. Then, you can create a webhook listener in Medusa that executes the workflow, and use the webhook in the ERP system to send order updates to Medusa.
|
|
|
|
### 1. Sync Order to ERP
|
|
|
|
To sync the order from Medusa to the ERP system, you can create a custom workflow that sends the order's details from Medusa to the ERP system. For example:
|
|
|
|
```ts title="src/workflows/sync-order-to-erp.ts"
|
|
import { createStep, createWorkflow, StepResponse, WorkflowResponse } from "@medusajs/framework/workflows-sdk"
|
|
import { updateOrderWorkflow, useQueryGraphStep } from "@medusajs/medusa/core-flows"
|
|
import { OrderDTO } from "@medusajs/framework/types"
|
|
|
|
type StepInput = {
|
|
order: OrderDTO
|
|
}
|
|
|
|
export const syncOrderToErpStep = createStep(
|
|
"sync-order-to-erp",
|
|
async ({ order }: StepInput, { container }) => {
|
|
const erpModuleService = container.resolve("erp")
|
|
|
|
const erpOrderId = await erpModuleService.createOrder(order)
|
|
|
|
return new StepResponse(erpOrderId, erpOrderId)
|
|
},
|
|
async (erpOrderId, { container }) => {
|
|
if (!erpOrderId) {
|
|
return
|
|
}
|
|
|
|
const erpModuleService = container.resolve("erp")
|
|
await erpModuleService.deleteOrder(erpOrderId)
|
|
}
|
|
)
|
|
|
|
type WorkflowInput = {
|
|
order_id: string
|
|
}
|
|
|
|
export const syncOrderToErpWorkflow = createWorkflow(
|
|
"sync-order-to-erp",
|
|
({ order_id }: WorkflowInput) => {
|
|
// @ts-ignore
|
|
const { data: orders } = useQueryGraphStep({
|
|
entity: "order",
|
|
fields: [
|
|
"*",
|
|
"shipping_address.*",
|
|
"billing_address.*",
|
|
"items.*",
|
|
],
|
|
filters: {
|
|
id: order_id,
|
|
},
|
|
options: {
|
|
throwIfKeyNotFound: true,
|
|
},
|
|
})
|
|
|
|
const erpOrderId = syncOrderToErpStep({
|
|
order: orders[0] as unknown as OrderDTO,
|
|
})
|
|
|
|
updateOrderWorkflow.runAsStep({
|
|
input: {
|
|
id: order_id,
|
|
user_id: "",
|
|
metadata: {
|
|
external_id: erpOrderId,
|
|
},
|
|
},
|
|
})
|
|
|
|
return new WorkflowResponse(erpOrderId)
|
|
})
|
|
```
|
|
|
|
You first create a `syncOrderToErpStep` that receives an order's details, resolves the ERP Module's service from the Medusa container, and calls a `createOrder` method in the ERP Module's service that creates the order in the ERP.
|
|
|
|
Notice that you pass to `createStep` a third-parameter function. This is the compensation function that defines how to rollback changes. So, when an error occurs during the workflow's execution, the step deletes the order from the ERP system. This ensures that the data remains consistent across systems.
|
|
|
|
<Note>
|
|
|
|
Learn more about the compensation function in [this documentation](!docs!/learn/fundamentals/workflows/compensation-function).
|
|
|
|
</Note>
|
|
|
|
Then, you create a `syncOrderToErpWorkflow` that retrieves the order's details from the database using the `useQueryGraphStep`, then executes the `syncOrderToErpStep` to sync the order to the ERP system. Finally, you update the order in Medusa to set the ERP order's ID in the `metadata` field.
|
|
|
|
You can now use this workflow whenever an order is placed. To do that, you can create a subscriber that listens to the `order.created` event and executes the workflow:
|
|
|
|
```ts title="src/subscribers/sync-order-to-erp.ts"
|
|
import type {
|
|
SubscriberArgs,
|
|
SubscriberConfig,
|
|
} from "@medusajs/framework"
|
|
import { syncOrderToErpWorkflow } from "../workflows/sync-order-to-erp"
|
|
|
|
export default async function productCreateHandler({
|
|
event: { data },
|
|
container,
|
|
}: SubscriberArgs<{ id: string }>) {
|
|
const { result } = await syncOrderToErpWorkflow(container)
|
|
.run({
|
|
input: {
|
|
order_id: data.id,
|
|
},
|
|
})
|
|
|
|
console.log(`Order synced to ERP with id: ${result}`)
|
|
}
|
|
|
|
export const config: SubscriberConfig = {
|
|
event: "order.placed",
|
|
}
|
|
```
|
|
|
|
You create a subscriber that listens to the `order.placed` event. When the event is triggered, the subscriber executes the `syncOrderToErpWorkflow` to sync the order to the ERP system.
|
|
|
|
Learn more about events and subscribers in [this documentation](!docs!/learn/fundamentals/events-and-subscribers).
|
|
|
|
### 2. Sync Order from ERP to Medusa
|
|
|
|
To sync the order from the ERP system back to Medusa, create first the workflow that receives the updated order data and reflects them in Medusa:
|
|
|
|
```ts title="src/workflows/sync-order-from-erp.ts"
|
|
import { createWorkflow, transform, WorkflowResponse } from "@medusajs/framework/workflows-sdk"
|
|
import { updateOrderWorkflow, useQueryGraphStep } from "@medusajs/medusa/core-flows"
|
|
|
|
type Input = {
|
|
order_erp_data: any
|
|
}
|
|
|
|
export const syncOrderFromErpWorkflow = createWorkflow(
|
|
"sync-order-from-erp",
|
|
({ order_erp_data }: Input) => {
|
|
const { data: orders } = useQueryGraphStep({
|
|
entity: "order",
|
|
fields: ["*"],
|
|
filters: {
|
|
// @ts-ignore
|
|
metadata: {
|
|
external_id: order_erp_data.id,
|
|
},
|
|
},
|
|
})
|
|
|
|
const orderUpdateData = transform({
|
|
order_erp_data,
|
|
orders,
|
|
}, (data) => {
|
|
return {
|
|
id: data.orders[0].id,
|
|
user_id: "",
|
|
status: data.order_erp_data.status,
|
|
}
|
|
})
|
|
|
|
const order = updateOrderWorkflow.runAsStep({
|
|
input: orderUpdateData,
|
|
})
|
|
|
|
return new WorkflowResponse(order)
|
|
}
|
|
)
|
|
```
|
|
|
|
In the workflow, you retrieve the order from the database using the `useQueryGraphStep`, assuming that the ERP order's ID is stored in the order's metadata. Then, you prepare the order's data to be updated in Medusa, setting the order's status to the status you received from the ERP system. Finally, you update the order using the `updateOrderWorkflow`.
|
|
|
|
You can now create an API route that receives webhook updates from the ERP system and executes the workflow:
|
|
|
|
```ts title="src/api/erp/order-updates/route.ts"
|
|
import { MedusaRequest, MedusaResponse } from "@medusajs/framework/http"
|
|
import { syncOrderFromErpWorkflow } from "../../workflows/sync-order-from-erp"
|
|
|
|
export async function POST(
|
|
req: MedusaRequest,
|
|
res: MedusaResponse
|
|
) {
|
|
const webhookData = req.rawBody
|
|
|
|
// TODO construct the order object from the webhook data
|
|
|
|
// execute the workflow
|
|
await syncOrderFromErpWorkflow(req.scope).run({
|
|
input: {
|
|
order_erp_data, // pass constructed order object
|
|
},
|
|
})
|
|
}
|
|
```
|
|
|
|
In the API route, you receive the raw webhook data from the request body. You can then construct the order object from the webhook data based on the ERP system's format.
|
|
|
|
Then, you call the `syncOrderFromErpWorkflow` to sync the order from the ERP system back to Medusa.
|
|
|
|
Finally, to ensure the webhook's raw data is received, you need to configure the middleware that runs before the route handler to preserve the raw body data. To do that, add the following middleware configuration in `src/api/middlewares.ts`:
|
|
|
|
```ts title="src/api/middlewares.ts"
|
|
import { defineMiddlewares } from "@medusajs/framework/http"
|
|
|
|
export default defineMiddlewares({
|
|
routes: [
|
|
{
|
|
method: ["POST"],
|
|
bodyParser: { preserveRawBody: true },
|
|
matcher: "/erp/order-updates",
|
|
},
|
|
],
|
|
})
|
|
```
|
|
|
|
You configure the body parser of `POST` requests to the `/erp/order-updates` route to preserve the raw body data.
|
|
|
|
You can now receive webhook requests from your ERP system and sync the order data back to Medusa.
|
|
|
|
<Note>
|
|
|
|
Learn more about middlewares in [this documentation](!docs!/learn/fundamentals/api-routes/middlewares).
|
|
|
|
</Note>
|
|
|
|
---
|
|
|
|
## Validate Inventory Availability in ERP
|
|
|
|
An ERP system often manages the inventory of products, with the ability to track the stock levels and availability of products. When a customer is purchasing a product through Medusa, you want to ensure that the product is available in the ERP system before allowing the purchase.
|
|
|
|
Similar to the [product-purchase restriction](#restrict-purchase-with-custom-erp-rules) use case, you can use the `validate` hook of the `addToCartWorkflow` or the [completeCartWorkflow](/references/medusa-workflows/completeCartWorkflow) to check the product's availability in the ERP system. For example:
|
|
|
|
```ts title="src/workflows/hooks/validate-inventory.ts"
|
|
import { MedusaError } from "@medusajs/framework/utils"
|
|
import { addToCartWorkflow } from "@medusajs/medusa/core-flows"
|
|
|
|
addToCartWorkflow.hooks.validate(
|
|
async ({ input }, { container }) => {
|
|
const erpModuleService = container.resolve("erp")
|
|
const productModuleService = container.resolve("product")
|
|
|
|
const productVariants = await productModuleService.listProductVariants({
|
|
id: input.items.map((item) => item.variant_id).filter(Boolean) as string[],
|
|
}, {
|
|
relations: ["product"],
|
|
})
|
|
|
|
await Promise.all(
|
|
productVariants.map(async (productVariant) => {
|
|
const erpVariant = await erpModuleService.getQty(productVariant.metadata?.external_id)
|
|
const item = input.items.find((item) => item.variant_id === productVariant.id)!
|
|
|
|
if (erpVariant.qty_available < item.quantity && !erpVariant.allow_out_of_stock_order) {
|
|
throw new MedusaError(
|
|
MedusaError.Types.NOT_ALLOWED,
|
|
`Not enough stock for product ${productVariant.product?.id}`
|
|
)
|
|
}
|
|
})
|
|
)
|
|
}
|
|
)
|
|
```
|
|
|
|
You consume the `validate` hook of the `addToCartWorkflow` to inject a step function. In the step, you resolve the services of the ERP Module and the Product Module from the Medusa container. Then, you loop over the product variants to be added to the cart, and for each variant, you call a `getQty` method in the ERP Module's service to get the variant's quantity available.
|
|
|
|
If the available quantity in the ERP is less than the quantity to be added to the cart, and the ERP doesn't allow out-of-stock orders for the variant, you throw an error that the product is out of stock.
|
|
|
|
So, only products that have sufficient quantity in the ERP system can be added to the cart.
|
|
|
|
---
|
|
|
|
## Implement More Use Cases
|
|
|
|
The use cases covered in this guide are some common ERP integration scenarios that you can implement with Medusa. However, you can implement more use cases based on your ERP system's capabilities and your business requirements.
|
|
|
|
Refer to the [main documentation](!docs!/learn) to learn more about Medusa's concepts and how to implement customizations. You can also use the feedback form at the end of this guide to suggest more use cases you'd like to see implemented.
|