* docs: added features and guides overview page

* added image

* added version 2

* added version 3

* added version 4

* docs: implemented new color scheme

* docs: redesigned sidebar (#3193)

* docs: redesigned navbar for restructure (#3199)

* docs: redesigned footer (#3209)

* docs: redesigned cards (#3230)

* docs: redesigned admonitions (#3231)

* docs: redesign announcement bar (#3236)

* docs: redesigned large cards (#3239)

* docs: redesigned code blocks (#3253)

* docs: redesigned search modal and page (#3264)

* docs: redesigned doc footer (#3268)

* docs: added new sidebars + refactored css and assets (#3279)

* docs: redesigned api reference sidebar

* docs: refactored css

* docs: added code tabs transition

* docs: added new sidebars

* removed unused assets

* remove unusued assets

* Fix deploy errors

* fix incorrect link

* docs: fixed code responsivity + missing icons (#3283)

* docs: changed icons (#3296)

* docs: design fixes to the sidebar (#3297)

* redesign fixes

* docs: small design fixes

* docs: several design fixes after restructure (#3299)

* docs: bordered icon fixes

* docs: desgin fixes

* fixes to code blocks and sidebar scroll

* design adjustments

* docs: restructured homepage (#3305)

* docs: restructured homepage

* design fixes

* fixed core concepts icon

* docs: added core concepts page (#3318)

* docs: restructured homepage

* design fixes

* docs: added core concepts page

* changed text of different components

* docs: added architecture link

* added missing prop for user guide

* docs: added regions overview page (#3327)

* docs: added regions overview

* moved region pages to new structure

* docs: fixed description of regions architecture page

* small changes

* small fix

* docs: added customers overview page (#3331)

* docs: added regions overview

* moved region pages to new structure

* docs: fixed description of regions architecture page

* small changes

* small fix

* docs: added customers overview page

* fix link

* resolve link issues

* docs: updated regions architecture image

* docs: second-iteration fixes (#3347)

* docs: redesigned document

* design fixes

* docs: added products overview page (#3354)

* docs: added carts overview page (#3363)

* docs: added orders overview (#3364)

* docs: added orders overview

* added links in overview

* docs: added vercel redirects

* docs: added soon badge for cards (#3389)

* docs: resolved feedback changes + organized troubleshooting pages (#3409)

* docs: resolved feedback changes

* added extra line

* docs: changed icons for restructure (#3421)

* docs: added taxes overview page (#3422)

* docs: added taxes overview page

* docs: fix sidebar label

* added link to taxes overview page

* fixed link

* docs: fixed sidebar scroll (#3429)

* docs: added discounts overview (#3432)

* docs: added discounts overview

* fixed links

* docs: added gift cards overview (#3433)

* docs: added price lists overview page (#3440)

* docs: added price lists overview page

* fixed links

* docs: added sales channels overview page (#3441)

* docs: added sales overview page

* fixed links

* docs: added users overview (#3443)

* docs: fixed sidebar border height (#3444)

* docs: fixed sidebar border height

* fixed svg markup

* docs: added possible solutions to feedback component (#3449)

* docs: added several overview pages + restructured files (#3463)

* docs: added several overview pages

* fixed links

* docs: added feature flags + PAK overview pages (#3464)

* docs: added feature flags + PAK overview pages

* fixed links

* fix link

* fix link

* fixed links colors

* docs: added strategies overview page (#3468)

* docs: automated upgrade guide (#3470)

* docs: automated upgrade guide

* fixed vercel redirect

* docs: restructured files in docs codebase (#3475)

* docs: restructured files

* docs: fixed eslint exception

* docs: finished restructure loose-ends (#3493)

* fixed uses of backend

* docs: finished loose ends

* eslint fixes

* fixed links

* merged master

* added update instructions for v1.7.12
210 lines
6.5 KiB
Markdown
210 lines
6.5 KiB
Markdown
---
|
||
description: 'Learn how to integrate Mailchimp with the Medusa backend. Learn how to install the plugin on the Medusa backend and how to add a subscription form.'
|
||
addHowToData: true
|
||
---
|
||
|
||
# Mailchimp
|
||
|
||
In this document, you’ll learn about the Mailchimp plugin, what it does, and how to use it.
|
||
|
||
## Overview
|
||
|
||
[Mailchimp](https://mailchimp.com) is an email marketing service that can be used to create newsletters and subscriptions.
|
||
|
||
By integrating Mailchimp with Medusa, customers will be able to subscribe from Medusa to your Mailchimp newsletter and will be automatically added to your Mailchimp subscribers list.
|
||
|
||
:::note
|
||
|
||
This plugin is only used to allow your customers to subscribe but does not actually do any email sending. If you want to send emails to customers based on specific events, for example, when an order is placed, you should check out the [SendGrid plugin](./sendgrid.mdx) instead.
|
||
|
||
:::
|
||
|
||
---
|
||
|
||
## Prerequisites
|
||
|
||
Before going further with this guide make sure you have a Medusa backend set up. You can follow the [Quickstart guide](../../development/backend/install.mdx).
|
||
|
||
You also need a Mailchimp account, so please [create one](https://mailchimp.com/signup) before you start.
|
||
|
||
---
|
||
|
||
## Obtain Mailchimp Keys
|
||
|
||
To integrate the plugin into Medusa you need two keys: The API Key and the Newsletter list or Audience ID. The API Key acts as a credential for your account, whereas the Newsletter list ID determines which audience should the subscribed customers be added to.
|
||
|
||
You can follow [this guide](https://mailchimp.com/help/about-api-keys/#Find_or_generate_your_API_key) from Mailchimp’s documentation to obtain an API Key.
|
||
|
||
You can follow [this guide](https://mailchimp.com/help/find-audience-id/) from Mailchimp’s documentation to obtain your Newsletter list or Audience ID.
|
||
|
||
---
|
||
|
||
## Install the Plugin
|
||
|
||
In the directory of your Medusa backend, run the following command to install the Mailchimp plugin:
|
||
|
||
```bash npm2yarn
|
||
npm install medusa-plugin-mailchimp
|
||
```
|
||
|
||
### Add Keys
|
||
|
||
Open `.env` and add the following keys:
|
||
|
||
```bash
|
||
MAILCHIMP_API_KEY=<YOUR_API_KEY>
|
||
MAILCHIMP_NEWSLETTER_LIST_ID=<YOUR_NEWSLETTER_LIST_ID>
|
||
```
|
||
|
||
Make sure to replace `<YOUR_API_KEY>` with your API Key and `<YOUR_NEWSLETTER_LIST_ID>` with your Newsletter list or Audience ID.
|
||
|
||
### Add Plugin to Medusa Config
|
||
|
||
Open `medusa-config.js` and add the new plugin into the `plugins` array:
|
||
|
||
```js title=medusa-config.js
|
||
const plugins = [
|
||
// ...,
|
||
{
|
||
resolve: `medusa-plugin-mailchimp`,
|
||
options: {
|
||
api_key: process.env.MAILCHIMP_API_KEY,
|
||
newsletter_list_id:
|
||
process.env.MAILCHIMP_NEWSLETTER_LIST_ID,
|
||
},
|
||
},
|
||
]
|
||
```
|
||
|
||
---
|
||
|
||
## Test it Out
|
||
|
||
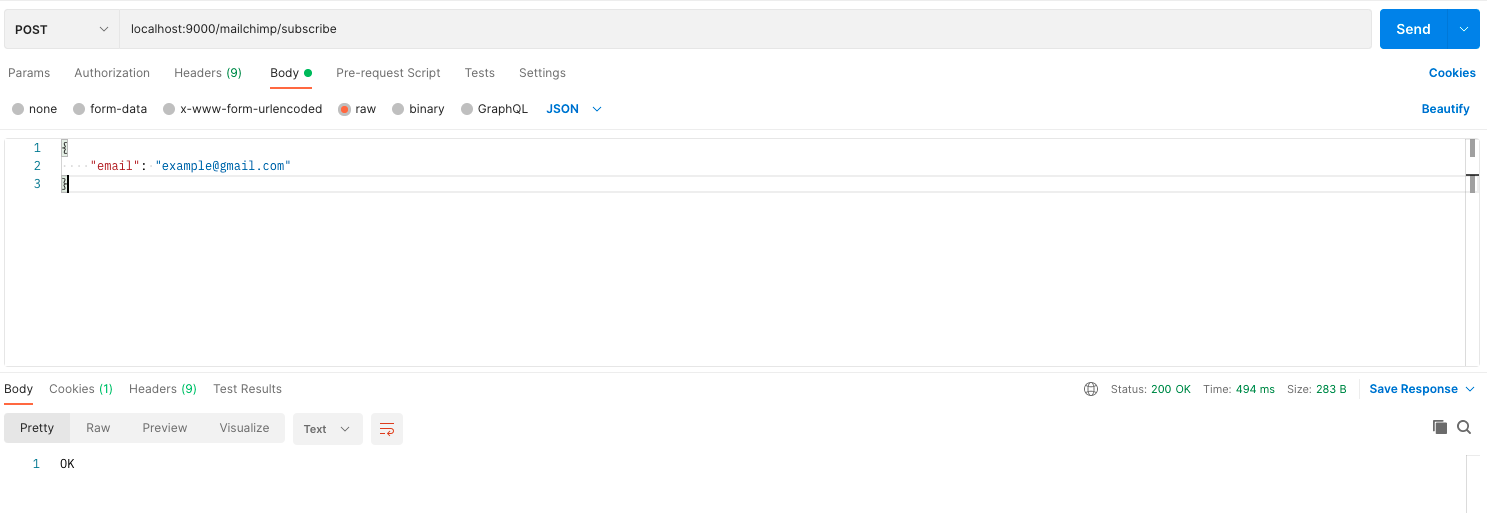
This plugin adds a new `POST` endpoint at `/mailchimp/subscribe`. This endpoint requires in the body of the request an `email` field. You can also optionally include a `data` object that holds any additional data you want to send to Mailchimp. You can check out [Mailchimp’s subscription documentation](https://mailchimp.com/developer/marketing/api/list-members/add-member-to-list/) for more details on the data you can send.
|
||
|
||
### Without Additional Data
|
||
|
||
Try sending a `POST` request to `/mailchimp/subscribe` with the following JSON body:
|
||
|
||
```json noReport
|
||
{
|
||
"email": "example@gmail.com"
|
||
}
|
||
```
|
||
|
||
If the subscription is successful, a `200` response code will be returned with `OK` message.
|
||
|
||
|
||
|
||
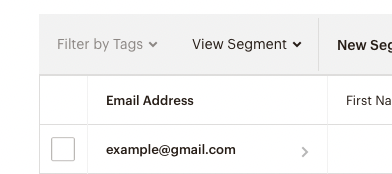
If you check your Mailchimp dashboard, you should find the email added to your Audience list.
|
||
|
||
|
||
|
||
### With Additional Data
|
||
|
||
Here’s an example of sending additional data with the subscription:
|
||
|
||
```json noReport
|
||
{
|
||
"email": "example@gmail.com",
|
||
"data": {
|
||
"tags": ["customer"]
|
||
}
|
||
}
|
||
```
|
||
|
||
All fields inside `data` will be sent to Mailchimp’s API along with the email.
|
||
|
||
---
|
||
|
||
## Use Mailchimp Service
|
||
|
||
If you want to subscribe to users without using this endpoint or at a specific place in your code, you can use Mailchimp’s service `mailchimpService` in your endpoints, services, or subscribers. This service has a method `subscribeNewsletter` which lets you use the subscribe functionality.
|
||
|
||
Here’s an example of using the `mailchimpService` inside an endpoint:
|
||
|
||
```jsx title=src/api/index.ts
|
||
const mailchimpService = req.scope.resolve("mailchimpService")
|
||
|
||
mailchimpService.subscribeNewsletter(
|
||
"example@gmail.com",
|
||
{ tags: ["customer"] } // optional
|
||
)
|
||
```
|
||
|
||
:::tip
|
||
|
||
You can learn more about how you can use services in your endpoints, services, and subscribers in the [Services documentation](../../development/services/create-service.md#using-your-custom-service).
|
||
|
||
:::
|
||
|
||
---
|
||
|
||
## Add Subscription Form
|
||
|
||
This section has a simple example of adding a subscription form in your storefront. The code is for React-based frameworks but you can use the same logic for your storefronts regardless of the framework you are using.
|
||
|
||
You’ll need to use [axios](https://github.com/axios/axios) to send API requests, so if you don’t have it installed make sure you install it first:
|
||
|
||
```bash npm2yarn
|
||
npm install axios
|
||
```
|
||
|
||
Then, in the component you want to add the subscription form add the following code:
|
||
|
||
```tsx
|
||
import axios from "axios"
|
||
import { useState } from "react"
|
||
|
||
export default function NewsletterForm() {
|
||
const [email, setEmail] = useState("")
|
||
|
||
function subscribe(e) {
|
||
e.preventDefault()
|
||
if (!email) {
|
||
return
|
||
}
|
||
|
||
axios.post("http://localhost:9000/mailchimp/subscribe", {
|
||
email,
|
||
})
|
||
.then((e) => {
|
||
alert("Subscribed sucessfully!")
|
||
setEmail("")
|
||
})
|
||
.catch((e) => {
|
||
console.error(e)
|
||
alert("An error occurred")
|
||
})
|
||
}
|
||
|
||
return (
|
||
<form onSubmit={subscribe}>
|
||
<h2>Sign Up for our newsletter</h2>
|
||
<input
|
||
type="email"
|
||
name="email"
|
||
id="email"
|
||
placeholder="example@gmail.com"
|
||
value={email}
|
||
onChange={(e) => setEmail(e.target.value)}
|
||
/>
|
||
<button type="submit">Subscribe</button>
|
||
</form>
|
||
)
|
||
}
|
||
```
|
||
|
||
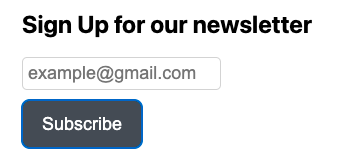
This will result in a subscription form similar to the following:
|
||
|
||
|
||
|
||
If you try entering an email and clicking Subscribe, the email will be subscribed to your Mailchimp newsletter successfully.
|
||
|
||
---
|
||
|
||
## See Also
|
||
|
||
- Check out [SendGrid plugin](./sendgrid.mdx) for more Email functionalities.
|
||
- [Plugins Overview](../../development/plugins/overview.mdx)
|