525 lines
18 KiB
Markdown
525 lines
18 KiB
Markdown
---
|
||
description: 'Learn step-by-step.'
|
||
---
|
||
|
||
# Deploy Your Medusa Server on Qovery
|
||
|
||
In this document, you'll learn how to deploy your Medusa server on Qovery with the help of Terraform.
|
||
|
||
[Qovery](https://www.qovery.com/) is a Continuous Deployment Platform that provides you with the developer experience of Heroku on top of your cloud provider (For example, AWS, DigitalOcean).
|
||
|
||
[Terraform](https://www.terraform.io/) is an open source infrastructure as code software (IaC) tool that allows you to easily deploy apps like Medusa and the resources it needs to Qovery using a single script.
|
||
|
||
:::note
|
||
|
||
This tutorial explains how to deploy Medusa to a Qovery organization with an AWS cluster. If you want to use a cloud provider other than AWS, you need to make changes to some of the keys and variables used in the tutorial.
|
||
|
||
:::
|
||
|
||
## Prerequisites
|
||
|
||
### Medusa Server
|
||
|
||
It is assumed that you already have a Medusa server installed locally. If you don’t, please follow the [quickstart guide](../../quickstart/quick-start.mdx).
|
||
|
||
Furthermore, your Medusa server should be configured to work with PostgreSQL and Redis. You can follow the [Configure your Server documentation](../../usage/configurations.md) to learn how to do that.
|
||
|
||
### Needed Accounts
|
||
|
||
- A [Qovery](https://start.qovery.com/) account with a created organization. Qovery provides a free plan that you can use.
|
||
- An [AWS](https://aws.amazon.com/) account that you’ll connect to a Qovery cluster.
|
||
- A [GitHub](https://github.com/) account to create a repository to host your server’s codebase.
|
||
|
||
:::tip
|
||
|
||
If you want to use another [Git Provider supported by Qovery](https://hub.qovery.com/docs/useful-resources/faq/#what-git-providers-do-you-support), it’s possible to follow along with this guide but you’ll have to perform the equivalent steps in your Git Provider.
|
||
|
||
:::
|
||
|
||
### Required Tools
|
||
|
||
- Git’s CLI tool. You can follow [this documentation to learn how to install it for your operating system](../../tutorial/0-set-up-your-development-environment.mdx#git).
|
||
- Terraform’s CLI tool. You can follow [this guide to install it based on your operating system](https://www.terraform.io/downloads).
|
||
- Qovery’s CLI tool. You can follow [this guide to install it based on your operating system](https://hub.qovery.com/docs/using-qovery/interface/cli/#install).
|
||
|
||
---
|
||
|
||
## Create GitHub Repository
|
||
|
||
Before you can deploy your Medusa server you need to create a GitHub repository and push the code base to it.
|
||
|
||
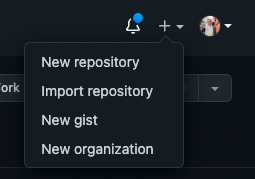
On GitHub, click the plus icon at the top right, then click New Repository.
|
||
|
||
|
||
|
||
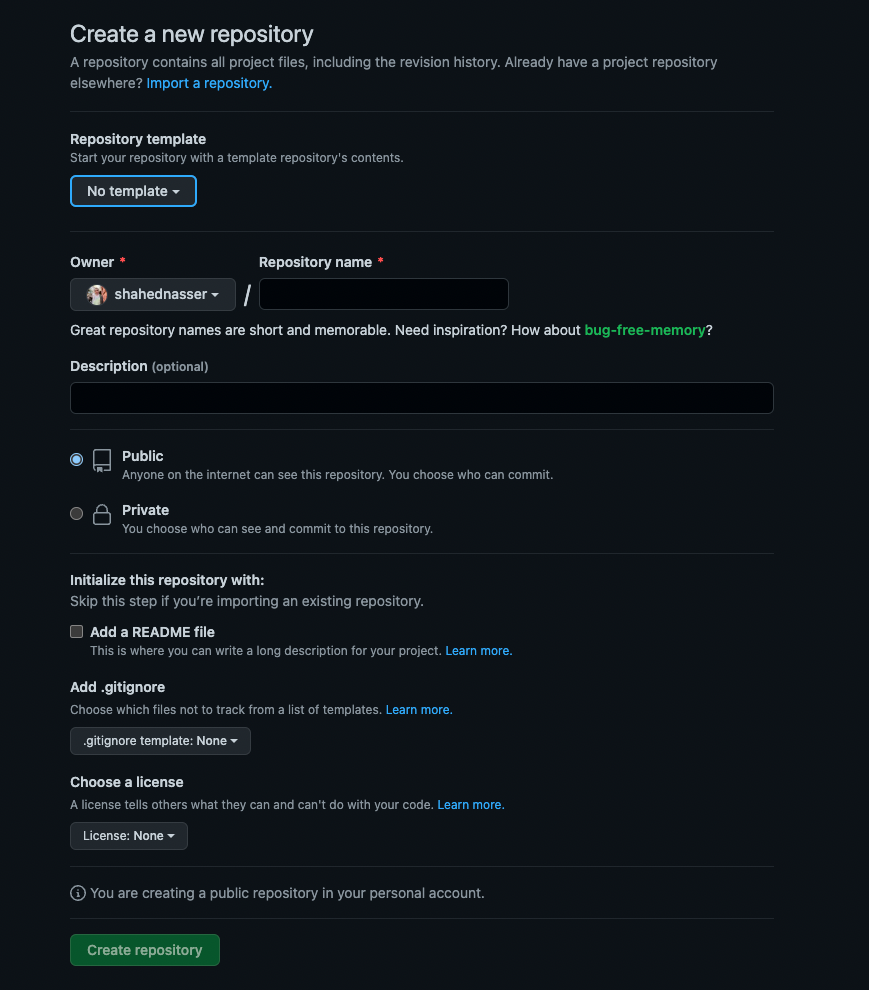
You’ll then be redirected to a new page with a form. In the form, enter the Repository Name then scroll down and click Create repository.
|
||
|
||
|
||
|
||
### Push Code to GitHub Repository
|
||
|
||
The next step is to push the code to the GitHub repository you just created.
|
||
|
||
After creating the repository, you’ll be redirected to the repository’s page. On that page, you should see a URL that you can copy to connect your repository to a local directory.
|
||
|
||

|
||
|
||
Copy the link. Then, open your terminal in the directory that holds your Medusa server codebase and run the following commands:
|
||
|
||
```bash
|
||
git init
|
||
git remote add origin <GITHUB_URL>
|
||
```
|
||
|
||
Where `<GITHUB_URL>` is the URL you just copied.
|
||
|
||
Then, add, commit, and push the changes into the repository:
|
||
|
||
```bash
|
||
git add .
|
||
git commit -m "initial commit"
|
||
git push origin master
|
||
```
|
||
|
||
After pushing the changes, you can find the files in your GitHub repository.
|
||
|
||
---
|
||
|
||
## Deploy to Qovery
|
||
|
||
In this section, you’ll learn how to deploy your Medusa server to Qovery with the help of Terraform.
|
||
|
||
### Sign in Using Qovery CLI
|
||
|
||
If you haven’t logged in to your Qovery account using the Qovery CLI tool yet, run the following command:
|
||
|
||
```bash
|
||
qovery auth
|
||
```
|
||
|
||
This opens a new page in your browser to log in to Qovery.
|
||
|
||
### Retrieve Qovery Access Token
|
||
|
||
Terraform needs an access token from Qovery so that it can deploy to your Qovery organization.
|
||
|
||
Run the following command to retrieve a Qovery access token:
|
||
|
||
```bash
|
||
qovery token
|
||
```
|
||
|
||
You’ll be prompted to choose an organization and add a name and description for the token. Once the command finishes executing, you’ll be given an access token. Save it to use in the next steps.
|
||
|
||
### Add Terraform Variables
|
||
|
||
You need to add some variables to use for your Medusa deployment to Qovery.
|
||
|
||
In the root directory of your Medusa server, create the file `variables.tf` with the following content:
|
||
|
||
```
|
||
variable "qovery_organization_id" {
|
||
type = string
|
||
nullable = false
|
||
description = "ID of Qovery organization"
|
||
}
|
||
|
||
variable "qovery_create_cluster" {
|
||
type = bool
|
||
nullable = false
|
||
default = true
|
||
description = "Whether to create a new cluster or not"
|
||
}
|
||
|
||
variable "qovery_cluster_id" {
|
||
type = string
|
||
nullable = true
|
||
default = ""
|
||
description = "The ID of the cluster you want to use if you don't want to create a new one. You can get the Cluster ID using this endpoint: https://api-doc.qovery.com/#tag/Clusters/operation/listOrganizationCluster"
|
||
}
|
||
|
||
variable "qovery_access_token" {
|
||
type = string
|
||
sensitive = true
|
||
nullable = false
|
||
description = "Qovery's access token generated with the command 'qovery token'"
|
||
}
|
||
|
||
variable "aws_access_key_id" {
|
||
type = string
|
||
sensitive = true
|
||
nullable = true
|
||
description = "Necessary only if creating a new cluster"
|
||
}
|
||
|
||
variable "aws_secret_access_key" {
|
||
type = string
|
||
sensitive = true
|
||
nullable = true
|
||
description = "Necessary only if creating a new cluster"
|
||
}
|
||
|
||
variable "aws_region" {
|
||
type = string
|
||
nullable = false
|
||
default = "us-east-2"
|
||
description = "Necessary only if creating a new cluster"
|
||
}
|
||
|
||
variable "medusa_jwt_secret" {
|
||
type = string
|
||
default = "your-super-secret" # TO CHANGE FOR PRODUCTION
|
||
sensitive = true
|
||
nullable = false
|
||
description = "The JWT Secret to use in Medusa"
|
||
}
|
||
|
||
variable "medusa_cookie_secret" {
|
||
type = string
|
||
default = "your-super-secret-pt2" # TO CHANGE FOR PRODUCTION
|
||
sensitive = true
|
||
nullable = false
|
||
description = "The Cookie Secret to use in Medusa"
|
||
}
|
||
|
||
variable "git_url" {
|
||
type = string
|
||
nullable = false
|
||
description = "The Git repo associated with the qovery app. Make sure it ends with '.git'."
|
||
}
|
||
|
||
variable "git_branch" {
|
||
type = string
|
||
nullable = false
|
||
default = "master"
|
||
description = "The branch of the Git repo. Default is master"
|
||
}
|
||
|
||
variable "git_root_path" {
|
||
type = string
|
||
nullable = false
|
||
default = "/"
|
||
description = "The base directory to run the app from. Default is /"
|
||
}
|
||
```
|
||
|
||
This defines the required variables and sets some of them as `secret` to ensure their values aren’t printed in the console during deployment.
|
||
|
||
Next, to set the values of these variables, create the file `terraform.tfvars` with the following content:
|
||
|
||
```bash
|
||
qovery_organization_id = ""
|
||
|
||
# Optional
|
||
qovery_create_cluster = true
|
||
|
||
# Optional
|
||
qovery_cluster_id = null
|
||
|
||
qovery_access_token = ""
|
||
|
||
# Optional
|
||
aws_access_key_id = null
|
||
|
||
# Optional
|
||
aws_secret_access_key = null
|
||
|
||
# Optional
|
||
aws_region = null
|
||
|
||
# Optional
|
||
medusa_jwt_secret = "secret"
|
||
|
||
# Optional
|
||
medusa_cookie_secret = "secret"
|
||
|
||
git_url = ""
|
||
|
||
# Optional
|
||
git_branch = "master"
|
||
|
||
# Optional
|
||
git_root_path = "/"
|
||
```
|
||
|
||
Here’s an explanation of each of the variables and how to retrieve their variables:
|
||
|
||
- `qovery_organization_id`: The ID of the Qovery organization to deploy the server to. It can be found by logging into your [Qovery Console](https://console.qovery.com/). You’ll be redirected to the organization’s main page with a URL of the format `https://console.qovery.com/platform/organization/<ORGANIZATION_ID>/projects`. Copy the `<ORGANIZATION_ID>` in the URL to use as the value of this field.
|
||
- `qovery_create_cluster`: A boolean value indicating whether a new cluster should be created or not. If you already have a cluster that you want to use, you can set the value to `false` and set the value of `qovery_cluster_id`. Otherwise, set the value to `true` and set the values of `aws_access_key_id`, `aws_secret_access_key`, and `aws_region`.
|
||
- `qovery_cluster_id`: The ID of the existing cluster to use (if `qovery_create_cluster` is set to `false`). You can use [Qovery’s REST API](https://api-doc.qovery.com/#tag/Clusters/operation/listOrganizationCluster) to retrieve the cluster ID. You can use the token you generated earlier for the Bearer authorization token as explained [here](https://hub.qovery.com/docs/using-qovery/interface/cli/#generate-api-token).
|
||
- `aws_access_key_id`, `aws_secret_access_key`, and `aws_region`: The credentials used to create the cluster (if `qovery_create_cluster` is set to `true`). You can refer to [this guide](https://docs.aws.amazon.com/general/latest/gr/aws-sec-cred-types.html#access-keys-and-secret-access-keys) to learn how to retrieve the `aws_access_key_id` and `aws_secret_access_key`.
|
||
- `medusa_jwt_secret`: The value of the JSON Web Token (JWT) Secret on your Medusa server. It’s recommended to use a strong randomly generated string.
|
||
- `medusa_cookie_secret`: The value of the Cookie Secret on your Medusa server. It’s recommended to use a strong randomly generated string.
|
||
- `git_url`: The URL of the Git repository you created earlier. Make sure it ends with `.git`.
|
||
- `git_branch`: The branch to use in the GitHub repo. By default it’s `master`.
|
||
- `git_root_path`: The root path of the Medusa server. By default, it’s `/`. If you are hosting your Medusa server in a monorepo in a nested directory, you need to change the value of this variable.
|
||
|
||
### Add Terraform Configuration File
|
||
|
||
In the root directory of your Medusa server, create the file `main.tf` with the following content:
|
||
|
||
```bash
|
||
# Install the Qovery Terraform provider
|
||
terraform {
|
||
required_providers {
|
||
qovery = {
|
||
source = "qovery/qovery"
|
||
}
|
||
}
|
||
}
|
||
|
||
# Set the access token
|
||
provider "qovery" {
|
||
token = var.qovery_access_token
|
||
}
|
||
|
||
# Create the AWS credentials if qovery_create_cluster is true
|
||
resource "qovery_aws_credentials" "my_aws_creds" {
|
||
organization_id = var.qovery_organization_id
|
||
name = "My AWS Creds"
|
||
access_key_id = var.aws_access_key_id
|
||
secret_access_key = var.aws_secret_access_key
|
||
count = var.qovery_create_cluster ? 1 : 0
|
||
}
|
||
|
||
# Create a new cluster if qovery_create_cluster is true
|
||
resource "qovery_cluster" "my_cluster" {
|
||
organization_id = var.qovery_organization_id
|
||
credentials_id = qovery_aws_credentials.my_aws_creds[0].id
|
||
name = "Demo Medusa cluster"
|
||
description = "Terraform medusa cluster"
|
||
cloud_provider = "AWS"
|
||
region = var.aws_region
|
||
instance_type = "T3A_MEDIUM"
|
||
min_running_nodes = 3
|
||
max_running_nodes = 4
|
||
state = "RUNNING"
|
||
count = var.qovery_create_cluster ? 1 : 0
|
||
|
||
depends_on = [
|
||
qovery_aws_credentials.my_aws_creds
|
||
]
|
||
}
|
||
|
||
# Create a new project
|
||
resource "qovery_project" "my_project" {
|
||
organization_id = var.qovery_organization_id
|
||
name = "Medusa"
|
||
|
||
depends_on = [
|
||
qovery_cluster.my_cluster
|
||
]
|
||
}
|
||
|
||
# Create a new environment in the project
|
||
resource "qovery_environment" "production" {
|
||
project_id = qovery_project.my_project.id
|
||
name = "production"
|
||
mode = "PRODUCTION"
|
||
cluster_id = !var.qovery_create_cluster && var.qovery_cluster_id != "" ? var.qovery_cluster_id : qovery_cluster.my_cluster[0].id
|
||
|
||
depends_on = [
|
||
qovery_project.my_project
|
||
]
|
||
}
|
||
|
||
# Create a PostgreSQL database in the environment
|
||
resource "qovery_database" "my_psql_database" {
|
||
environment_id = qovery_environment.production.id
|
||
name = "medusa psql db"
|
||
type = "POSTGRESQL"
|
||
version = "13"
|
||
mode = "MANAGED" # Use AWS RDS for PostgreSQL (backup and PITR automatically configured by Qovery)
|
||
storage = 10 # 10GB of storage
|
||
accessibility = "PRIVATE" # do not make it publicly accessible
|
||
state = "RUNNING"
|
||
|
||
depends_on = [
|
||
qovery_environment.production,
|
||
]
|
||
}
|
||
|
||
# Create a Redis database in the environment
|
||
resource "qovery_database" "my_redis_database" {
|
||
environment_id = qovery_environment.production.id
|
||
name = "medusa redis db"
|
||
type = "REDIS"
|
||
version = "6"
|
||
mode = "CONTAINER"
|
||
storage = 10 # 10GB of storage
|
||
accessibility = "PRIVATE"
|
||
state = "RUNNING"
|
||
|
||
depends_on = [
|
||
qovery_environment.production,
|
||
qovery_database.my_psql_database,
|
||
]
|
||
}
|
||
|
||
# Create the Medusa application with all the configuration needed
|
||
resource "qovery_application" "medusa_app" {
|
||
environment_id = qovery_environment.production.id
|
||
name = "medusa app"
|
||
cpu = 1000
|
||
memory = 512
|
||
state = "RUNNING"
|
||
git_repository = {
|
||
url = var.git_url
|
||
branch = var.git_branch
|
||
root_path = var.git_root_path
|
||
}
|
||
build_mode = "DOCKER"
|
||
dockerfile_path = "Dockerfile"
|
||
min_running_instances = 1
|
||
max_running_instances = 1
|
||
ports = [
|
||
{
|
||
internal_port = 9000
|
||
external_port = 443
|
||
protocol = "HTTP"
|
||
publicly_accessible = true
|
||
}
|
||
]
|
||
environment_variables = [
|
||
{
|
||
key = "PORT"
|
||
value = "9000"
|
||
},
|
||
{
|
||
key = "NODE_ENV"
|
||
value = "production"
|
||
},
|
||
{
|
||
key = "NPM_CONFIG_PRODUCTION"
|
||
value = "false"
|
||
}
|
||
]
|
||
secrets = [
|
||
{
|
||
key = "JWT_SECRET"
|
||
value = var.medusa_jwt_secret
|
||
},
|
||
{
|
||
key = "COOKIE_SECRET"
|
||
value = var.medusa_cookie_secret
|
||
},
|
||
{
|
||
key = "DATABASE_URL"
|
||
value = "postgresql://${qovery_database.my_psql_database.login}:${qovery_database.my_psql_database.password}@${qovery_database.my_psql_database.internal_host}:${qovery_database.my_psql_database.port}/postgres"
|
||
},
|
||
{
|
||
key = "REDIS_URL"
|
||
value = "redis://${qovery_database.my_redis_database.login}:${qovery_database.my_redis_database.password}@${qovery_database.my_redis_database.internal_host}:${qovery_database.my_redis_database.port}"
|
||
}
|
||
]
|
||
|
||
depends_on = [
|
||
qovery_environment.production,
|
||
qovery_database.my_psql_database,
|
||
qovery_database.my_redis_database,
|
||
]
|
||
}
|
||
```
|
||
|
||
This is a Terraform configuration file that creates all the resources necessary to deploy Medusa to Qovery. If you set `qovery_create_cluster` to `true`, it will create new credentials and a cluster in your Qovery organization using the AWS credentials you set in the variables.
|
||
|
||
Next, it creates a new project, environment, PostgreSQL database, and a Redis database in your Qovery organization.
|
||
|
||
Finally, it creates the Medusa app and sets all the necessary environment variables needed to run it.
|
||
|
||
:::tip
|
||
|
||
This deployment uses Docker. By default, you should have the files [`Dockerfile`](https://github.com/medusajs/medusa-starter-default/blob/master/Dockerfile) and [`docker-compose.yml`](https://github.com/medusajs/medusa-starter-default/blob/master/docker-compose.yml)` in the root of your Medusa server.
|
||
|
||
:::
|
||
|
||
### Change develop.sh
|
||
|
||
The `Dockerfile` runs the file `develop.sh` to start the server. Change the content of `develop.sh` to the following:
|
||
|
||
```bash
|
||
#!/bin/bash
|
||
|
||
#Run migrations to ensure the database is updated
|
||
medusa migrations run
|
||
|
||
#Start production server
|
||
medusa start
|
||
```
|
||
|
||
This makes sure the production server is started and not a development server.
|
||
|
||
### Initialize Terraform
|
||
|
||
In your terminal, run the following command to initialize Terraform:
|
||
|
||
```bash
|
||
terraform init
|
||
```
|
||
|
||
This will install the Qovery Terraform provider and have everything ready before the deployment.
|
||
|
||
### Deploy the Medusa App
|
||
|
||
Finally, run the following command to deploy your Medusa app:
|
||
|
||
```bash
|
||
terraform apply
|
||
```
|
||
|
||
You’ll be asked to confirm creating all the necessary resources in Qovery. Enter `yes` and the deployment will start.
|
||
|
||
The deployment can take up to thirty minutes to finish. You’ll be able to track its status both in your terminal and in the [Qovery Console](https://console.qovery.com/).
|
||
|
||
:::tip
|
||
|
||
If you run into any errors while running this command, you can just re-run it after fixing the errors and it will pick up from where it left off. For example, if an error occurred after the creation of the PostgreSQL database, terraform continues from the next task and does not recreate the PostgreSQL database.
|
||
|
||
:::
|
||
|
||
---
|
||
|
||
## Test your Server
|
||
|
||
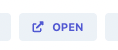
Once the command finishes and the deployment is successful, you can access your server in the [Qovery Console](https://console.qovery.com/). Go to the project, environment, then the app that you created using Terraform and Qovery. In the app, click the Open button at the top right to open your website in a new tab.
|
||
|
||
|
||
|
||
You can access any of the endpoints on your server using the server URL. For example, you can get the list of products using the endpoint `/store/products`.
|
||
|
||
---
|
||
|
||
## Run Commands on Your Server
|
||
|
||
To run commands on your server, run the following command:
|
||
|
||
```bash
|
||
qovery shell
|
||
```
|
||
|
||
You’ll be asked to either confirm the existing context or choose a new context.
|
||
|
||
After choosing your Medusa app in the context, you should be able to execute any command in the directory of your Medusa server. For example, you can run the [`user` command using Medusa’s CLI tool to create a new user](../../cli/reference.md#user):
|
||
|
||
```bash
|
||
npm install @medusajs/medusa-cli -g
|
||
medusa user --email <EMAIL> --password <PASSWORD>
|
||
```
|
||
|
||
---
|
||
|
||
## Add Environment Variables
|
||
|
||
You’ll likely need to add environment variables later such as Admin Cross-Origin Resource Sharing (CORS) and Store CORS variables.
|
||
|
||
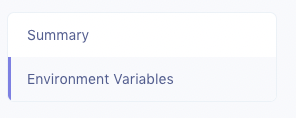
To add environment variables, in your [Qovery Console](https://console.qovery.com/) go to the Medusa app and choose Environment Variables from the sidebar. You can add environment variables here at any point later on.
|
||
|
||
|
||
|
||
---
|
||
|
||
## See Also
|
||
|
||
- [Deploy the Medusa Admin to Netlify](../admin/deploying-on-netlify.md)
|
||
- [Deploy the Gatsby Storefront to Netlify](../storefront/deploying-gatsby-on-netlify.md)
|