76 lines
4.3 KiB
Markdown
76 lines
4.3 KiB
Markdown
---
|
||
description: "Users are admins that can manage the ecommerce store’s data and operations. Learn about the available features and guides."
|
||
---
|
||
|
||
# Users Architecture Overview
|
||
|
||
In this document, you’ll learn about the users architecture and invites in Medusa.
|
||
|
||
## Overview
|
||
|
||
A user is an admin that can view and process sensitive and private information in the commerce store. A store in Medusa can have more than one user. Users can create or invite other users to manage the store.
|
||
|
||
:::tip
|
||
|
||
A user is typically referred to as “admin” throughout the documentation and user guide.
|
||
|
||
:::
|
||
|
||
---
|
||
|
||
## User Entity Overview
|
||
|
||
Some of the `User` entity attributes include:
|
||
|
||
- `email`: a unique string indicating the email of the user.
|
||
- `password_hash`: a string indicating the encrypted password of the user. Passwords are encrypted using the [scrypt-kdf NPM package](https://www.npmjs.com/package/scrypt-kdf). The password hash is nullable, which can be useful if you want to integrate a third-party authentication service that does not require a password.
|
||
- `first_name`: a string indicating the user’s first name.
|
||
- `last_name`: a string indicating the user’s last name.
|
||
- `api_token`: a string that holds the user’s API token. The API token can be used to send authenticated requests to admin endpoints, instead of using cookie session authentication. Check out the [API reference](/api/admin#section/Authentication) to learn how to use it.
|
||
- `role`: a string that indicates the role of the user. Its value can be either `admin`, `member`, or `developer`.
|
||
|
||
:::note
|
||
|
||
The `role` attribute does not actually provide permission or Access Control List (ACL) features within Medusa.
|
||
|
||
:::
|
||
|
||
---
|
||
|
||
## Invites Overview
|
||
|
||
A user can create other users where they specify the user’s details and credentials, and the new user can immediately authenticate using their credentials.
|
||
|
||
Alternatively, a user can invite another user to join by just supplying the new user’s email. Then, the new user can accept the invite and provide their credentials.
|
||
|
||
### Invite Entity Overview
|
||
|
||
An invitation is represented by the `Invite` entity. Some of its attributes include:
|
||
|
||
- `user_email`: a string indicating the email of the user.
|
||
- `role`: a string indicating the role of the user. Similar to the `User` entity’s `role` attribute, its value can be either `admin`, `member`, or `developer`.
|
||
- `accepted`: a boolean value indicating whether the invite has been accepted.
|
||
- `token`: a string that is automatically generated when the invite is created. It’s a hash that is used to later accept the invitation.
|
||
- `expires_at`: a date indicating when the invitation expires.
|
||
|
||
### Invite Process Overview
|
||
|
||
You have full freedom in how you choose to implement the invite flow. This section explains how it’s implemented within the Medusa backend.
|
||
|
||
|
||
|
||
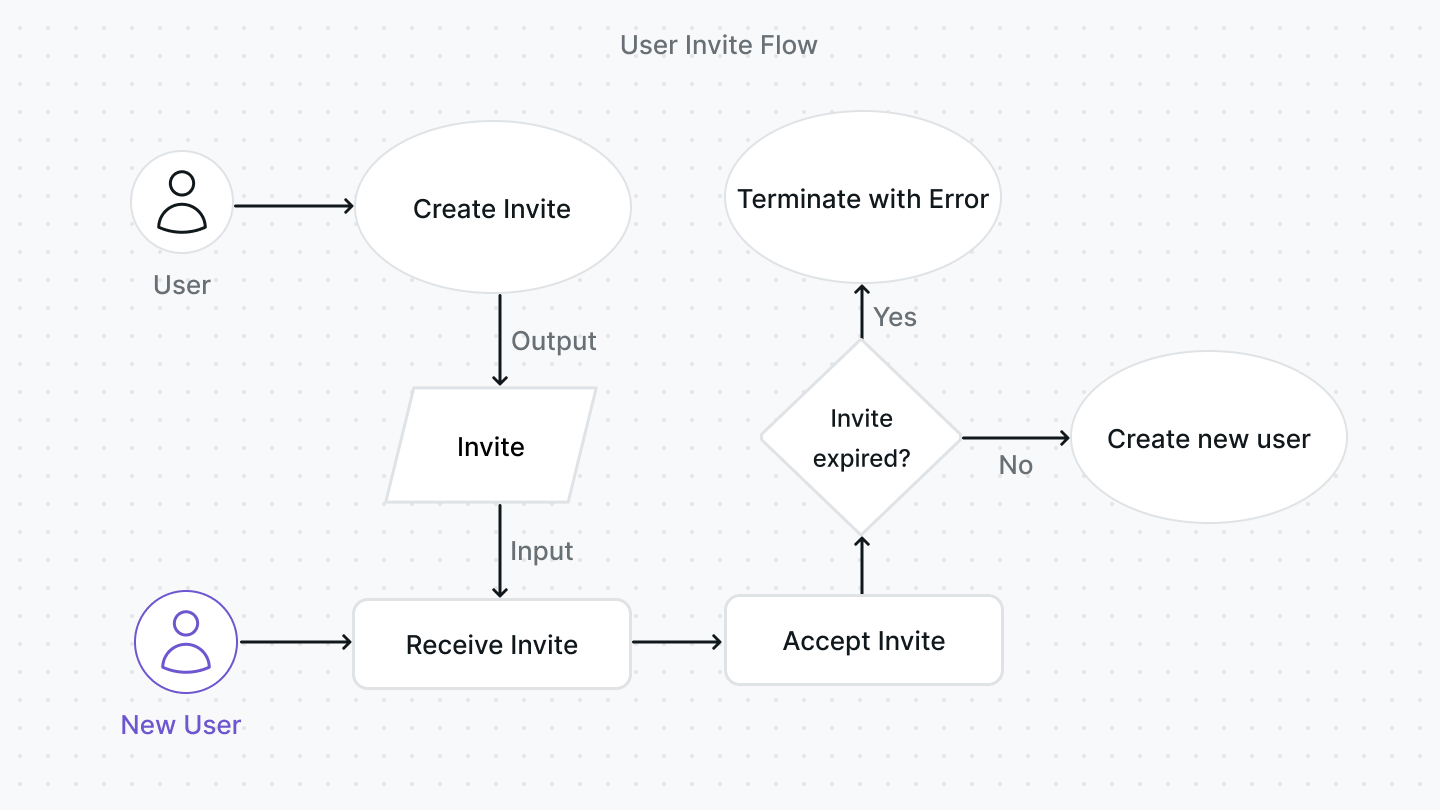
The invitation process typically follows these steps in the Medusa backend:
|
||
|
||
1. A user creates an invite either using the [Create Invite endpoint](/api/admin#tag/Invites/operation/PostInvites) or the `InviteService`'s `create` method. Part of creating an invite includes generating the token and setting the expiry date. By default, the expiry date is set to a week after the date of invitation creation.
|
||
2. The new user receives the invite, typically through their email (although this is not implemented by default within the Medusa backend). The new user has to provide their details and password. The invite can be accepted either using the [Accept Invite endpoint](/api/admin#tag/Invites/operation/PostInvitesInviteAccept) or using the `InviteService`'s `accept` method.
|
||
3. When the new user accepts the invite, the invitation is validated first to ensure it’s not expired. If it’s not expired, a new user is created using the `UserService`'s [create method](../../references/services/classes/UserService.md#create).
|
||
|
||
If an invitation is expired, an existing user can resend the invite either using the Resend Invite endpoint or using the `InviteService`'s resend method. This would generate a new token and reset the expiry date.
|
||
|
||
---
|
||
|
||
## See Also
|
||
|
||
- [How to send an invitation email](./backend/send-invite.md)
|
||
- [How to manage a user's profile](./admin/manage-profile.mdx)
|