387 lines
14 KiB
Markdown
387 lines
14 KiB
Markdown
---
|
||
description: 'Learn how to integrate MeiliSearch with the Medusa backend. Learn how to install the MeiliSearch plugin on the Medusa backend and integrate it into the storefront.'
|
||
addHowToData: true
|
||
---
|
||
|
||
# MeiliSearch
|
||
|
||
In this document, you’ll learn how to install the [MeiliSearch plugin](https://github.com/medusajs/medusa/tree/master/packages/medusa-plugin-meilisearch) and use it on both your Medusa Backend and your storefront.
|
||
|
||
## Overview
|
||
|
||
[MeiliSearch](https://www.meilisearch.com/) is a super-fast, open source search engine built in Rust. It comes with a wide range of features including typo-tolerance, filtering, and sorting.
|
||
|
||
MeiliSearch also provides a pleasant developer experience, as it is extremely intuitive and newcomer-friendly. So, even if you're new to the search engine ecosystem, [their documentation](https://docs.meilisearch.com/) is resourceful enough for everyone to go through and understand.
|
||
|
||
Through Medusa's flexible plugin system, it is possible to add a search engine to your Medusa backend and storefront using MeiliSearch with just a few steps.
|
||
|
||
---
|
||
|
||
## Prerequisites
|
||
|
||
### Medusa Components
|
||
|
||
It is required to have a Medusa backend installed before starting with this documentation. If not, please follow along with the [quickstart guide](../../development/backend/install.mdx) to get started in minutes. The Medusa backend must also have an event bus module installed, which is available when using the default Medusa backend starter.
|
||
|
||
### MeiliSearch Instance
|
||
|
||
You must install MeiliSearch to use it with Medusa. You can follow [this documentation to install MeiliSearch](https://docs.meilisearch.com/learn/getting_started/quick_start.html#setup-and-installation) either locally or on a cloud.
|
||
|
||
Furthermore, you should create a master key for your MeiliSearch instance. If you don’t have one created, follow [this guide](https://docs.meilisearch.com/learn/security/master_api_keys.html#protecting-a-meilisearch-instance) to create a master key.
|
||
|
||
---
|
||
|
||
## Install the MeiliSearch Plugin
|
||
|
||
In the directory of your Medusa backend, run the following command to install the MeiliSearch plugin:
|
||
|
||
```bash npm2yarn
|
||
npm install medusa-plugin-meilisearch
|
||
```
|
||
|
||
Then, add the following environment variables to your Medusa backend:
|
||
|
||
```bash
|
||
MEILISEARCH_HOST=<YOUR_MEILISEARCH_HOST>
|
||
MEILISEARCH_API_KEY=<YOUR_MASTER_KEY>
|
||
```
|
||
|
||
Where `<YOUR_MEILISEARCH_HOST>` is the host of your MeiliSearch instance. By default, if MeiliSearch is installed locally, the host is `http://127.0.0.1:7700`.
|
||
|
||
`<YOUR_MASTER_KEY>` is the master key of your MeiliSearch instance.
|
||
|
||
Finally, in `medusa-config.js` add the following item into the `plugins` array:
|
||
|
||
```jsx title=medusa-config.js
|
||
const plugins = [
|
||
// ...
|
||
{
|
||
resolve: `medusa-plugin-meilisearch`,
|
||
options: {
|
||
// config object passed when creating an instance
|
||
// of the MeiliSearch client
|
||
config: {
|
||
host: process.env.MEILISEARCH_HOST,
|
||
apiKey: process.env.MEILISEARCH_API_KEY,
|
||
},
|
||
settings: {
|
||
// index settings...
|
||
},
|
||
},
|
||
},
|
||
]
|
||
```
|
||
|
||
### Index Settings
|
||
|
||
Under the `settings` key of the plugin's options, you can add settings specific to each index. The settings are of the following format:
|
||
|
||
```js
|
||
const plugins = [
|
||
// ...
|
||
{
|
||
resolve: `medusa-plugin-meilisearch`,
|
||
options: {
|
||
// other options...
|
||
settings: {
|
||
indexName: {
|
||
indexSettings: {
|
||
searchableAttributes,
|
||
displayedAttributes,
|
||
},
|
||
primaryKey,
|
||
transformer,
|
||
},
|
||
},
|
||
},
|
||
},
|
||
]
|
||
```
|
||
|
||
Where:
|
||
|
||
- `indexName`: the name of the index to create in MeiliSearch. For example, `products`. Its value is an object containing the following properties:
|
||
- `indexSettings`: an object that includes the following properties:
|
||
- `searchableAttributes`: an array of strings indicating the attributes in the product entity that can be searched.
|
||
- `displayedAttributes`: an array of strings indicating the attributes in the product entity that should be displayed in the search results.
|
||
- `primaryKey`: an optional string indicating which property acts as a primary key of a document. It's used to enforce unique documents in an index. The default value is `id`. You can learn more in [MeiliSearch's documentation](https://docs.meilisearch.com/learn/core_concepts/primary_key.html#primary-field).
|
||
- `transformer`: an optional function that accepts a product as a parameter and returns an object to be indexed. This allows you to have more control over what you're indexing. For example, you can add details related to variants or custom relations, or you can filter out certain products.
|
||
|
||
Using this index settings structure, you can add more than one index.
|
||
|
||
:::tip
|
||
|
||
These settings are just examples of what you can pass to the MeiliSearch provider. If you need to pass more settings to the MeiliSearch SDK you can pass it inside `indexSettings`.
|
||
|
||
:::
|
||
|
||
Here's an example of the settings you can use:
|
||
|
||
```js title=medusa-config.js
|
||
const plugins = [
|
||
// ...
|
||
{
|
||
resolve: `medusa-plugin-meilisearch`,
|
||
options: {
|
||
// other options...
|
||
settings: {
|
||
products: {
|
||
indexSettings: {
|
||
searchableAttributes: [
|
||
"title",
|
||
"description",
|
||
"variant_sku",
|
||
],
|
||
displayedAttributes: [
|
||
"title",
|
||
"description",
|
||
"variant_sku",
|
||
"thumbnail",
|
||
"handle",
|
||
],
|
||
},
|
||
primaryKey: "id",
|
||
transform: (product) => ({
|
||
id: product.id,
|
||
// other attributes...
|
||
}),
|
||
},
|
||
},
|
||
},
|
||
},
|
||
]
|
||
```
|
||
|
||
---
|
||
|
||
## Test MeiliSearch Plugin
|
||
|
||
Make sure your MeiliSearch instance is running. If you’re unsure how to run it, you can check the [installation documentation](https://docs.meilisearch.com/learn/getting_started/quick_start.html#setup-and-installation) for the command to run the MeiliSearch instance.
|
||
|
||
Then, run the Medusa backend:
|
||
|
||
```bash npm2yarn
|
||
npm run start
|
||
```
|
||
|
||
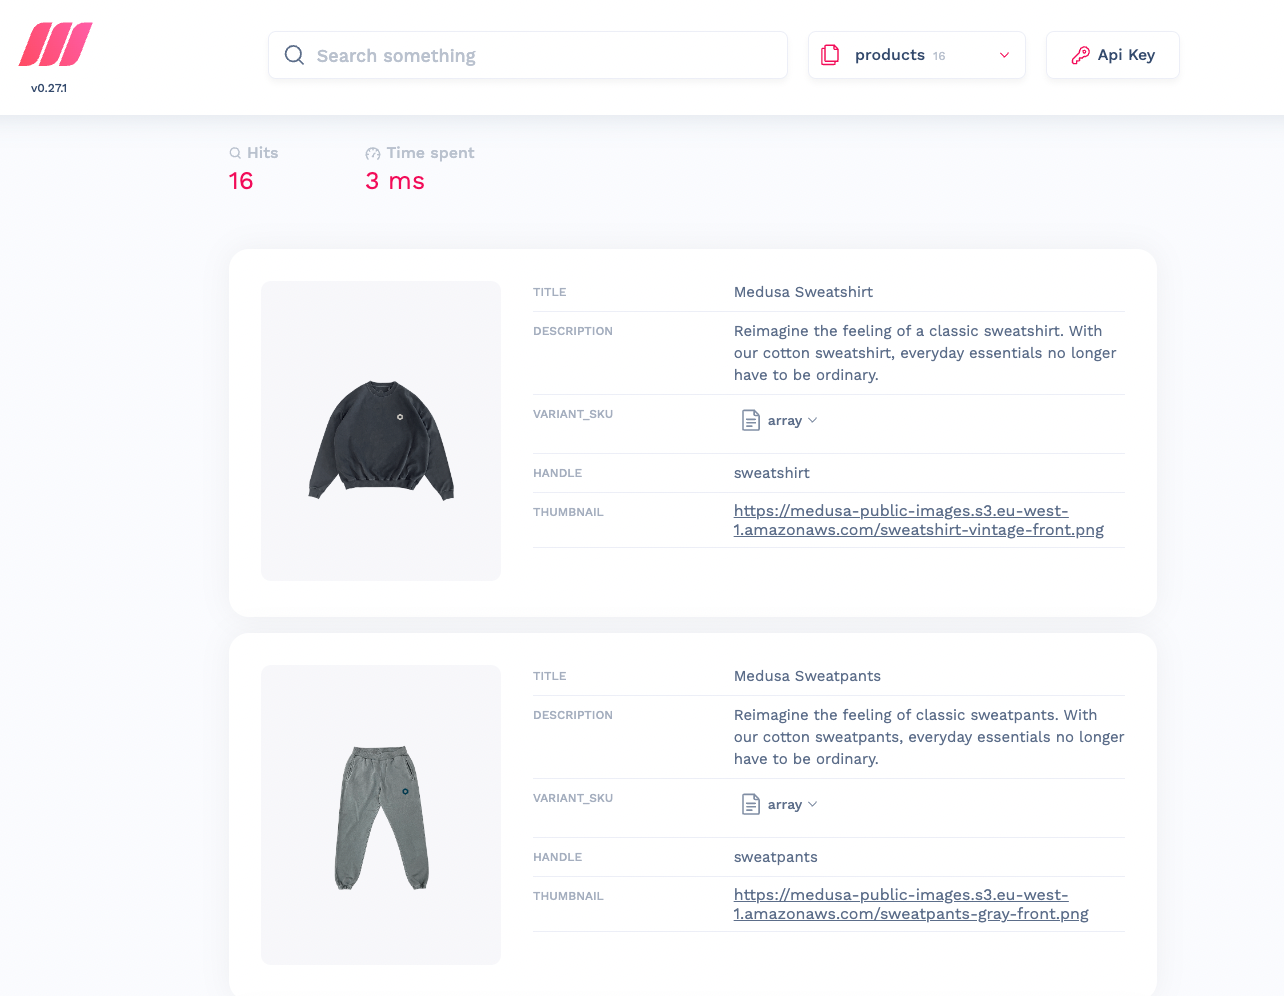
The quickest way to test that the integration is working is by sending a `POST` request to `/store/products/search`. This endpoint accepts a `q` body parameter of the query to search for and returns in the result the products that match this query.
|
||
|
||

|
||
|
||
You can also check that the products are properly indexed by opening the MeiliSearch host URL in your browser, which is `http://127.0.0.1:7700/` by default. You’ll find your products that are on your Medusa backend added there.
|
||
|
||
|
||
|
||
### Add or Update Products
|
||
|
||
If you add or update products on your Medusa backend, the addition or update will be reflected in the MeiliSearch indices.
|
||
|
||
:::note
|
||
|
||
This feature is only available if you have an event module installed in your Medusa backend, as explained in the Prerequisites section.
|
||
|
||
:::
|
||
|
||
---
|
||
|
||
## Add Search to your Storefront
|
||
|
||
In this section, you’ll learn how to add the UI on your storefront to allow searching with MeiliSearch. This section has instructions for Medusa’s [Next.js](../../starters/nextjs-medusa-starter.mdx) storefront as well as React-based frameworks.
|
||
|
||
### Storefront Prerequisites
|
||
|
||
It is assumed you already have a storefront set up and working with the Medusa backend, as this section only covers how to add the search UI.
|
||
|
||
:::tip
|
||
|
||
If you don’t have a storefront set up, you can use the [Next.js starter storefront](../../starters/nextjs-medusa-starter.mdx) that Medusa provides.
|
||
|
||
:::
|
||
|
||
Furthermore, you must create an API key in your MeiliSearch instance that will be used to search on the storefront. To do that, run the following command in your terminal while the MeiliSearch instance is running:
|
||
|
||
```bash
|
||
curl \
|
||
-X POST '<MEILISEARCH_HOST>/keys' \
|
||
-H 'Content-Type: application/json' \
|
||
-H 'Authorization: Bearer <MEILISEARCH_MASTER_KEY>' \
|
||
--data-binary '{
|
||
"description": "Search products",
|
||
"actions": ["search"],
|
||
"indexes": ["products"],
|
||
"expiresAt": "2024-01-01T00:00:00Z"
|
||
}'
|
||
```
|
||
|
||
Make sure to replace `<MEILISEARCH_HOST>` and `<MEILISEARCH_MASTER_KEY>` accordingly.
|
||
|
||
If this request is successful, the API key will be available under the `key` property returned in the JSON response.
|
||
|
||
### Add to Next.js Storefront
|
||
|
||
The Next.js storefront has the MeiliSearch integration available out of the box. To get it working, you just need to follow two steps.
|
||
|
||
First, ensure that the search feature is enabled in `store.config.json`:
|
||
|
||
```json title=store.config.json
|
||
{
|
||
"features": {
|
||
"search": true
|
||
}
|
||
}
|
||
```
|
||
|
||
Then, add the necessary environment variables:
|
||
|
||
```bash
|
||
NEXT_PUBLIC_SEARCH_ENDPOINT=<YOUR_MEILISEARCH_HOST>
|
||
NEXT_PUBLIC_SEARCH_API_KEY=<YOUR_API_KEY>
|
||
NEXT_PUBLIC_SEARCH_INDEX_NAME=products
|
||
```
|
||
|
||
Make sure to replace `<YOUR_MEILISEARCH_HOST>` with your MeiliSearch host and `<YOUR_API_KEY>` with the API key you created as instructed in the [Storefront Prerequisites](#storefront-prerequisites) section.
|
||
|
||
If you run your Next.js storefront now while the Medusa backend and the MeiliSearch services are running, the search functionality will be available in your storefront.
|
||
|
||
:::note
|
||
|
||
To make sure the Next.js storefront properly displays the products in the search result, include in the `displayedAttributes` setting of the MeiliSearch plugin on the Medusa backend at least the fields `title`, `handle`, `description`, and `thumbnail`.
|
||
|
||
:::
|
||
|
||

|
||
|
||
### Add to Gatsby and React-Based Storefronts
|
||
|
||
This section covers adding the search UI to React-based storefronts. It uses the Gatsby storefront as an example, but you can use the same steps on any React-based framework.
|
||
|
||
:::tip
|
||
|
||
For other frontend frameworks, please check out [MeiliSearch’s Integrations guide](https://github.com/meilisearch/integration-guides) for steps based on your framework.
|
||
|
||
:::
|
||
|
||
In the directory that contains your storefront, run the following command to install the necessary dependencies:
|
||
|
||
```bash npm2yarn
|
||
npm install react-instantsearch-dom @meilisearch/instant-meilisearch
|
||
```
|
||
|
||
Then, add the following environment variables:
|
||
|
||
```bash
|
||
GATSBY_MEILISEARCH_HOST=<YOUR_MEILISEARCH_HOST>
|
||
GATSBY_MEILISEARCH_API_KEY=<YOUR_API_KEY>
|
||
GATSBY_SEARCH_INDEX_NAME=products
|
||
```
|
||
|
||
Make sure to replace `<YOUR_MEILISEARCH_HOST>` with your MeiliSearch host and `<YOUR_API_KEY>` with the API key you created as instructed in the [Storefront Prerequisites](#storefront-prerequisites) section.
|
||
|
||
:::caution
|
||
|
||
In Gatsby, environment variables that should be public and available in the browser are prefixed with `GATSBY_`. If you’re using another React-based framework, you might need to use a different prefix to ensure these variables can be used in your code. Please refer to your framework’s documentation for help on this.
|
||
|
||
:::
|
||
|
||
Then, create the file `src/components/header/search.jsx` with the following content:
|
||
|
||
```jsx title=src/components/header/search.jsx
|
||
import {
|
||
Highlight,
|
||
Hits,
|
||
InstantSearch,
|
||
SearchBox,
|
||
connectStateResults,
|
||
} from "react-instantsearch-dom"
|
||
|
||
import React from "react"
|
||
import {
|
||
instantMeiliSearch,
|
||
} from "@meilisearch/instant-meilisearch"
|
||
|
||
const searchClient = instantMeiliSearch(
|
||
process.env.GATSBY_MEILISEARCH_HOST,
|
||
process.env.GATSBY_MEILISEARCH_API_KEY
|
||
)
|
||
|
||
const Search = () => {
|
||
const Results = connectStateResults(
|
||
({ searchState, searchResults, children }) => {
|
||
return (
|
||
searchState && searchState.query &&
|
||
searchResults && searchResults.nbHits !== 0 ?
|
||
(
|
||
<div
|
||
className="absolute ...">
|
||
{children}
|
||
</div>
|
||
) : (
|
||
<div></div>
|
||
)
|
||
)
|
||
}
|
||
)
|
||
|
||
return (
|
||
<div className="relative">
|
||
<InstantSearch
|
||
indexName={process.env.GATSBY_SEARCH_INDEX_NAME}
|
||
searchClient={searchClient}>
|
||
<SearchBox submit={null} reset={null} />
|
||
<Results>
|
||
<Hits hitComponent={Hit} />
|
||
</Results>
|
||
</InstantSearch>
|
||
</div>
|
||
)
|
||
}
|
||
|
||
const Hit = ({ hit }) => {
|
||
return (
|
||
<div key={hit.id} className="relative">
|
||
<div className="hit-name">
|
||
<Highlight attribute="title" hit={hit} tagName="mark" />
|
||
</div>
|
||
</div>
|
||
)
|
||
}
|
||
|
||
export default Search
|
||
```
|
||
|
||
This file uses the dependencies you installed to show the search results. It also initializes MeiliSearch using the environment variables you added.
|
||
|
||
:::caution
|
||
|
||
If you named your environment variables differently based on your framework, make sure to rename them here as well.
|
||
|
||
:::
|
||
|
||
Finally, import this file at the beginning of `src/components/header/index.jsx`:
|
||
|
||
```jsx title=src/components/header/index.jsx
|
||
import Search from "./search"
|
||
```
|
||
|
||
And add the `Search` component in the returned JSX before `RegionPopover`:
|
||
|
||
```jsx title=src/components/header/index.jsx
|
||
// ...
|
||
<div className="...">
|
||
<Search />
|
||
<RegionPopover regions={mockData.regions} />
|
||
</div>
|
||
// ...
|
||
```
|
||
|
||
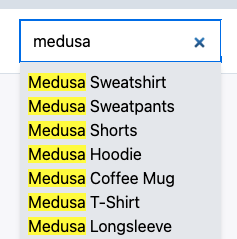
If you run your Gatsby storefront while the Medusa backend and the MeiliSearch instance are running, you should find a search bar in the header of the page. Try entering a query to search through the products in your store.
|
||
|
||
|
||
|
||
---
|
||
|
||
## See Also
|
||
|
||
- [Deploy your Medusa backend](../../deployments/server/index.mdx).
|
||
- [Deploy your Gatsby storefront](../../deployments/storefront/deploying-gatsby-on-netlify.md).
|